- 20–25 hof mowing between sharpenings (ECHO)
- 30°the angle Oregon grinds its blades at
- 1 inof width gone means replace (Oregon)
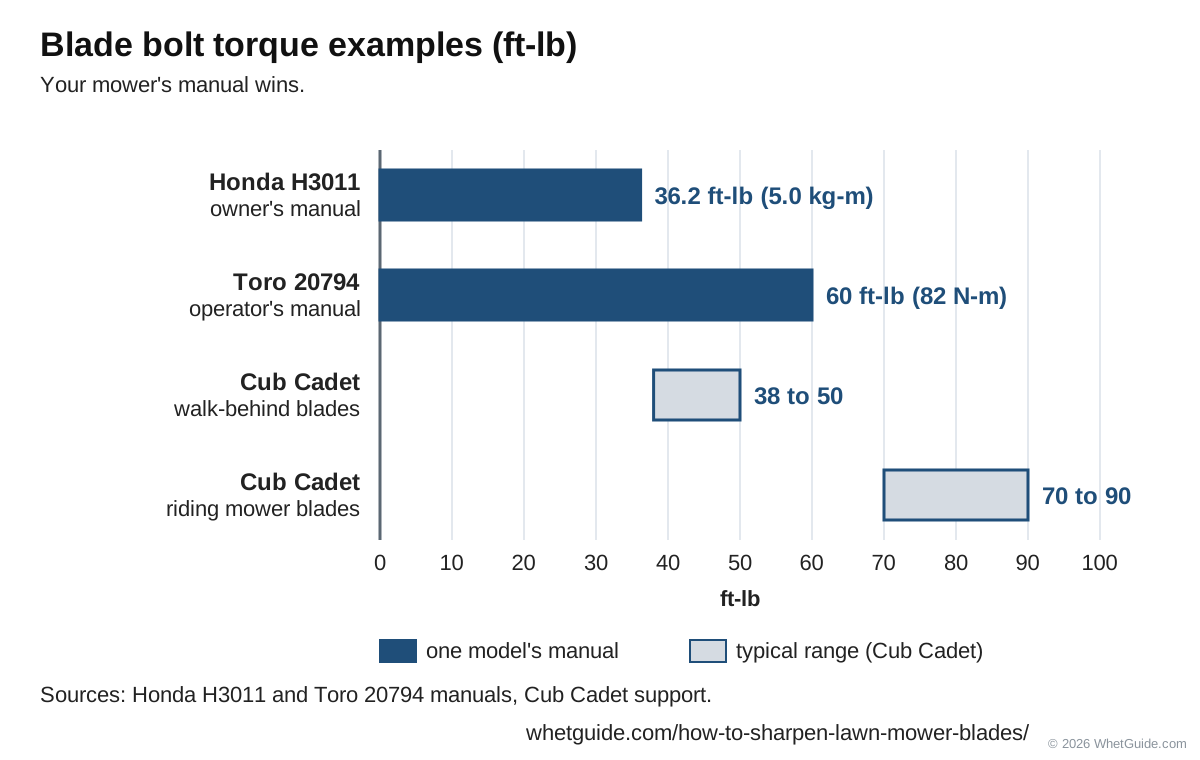
- 36–90ft-lb blade bolt torque across the manuals and maker pages in torque
Quick answer: how to sharpen a lawn mower blade
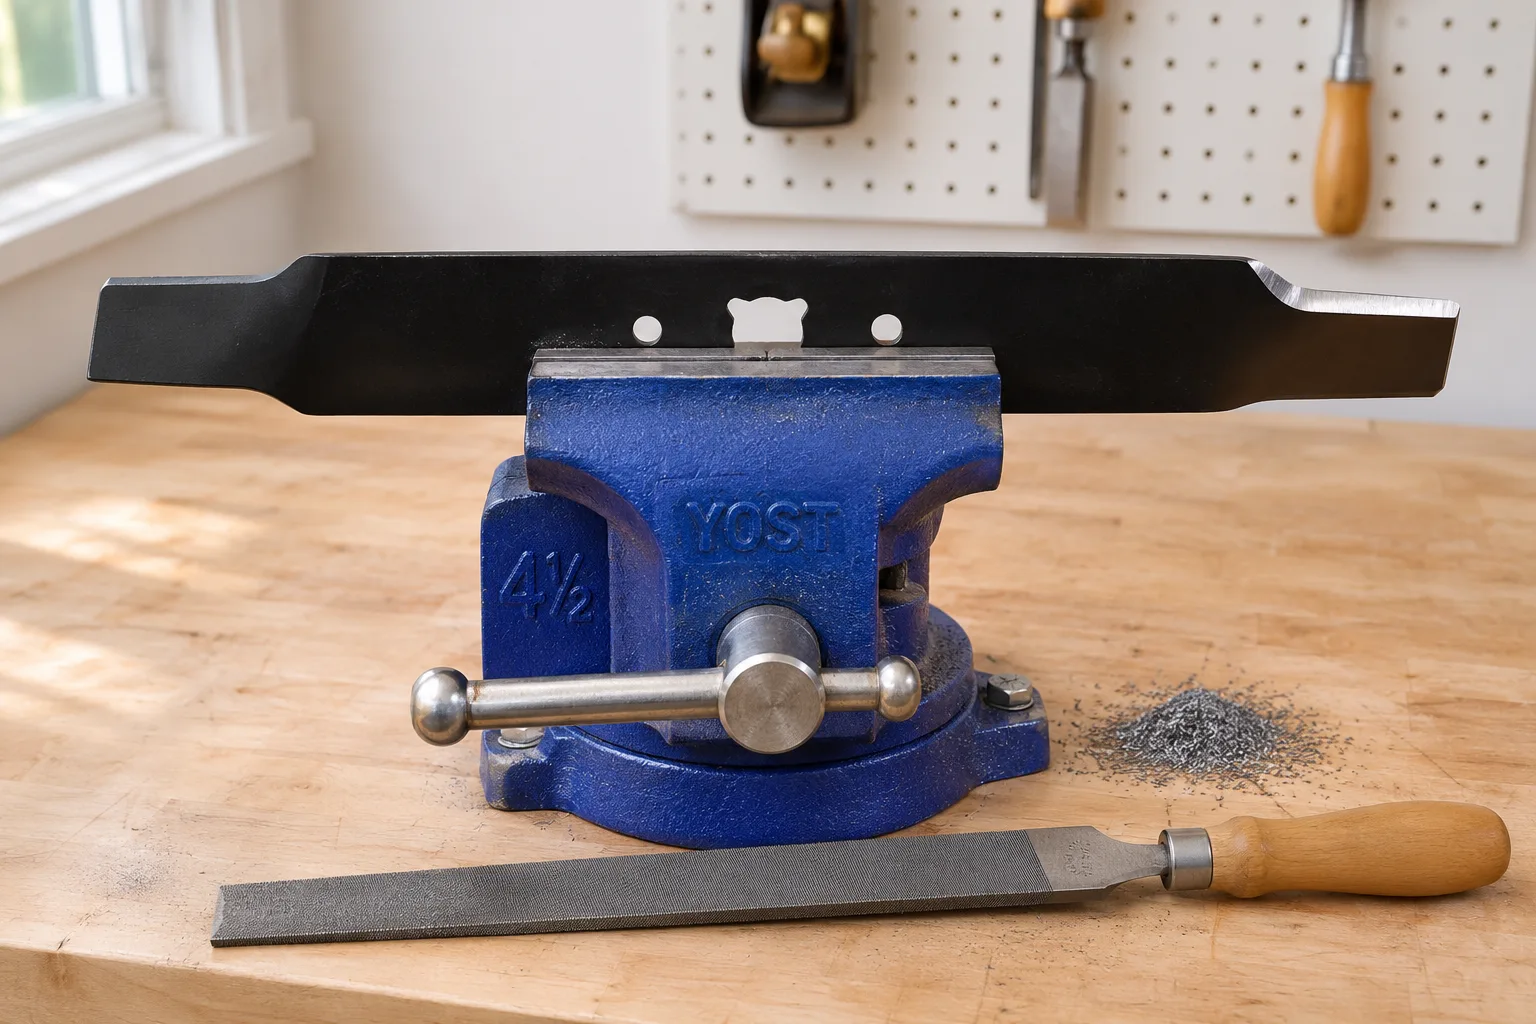
Take the spark plug out, not just the wire. Tip the mower on its side with the air filter facing up, mark the side of the blade that faces the grass, chock it with a block of wood and loosen the bolt. Clamp the blade in a vise and file the top, beveled face only, at the angle it already has. If you can't see one, 30 degrees is the starting point that Oregon and ECHO use. Stop at a blunt, even edge. A mower blade is meant to be much duller than a knife. Balance it on a nail, put it back with the marked side down, and tighten the bolt to the torque in your manual.
Is it hard? No. The bolt fights harder than the steel does. The parts that matter for safety and for the lawn are the ones people skip: the plug, the tipping side, the balance check and the torque wrench. A file and a vise will get any sound blade back to a clean cut. If the blade is cracked, bent or worn narrow, it's done; buy a new one (see sharpen or replace).
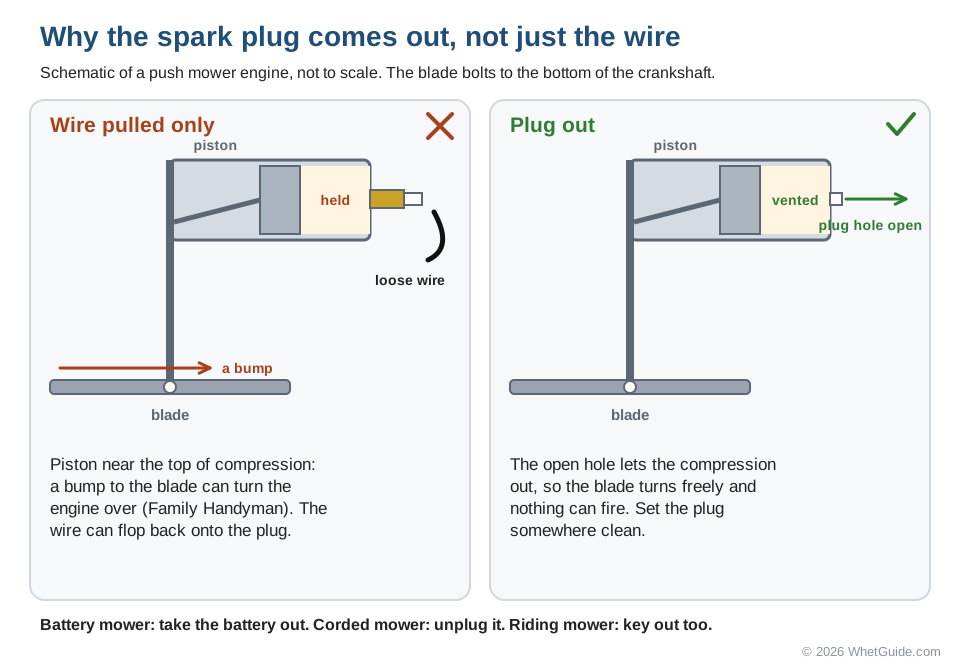
Two rules carry the whole page. Pull the plug because a bump to the blade can turn the engine over. And match the factory bevel, because the blade's maker chose that angle for that steel. Everything else is technique.
↑ Back to all sectionsThe 8 steps, plug out to test run
This is the whole procedure in order. Each step links to its section, where the reasons and the common mistakes live.
- Make it safeSpark plug out (battery out on electric) and fuel run low. Gloves and glasses on.
- Tip it air filter upNever carburetor or air filter down. Work outdoors with a rag handy.
- Mark it, then remove itPaint the grass side, wedge a 2x4, loosen counterclockwise, keep the washers in order.
- Clean and inspectScrape and brush it, then check flatness and cracks. Look at the lift and the width too.
- Sharpen the top bevelFile, drill attachment or grinder. Same angle, same work on both ends.
- BalanceHeavy end drops. Take metal off that end's edge until it hangs level.
- ReinstallMarked side toward the grass, washers in the right order, threads started by hand.
- Torque and testTorque wrench to the manual's figure, plug back in, listen for vibration.
How long? Family Handyman lists the job at an hour or less, and Bob Vila at about an hour. The first time, a rusted bolt can eat a good part of that. The second time you'll know your socket size and where the vise is.
↑ Back to all sectionsIs it time? Signs of a dull blade, and how often to sharpen
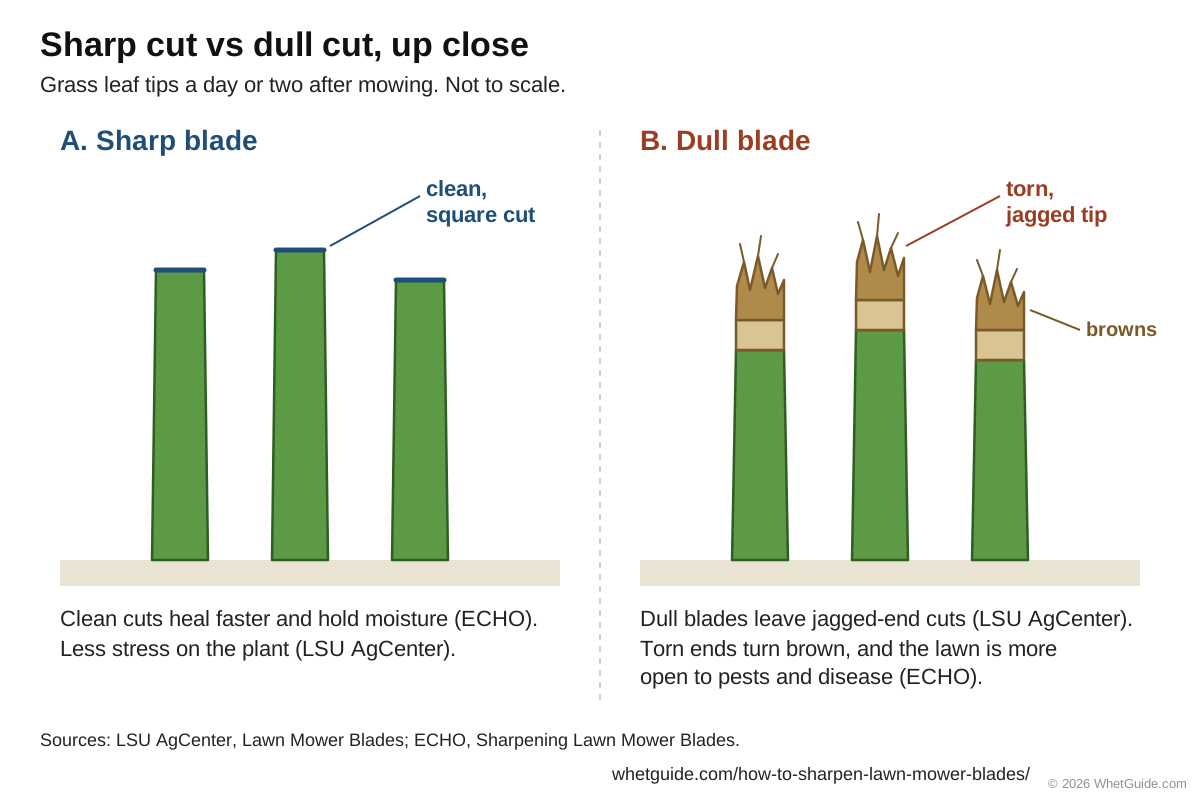
Look at the grass, not the blade. Kneel down a day or two after you mow and look at the cut tips. A clean blade leaves flat, square ends. A dull one tears them, and the torn ends dry out and turn brown or whitish, which gives a freshly mowed lawn a gray-tan cast. LSU AgCenter says dull blades leave jagged-end cuts, and that a sharp blade puts less stress on the plant. ECHO adds that the jagged ends turn brown and leave the lawn more open to pests and disease. As This Old House's Roger Cook puts it, grass heals much better and more quickly when you cut it clean.
Other signs, from the mowing side:
- Ragged, frayed or brown tips a day or two after mowing.
- An uneven cut, with tufts or strips left standing.
- Clippings that clump instead of spreading or bagging cleanly.
- Needing a second pass where one used to do it.
- Patches that look pushed down rather than cut. Bob Vila says flattened, uncut sections mean the blade is too dull.
- On the blade itself: a rounded, shiny edge you can see from a few feet away, or nicks from stones.
The sources don't agree on a single interval, but they're close. Here is what each one says:
| Source | How often | Notes |
|---|---|---|
| ECHO | Every 20 to 25 hours, or once or twice a season | More often in sandy or dusty conditions |
| Toro 20794 manual | Replace or sharpen every 25 hours | Inspect before each use; replace at once if cracked or damaged |
| LSU AgCenter | Plan on 2 times a season | 3 for zoysia, which is tough on edges |
| Cub Cadet support | Service residential blades annually | Focus on the tips, where most cutting happens |
| Oregon | About once a year for home use | Replace damaged blades right away |
| Family Handyman | Twice a year for a lawn under an acre mowed weekly | Every 2 to 4 weeks for big lawns or several lawns |
| This Old House | A file touch-up every couple of weeks | For a blade in fairly good condition, clamped in a vise; a light pass, not a full sharpening |
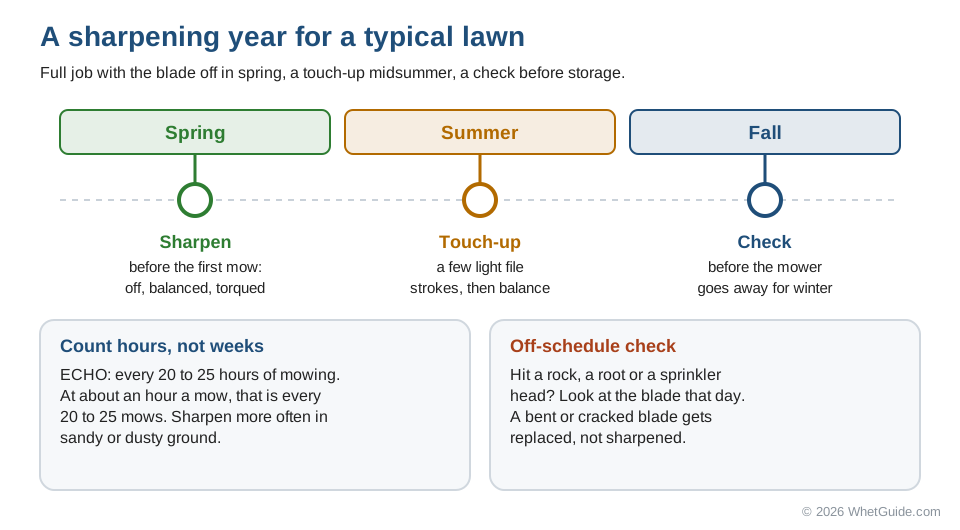
This Old House's every-couple-of-weeks file pass and ECHO's 20 to 25 hours don't really clash. A few light strokes keep a good edge going; the hours figure is for the full job with the blade off and balanced. For a typical yard, that works out to a sharpening in spring before the first mow, a touch-up in midsummer, and a check in fall before the mower goes away. If you hit a rock, a root or a sprinkler head, check the blade that day; don't wait for the schedule. To figure your own interval, time one mow. At an hour a mow, ECHO's figure works out to every 20 to 25 mows.
↑ Back to all sectionsWhat you need (and what you can skip)
You don't need a grinder. The core kit is a socket wrench, a block of wood, a vise and a file. Products are named in plain text so you know what to look for.
| Tool | Why | Need it? |
|---|---|---|
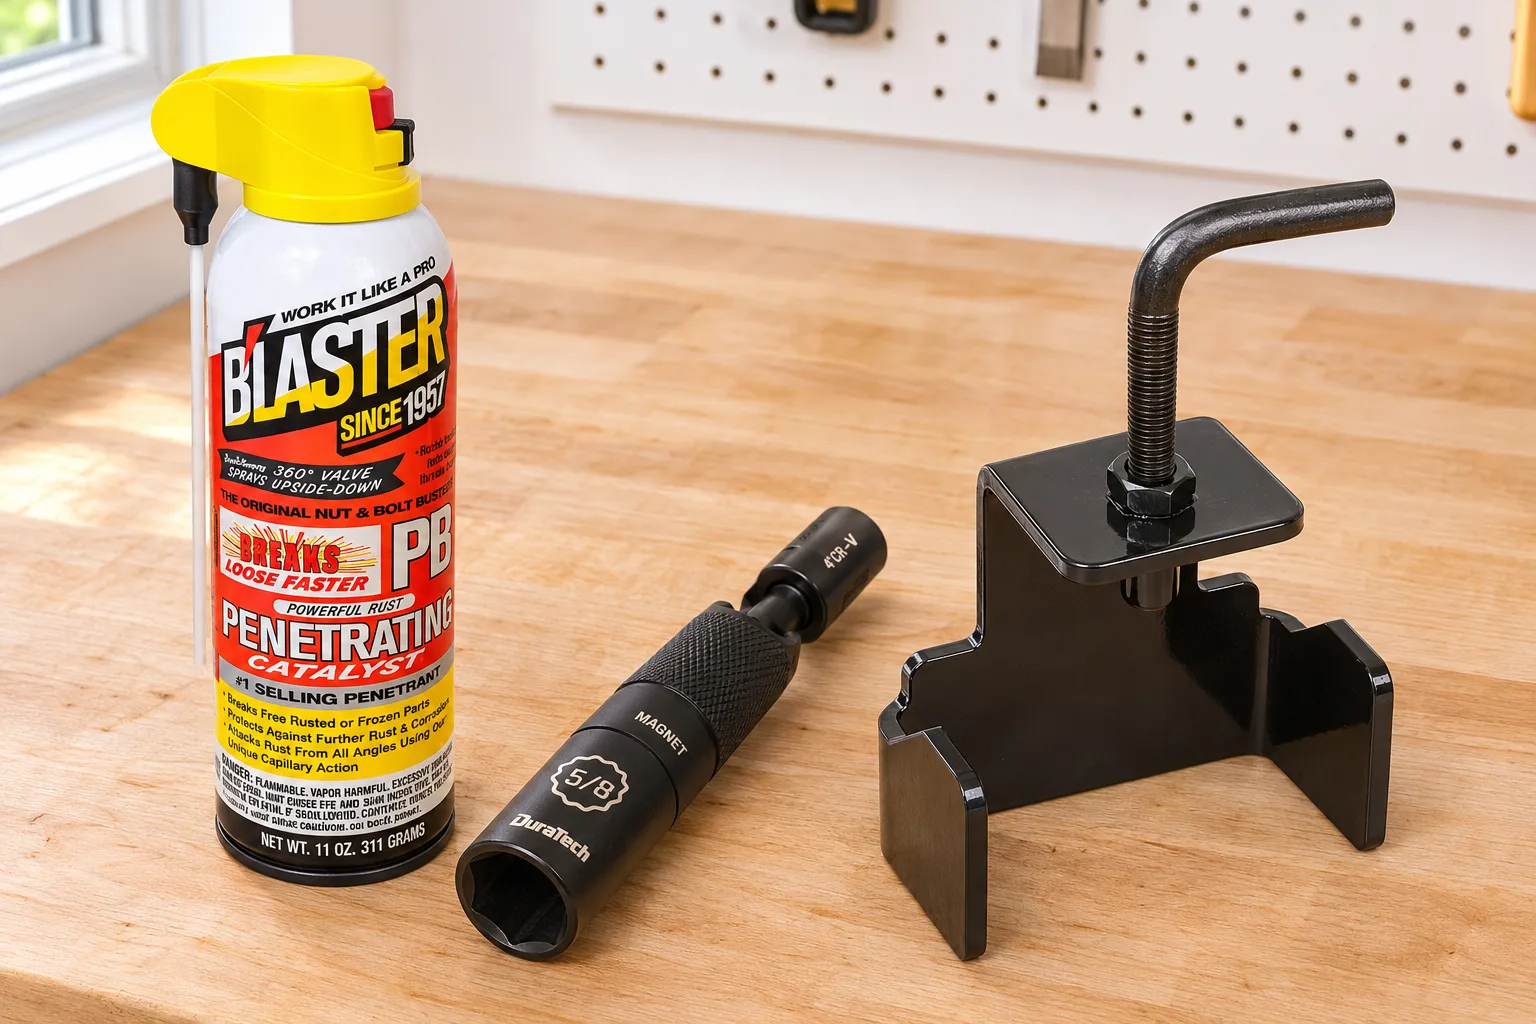
| Spark plug socket | To take the plug out, not just the wire. A swivel magnetic socket (DURATECH makes one) makes it easy on a cramped engine. | Yes, for gas mowers |
| Socket wrench or breaker bar that fits the blade bolt | Blade bolts are tight. A long handle saves your knuckles. | Yes |
| Scrap 2x4, or a blade-removal clamp | Chocks the blade so it can't turn while you loosen and tighten. The MaxPower universal removal tool clamps the blade instead. | Yes (the wood is free) |
| Marker or spray paint | Marks the grass side so the blade goes back right. | Yes |
| Penetrating oil | Frees a rusted bolt. PB Blaster is the common one. | Usually |
| Putty knife and wire brush | Scrapes caked grass off the blade and deck so you can inspect them. | Yes |
| Bench vise | Holds the blade edge-up so both hands are on the file. A homeowner's vise like the Yost LV-4 is plenty. | Strongly recommended (a C-clamp to the bench edge works) |
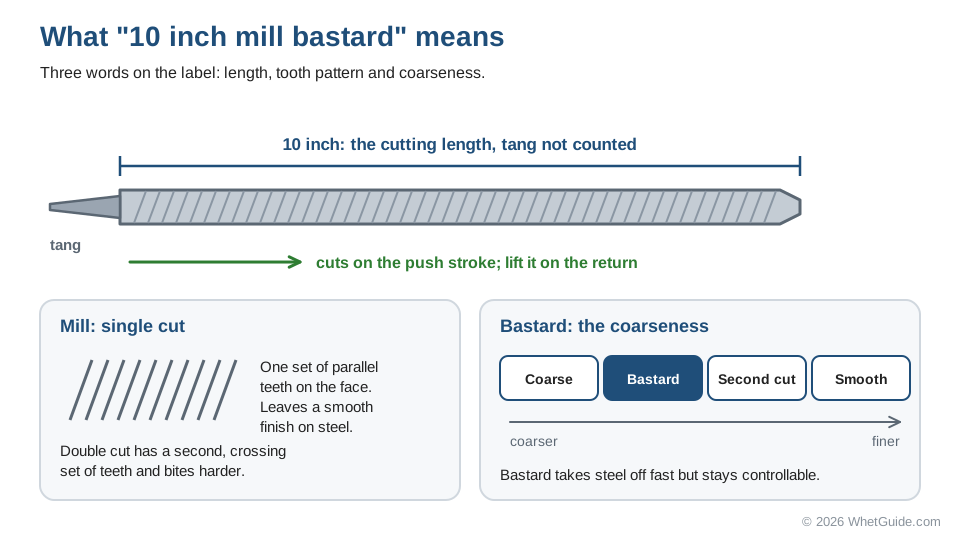
| 10 inch mill bastard file | The main sharpening tool. Single-cut, like Nicholson's 10 inch mill bastard. | Yes |
| Blade balancer | A cone balancer (Oregon sells one) or a nail in a wall stud. | Yes (the nail is free) |
| Torque wrench | Blade bolts have a specified torque. A 1/2 inch drive click wrench whose range covers your manual's figure. | Yes |
| Safety glasses and gloves | Filings and sparks fly, and the edge is sharp. Cut-resistant work gloves for handling the blade. | Yes |
| Hearing protection | Oregon lists it as required for grinding. | With any grinder |
| Drill sharpening attachment | A stone or diamond wheel on a drill, for quick touch-ups. | Optional |
| Angle grinder with a coarse flap disc, or a bench grinder | Fast removal of nicks and badly worn edges. | Optional, and only with experience |
Kits sold as a "blade sharpening and balancing kit" (Arnold's is one) pair a sharpening attachment with a balancer. Read the box to see what's in it; you'll still want the vise, the wood block and the torque wrench.
↑ Back to all sectionsSafety first: plug, fuel and tipping
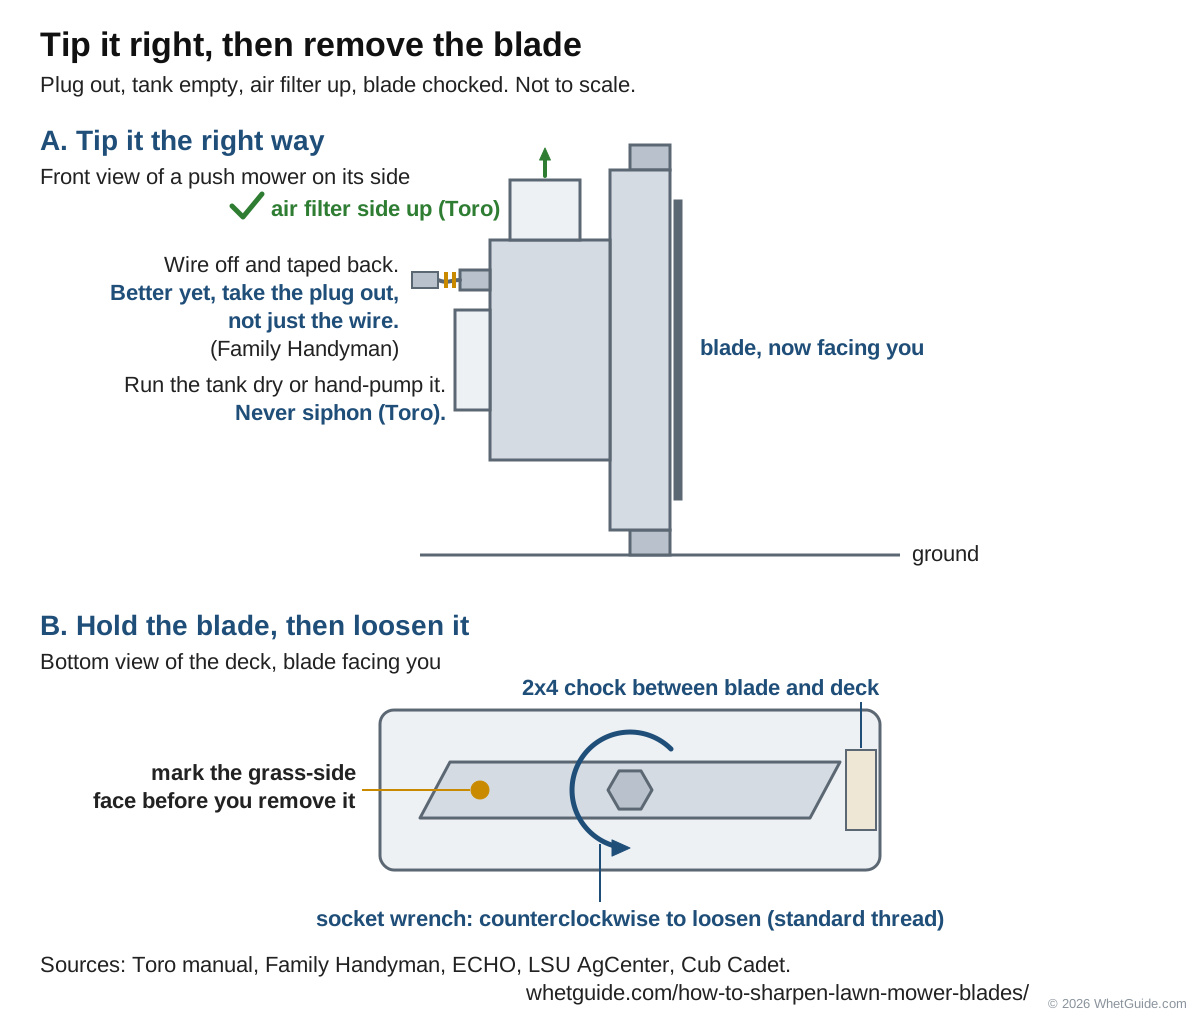
Family Handyman's mower guide explains why: if the piston happens to sit near the top of its compression stroke, a bump to the blade can turn the engine over. Taking the spark plug out relieves the compression, so the blade turns freely and nothing can fire. A loose plug wire can also flop back onto the plug while you're working. Take the plug out and set it somewhere clean.
On a battery mower, take the battery out. On a corded mower, unplug it. On a riding mower, take the key out and pull the plug wires too. ECHO and LSU AgCenter both make disconnecting power the first step, and the Honda H3011 manual says to remove the ignition key, disconnect the spark plug cap and wear heavy gloves before touching the blades.
Fuel and the tipping side
The Toro 20995 operator's manual gives two rules. Always tip the mower onto its side with the air filter up. And before tipping it, let the fuel tank run dry through normal use; if you can't, remove the fuel with a hand pump. Never siphon it. ECHO also lists draining fuel under its safety steps, and warns that tipping the wrong way lets oil flood into the cylinder. That's how people end up with a smoking engine that won't start after a blade job.
Even with a low tank, gas can seep from a vented cap when the mower is on its side. Do the job outside or in an open garage, keep a rag under the tank, and keep sparks and flames away. That includes the grinder if you plan to sharpen in the same spot.
Gear
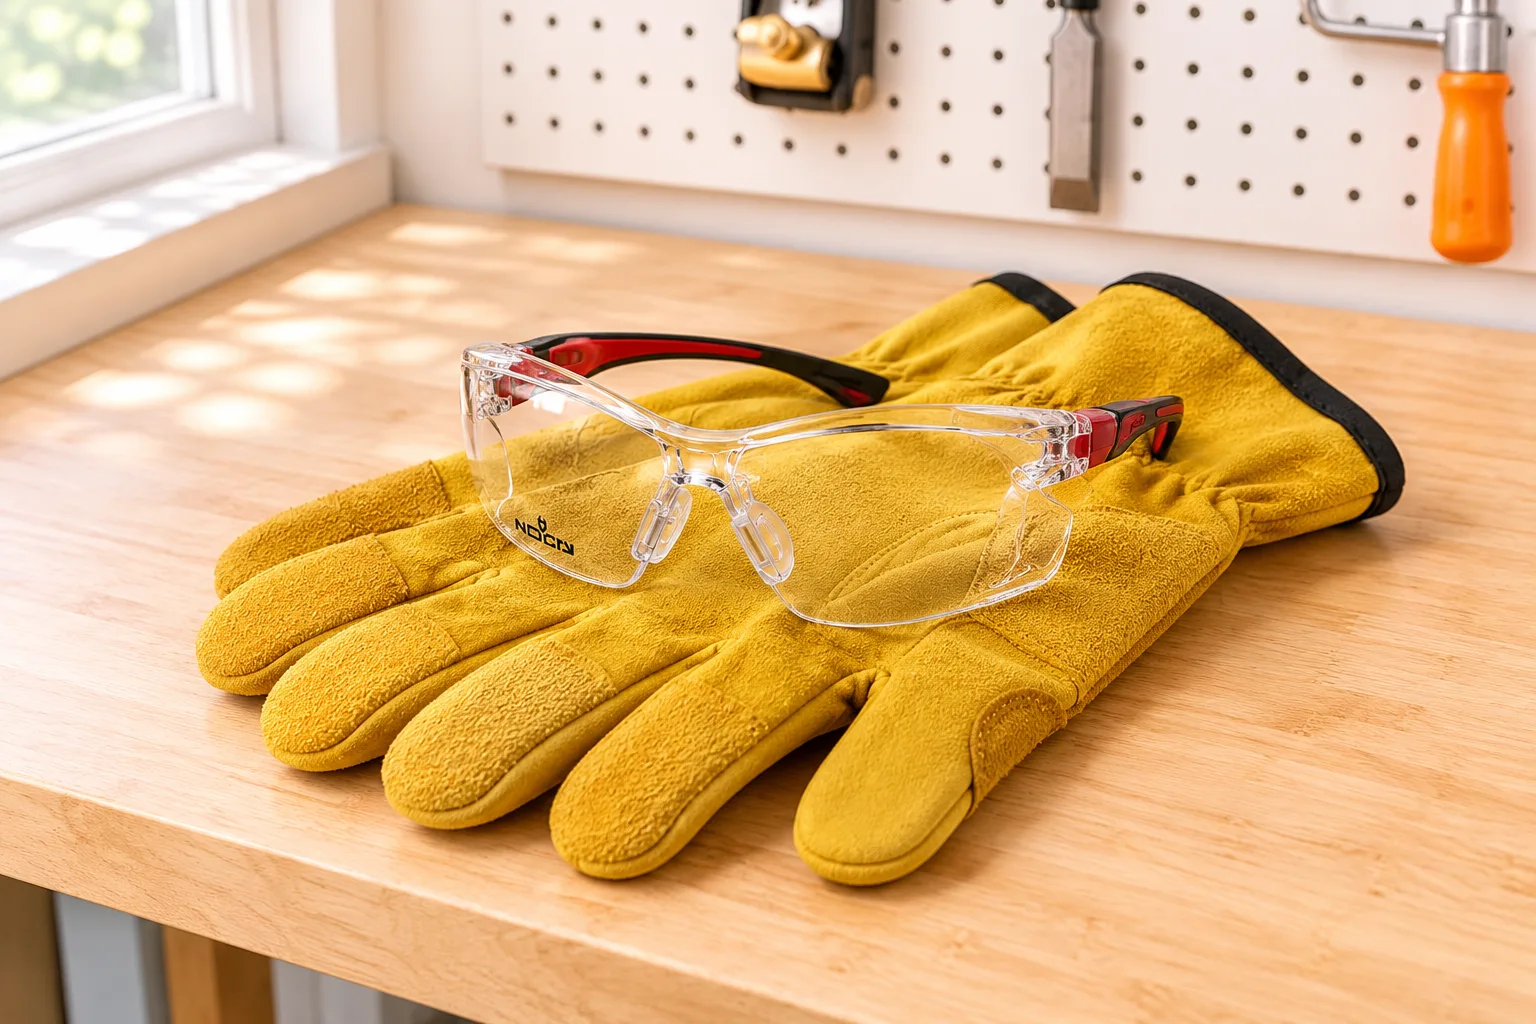
- Gloves for every step that touches the blade. Even a dull blade has sharp corners and burrs.
- Safety glasses, always. Filings fly off a file too.
- Hearing protection whenever a grinder runs (Oregon lists it with eyewear and gloves).
- For grinding, watch loose sleeves and keep sparks away from the fuel tank and rags (LSU).
- A block of wood to chock the blade. Your hand isn't one.
Battery mowers are less forgiving than they look. The motor is silent until it isn't. Battery out, every time.
↑ Back to all sectionsTaking the blade off
- Tip the mower air filter up. Plug out and tank low, as above. Set it on its side on a flat surface, handle supported so it can't roll back down.
- Mark the blade. Put a dab of paint or a marker line on the face that points at the grass. LSU says to note the top side and the bottom; Family Handyman and ECHO say the same. This one mark prevents the most common reinstall mistake.
- Scrape the deck. Knock caked clippings off around the blade so you can see the bolt and washers, plus the blade's lift (the bent-up rear edge).
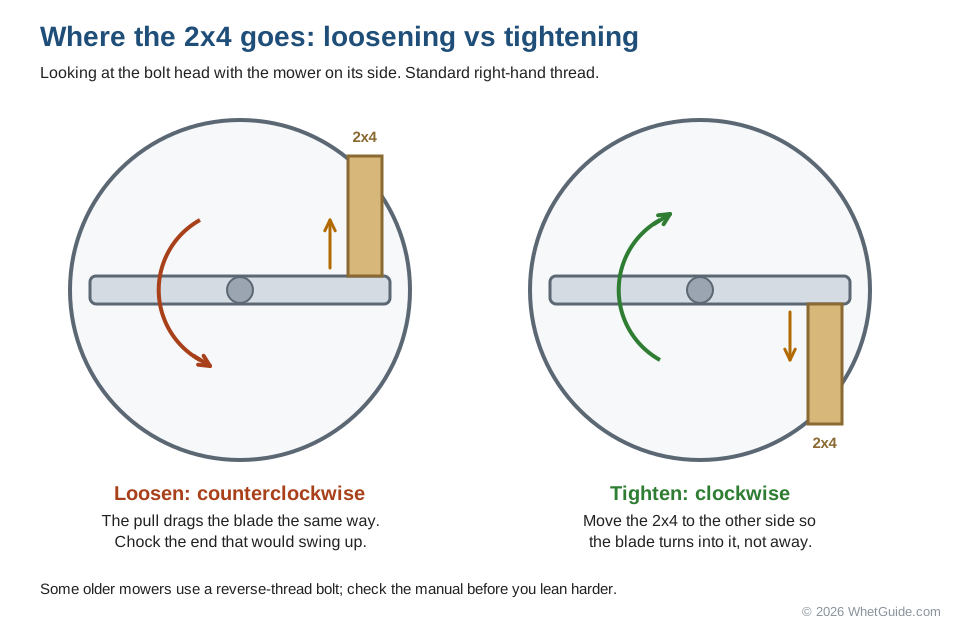
- Chock the blade. Wedge a 2x4 between one end of the blade and the inside of the deck so the blade can't turn as you pull on the wrench.
- Spray the bolt. Penetrating oil on the threads, wait a few minutes, then spray again if it's rusty.
- Loosen it. Standard blade bolts are right-hand thread, so they loosen counterclockwise as you look at them from the bolt head (Cub Cadet support says so). Family Handyman notes that some older mowers use a reverse-thread bolt; if it won't budge with steady force, check the manual before you lean harder. Use a long handle and a steady pull, not jerks.
- Keep the stack in order. Lay the bolt, washers, any spacer or blade adapter on the bench in the order they came off. A phone photo before you take the last piece off saves guesswork later. Honda's H3011 manual calls its blade bolt and washer special parts that shouldn't be swapped for hardware-store pieces.
Common mistake: the chock on the wrong side, so the blade spins as you pull. Put the chock where it stops the blade turning the way you're pulling; move it to the other side to tighten.
Electric and riding mowers
Battery and corded mowers come apart the same way once the battery is out or the cord is unplugged. Many have no fuel or oil to worry about, but check your manual for which side to tip. Riding mowers often have more than one blade under a wide deck; the manual tells you whether to raise the front, remove the deck or work from underneath on ramps. Never work under a mower held up by a jack alone. Brand doesn't change the method: a Stihl blade comes off and goes back the same way as a Toro, with its own torque figure from its own manual.
↑ Back to all sectionsClean and inspect before you sharpen
A blade that shouldn't go back on the mower doesn't deserve a sharpening. Clean it first so you can see it. Scrape off packed grass with a putty knife, then go over both faces with a wire brush. Rust and grime hide cracks.
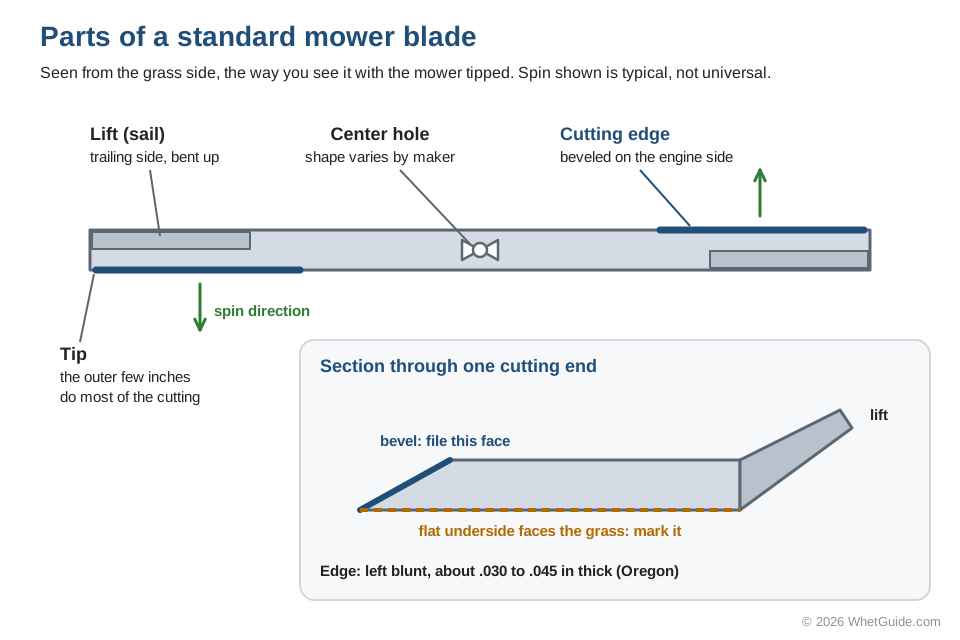
Then check these, the list ECHO gives plus Oregon's width rule:
- Flatness. Lay the blade on a flat bench or a piece of glass. If it rocks, or one end lifts, it's bent.
- Cracks. Look hard at the center hole and at the bends where the lift rises. A crack there means the blade goes in the trash.
- The lift. The upturned back edge (the sail) wears thin from sand. ECHO warns that a worn lift can break off and be thrown from the housing.
- Width. Compare it with a new blade or the size printed on the package. Oregon says to replace a blade once about 1 inch of its original width has been ground away.
- Nicks and dents. Small nicks file out. Deep gouges take a lot of steel to remove and may be a reason to replace.
If any of the first four fail, skip ahead to sharpen or replace. If the blade passes, clamp it in the vise edge-up, top (beveled) face toward you, and go on to the angle.
↑ Back to all sectionsWhat angle to sharpen a lawn mower blade
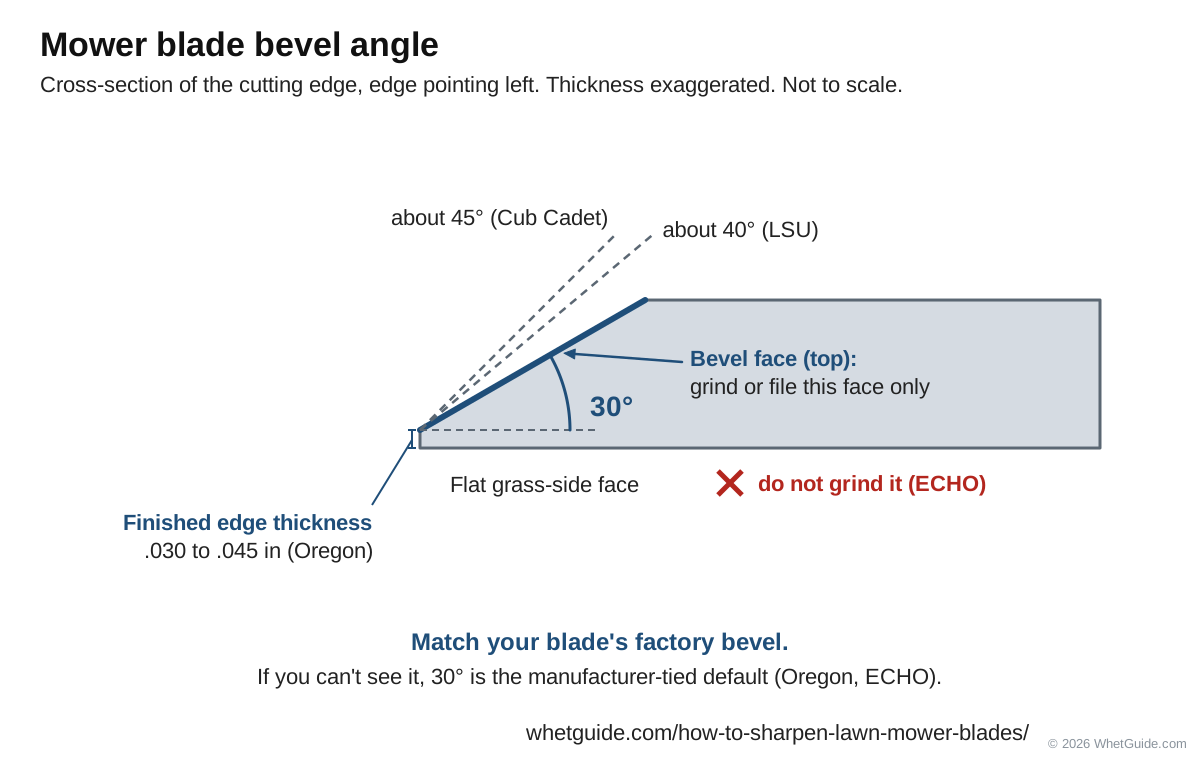
Match the bevel your blade already has. If it's too worn to see, 30 degrees is the place to start. That's the manufacturer-tied number: Oregon grinds all its blades at 30 degrees, and ECHO says to file at about 30.
Other sources go steeper. LSU AgCenter puts the cutting surface at about 40 degrees, saying a thinner edge is weak and a thicker one cuts less cleanly. Cub Cadet support says about 45 degrees is sufficient. All of them cut grass. The real mistake is changing the angle from one sharpening to the next, which wastes steel and leaves a wavy edge.
How sharp is sharp enough
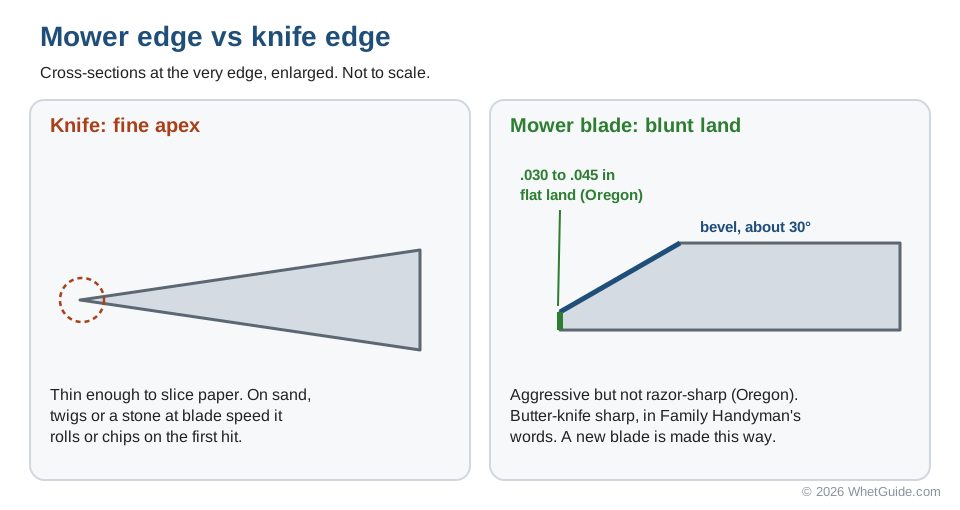
Much blunter than a knife. Oregon describes the finished edge as aggressive but not razor-sharp, and gives a target edge thickness of .030 to .045 inch. That's a thin flat land left at the very edge, thick enough to see and to feel with a gloved fingertip. Family Handyman's phrase for it is butter-knife sharp. A mower blade hits sand, twigs and the odd stone at full speed, and a razor edge would roll or chip on the first one.
That's also why a brand-new blade feels dull in your hand. It's supposed to. Run a gloved finger along it: a new blade has a crisp, even edge you can see, not a fine line you can't.
The top face only
ECHO's rule is to grind the top, beveled surface and leave the bottom alone. The flat underside keeps the edge straight and the blade's balance and cutting height where the maker put them. Grinding a second bevel underneath makes a knife edge that dulls fast. The only thing the underside ever gets is one light, flat pass of the file to knock off the burr.
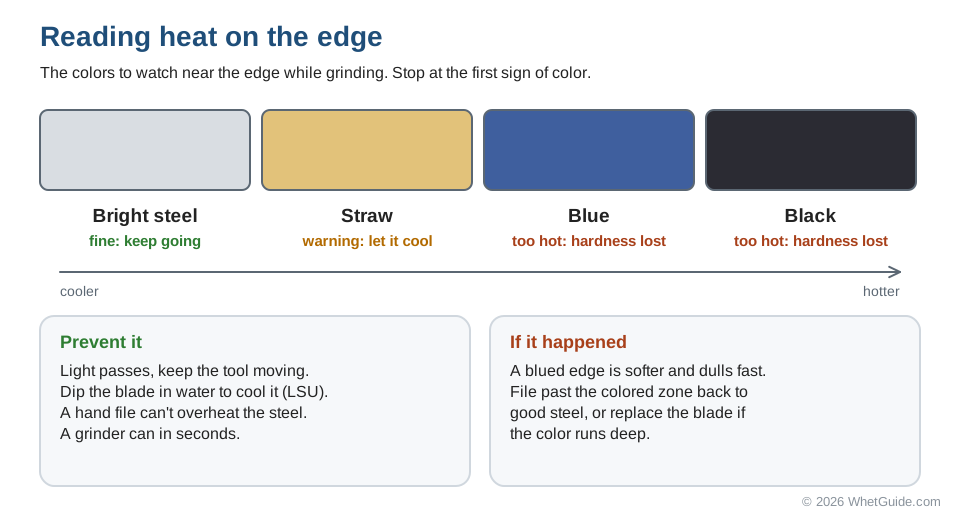
Heat is the other angle-related trap. If the steel turns blue or black near the edge, it got hot enough to lose its temper (its hardness). LSU and ECHO both warn about it. A file can't do that; a grinder can in seconds.
Which method? File, drill, grinder or belt
For most people, a hand file. It's slow but it can't overheat the blade, it's cheap, and you see every bit of steel you remove. A drill attachment is the quick option for a blade that just needs a touch-up. Grinders are for blades with nicks, for people who've used one before, and for anyone sharpening a lot of blades.
| Method | Skill | Speed | Heat risk | Angle control | Best for |
|---|---|---|---|---|---|
| Hand file | Low | Slowest | None | Good, by eye | Most homeowners; any blade; the first time |
| Drill attachment | Low | Fast | Low | Set by the guide | Light touch-ups on a blade in decent shape |
| Angle grinder, flap disc | Medium to high | Fastest | High | By hand only | Nicked or very worn blades; experienced users |
| Bench grinder | Medium | Fast | High | Helped by the tool rest | Nicks; several blades at once |
| Belt sander | Medium | Fast | High | Helped by the platen | People who already own one |
| Dedicated blade grinder | Shop | Fast | Controlled | Best (Oregon's preferred tool) | Mower shops; see pay a pro |
| On-deck stone (blade left on) | Low | Fast | Low | Poor | Not recommended; no inspection, no balancing |
The homemade sharpener people ask about is just this: a vise, a block of wood and a file. If you don't have a vise, a C-clamp holding the blade flat to the edge of a sturdy bench works, as long as the edge you're filing hangs out past the bench. Don't build a jig for an angle grinder out of scrap; a store-bought adjustable angle frame (SporGain's, for one, adjusts from 15 to 45 degrees) is the safer route if you want guided grinding.
↑ Back to all sectionsMethod 1: sharpen a mower blade with a hand file
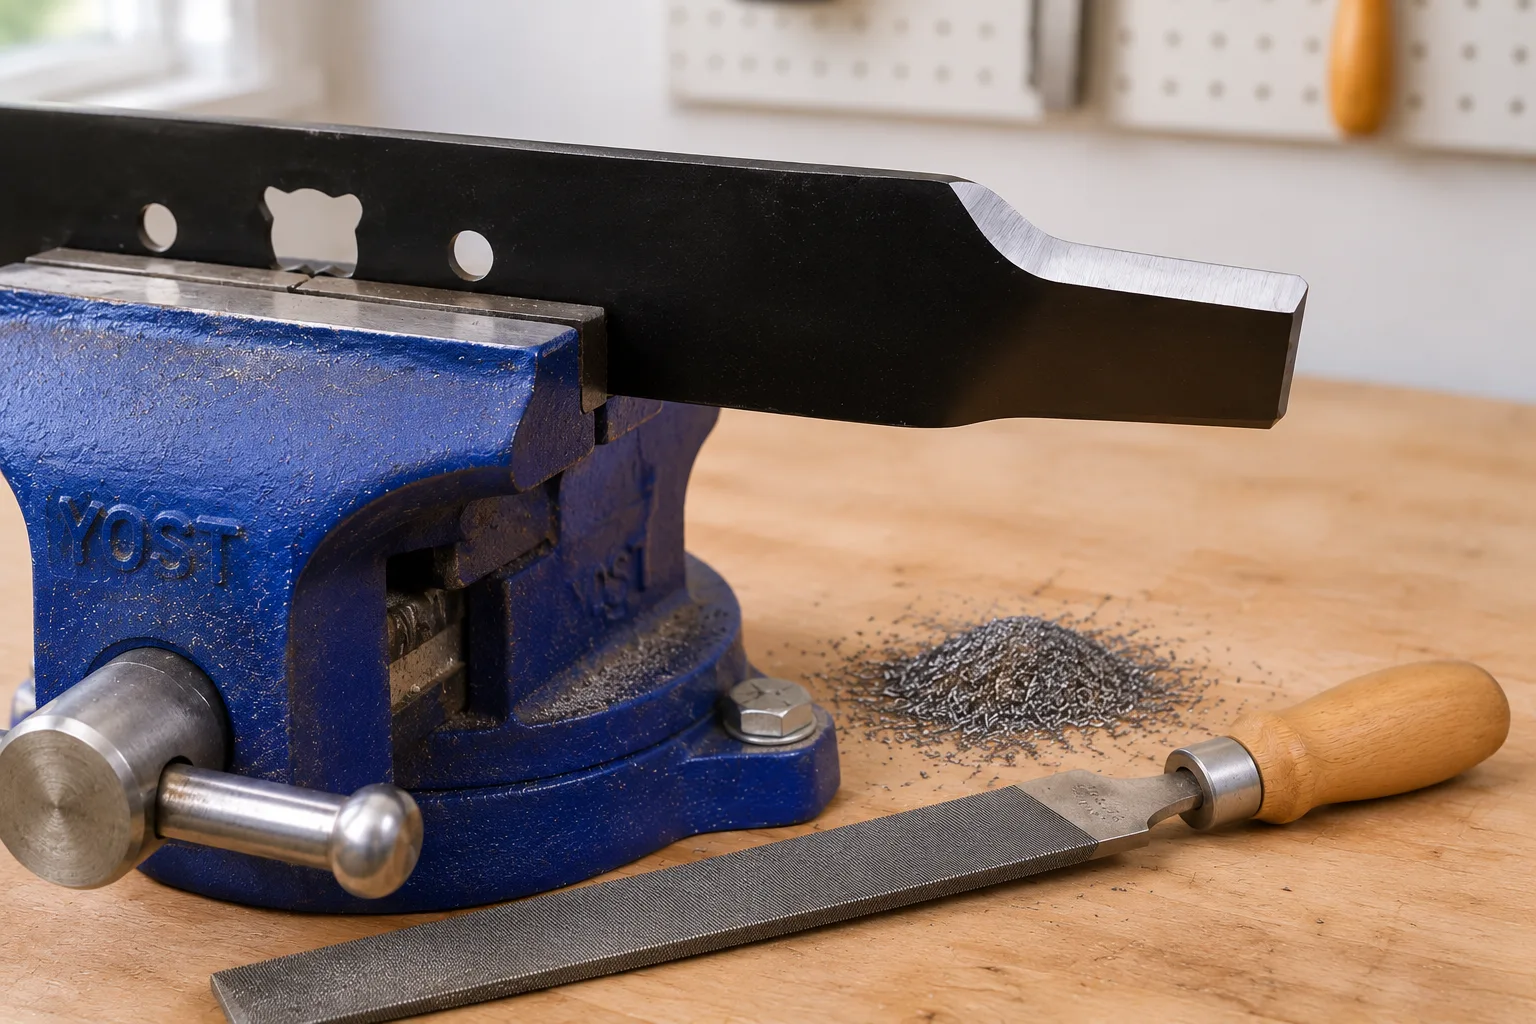
Yes, you can sharpen a lawn mower blade with a file, and it's the method I'd start anyone on. Use a 10 inch mill bastard file. This Old House's Roger Cook and Family Handyman both reach for that size.
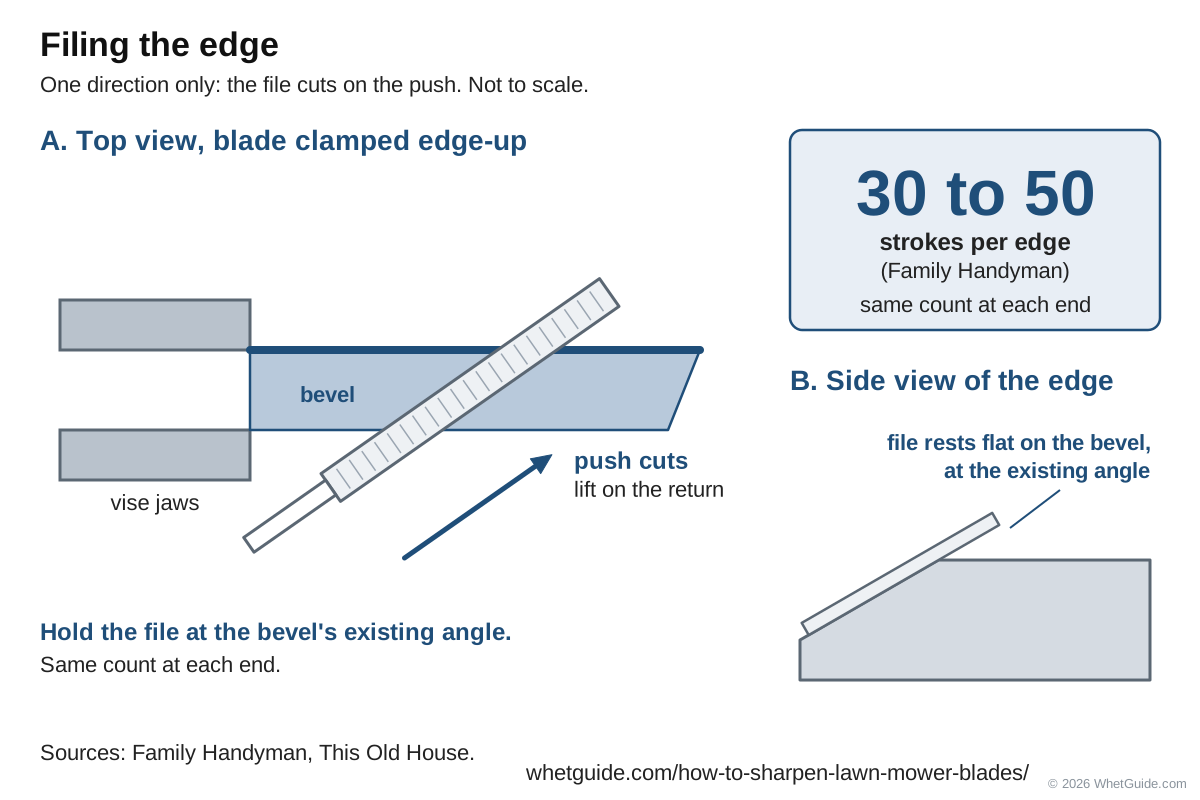
- Clamp the blade in the vise with one cutting edge up and the beveled face toward you. Clamp near the center so the end doesn't chatter. Put a rag over the other end's edge if you'll be reaching past it.
- Find the bevel. Lay the file flat on the bevel and rock it slightly until it sits on the whole face. That's your angle. Coloring the bevel with a marker helps: after a stroke or two, ink gone from the whole face means you're matching it.
- Push, then lift. A file cuts on the push stroke only. Push it forward and slightly along the edge with firm, even pressure, then lift it clear and bring it back. Dragging it back dulls the teeth and does nothing to the blade.
- Work from the inside out. Start each stroke near the inner end of the cutting edge and move toward the tip. The outer few inches do most of the cutting (Cub Cadet says to focus on the tips), so make sure the end of the blade gets full strokes.
- Count. Family Handyman puts it at 30 to 50 strokes to bring a dull blade back. Write down your count for the first end.
- Check. You're done when the shiny, rounded line at the edge is gone and the bevel meets the flat in an even edge, still blunt enough not to slice paper. Nicks should be filed out or nearly so.
- Knock off the burr. Lay the file flat on the underside and make one or two light strokes, flat, no angle.
- Turn the blade around and give the other end the same number of strokes, at the same angle, with the same pressure.
What it should feel like: a steady bite and a low rasping sound on every push. If the file skates and sings, either it's clogged (tap it on the bench and brush it with a file card) or you've hit a hard spot from an old grinder overheating. If it chatters, clamp the blade closer to the edge.
Common mistake: filing more on the end that looks worse. The ends then weigh different amounts and the blade vibrates. Equal strokes first, then let the balancer tell you where to take more.
↑ Back to all sectionsMethod 2: a drill-powered blade sharpener
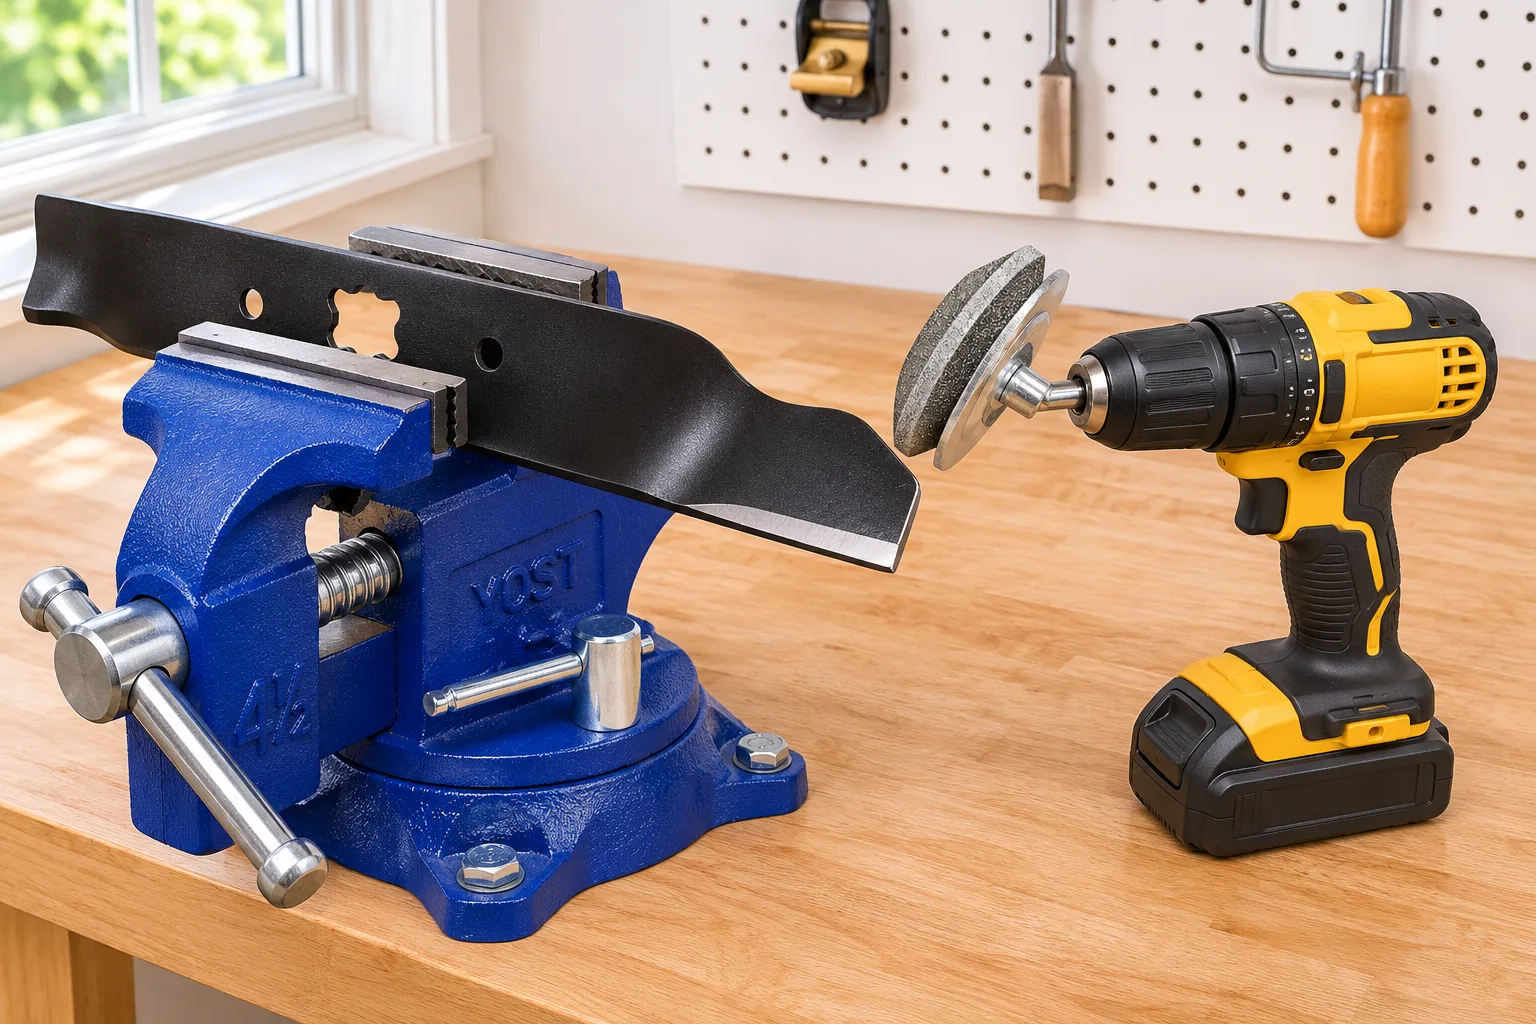
Drill attachments are a grinding stone or diamond wheel on a shaft, with a guide that rides on the blade so the abrasive meets the bevel at a set angle. They're quick and easy, and for a blade that's dull but not damaged they do a fine job.
- Take the blade off and clamp it in the vise, as for the file. Don't use these with the blade on the mower.
- Fit the attachment and set the drill to the speed its instructions give. Glasses on.
- Rest the guide against the back edge of the blade so the stone sits on the bevel. Bob Vila says the stone's plastic guide should rest against the rear of the blade to hold the angle, and the attachment Lawn Love uses has a built-in guide set to 30 degrees. Then run it along the edge from the inner end to the tip in light, even passes.
- Count passes and do the same on the other end.
- Deburr the underside with one flat file stroke, then balance.
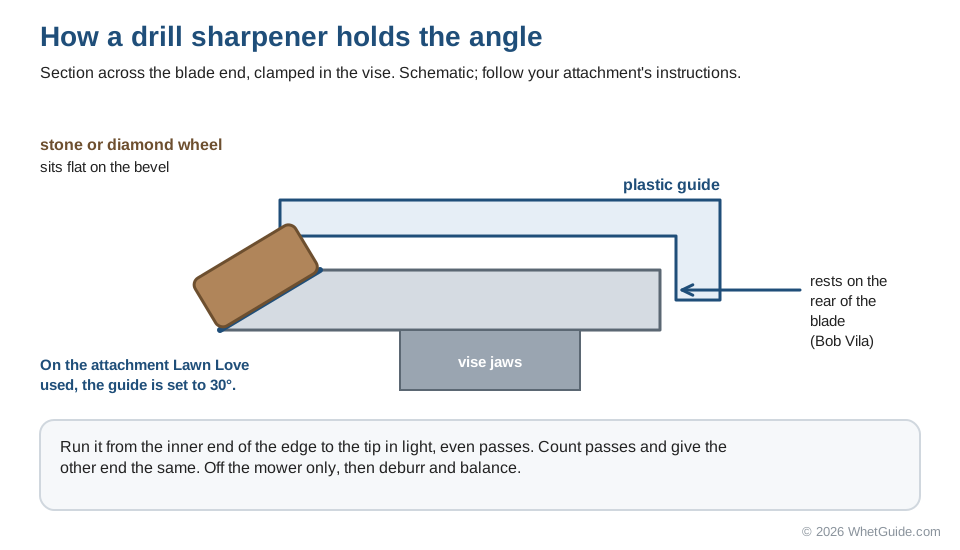
The limit is honesty about what it is. LSU AgCenter describes drill-mounted stones used on the deck as light-duty sharpening that doesn't let you balance the blade. Used off the mower, with a balance check after, they're a good touch-up tool. Deep nicks need a file or grinder first. Keep the passes light; the stone still makes heat, and if the edge colors, stop and let it cool.
↑ Back to all sectionsMethod 3: sharpen lawn mower blades with an angle grinder
Yes, it's okay to sharpen mower blades with an angle grinder, and it's the fastest way to take out nicks. It's also the easiest way to ruin the temper or take off far too much steel. Use a flap disc, not a hard grinding wheel. A 60-grit zirconia flap disc (NEIKO's 11143A is a 4-1/2 inch one) removes steel quickly but more gently than a solid wheel, and it's easier to keep flat on the bevel.
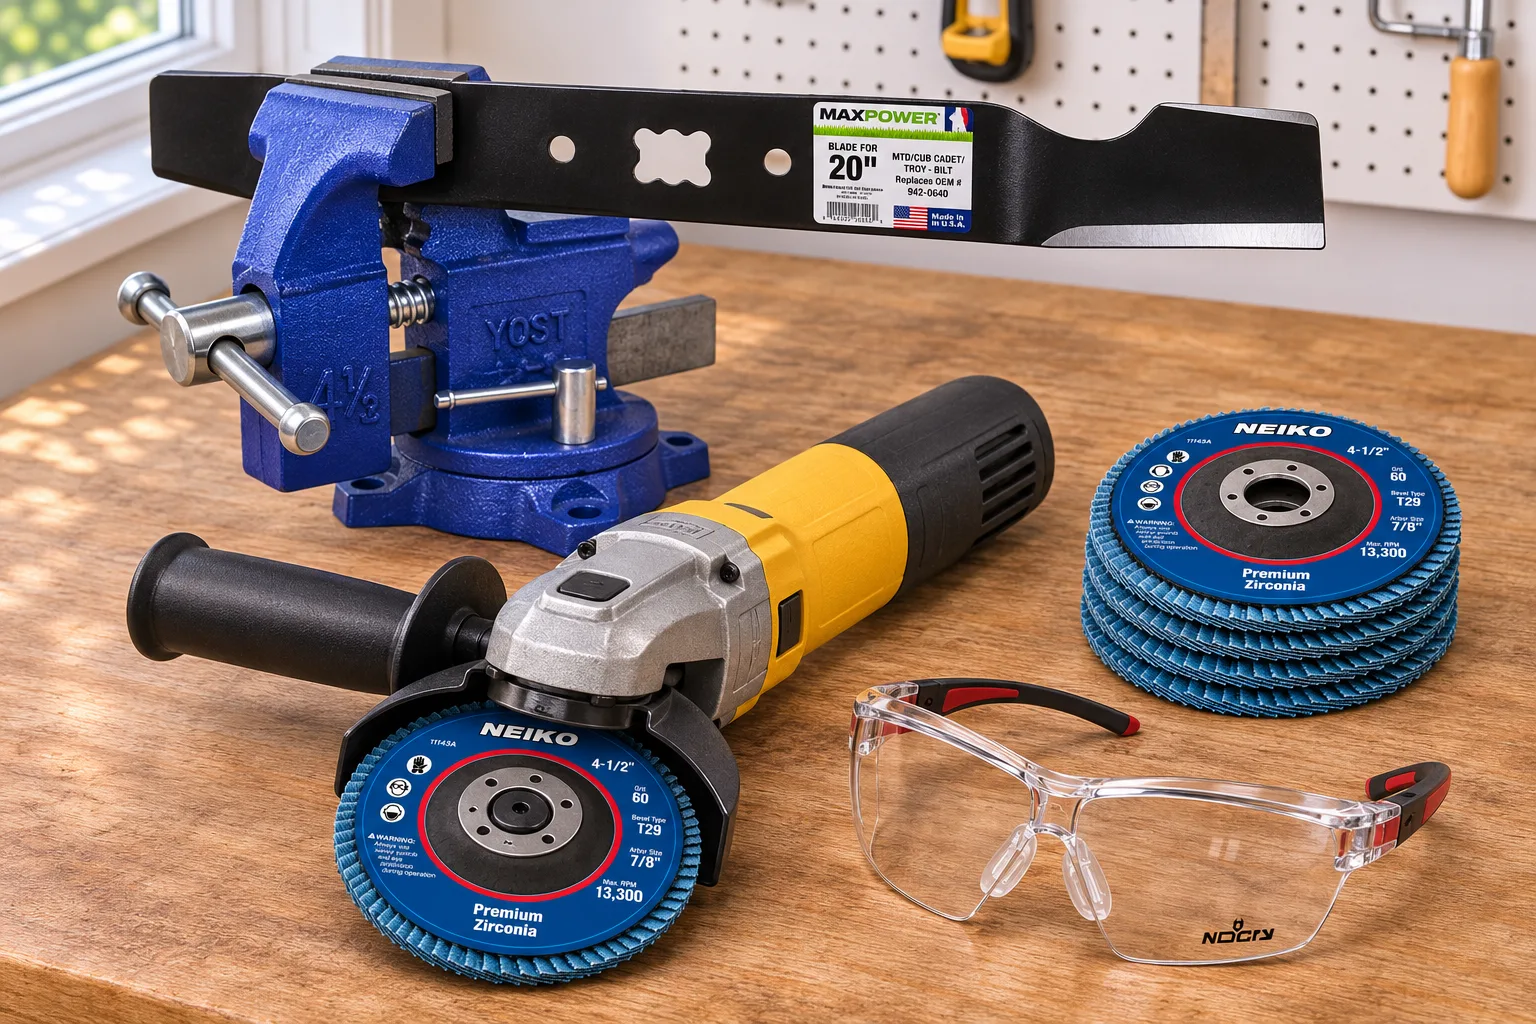
- Clamp the blade tight in the vise, bevel up. Never hold it in your hand.
- Eye and hearing protection plus gloves, as Oregon lists. Sleeves rolled down but snug. Nothing flammable in the spark path, including the mower's gas tank.
- Let the grinder reach full speed before it touches the steel, and stand out of the disc's line as it spins up.
- Hold the disc on the bevel at the bevel's own angle, with the disc rotating off the edge rather than into it, so it doesn't catch.
- Move. Sweep from the inner end of the edge to the tip in one smooth pass, light pressure, then lift off. Never park the disc in one place.
- Watch the color. After every few passes, look at the steel near the edge. Straw is warning; blue or black means it got too hot and lost hardness there (ECHO calls this bluing). LSU says to dip the blade in water to cool it. Let it cool between passes and you'll never get there.
- Stop short. A grinder gets to the right edge in a few passes. Finish the last bit with the file if you want more control.
- Don't touch the underside. Same rule as the file: deburr with a single flat file stroke.
- Count passes, match the other end, then balance.
Nicks: grind them out first, straight across, then restore the bevel along the whole edge. Otherwise the edge ends up with a dip where the nick was.
A rotary tool with a small grinding wheel is the gentler option. Family Handyman points to it for curved mulching blades, and it's slower and less aggressive than an angle grinder.
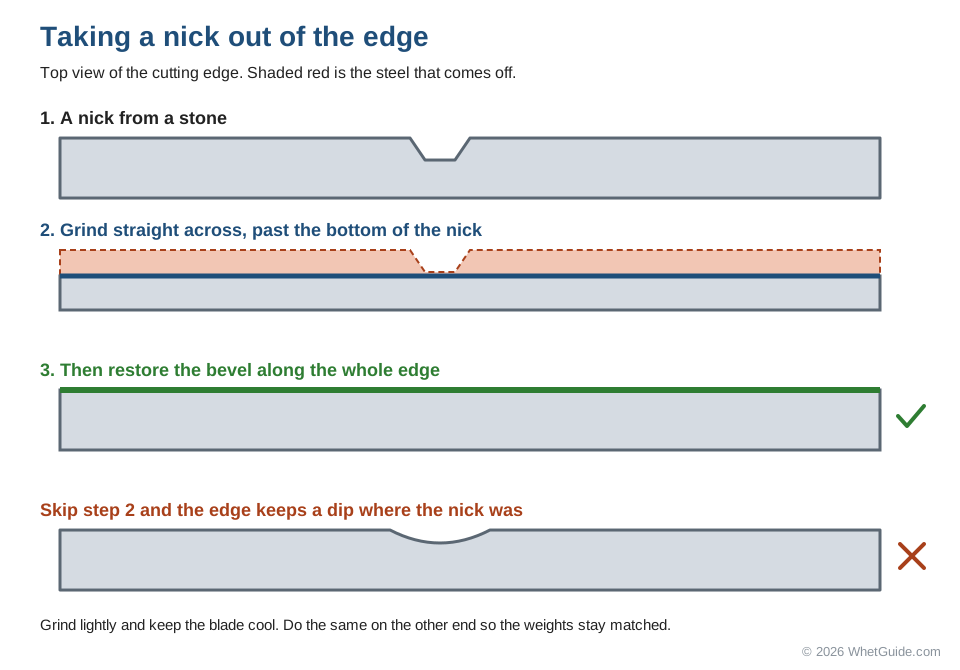
The steel should stay cool enough to touch with a gloved hand between passes. If a glove smells of hot leather, or the edge shows color, stop. A blued edge is softer than the rest and dulls fast. File past the colored zone to get back to good steel, or replace the blade if the color runs deep.
Method 4: bench grinder and belt sander
A bench grinder has two advantages over an angle grinder: the tool rest gives you a fixed reference for the angle, and both hands are on the blade. It also has the same heat problem, worse, because a solid wheel cuts hard.
- Check the wheel guard and tool rest settings against your grinder's manual before you switch it on. Oregon's guide puts the tongue guard on top no more than 1/4 inch from the stone and the bottom guard at the work table no more than 1/8 inch away, and says not to run the grinder until they're set. Other bench grinders list their own figures in the manual.
- Stand out of the wheel's line as it starts up. LSU says not to stand in front of the grindstone as it first starts; let it reach full speed.
- Set the blade on the rest, bevel against the wheel, and tilt it until the bevel sits flat on the wheel face. That's the factory angle.
- Slide the blade across the wheel from the inner end to the tip in light passes. Keep it moving. Dip it in water every few passes.
- Same count on each end, deburr with a file, then balance.
A belt sander does the same job with a flat platen behind the belt. It cuts fast and heats the thin edge quickly, so use light passes and frequent cooling. Our guides to sharpening on a bench grinder and sharpening on a belt sander cover setting up both machines; the belt guide also lists which coarse belts suit axes and mower blades. Powered belt sharpeners like the Work Sharp Ken Onion edition are sold with outdoor tools and mower blades in mind; our Work Sharp comparison covers what each model's listing says it handles.
↑ Back to all sectionsMulching, high-lift and standard blades
Blade names cause half the confusion here. According to Cub Cadet, a standard blade is also called a 2-in-1 blade, and Cub Cadet calls it a high-lift blade too: it discharges clippings out the side chute or blows them into the bag. A mulching blade is a 3-in-1, with a more curved surface and extra cutting edges so it chops clippings several times and drops them back into the lawn. Older mowers sometimes used a "+" setup, two blades stacked at right angles, as a mulching kit.
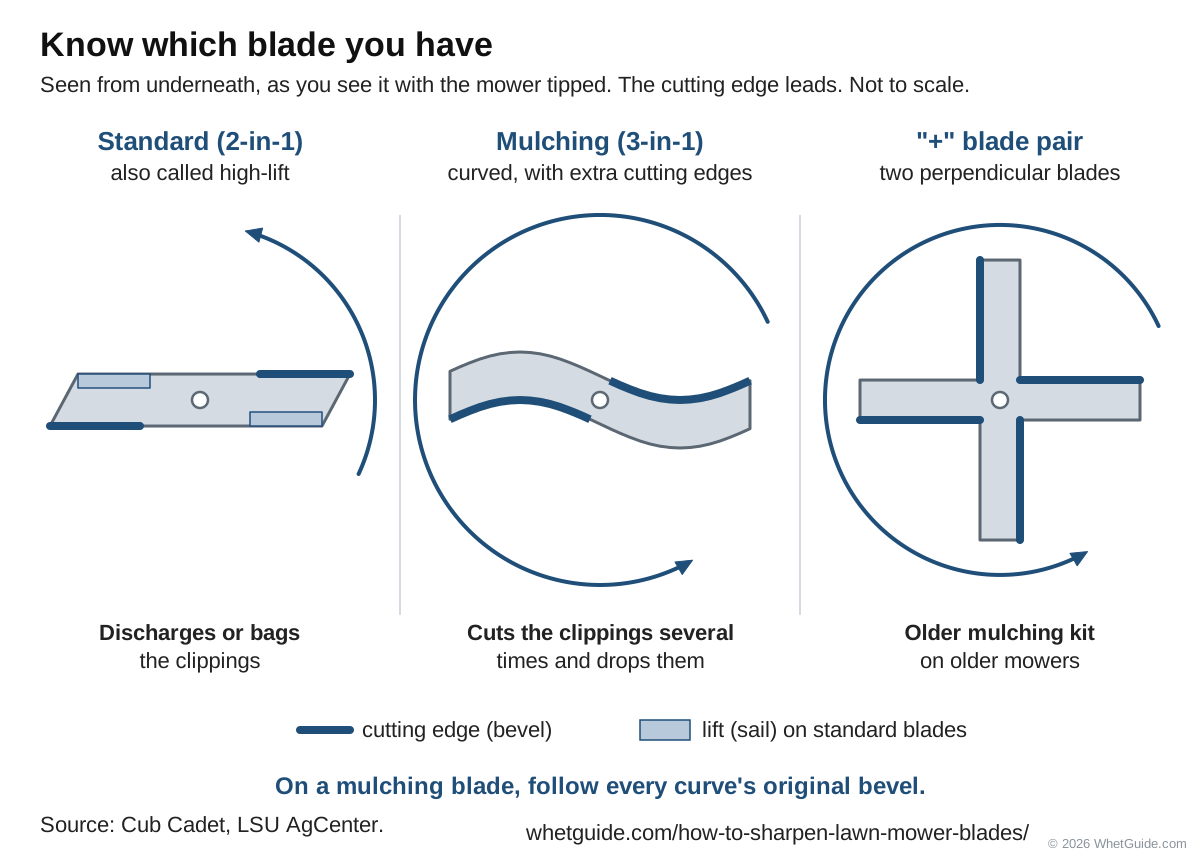
LSU AgCenter puts the difference in airflow terms: mulching blades have more bends and more cutting surface, while lift blades have more suction and airflow for bagging.
Sharpening a mulching blade
Yes, mulching blades can be sharpened. The method is the same; there's just more edge and some of it is curved.
- Sharpen every cutting edge, including the extra ones on the curved sections, at its own original bevel.
- File the straight runs normally. For the curves, Family Handyman suggests a rotary tool with a grinding wheel, which is easier to steer around a bend and safer than an angle grinder. A round or half-round file works too.
- Take the same amount off each end, edge for edge. With more edges, it's easier to lose track, so count per edge.
- Balance it exactly like a standard blade.
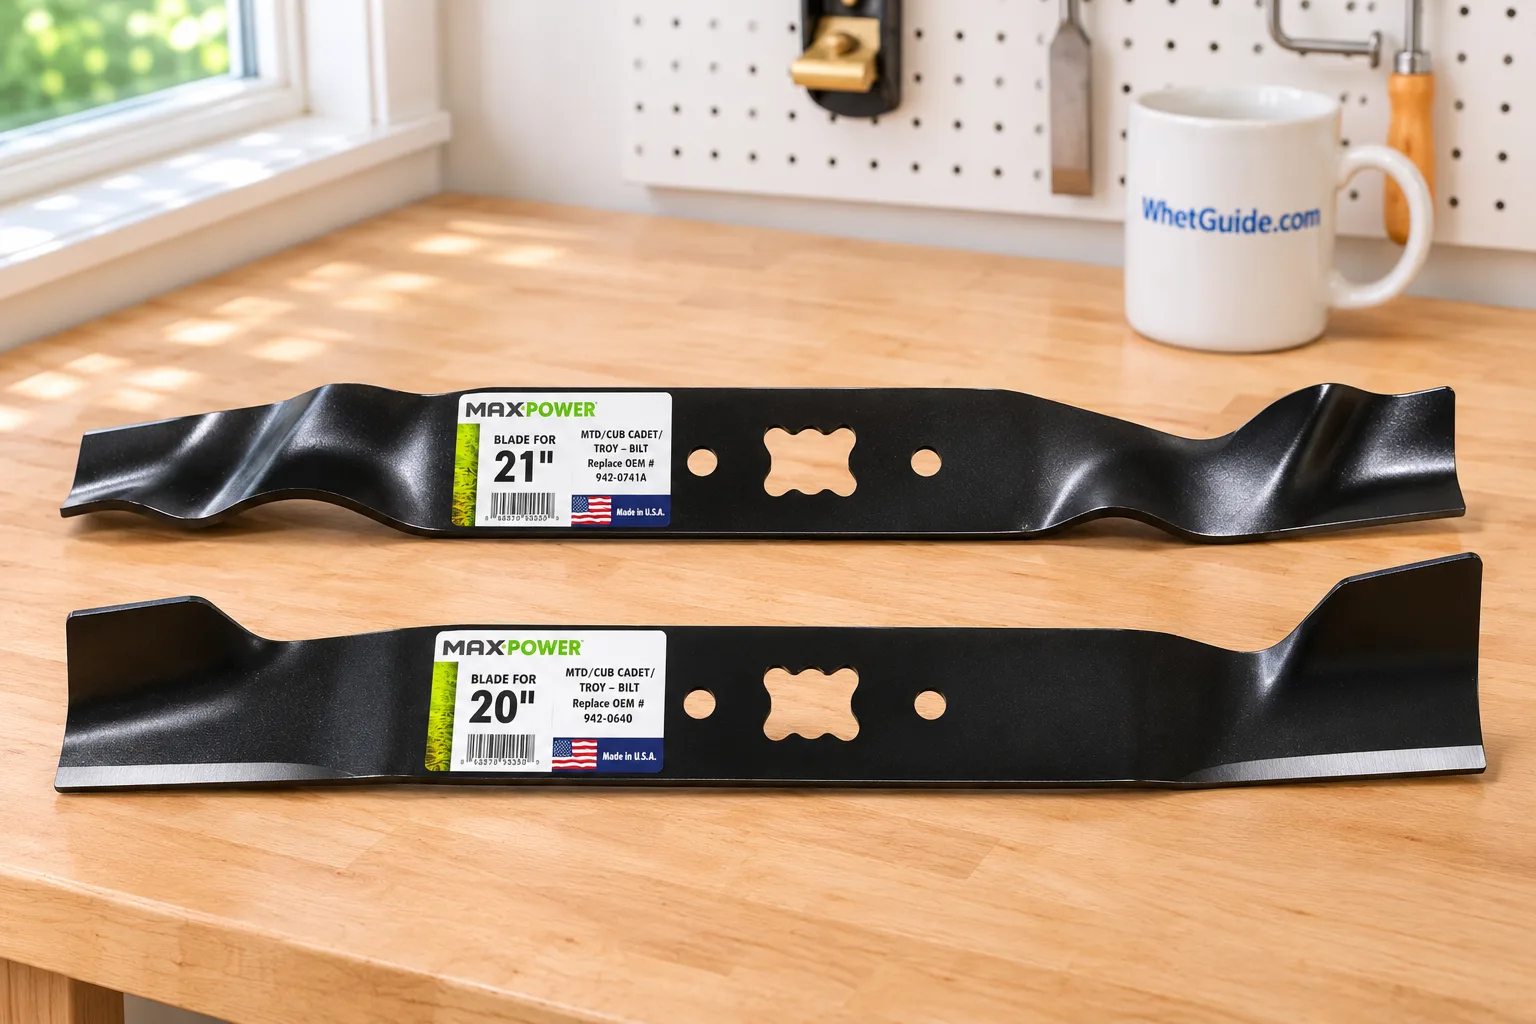
The downsides of mulching blades are mostly about clippings. Cub Cadet says they're less efficient at discharging clippings, and in tall or wet grass they can leave clumps. If you bag most of the time, a high-lift blade suits you better. Cub Cadet also warns that non-OEM blades are used at the owner's risk and may void a warranty, so check the part number before switching types.
People sometimes ask about sharpening mulcher head teeth. That's forestry equipment, a different machine. The same idea applies, each tooth sharpened at its own original bevel and the same amount off each, but follow the mulcher maker's manual for tooth service.
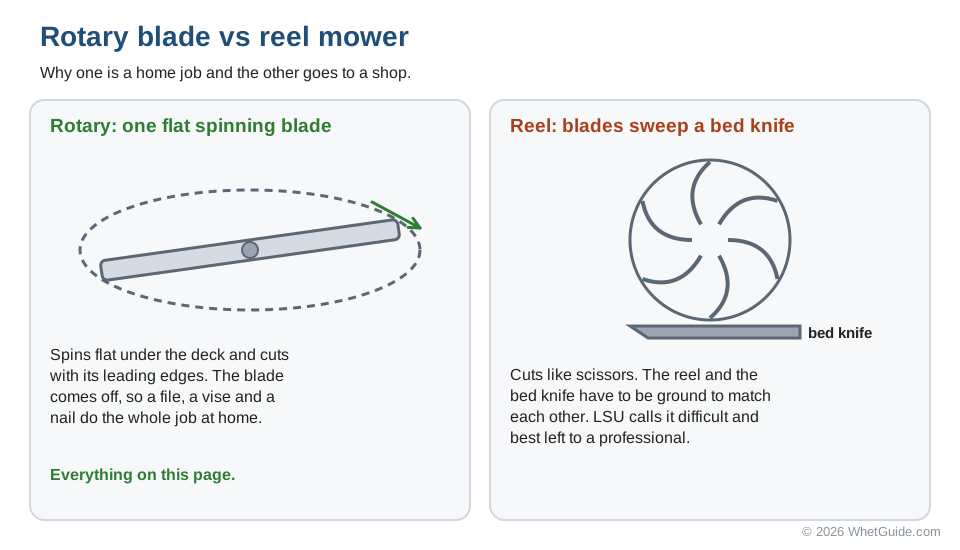
Reel mowers are another matter. LSU calls sharpening them difficult and best left to a professional, because the reel and bed knife have to be ground to match each other. Everything on this page is for rotary mowers.
↑ Back to all sectionsBalance the blade after sharpening
Yes, a mower blade needs to be balanced after sharpening. It spins very fast, and a little extra weight at one end turns into a shake you can feel in the handle. LSU AgCenter puts it plainly: a balanced blade vibrates less and causes less engine wear.
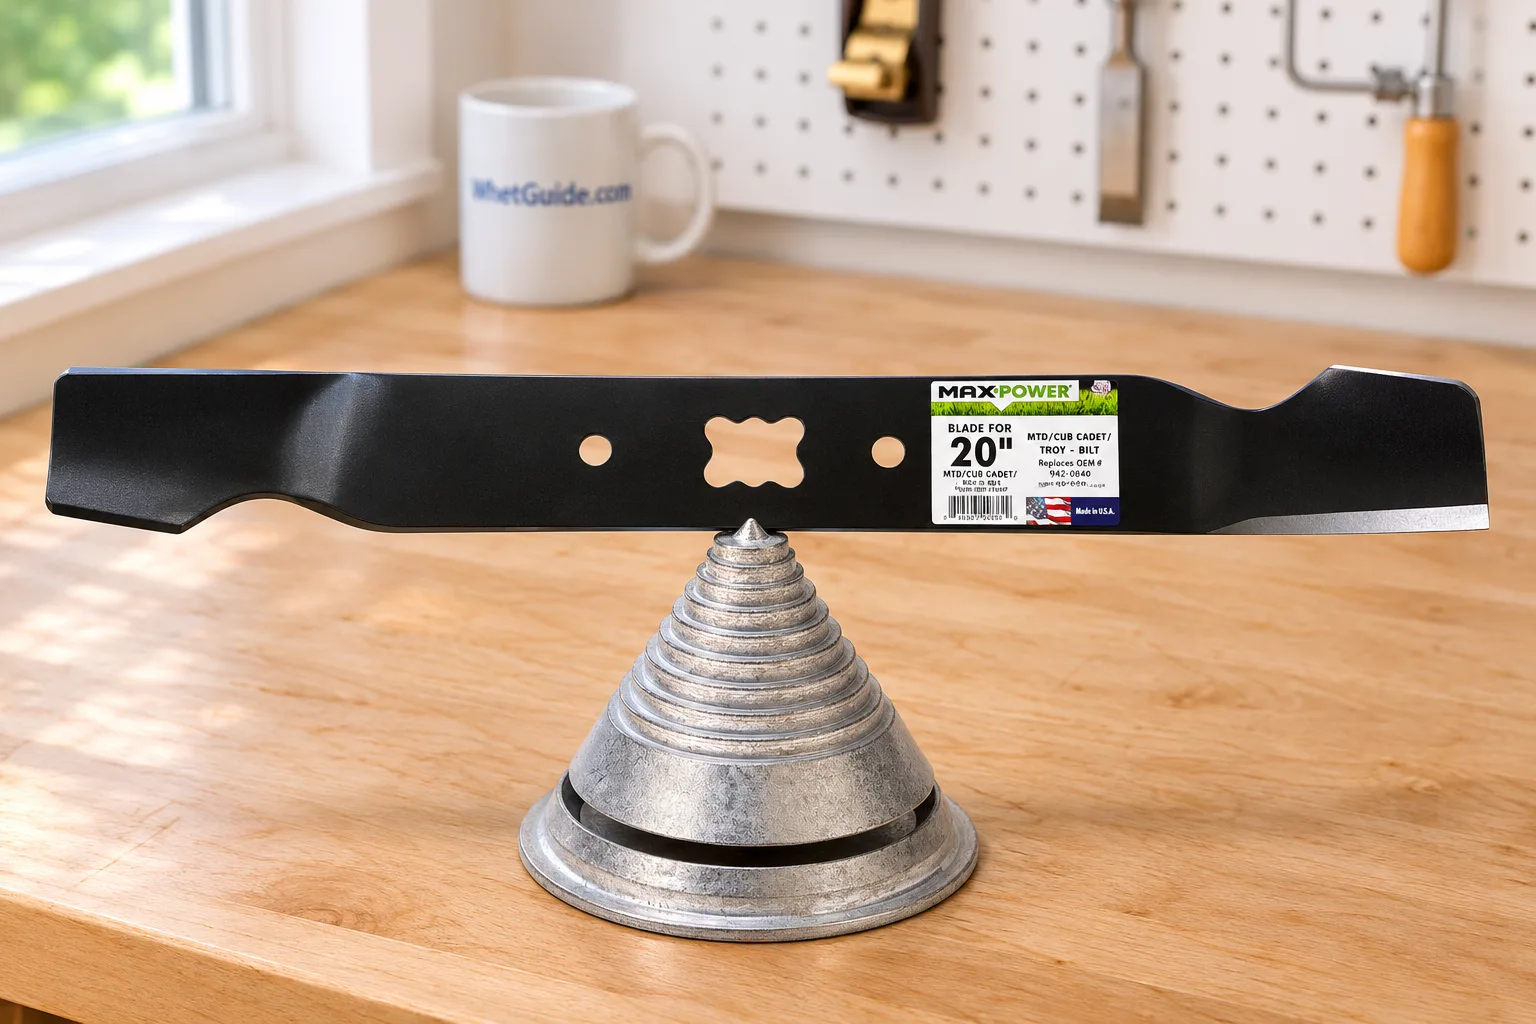
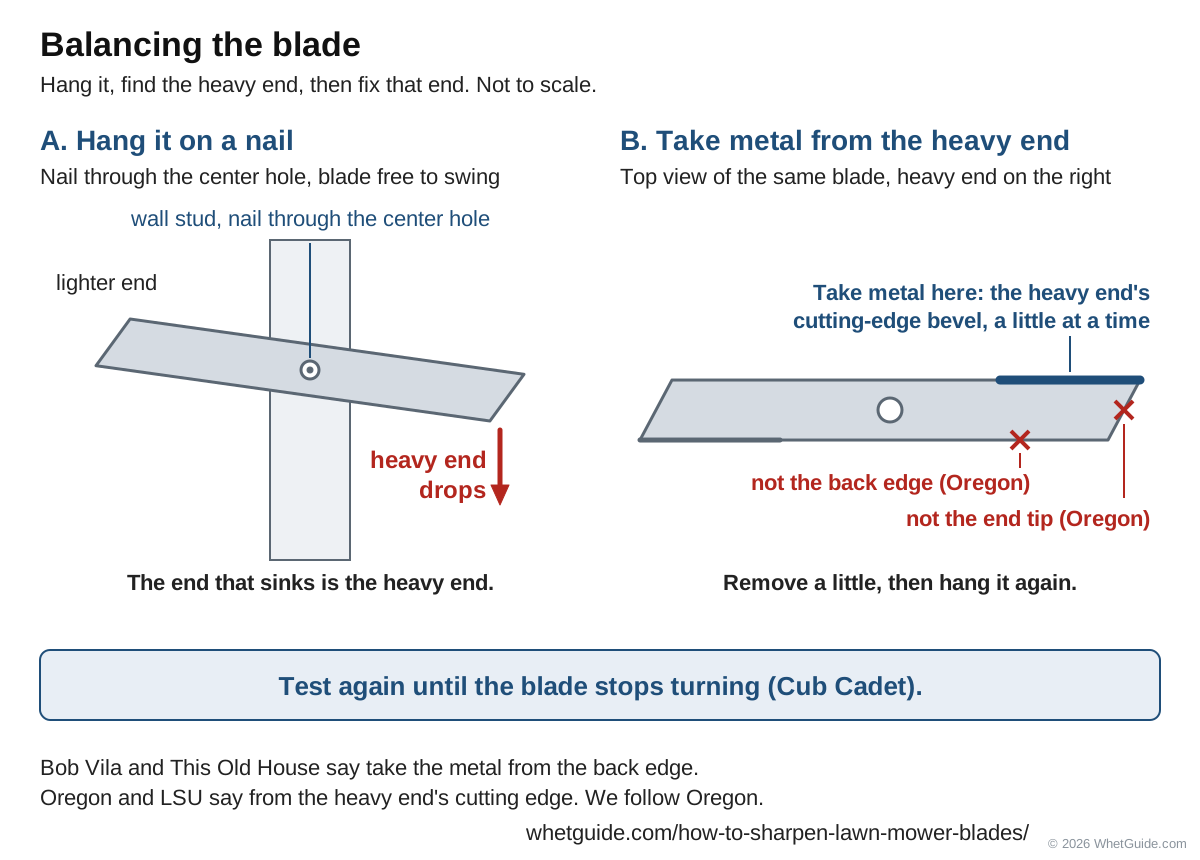
- Hang it. Drive a nail partway into a wall stud and hang the blade through its center hole, flat side to the wall. Or set it on a cone balancer, which centers the blade on its hole (Oregon's method). LSU, Cub Cadet and Family Handyman all describe the nail.
- Watch it. A balanced blade stays level. If one end drops, that end is heavy.
- Take metal off the heavy end's cutting edge. Oregon says to remove metal only from the sharpened edge of the heavy end, never from the ends or the back of the blade. LSU says the same: take more off that end's cutting surface. A few file strokes at a time.
- Test again. Keep going until the blade no longer rotates, which is Cub Cadet's rule.
Some guides disagree. This Old House and Bob Vila say to take the extra metal from the back edge rather than the cutting edge. We follow Oregon, which makes blades and balancers, and LSU: the back edge is where the lift is, and grinding there thins the part ECHO warns can break off. Taking it from the heavy end's bevel also means you're sharpening while you balance.
What it feels like when you're close: the heavy end drifts down slowly instead of dropping. A few more light strokes usually settle it. A nail is a little less sensitive than a cone, so if the blade hangs level on the nail but the mower still shakes, check for a bent blade or a bent crankshaft before blaming the balance.
Putting the blade back on
- Check the orientation. The mark you painted faces the grass. The Toro 20794 manual says the curved ends of the blade point toward the mower housing. The Honda H3011 manual says to install the lift section toward the cutter deck. Same idea: the bent-up lift goes up, toward the engine.
- Rebuild the stack in the order it came off. On the Honda, the washer marked INSIDE faces the blade. Use the original bolt and washer, not substitutes.
- Start the bolt by hand. A few turns with your fingers makes sure it isn't cross-threaded.
- Chock the blade on the other side of the deck from where it was during removal, so it can't turn as you tighten.
- Torque it to the manual's figure with a torque wrench (see torque).
- Remove the chock, turn the blade by hand (gloved) to make sure it clears the deck, set the mower upright, put the spark plug back and reconnect the wire.
- Test run. Start it on a hard surface and listen. A balanced, tight blade sounds smooth. A new shake or a ticking noise means stop, pull the plug and look again.
Common mistake: the blade goes on upside down. The mower then pushes the grass over and leaves it standing, because the sharpened edge trails and the lift pushes air the wrong way. If the first pass after a sharpening looks worse than before, check this before anything else.
↑ Back to all sectionsBlade bolt torque, by manual
Use the number in your own manual, measured with a torque wrench. "Good and tight" isn't a spec, and ECHO says to torque to the manual. Some guides say hand-tight; every manual we read disagrees.
| Mower or maker | Blade bolt torque | Source |
|---|---|---|
| Honda H3011 (riding mower) | 5.0 kg-m (36.2 ft-lb) | Owner's manual |
| Toro 20794 (walk-behind) | 60 ft-lb (82 N-m) | Operator's manual |
| Cub Cadet walk-behind mowers | 38 to 50 ft-lb | Cub Cadet support |
| Cub Cadet riding mowers | 70 to 90 ft-lb | Cub Cadet support |
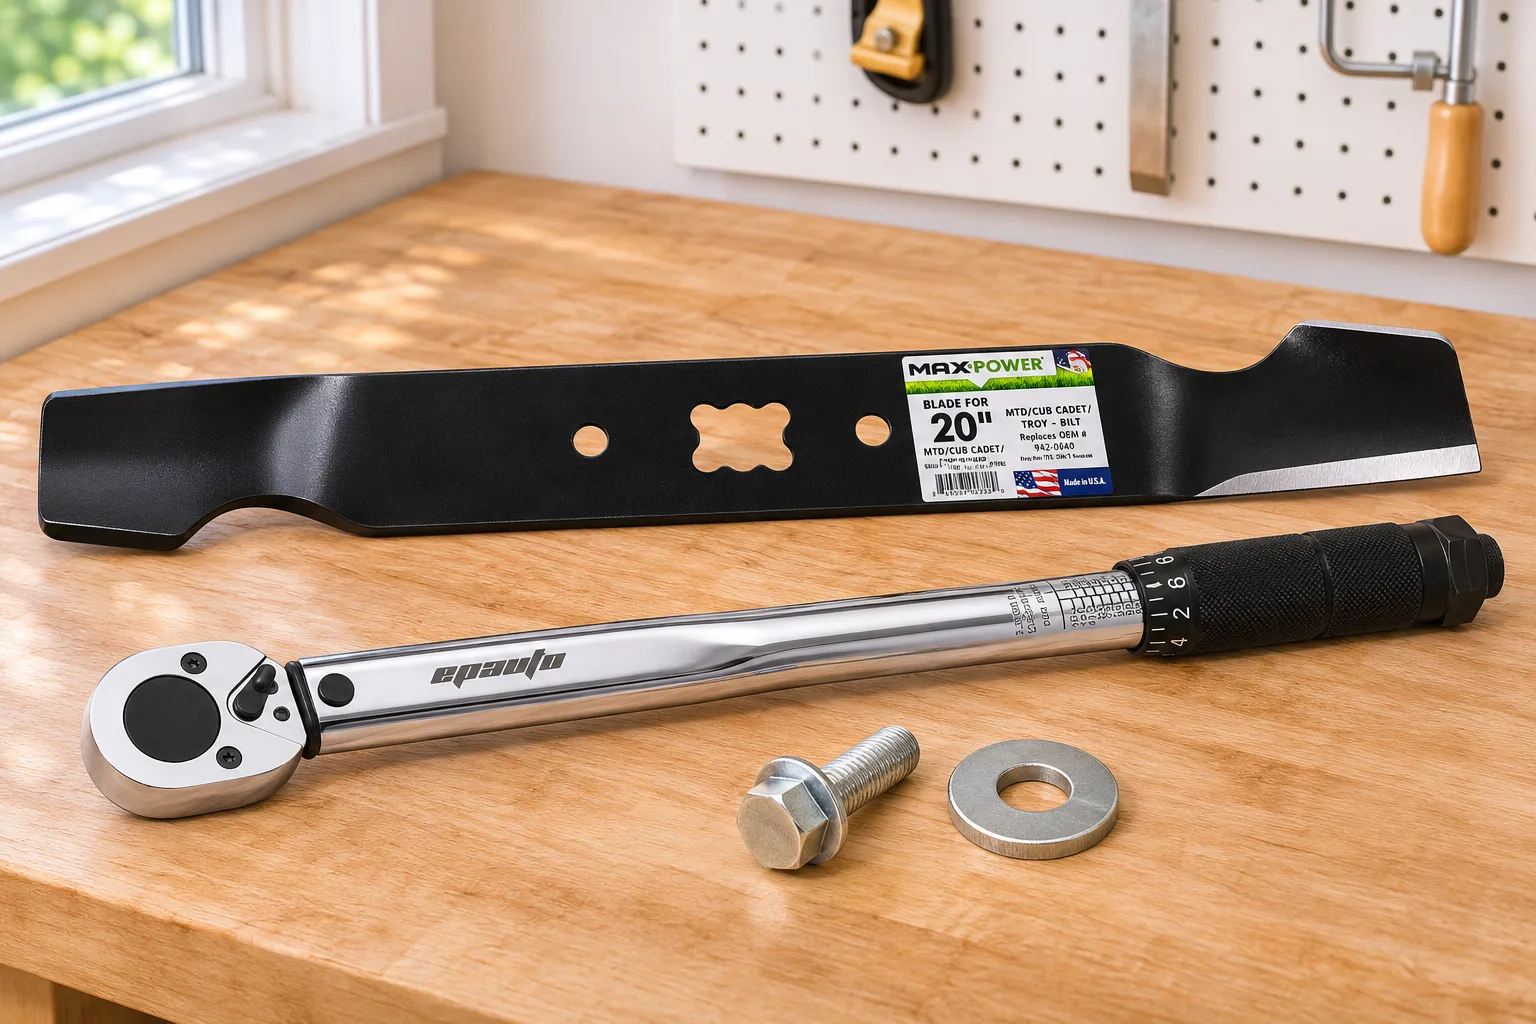
The spread is the point. Toro's 60 ft-lb is above the top of Cub Cadet's 38 to 50 walk-behind range, so a number from one brand can leave another brand's blade loose or overtightened. And Cub Cadet's riding mowers sit near double its walk-behinds. A loose bolt costs more than a wobbly blade: Family Handyman says under-tightening can throw off the engine timing and cause hard starting. Can't find the manual? Most makers post them on their support sites under the model number on the deck sticker.
How to use a click wrench: set it to the number, pull smoothly on the handle (not the head) until it clicks once, and stop. Pulling past the click adds torque. Store it wound down to its lowest setting.
↑ Back to all sectionsSharpen or replace?
A blade is worth sharpening as long as the steel is sound. Replace it, don't sharpen it, if any of these is true:
- It's cracked anywhere, especially near the center hole or the bends.
- It's bent. Lay it on a flat surface; if it rocks, it's bent. LSU AgCenter says never to try to straighten a badly bent blade and never to use a cracked one. Bent steel has been stressed and can break at speed.
- The lift (the upturned back edge) is worn thin or notched. ECHO warns a worn lift can break off and be thrown.
- About 1 inch of its original width is gone, Oregon's point for replacement.
- Deep gouges would take a lot of steel to file out.
- The center hole is worn oval and the blade sits loose on its adapter.
- It has been blued by a grinder deep into the edge.
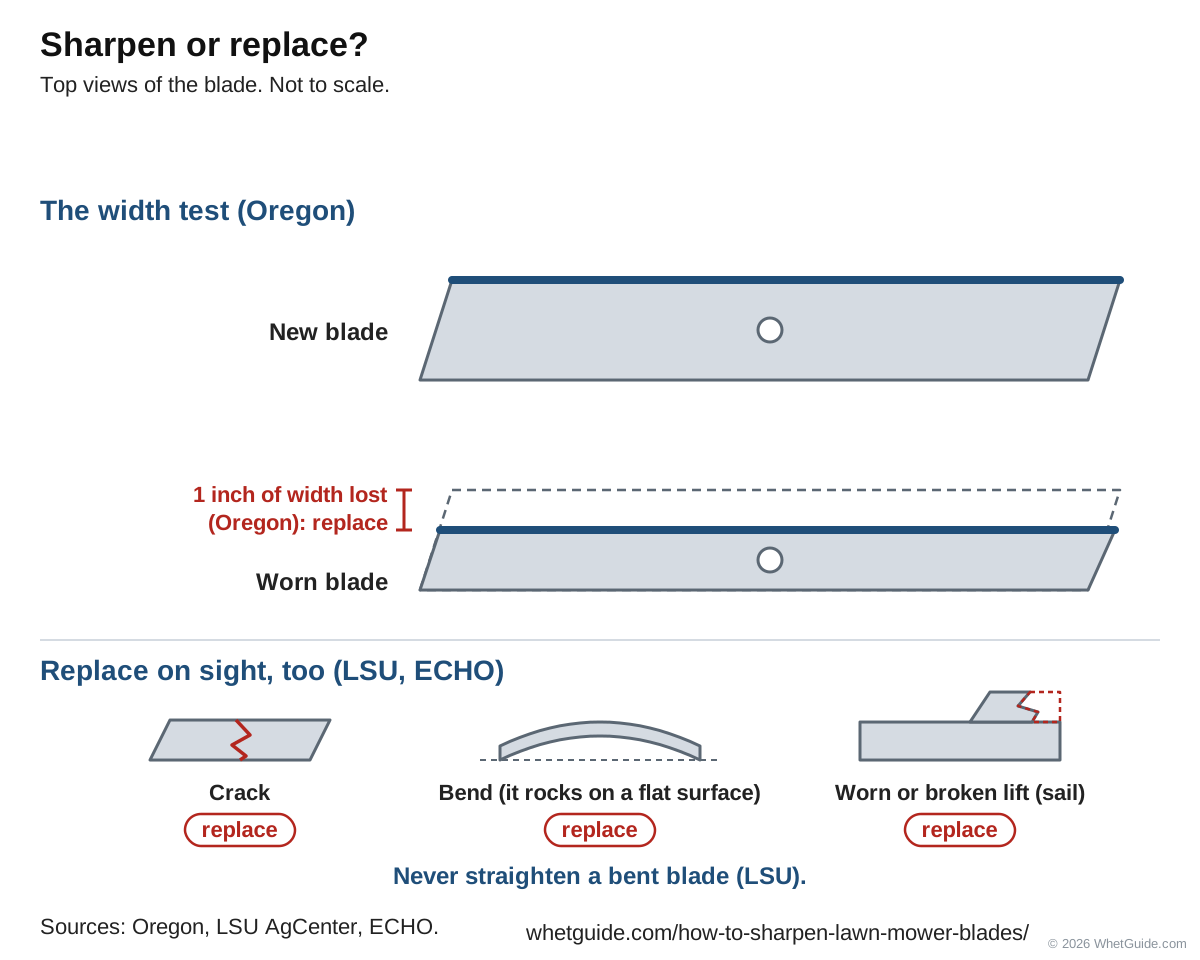
When you buy a new one, match the part number in your manual or on the old blade. Blades that look alike differ in length, center hole shape and lift. Cub Cadet says aftermarket blades are the owner's risk and may affect the warranty. Many people keep a second blade on the shelf, swap it in when the first goes dull, and sharpen the dull one on a rainy day.
Keeping a blade sharp longer is mostly about what it hits. Walk the lawn and pick up sticks, stones and pine cones before you mow. Raise the deck over rough or bare ground and around gravel edges. Lawn Love adds two habits: never mow wet grass, and clean the underside of the deck after each use so clippings don't build up and rust it. Give it a thorough scrape after the last mow of the year, and, as ECHO says, store the mower dry so the blade doesn't rust.
↑ Back to all sectionsPay a pro? Who sharpens mower blades and what it costs
If you'd rather not, a shop will do it, and most want the blade already removed. Family Handyman puts the average at about $30 when you bring the blade in. Prices vary a lot by area, so call first.
- Ace Hardware: some stores do. Ace stores are locally owned, so services and prices differ. A Fort Collins Ace post from April 2023 says that store sharpens mower blades. Our page on whether Ace sharpens lists the stores we found and what they say.
- Home Depot and Lowe's: a July 2026 Hunker article reports that neither sharpens mower blades in store.
- Small-engine and mower repair shops: the usual answer, and they'll check the balance and spot a bent blade.
- Reel mowers: send them to a pro. LSU says reel sharpening is difficult and best left to a professional.
What do professionals use? A dedicated mower blade grinder. Oregon recommends one over other grinders because it keeps the angle consistent from pass to pass, then each blade goes on a cone balancer. That's the best commercial setup, and for a homeowner who sharpens a blade twice a year it's overkill. A mill file and a nail get you the same edge, slower.
↑ Back to all sectionsGarden tools: shovels, hoes, trowels, rakes and pruners
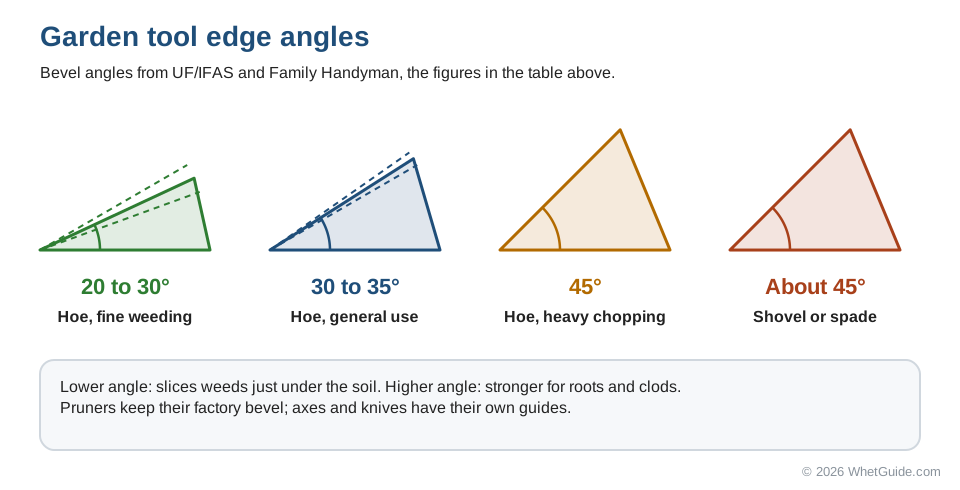
The same file that does your mower blade sharpens most of the shed. The rules come from the University of Florida's UF/IFAS Gardening Solutions and Family Handyman's garden tool list. Start every tool the same way: clean off dirt and rust with steel wool or a wire brush (Family Handyman uses sandpaper), and finish with a thin coat of oil.
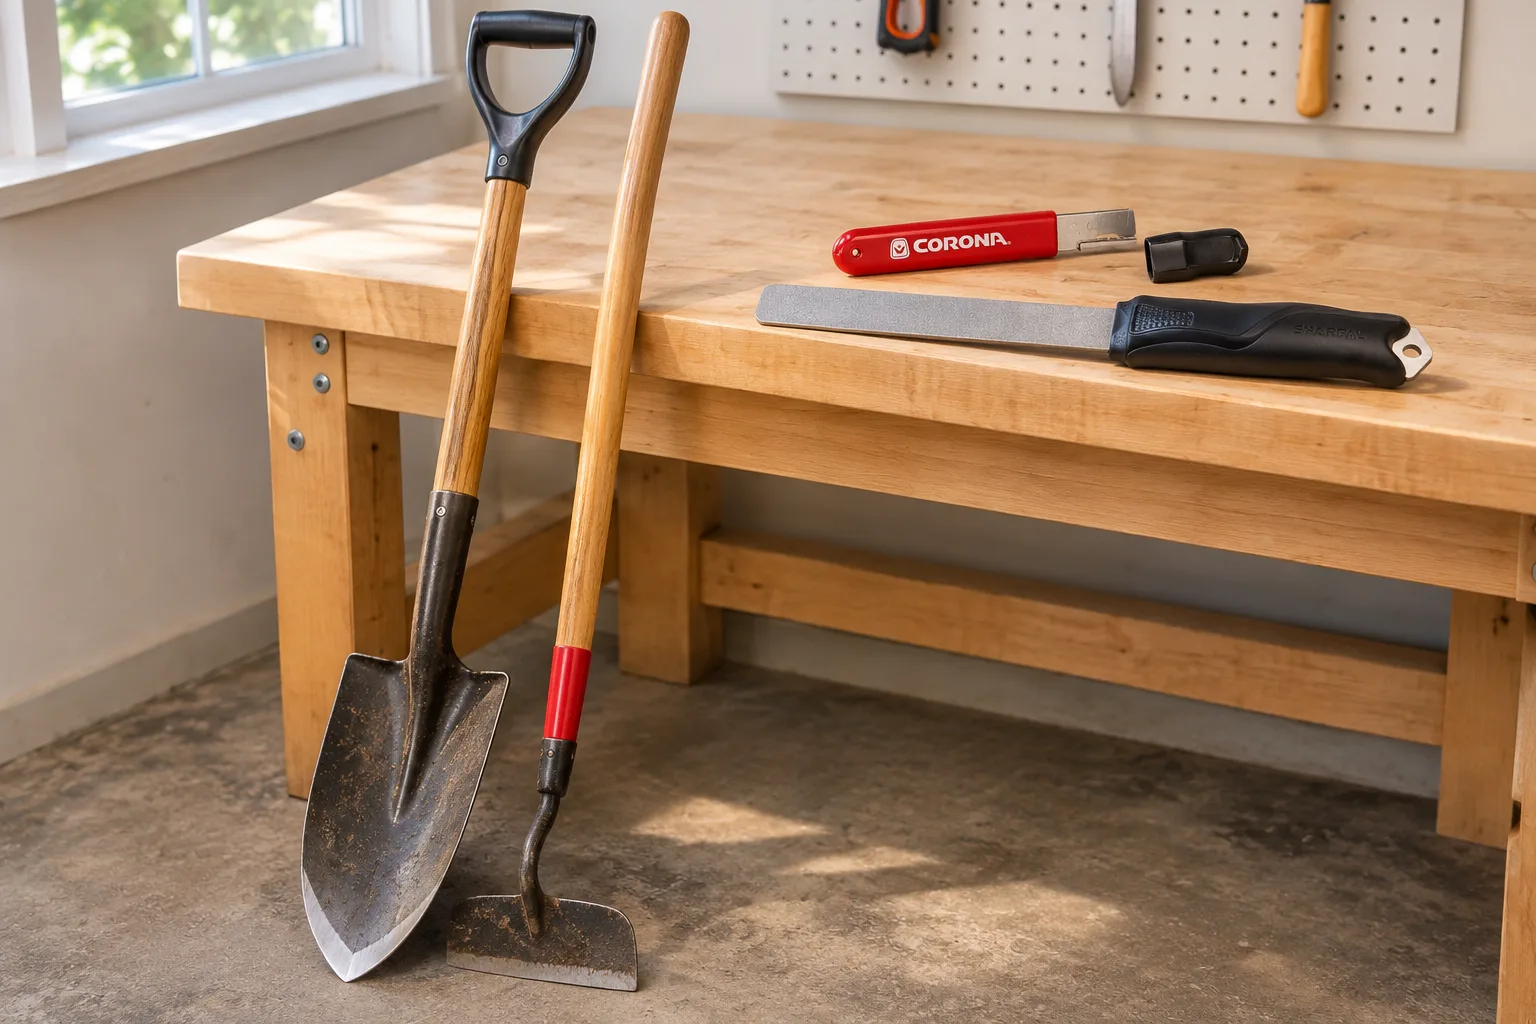
| Tool | Angle | How |
|---|---|---|
| Shovel or spade | About 45 degrees | Clamp it, then use a flat mill file (8 to 10 inch), filing in one direction across the blade. Deburr the back with 300-grit paper. Curved-edge digging shovels benefit most; flat-edged shovels don't need much (FH). |
| Hoe | 45 for heavy chopping, 30 to 35 for general use, 20 to 30 for fine weeding | File the existing bevel. Family Handyman notes some hoes have no bevel at all; use a light touch. |
| Trowel | Keep the factory shape | Sand off rust, then a few file strokes on the working edge. |
| Heavy rake | n/a | A small file around the tines of a heavy rake. Light leaf rakes don't need it (FH). |
| Pruners and loppers | Match the factory bevel | Sharpen the beveled cutting blade only. A round or half-round file for curved blades, 300-grit to finish, then oil (UF/IFAS). Full method in how to sharpen pruning shears. |
| Axe or hatchet | See the axe guide | Sharpened on both sides; a grinder only if badly worn (FH). See how to sharpen an axe and the axe sharpening angle page. |
| Garden and pocket knives | Per knife | A diamond plate or whetstone (FH). See how to use a whetstone. |
The hoe angles are the most useful numbers on this page for gardeners: a weeding hoe used to slice weeds just under the soil cuts better at a lower angle, and a chopping hoe that hits roots and clods needs the stronger 45. Handheld carbide sharpeners like Corona's and pocket diamond files like the SHARPAL 121N are easy to keep in a garden bag for quick touch-ups between real sharpenings.
Every one of these tools rusts faster than a mower blade because it lives in wet soil. Wipe it, dry it, and a few drops of oil after use do more for its edge than any sharpener. Our axe sharpener guide covers the puck-style stones that suit axes and hatchets.
Common mistakes and fixes
| Mistake | What happens | Fix |
|---|---|---|
| Pulling only the plug wire | A bump to the blade can turn the engine over; the wire can flop back | Take the plug out (battery out on electric). |
| Tipping air filter or carburetor down | Oil and gas flood where they shouldn't; smoke and a hard start | Air filter up, tank run low (Toro). |
| Not marking the blade | It goes back upside down and won't cut | Paint the grass side before removal. |
| No chock | The blade spins and the wrench slips into your knuckles | A 2x4 wedge, moved to the other side to tighten. |
| Changing the angle | Wasted steel and a weak or blunt edge | Match the factory bevel; 30 degrees if you can't see it. |
| Grinding the underside | A knife edge that dulls fast | Top face only (ECHO); one flat stroke to deburr. |
| Overheating with a grinder | Blue or black steel that's lost its hardness | Light passes, keep moving, dip in water (LSU). |
| Sharpening razor thin | The edge rolls or chips on the first stick | Stop at .030 to .045 inch thick (Oregon). |
| Filing one end more | Vibration, engine wear | Count strokes; balance after every sharpening. |
| Balancing from the back edge or the tip | Thins the lift or shortens the blade | Take metal from the heavy end's cutting edge (Oregon). |
| Bolt left hand-tight | The blade or adapter slips; timing and starting trouble | Torque wrench to the manual's figure. |
| Sharpening a cracked or bent blade | It can break at speed | Replace it; never straighten (LSU). |
| Sharpening on the mower | No inspection, no balance | Take the blade off. |
The two that cause real harm are the plug and the cracked blade. The rest cost you a bad cut or a rough-running mower, and all of them are fixed by doing the step again properly.
↑ Back to all sectionsMower blade cheat sheet
The whole job on one card. Print it and tape it above the bench, next to your mower's torque figure.
| ☐ Safe | Spark plug OUT (battery out on electric). Fuel run low or hand-pumped, never siphoned. Gloves and glasses; hearing protection for grinders. |
|---|---|
| ☐ Tip | On its side, air filter UP. Outdoors, rag under the tank. |
| ☐ Remove | Paint the grass side. Chock with a 2x4. Penetrating oil. Counterclockwise (check for reverse thread on old mowers). Keep washers in order. |
| ☐ Inspect | Flat? No cracks? Lift not worn? Less than 1 inch of width gone? If not, replace. Never straighten. |
| ☐ Angle | Match the factory bevel. Default 30° (Oregon, ECHO). Top face only. Edge .030 to .045 in thick, not razor. |
| ☐ File | 10 in mill bastard. Push cuts, lift on return. 30 to 50 strokes (FH). Same count each end. One flat stroke under to deburr. |
| ☐ Grinder | Clamped blade, flap disc, light passes, keep moving. Blue = too hot: dip in water. |
| ☐ Balance | Nail or cone. Heavy end drops: file that end's cutting edge until level. |
| ☐ Refit | Mark toward the grass, lift toward the engine. Start the bolt by hand. Chock the other side. |
| ☐ Torque | My mower: ______ ft-lb. Examples: Honda H3011 36.2, Toro 20794 60, Cub Cadet 38 to 50 walk-behind, 70 to 90 riding. |
| ☐ Test | Plug back in. Start on a hard surface. Shake or ticking: stop and check. |
| Next time | Every 20 to 25 hours (ECHO), or about 2 a season (LSU). Check after hitting anything hard. |
Sources: Oregon, Lawn mower blade sharpening how-to guide (30 degree grind, .030 to .045 inch edge, cone balancing and the heavy-end rule, 1 inch replacement point, required safety gear, yearly sharpening); ECHO, Sharpening lawn mower blades (20 to 25 hour interval, 30 degree file angle, top face only, bluing, inspection, torque to the manual); LSU AgCenter, Lawn mower blades (about 40 degrees, cooling, balance, on-deck stones, reel mowers, never straighten); Cub Cadet support FAQ (about 45 degrees, thread direction, torque ranges, annual service) and mulching vs high-lift blades; Toro 20995 and 20794 operator's manuals; Honda H3011 and MM60 owner's manuals; UF/IFAS Gardening Solutions (shovel and hoe angles, rust and oil); Family Handyman, lawn mower blade sharpening (plug removal, file strokes, rotary tool, job time, cost) and how to sharpen garden tools; This Old House, how to sharpen lawn mower blades (file touch-ups every couple of weeks); Bob Vila, how to sharpen lawn mower blades (job time). Manuals were read as scanned copies on ManualsLib and ManualsDir on November 14, 2026; check your own model's manual. Store service details are on our Ace page. How we research