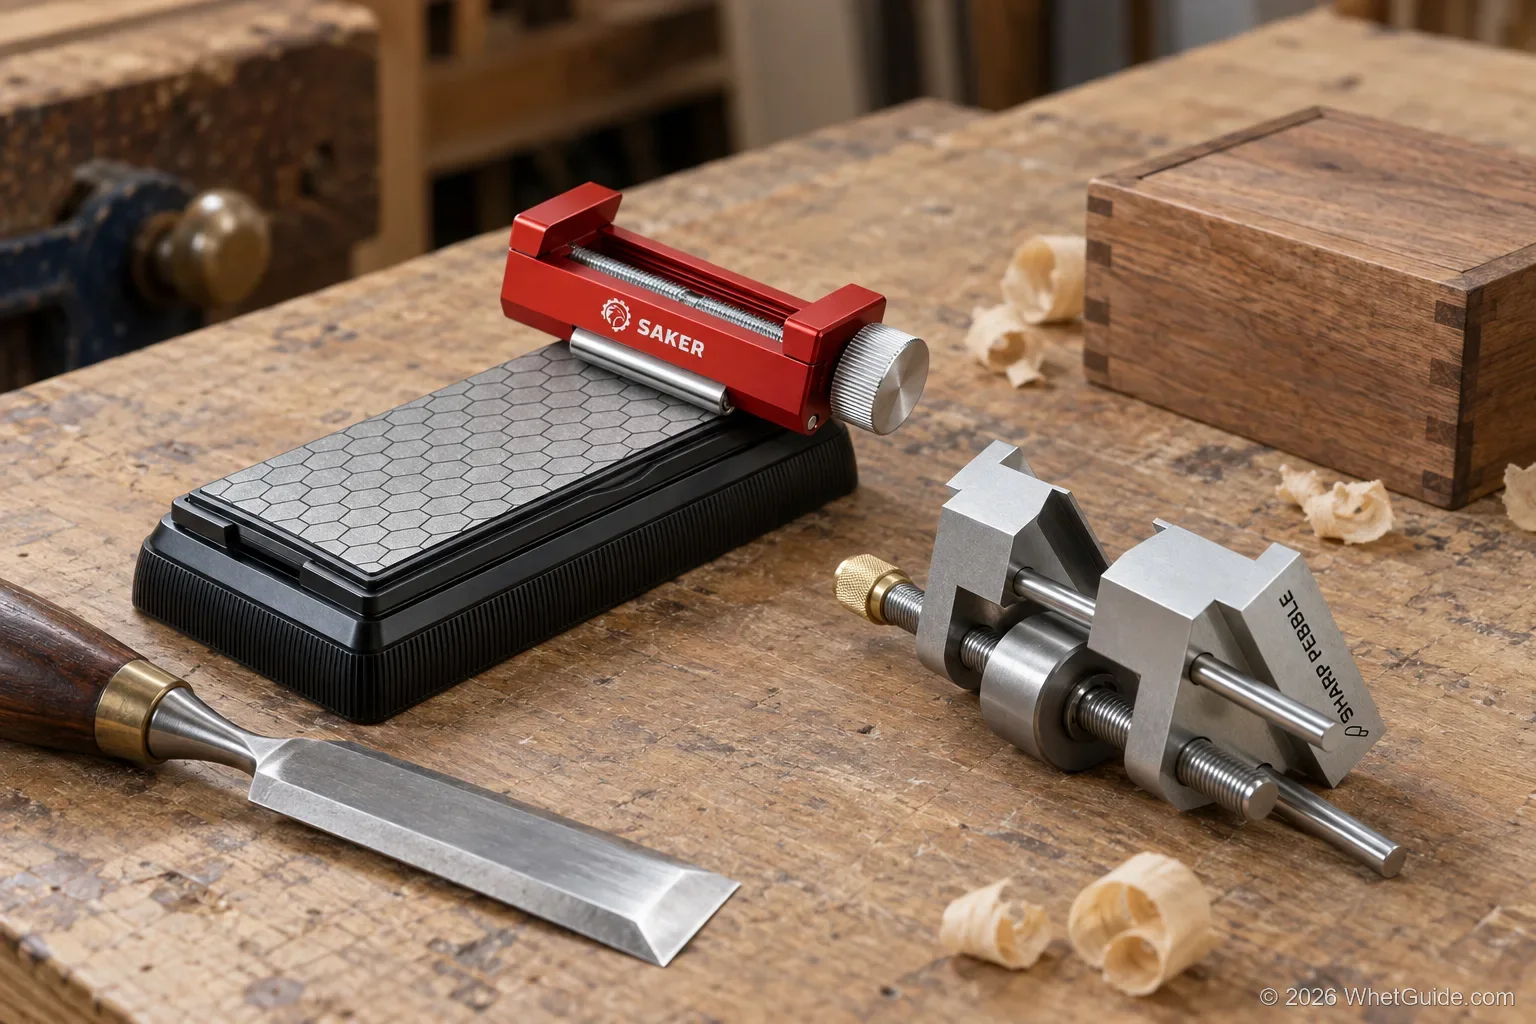
The best chisel sharpening jig for most benches is the ATLIN honing guide. Its self-centering clamp takes chisels 1/8 to 1-7/8 inches wide, and it rolls on a hardened steel wheel. It has the biggest owner base of any guide in our Amazon search, at 5,980 ratings when we checked on Nov 15, 2026. Buy a Saker off-center guide instead if you also sharpen short plane irons. A kit like the Gohelper only earns its place if you want an angle fixture and a diamond stone in the same box. Whichever you pick, budget for a flat stone, because the jig only sets the angle.
↑ SectionsQuick answer: which chisel jig fits your chisels
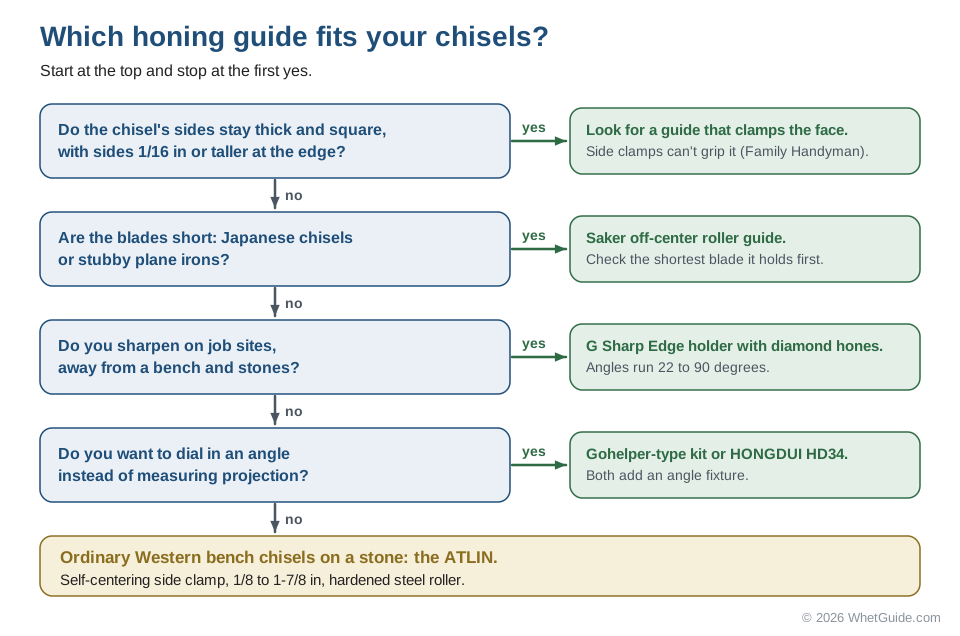
Look at your chisels before you look at the jigs. The sides and the length of the blade decide which guide can hold it, and the width only rules out the extremes.
| What you sharpen | Get | Why |
|---|---|---|
| Western bevel-edge bench chisels, 1/4 to 1-1/2 in | ATLIN | Self-centering side clamp, steel roller, longest owner record |
| Bench chisels plus short block-plane irons | Saker off-center | Listed as better with shorter blades |
| You've never set a projection and want the numbers printed | Sharp Pebble | Projection chart in the manual and ebook |
| You want to set an angle by number | Gohelper kit or HONGDUI HD34 | Angle fixture positions the blade for you |
| Wide plane irons over 2-1/2 in | HONGDUI HD34 | Listed to 3.22 in |
| Chisels sharpened on job sites | G Sharp Edge | Holder and four diamond hones in one tool-bag unit |
| Mortise chisels with thick, square sides | A face-clamping guide | Side clamps can't grip sides that don't taper |
| Lathe gouges and skews on a grinder | A grinding jig, not a honing guide | Different tool for a different machine |
Quick picks
| Best overall | ATLIN Honing Guide | Amazon |
|---|---|---|
| Best for short blades | Saker Honing Guide, off-center roller | Amazon |
| Best step up from the basics | Saker Chisel Sharpening Jig | Amazon |
| Best for beginners | Sharp Pebble Honing Guide | Amazon |
| Best kit with stone and angle gauge | Gohelper Chisel Sharpening Jig kit | Amazon |
| Best for measured angles | HONGDUI HD34 Honing Guide | Amazon |
| Best different approach | G Sharp Edge Chisel Sharpener | Amazon |
How we picked these jigs
On Oct 29, 2026 we searched Amazon for chisel sharpening jigs and sorted the results by "bought in the past month" and by rating counts. The best-selling real honing guides were the ATLIN (5,979 ratings, about 200 purchases a month), the Saker guides and the Sharp Pebble. Many of the page-one results were cheap clones with 10 to 100 ratings, so we kept only guides with enough ratings to judge or an unusual design, like the G Sharp Edge. We read each listing for width range, how it sets the angle, and what material it's built from. On Nov 15 we rechecked every listing, and the ratings and stars on this page are from that check.
We also read Fine Woodworking's case for honing guides, which recommends one for hobbyists. Asa Christiana concedes that freehand honing is faster because it needs no setup, but he still points hobbyists to a guide, since most don't sharpen often enough to build the muscle memory.
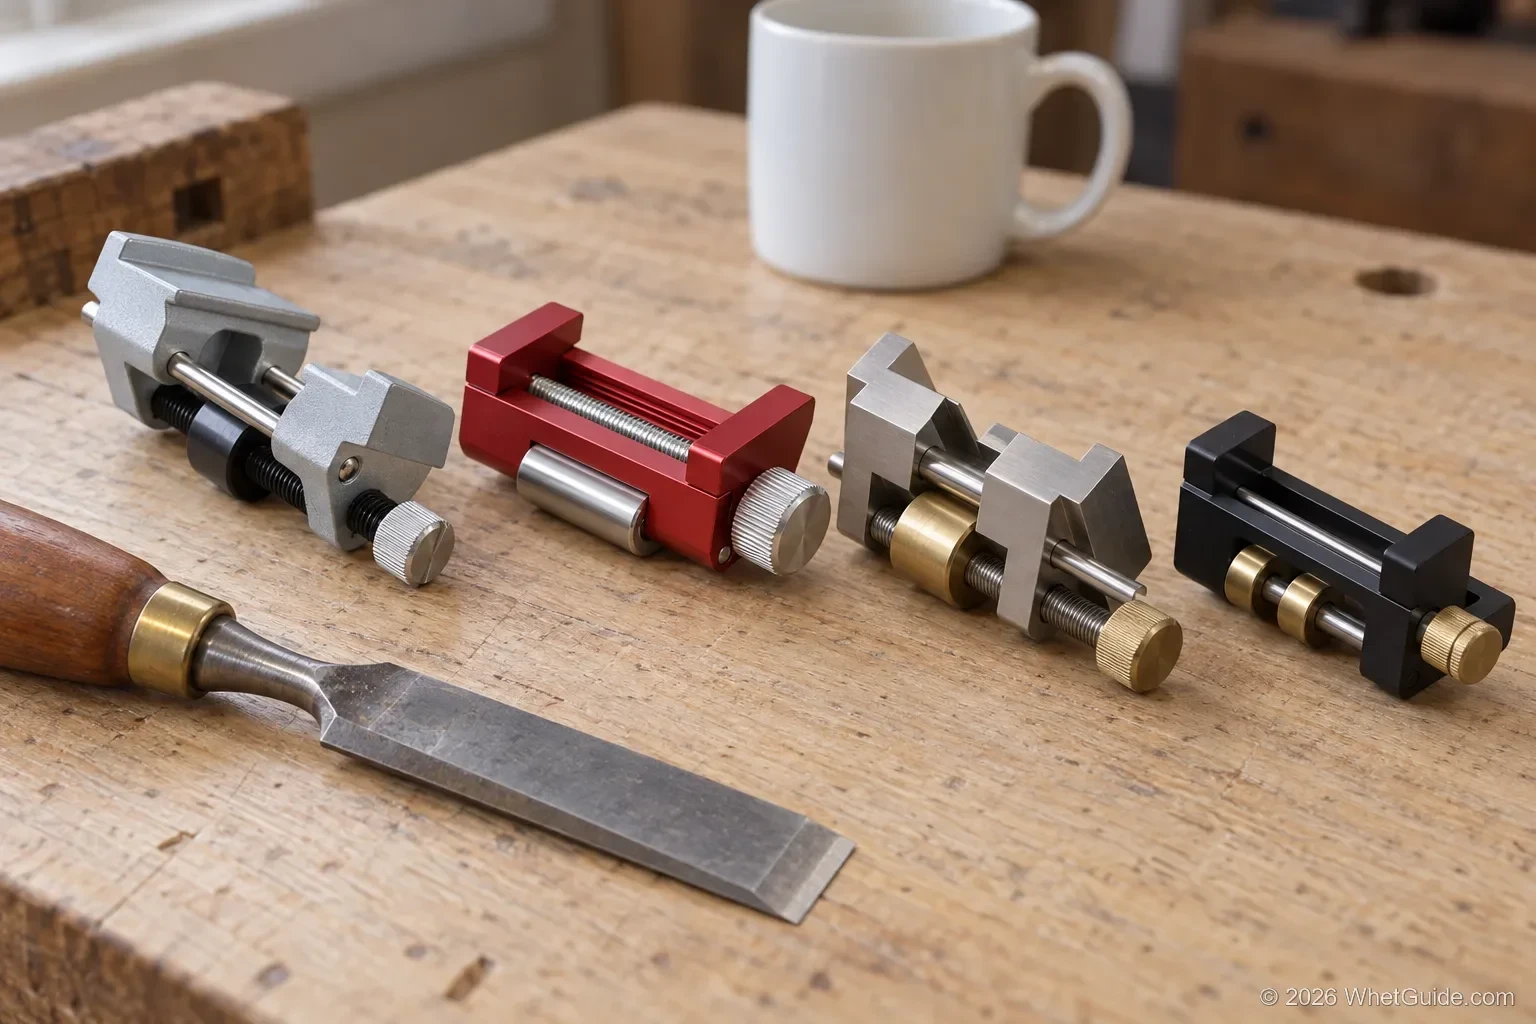
A rating count tells you how many people bought a guide and bothered to rate it. It can't tell you whether the jaws close square or how the roller wears after a few years. So we read the count as a track record. The ATLIN's 5,980 ratings and the HONGDUI's 60 are both on this page, for different reasons: one is the safe default, the other has a feature nothing else here offers. One caution from the listings themselves: the two Saker guides (B0C5C44DDJ and B0C5J97VZM) share almost identical bullet text, including the line about the off-center roller. We treat them as one design sold under two titles, so they count once as evidence.
Details come from the listings and published woodworking guidance, checked Oct 29 and Nov 15, 2026. How we research.
How a jig grips: the part that decides the fit
| Style | Good for | Watch for | Guides here |
|---|---|---|---|
| Side clamp, centered roller | Standard bench chisels and plane irons | Chisels with thick, square sides, per Family Handyman | ATLIN, Saker, Sharp Pebble |
| Off-center roller | Short plane blades and chisels | Only worth it if you sharpen short blades | Saker off-center |
| Clamp plus angle fixture | Repeatable, measured angles | More parts to set up each time | Gohelper, HONGDUI |
| Holder with diamond hones | Tool-bag sharpening | Angles run 22 to 90 degrees | G Sharp Edge |
The angle comes from projection, the length of blade sticking out. The ATLIN and Sharp Pebble listings both say every standard angle comes from adjusting the projection; Sharp Pebble prints the measurements in a manual and ebook. A fixture like the Gohelper's or HONGDUI's positions the blade to that length for you, which is where kits earn their price. For the method itself, including the 25 degree bevel and 30 degree micro bevel we use, see how to sharpen a chisel.
There's no single right answer on clamp style. Chris Gochnour, testing guides for Fine Woodworking in 2019, put the question as whether a guide should clamp from the sides or the top, and answered that it depends. It depends on the chisels. A side clamp self-centers fast on a bevel-edge chisel and has nothing to grab on a chisel with tall, square sides. A face clamp doesn't need tapered sides at all.
The one-minute fit test
Family Handyman's rule is that side-clamp guides only grip chisels whose sides taper to less than 1/16 inch. To check yours, lay the chisel on its back and look at the sides end-on. A bevel-edge bench chisel has sides that slope down to a thin edge. A mortise chisel or a firmer chisel has sides as tall as the blade is thick, and they stay square.
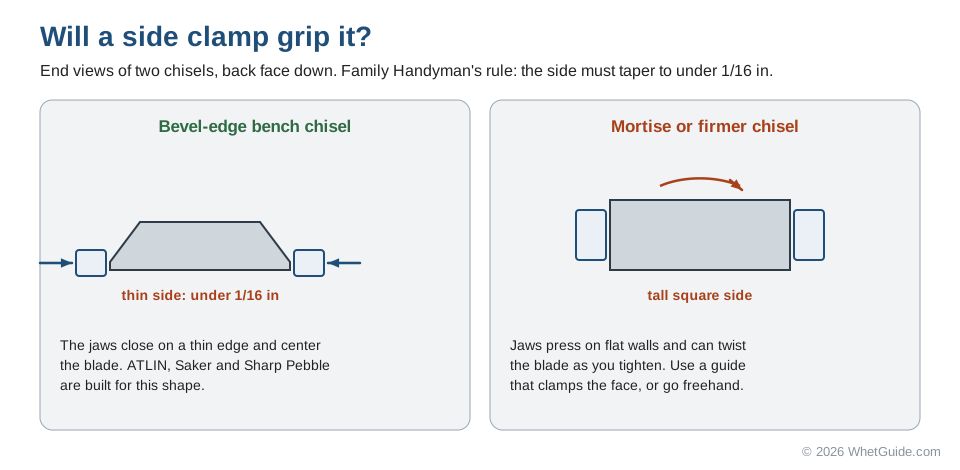
If the side is thin, a side clamp will grip it. If it's tall and square, the jaws of an ATLIN-style guide land on a flat wall and can twist the blade as you tighten. That's the case for a face clamp. The Amazon Basics chisel set lists "narrow side bevels," which is the shape side clamps are built around, and that set ships with its own honing guide.
| Chisel | Sides | Side clamp? | Notes |
|---|---|---|---|
| Bevel-edge bench chisel | Thin, tapered | Yes | The chisel these guides are built for |
| Paring chisel | Thin, tapered | Yes, if long enough | Long blades can overhang; support the handle |
| Firmer chisel | Square | Often no | Use the fit test |
| Mortise chisel | Tall, square | No | Needs a face clamp; see mortise chisels |
| Japanese chisel | Short blade | Usually no | See Japanese chisels below |
| Plane iron | Flat, square | Yes, wide jaws | Check the width range |
| Skew chisel | Varies | Not straight | Needs a skew jig or freehand |
The 7 best chisel sharpening jigs
ATLIN Honing Guide
It's the standard answer. About 6,000 ratings (5,980 on Nov 15, at 4.3 stars), a self-centering clamp and a hardened steel roller that, per the listing, won't wear flat spots. The width range covers a typical set of bench chisels and narrower plane irons. It's a plain guide with no angle fixture, so you set projection with a ruler or a gauge you make yourself.
That simplicity is also the limit. The listing doesn't mention short blades, and a side clamp needs sides that taper. Plane irons wider than 1-7/8 inches won't fit. Who it suits: anyone with a normal set of Western bench chisels and a decent flat stone. Pair it with a stop block and you'll set it in seconds.
- Width range1/8 to 1-7/8 in
- Styleself-centering side clamp
- Rollerhardened steel
- Angleset by projection
- Extrasinstructions included
Why it stands out
- Largest owner base of any chisel jig here
- Self-centering, so the chisel sits square
- Steel roller
Think twice if
- You want a built-in angle fixture
- Your chisels have thick, square sides
Saker Honing Guide, off-center roller
The listing says the upgraded off-center roller "improves performance with shorter planer blades," which is the one job a centered roller does poorly. It holds 0.2 to 2.55 inch blades, locks with a metal stud, and has a wide roller for stability. If you restore old planes, buy this one. It had 479 ratings at 4.3 stars on Nov 15, and at 2.55 inches it takes plane irons too wide for the ATLIN.
- Width range0.2 to 2.55 in
- Styleoff-center roller
- Bodyaluminum alloy
- Clampknob with metal stud lock
- Angleset by projection
Why it stands out
- Handles short plane irons
- Wide roller for stability
- All-metal body
Think twice if
- You only sharpen long chisels, where the ATLIN costs the same
Saker Chisel Sharpening Jig
The sibling of the guide above, with a wide roller and an aluminum alloy body. The listing says the roller design lets you "scroll and forth" across the stone, and that the blade is locked by a metal stud so it won't slip. It has 829 ratings at 4.4. Its bullets read almost word for word like the off-center Saker's, including the off-center roller line, so the honest difference between the two is the title and the photos. Look at the pictures of the underside before you choose, and pick this one if it's the one in stock.
- Width range0.2 to 2.55 in
- Rollerwide bearing roller (listing also names an off-center design)
- Bodyaluminum alloy
- Lockmetal stud
- Angleset by distance from chisel top to guide
Why it stands out
- Wide roller, stable on the stone
- Metal body that won't rust, per the listing
Think twice if
- You'd rather have the ATLIN's longer track record
Sharp Pebble Honing Guide
The pitch is the paperwork: illustrated instructions plus an ebook with projection measurements for each angle, so a first-timer doesn't have to work them out. The body is stainless steel with a bronze bearing. It costs more than the ATLIN and does the same job, so buy it if you want the guidance. 735 ratings at 4.4. The listing doesn't print a width range, which is odd for a guide. If you own very wide plane irons, check the photos or ask the seller before buying.
- Bodymachined stainless steel with bronze bearing
- Adjusterside knob
- Angleprojection chart in manual and ebook
Why it stands out
- Projection measurements supplied
- Stainless body with bronze bearing
Think twice if
- You already know your projection numbers
- You want the lowest cost
Gohelper Chisel Sharpening Jig kit
The kit answers the usual beginner questions in one box: an angle gauge for the chisel's bevel and a positioning block for the projection, plus the guide itself and a double-sided 400/1000 diamond stone. The listing says the jaws are two adjustable plates. A version without the stone (B0D1XRR8N7) and one with two stones (B0FPLGW45W) are also sold; see the kit family. It has 126 ratings at 4.6, a short record, so we'd buy it for the fixture and treat durability as unproven.
- Width range0.1 to 2.8 in
- Includesguide, 400/1000 diamond stone, angle gauge, angle fixture
- Bodyanodized aluminum and stainless steel
- Clamptwo adjustable jaws
Why it stands out
- Angle gauge and fixture take the guesswork out of projection
- Diamond stone included
Think twice if
- You want a long record of owner feedback
HONGDUI HD34 Honing Guide
This is the guide for people who like to dial in a number. The fixture runs from 15 to 47 degrees and locks, and the two brass rollers can mount inboard or outboard. It takes up to 3.22 inch blades, the widest here. 60 ratings at our Nov 15 check, so it's early. Two rollers spaced apart resist the side-to-side rocking that a single narrow roller allows. The spares are a nice touch, since the roller is the part that sits in the grit.
- Width range0.1 to 3.22 in
- Angle fixture15 to 47 degrees, auto-lock
- Rollerstwo brass, with two spares
- Includesrubber rings, magnetic hex key
Why it stands out
- Widest range and a locking angle fixture
- Spare rollers included
Think twice if
- You want a proven design
- You sharpen a few chisels a year
G Sharp Edge Chisel Sharpener
This isn't a roller guide. It holds the tool and moves it against diamond hones in four grits, with micro foils for polish, and the listing says it's small enough for a tool bag. It suits a carpenter who sharpens on site more than a hobbyist at a bench. 203 ratings at 4.4. Because it brings its own abrasives, it's the only pick here that works with nothing else bought. The 85 mm top end is about 3.35 inches.
- Width range3 to 85 mm
- Angle range22 to 90 degrees
- Honesdiamond 200, 400, 800, 1500
- Finishdiamond micro foils
Why it stands out
- Four diamond grits and foils included
- Compact enough for a tool bag
Think twice if
- You already own stones
- You sharpen at a bench and want a roller guide
Side by side
| Jig | Width range (listing) | Angle set by | Stars (ratings), Nov 15 |
|---|---|---|---|
| ATLIN | 1/8 to 1-7/8 in | Projection | 4.3 (5,980) |
| Saker off-center | 0.2 to 2.55 in | Projection | 4.3 (479) |
| Saker standard | 0.2 to 2.55 in | Projection | 4.4 (829) |
| Sharp Pebble | Not stated | Projection with chart | 4.4 (735) |
| Gohelper kit | 0.1 to 2.8 in | Fixture and gauge | 4.6 (126) |
| HONGDUI HD34 | 0.1 to 3.22 in | Fixture, 15 to 47 degrees | 4.4 (60) |
| G Sharp Edge | 3 to 85 mm | Holder, 22 to 90 degrees | 4.4 (203) |
Read the stars with the counts beside them. A 4.6 from 126 people and a 4.3 from nearly 6,000 aren't comparable numbers, because a small sample swings on a handful of reviews.
Width ranges against real chisel sizes
Width is rarely the problem with chisels. The Amazon Basics 8-piece set runs from 1/4 to 1-1/2 inches, and every guide here takes all six. The ranges matter for plane irons. The ATLIN stops at 1-7/8 inches, which leaves out wider plane irons. The Sakers reach 2.55, the Gohelper family 2.8 and the HONGDUI 3.22.
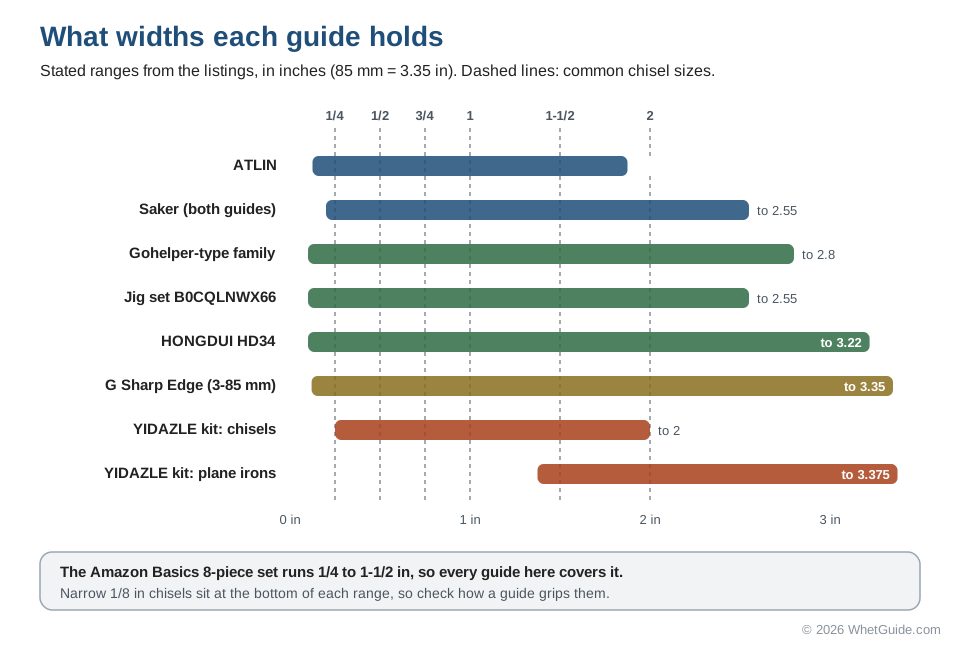
The bottom of the range deserves more suspicion than the top. A listing that says 0.1 inch means the jaws close that far. It doesn't promise a 1/8 inch chisel will stay square under pressure, and Woodsmith's comparison of classic guides found that a single-point clamp can let narrow chisels slip or pivot. If you own a lot of narrow chisels, see narrow and short chisels.
↑ Back to all sectionsKits with a fixture and a stone in the box
A kit adds two things to a bare guide: an angle fixture that sets the projection for you, and usually a diamond plate. Whether that's worth it comes down to how you'd rather set an angle. With a bare guide you measure once and mark a stop block. With a kit you set the fixture to a number and slide the blade against its positioning block.
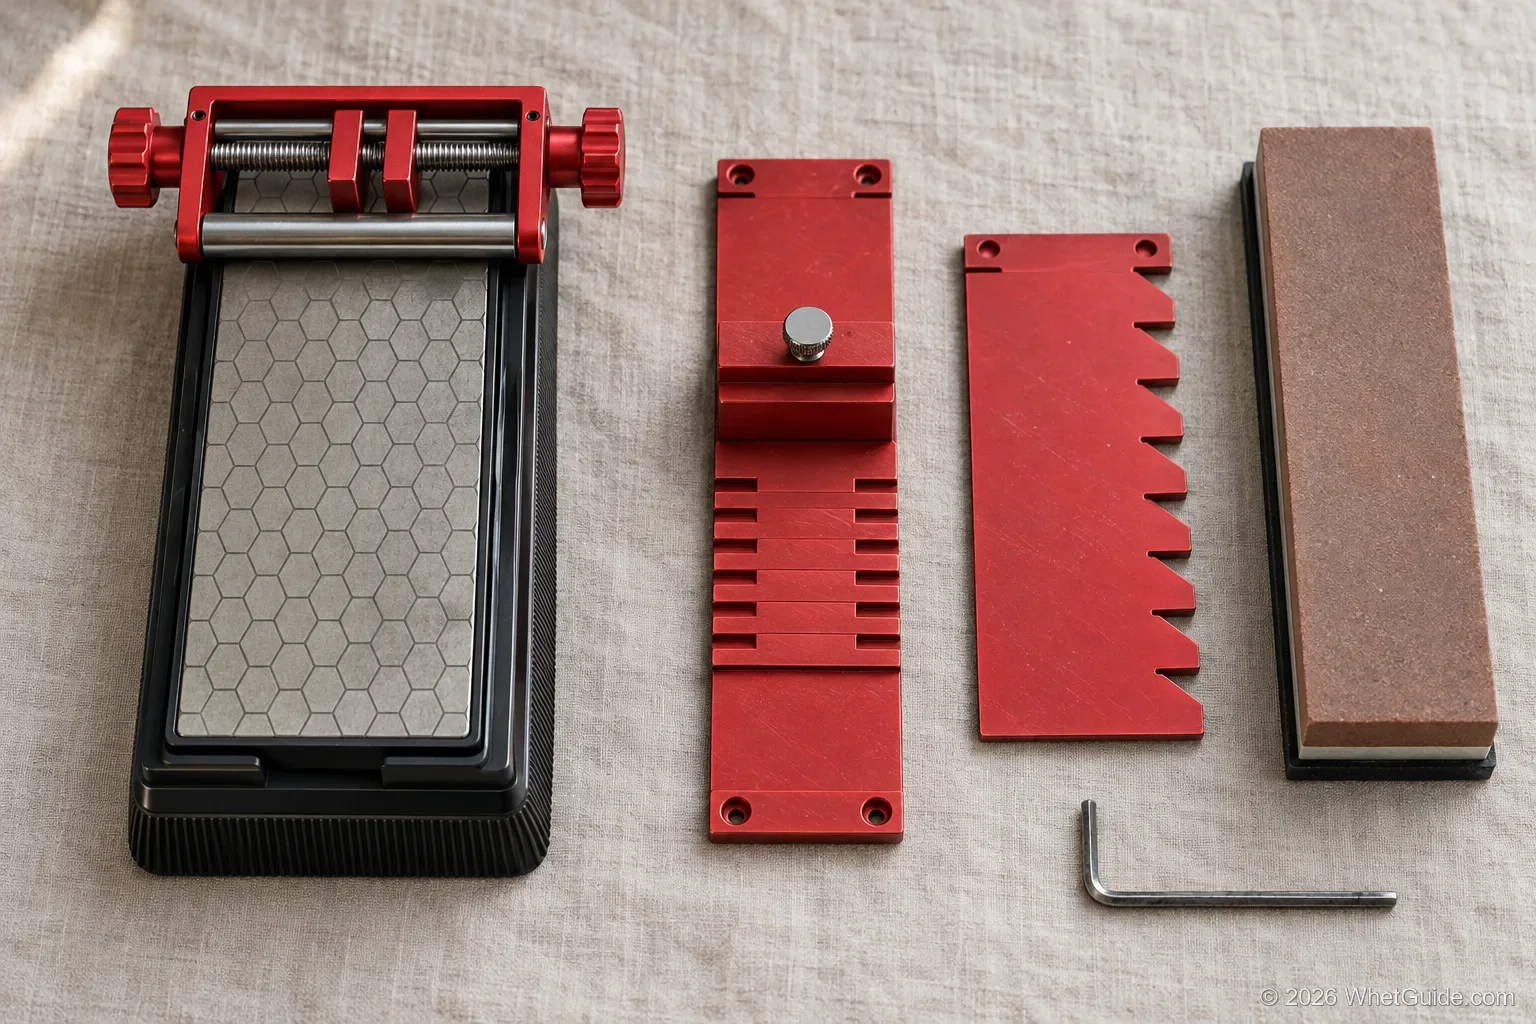
| Kit | What the listing includes | Stars (ratings) | Our read |
|---|---|---|---|
| Gohelper kit | Jig, angle fixture, 10 to 45 degree gauge, one 400/1000 diamond stone | 4.6 (126) | Our kit pick |
| Same jig, no stone | Jig, angle fixture, 10 to 45 degree gauge; title says excluding stone | 4.5 (524) | Buy this one if you already own stones |
| Same jig, two stones | Jig, fixture, gauge, two stones (400 and 1000 per the bullets) | 4.5 (163) | Same jig; the extra stone is the difference |
| Jig set | Jig, gauge, fixture, stone; 0.1 to 2.55 in | 4.5 (301) | Narrower range than the family above |
| Jig and guide kit | Fixture and 10 to 45 degree gauge, 400/1000 diamond stone, 0.1 to 2.8 in | 4.2 (98) | Same idea, lower stars |
| Kit with bag | Jig, 400/1000 diamond stone, non-slip base, angle guide, bag | 4.0 (72) | Lowest rated kit we found |
| YIDAZLE kit | Jig plus five diamond stones, 400 to 1200; chisels 1/4 to 2 in, plane irons 1-3/8 to 3-3/8 in | 4.3 (52) | Most grits; short record |
One jig, three listings
Three of these listings share the same title stem: "Chisel Sharpening Jig, Wood Honing Guide for Chisels and Planes Width 0.1" to 2.8"" with an angle fixture and a 10 to 45 degree gauge. B0DZ2P89BS comes with one stone, B0D1XRR8N7 with none, and B0FPLGW45W with two. The jig looks the same in all three. That means the 524 ratings on the stoneless version tell you more about the jig than the 126 on the kit we picked, so read both before you buy. Buy the stoneless version if you already own a decent whetstone or diamond plate. A kit stone is a 400/1000 plate that gets a chisel working, and you'll want something finer for a polished edge.
Kit or guide plus stone?
A kit needs no choices: one box, one order. A separate guide and stone take more picking and let you choose a stone that goes past 1,000 grit. If you're starting from nothing and want to be cutting this weekend, the Gohelper kit gets you there. If you'll still be sharpening chisels in five years, put the money into the stone and buy a plain guide like the ATLIN. Kit fixtures save time on each setup, but a stop block does the same job once you've made one.
↑ Back to all sectionsWhat stone does each jig need?

A jig fixes the angle. It does nothing without a flat, sharp abrasive. A rough rule that works for chisels: a coarse stone around 400 to 1000 grit to raise a burr, then a finer stone to polish, then a strop.
- Whetstones: a two-sided set like the Intelitopia 400/1000 and 3000/8000 kit, which per its listing includes a flattening stone, works with any roller guide. See our whetstone picks.
- Diamond plates: they don't dish, so they stay flat longer. The SHARPAL 121N dual-grit diamond stone is the best-selling one in the search; see diamond stone picks.
One more option is the Amazon Basics 8-piece chisel set. It comes with six chisels, a honing guide and a 120/240 grit stone (per the listing), which is a way to start without buying each piece. The stone is coarse, so you'll want something finer to finish.
Which abrasive under a roller guide
| Abrasive | Under a guide | Upkeep | Example |
|---|---|---|---|
| Waterstone (whetstone) | Fine grits available; slurry gets on the roller | Flatten regularly; it dishes with use | Sharp Pebble 1000/6000, KING KW65 1000/6000 |
| Thin waterstone | 0.6 in thick per its listing; keep it on a base | Flatten as it wears | Shapton Pro #1000 |
| Coarse waterstone | Sets a new bevel or removes a chip | Dishes fastest of all | Naniwa Chosera 400 |
| Diamond plate | Stays flat; the 162N listing says sharpen dry | Wipe clean; no flattening | SHARPAL 162N, 325/1200 |
| Diamond plate set | Several grits as separate plates | Wipe clean | 5-plate set, 400 to 1200 |
| Oilstone | Works; oil ends up on the roller | Flatten occasionally; see stone oil | See Arkansas stones |
| Sandpaper on glass | Cheapest flat surface; Gochnour's Fine Woodworking piece pairs it with off-the-stone guides | Replace sheets | See sandpaper on glass |
Grits for a guided chisel
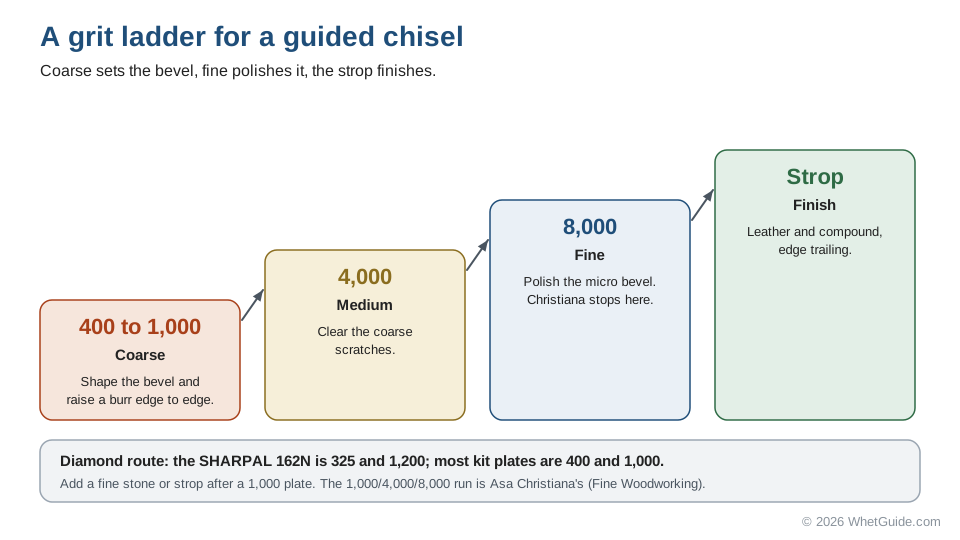
Christiana's guided routine runs 1,000, 4,000 and 8,000 grit. Start coarser only when you're setting a new bevel or grinding out a chip, since a 400 stone takes off steel fast and leaves deep scratches to remove. Most of the time a chisel only needs the micro bevel refreshed, and that starts on the fine stone.
The kit plates stop at 1,000 grit, or 1,200 on the five-plate sets. That is well short of Christiana's 8,000, so plan on a finer stone or at least a strop after it. The grit progression chart shows where intermediate stones fit.
Flatness: a dished stone undoes any jig
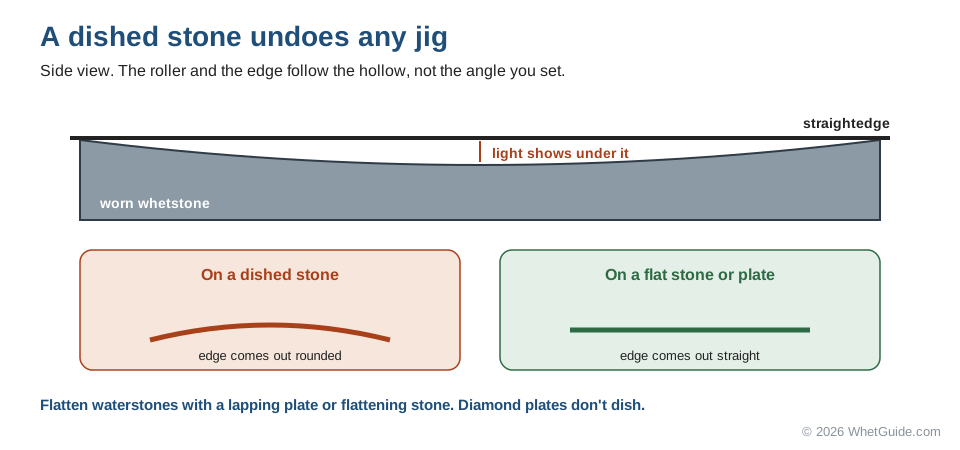
A guide copies whatever surface it rolls on. On a stone worn hollow down the middle, the roller drops into the dip while the edge rides the slope, so the angle changes along the stroke and the bevel comes out rounded.
Check with a straightedge across the stone and along it. If you see light underneath, flatten before you sharpen. A SHARPAL 145H lapping plate (listed flat to plus or minus 0.002 inch) or a Sharp Pebble 120/320 flattening stone does it; our flattening stone picks compare more. The step-by-step is in how to flatten a whetstone. Diamond plates skip this chore.
Finish on a strop
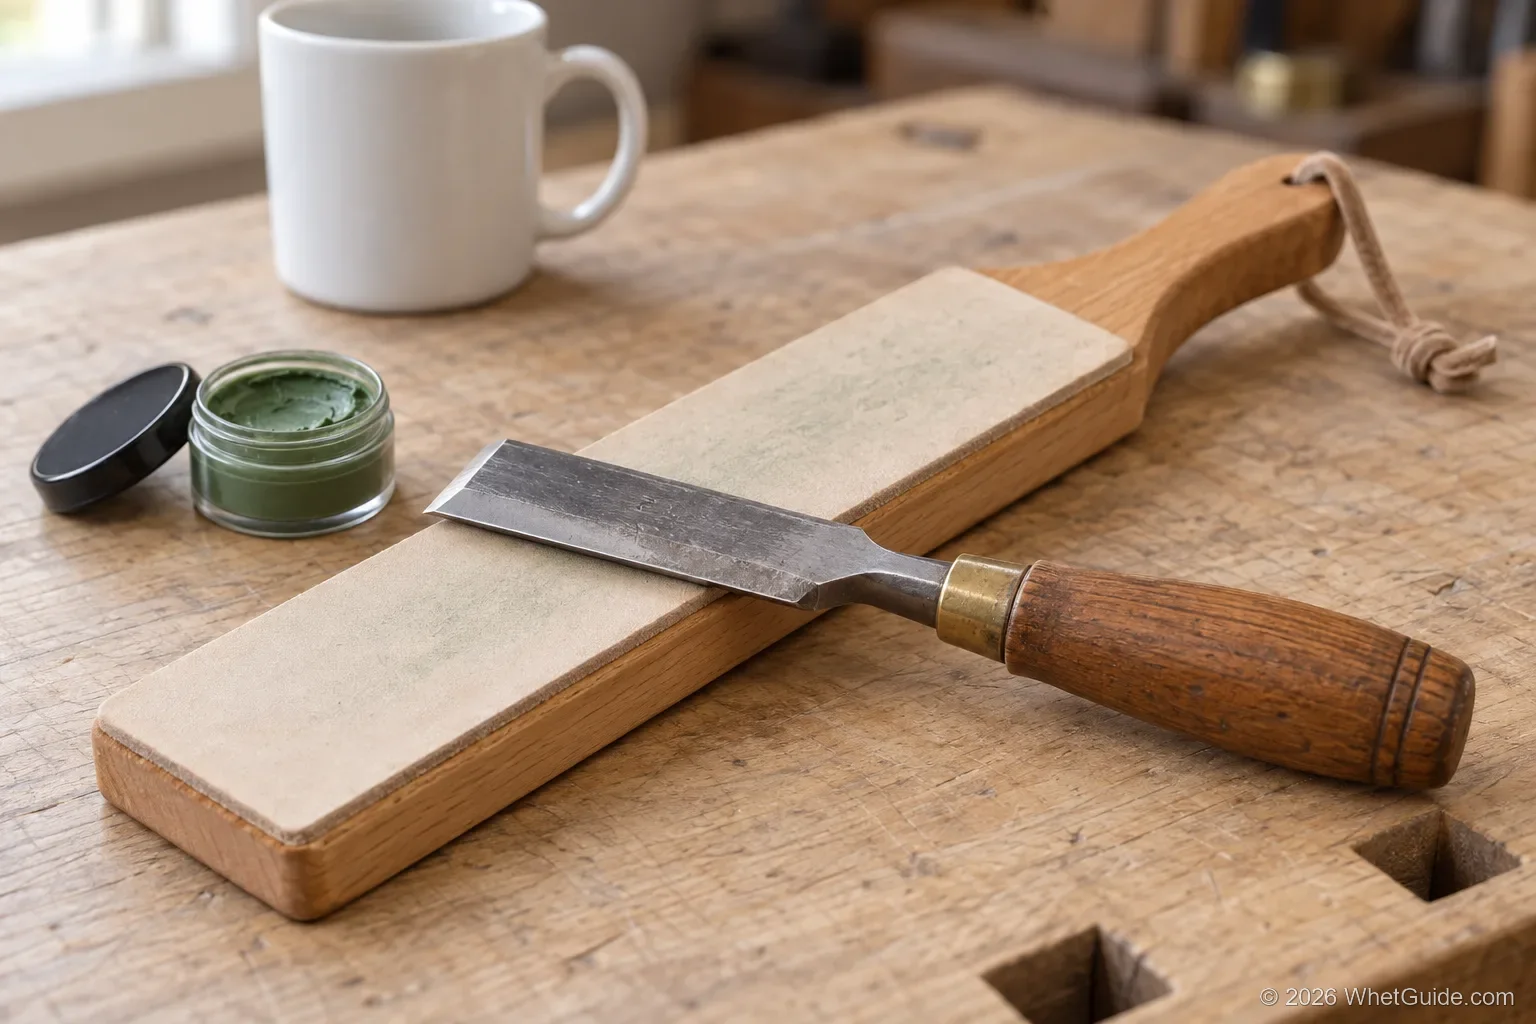
A strop takes the edge past the last stone and cleans up what's left of the burr. Take the chisel out of the guide for it; stropping is a light, edge-trailing pull, and the motion is in our stropping guide. The Bacher 12.6 inch strop comes with four compounds and lists woodworking chisels and plane irons among the tools it's for. The ANGERSTONE double-sided strop is 14 by 2 inches with a handle, and its title names chisels. Between full sharpenings, a few passes on the strop bring a slightly dull chisel back without putting it in the guide at all.
Three setups, from starter to full bench
| Setup | What to buy | Gets you | Missing |
|---|---|---|---|
| Starter | ATLIN plus a SHARPAL 121N diamond stone | A guided edge on a surface that stays flat | A fine polish; add a strop later |
| One box | Gohelper kit, or the stoneless jig plus your own stone | Angle fixture and gauge plus a 400/1000 plate | Anything finer than 1,000 grit |
| Full bench | Guide, a 1000/6000 or 3000/8000 waterstone, a lapping plate, a strop | Christiana-style progression and a way to keep it flat | Nothing for chisels; add a coarse stone for repairs |
| You already own kitchen whetstones | Just a guide | Most of the full-bench setup; the Sharp Pebble 1000/6000 listing names chisels among its tools | Check the stone for flatness first; knife use can wear it hollow |
Setting up and using a jig
Every jig on this page comes down to the same setup, and the review of Lee Valley's Veritas side-clamping guide at Wood Review, an Australian woodworking magazine, spells out the habits that carry over to the cheaper guides. This page covers the jig side of the job. Flattening the back, the stroke on the stone and taking off the burr are the same with any guide, and they're laid out step by step in how to sharpen a chisel. Do the back first. A guide can't fix a chisel whose back isn't flat near the edge.
- Seat the chisel fully and square. Wood Review warns that the small clamping ledges on that guide let a blade shift out of alignment if it isn't fully seated, so check before you tighten.
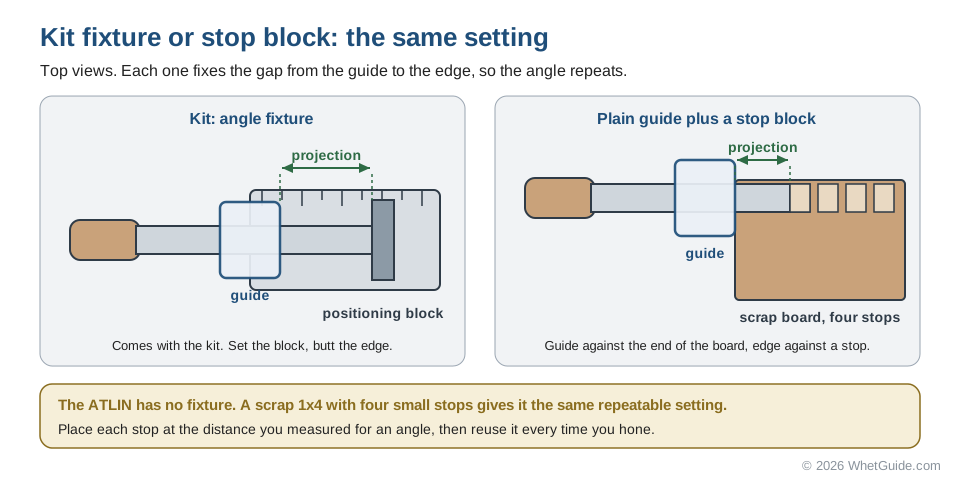
- Set the projection from a template. The Veritas ships a paper angle template: extend the blade to the mark for your angle. The reviewer suggests copying it onto a scrap of wood or plywood for a permanent gauge. A shop-made stop block does the same job for an ATLIN or Saker. The Gohelper and HONGDUI fixtures are that stop block, built in.
- Clamp. On the Veritas, wide plane irons get extra force from a small Allen screw in the thumbwheel; on the guides here, tighten the knob until the blade can't twist.
- Work the coarse stone until you raise a burr along the full width. See the burr guide for how to feel it.
- Move to the finer stone and repeat. Fine Woodworking's author works up to 8,000 grit with a guide.
- Add a micro bevel by retracting the blade slightly in the guide. Fine Woodworking's honing-guide test notes that some guides adjust for a micro bevel without unclamping; on the rest you slide the blade back about 1/8 inch. Fine Woodworking also lists burr removal with the blade still mounted as a feature of a few guides.
- Strop or finish freehand. The Wood Review tester got good sharpness from the guide and then finished freehand on a fine stone for a razor edge.
Projection numbers, and why yours may differ
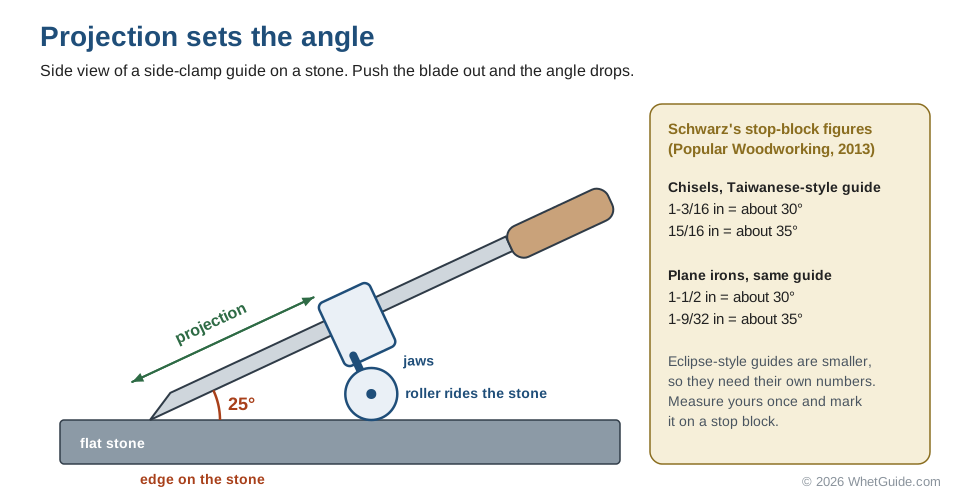
Christopher Schwarz published a set of stop-block numbers for the common Taiwanese-style side-clamp guide in Popular Woodworking back in 2013, and they still get passed around. For chisels: 1-3/16 inches of projection gives about 30 degrees, and 15/16 inch gives about 35. For plane irons in the same guide: 1-1/2 inches for about 30 and 1-9/32 for about 35.
Those numbers belong to that guide style. Schwarz says Eclipse-style guides are smaller and need their own measurements, and the Lie-Nielsen and Eclipse-style table on our woodworking tools page gives 1-9/16 inches for 30 degrees on an Eclipse-style guide, against Schwarz's 1-3/16 on the Taiwanese style. That gap is why a chart from one maker can't be trusted on another maker's guide.
Make a stop block
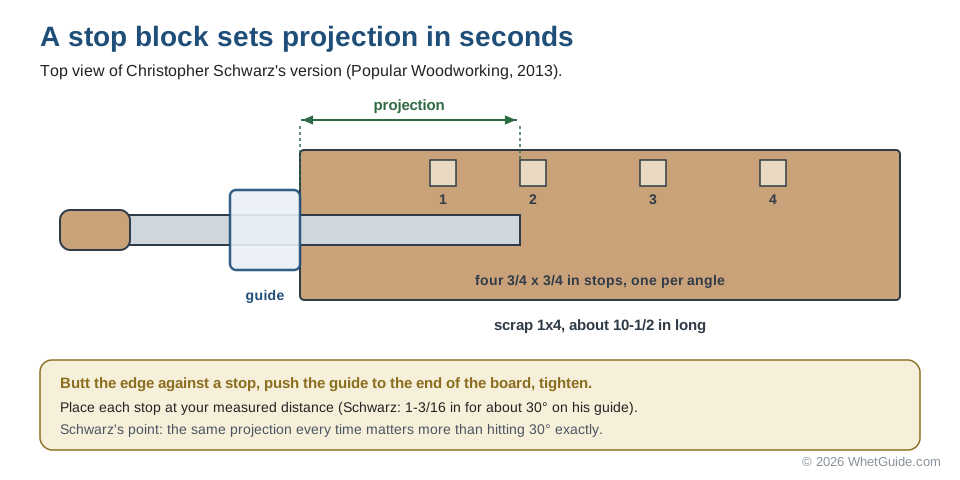
So measure your own once. Clamp a chisel at a guessed projection, set the guide on the stone, and check the angle with a digital angle gauge or a bevel gauge. Adjust until it reads what you want, then measure the projection with a rule and write it down. Do it for each angle you use.
Schwarz's version is a scrap board about 10-1/2 inches long, cut from a 1x4, with four small stops (3/4 by 3/4 inch) glued on at set distances from the end. You butt the chisel's edge against a stop, slide the guide up to the end of the board, and tighten. His line on it is that consistency matters more than accuracy: if every chisel goes in at the same projection, every edge comes out at the same angle, even if that angle is 29 degrees instead of 30. Label the stops with a pencil and keep the block with the guide. If you own two guides, make a block for each.
| Stop | Use for | Set it by |
|---|---|---|
| 1 | Chisel primary bevel | Your measured number for 25 degrees |
| 2 | Chisel micro bevel | Your number for 30 degrees (Schwarz: 1-3/16 in on his guide) |
| 3 | Plane iron primary bevel | Your number for 25 degrees |
| 4 | Plane iron micro bevel | Your number for 30 degrees (Schwarz: 1-1/2 in) |
Seat the blade square
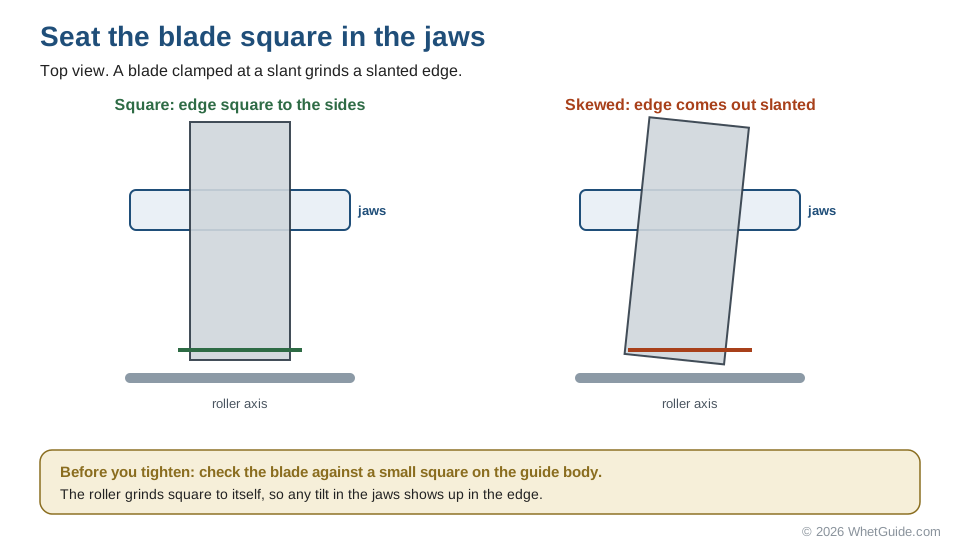
A guide grinds the edge parallel to its roller. If the blade sits a few degrees off in the jaws, the edge comes out a few degrees off square to the sides. Self-centering jaws like the ATLIN's help, and Wood Review's warning about blades shifting on small ledges applies to every guide. Before the final turn of the knob, hold a small square against the side of the blade and the guide body. If you can't get a reading, lay the clamped assembly on a sheet of paper with a line drawn square to the edge of a board, and check by eye.
The micro bevel in a guide
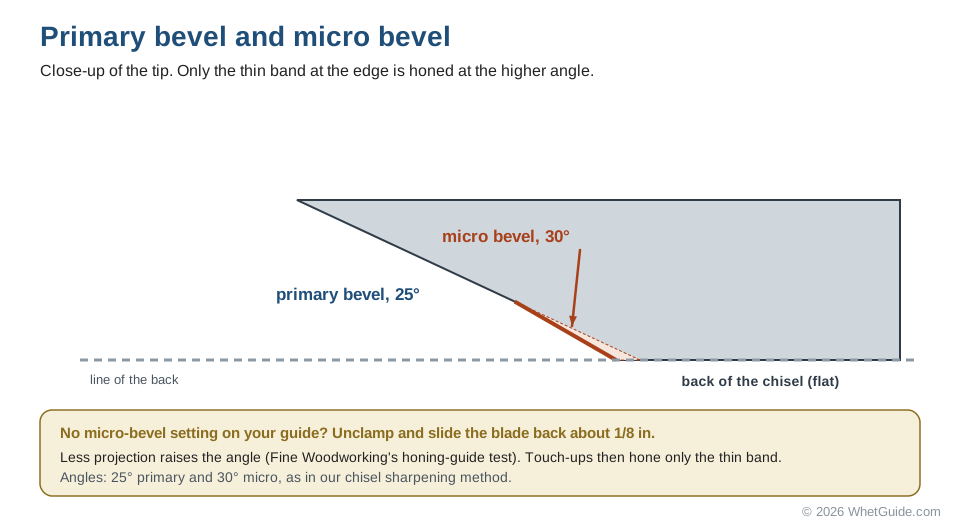
Cliff Colley's eight-guide test for Fine Woodworking describes the two ways guides handle it. Some have a secondary-bevel adjustment you set without unclamping. On the rest you loosen the blade and slide it back about 1/8 inch, which raises the angle. Colley's case for bothering is that a secondary bevel makes for a beefier edge that is easier to touch up later. None of the seven listings mentions a micro-bevel adjustment. On the bare guides that means the slide-back method or the second stop on your block; on the kits, you reset the fixture a few degrees higher.
The micro bevel is also why guides save time over the life of a chisel. Each sharpening only hones the thin band at the tip. When that band grows to most of the bevel, you go back to the primary stop and regrind. The chisel guide has a no-measure shortcut for setting it.
↑ Back to all sectionsRoller width and short chisels
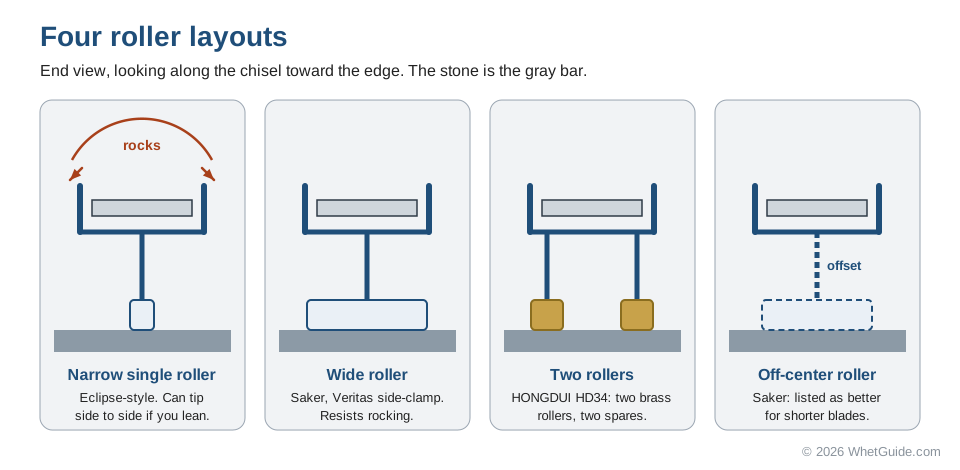
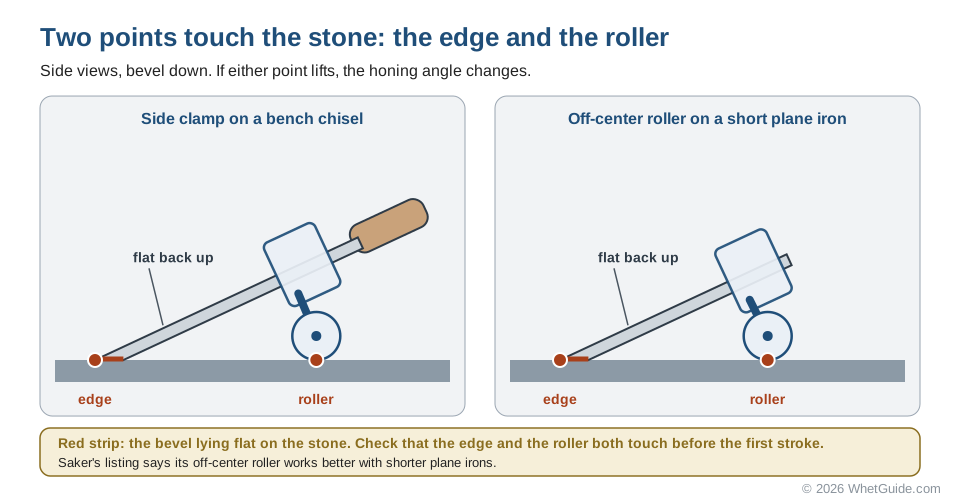
A narrow roller can let the guide rock side to side as you push, which rounds the edge across its width. Wood Review notes the Veritas's wide brass roller reduces rocking compared with narrower designs like the Eclipse style, and the Saker listing makes the same point about its widened roller's stability. So the Saker and the HONGDUI (two brass rollers) are worth a look over the narrowest clones.
Chisel length matters too. The Veritas side-clamping guide has an upper ledge for most chisels and a lower one for shorter blades, and Raf Nathan, reviewing it for Australian Wood Review, lists as its main drawback that it can't hold Japanese chisels, which have shorter blades. If you own Japanese chisels, check the minimum blade length before you buy any guide, and treat the Saker's off-center roller as the one our listings say is built for short blades. Fine Woodworking's tests, for context, found all eight guides it tested held blades from 1/8 to 2-7/8 inches wide, which is the range to expect from a normal guide.
What rocking looks like on the edge
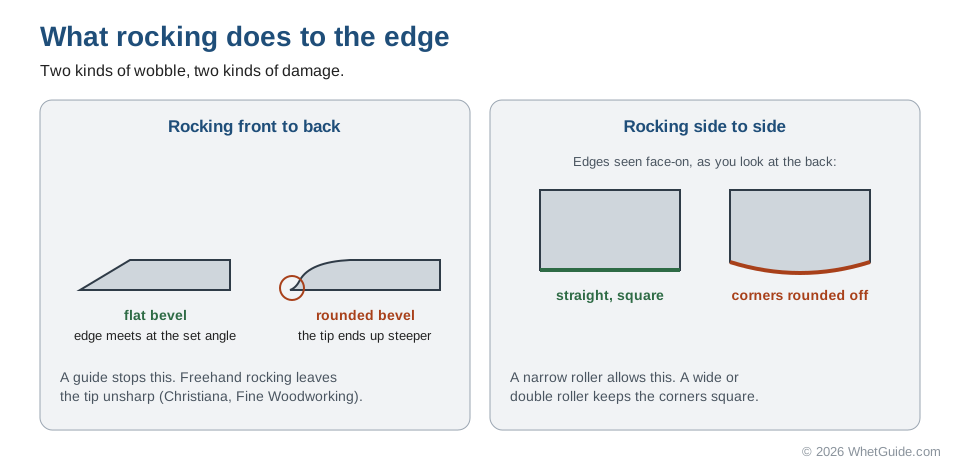
Christiana's case for guides rests on the front-to-back kind: freehand, a slight rock on each stroke rounds the bevel, and the very tip never gets sharp. A guide fixes that, since the roller holds the angle. It doesn't automatically fix side-to-side rocking. Pressing harder on one corner than the other on a narrow roller tips the guide, and the corners get ground back. Keep finger pressure centered on the blade near the edge and the problem mostly goes away.
Narrow and short chisels
| Problem | Why | What helps |
|---|---|---|
| Narrow chisel pivots in the jaws | Woodsmith: a single-point clamp can let narrow chisels slip or pivot | Self-centering jaws; light pressure; recheck square mid-session |
| Narrow chisel in a bulky guide | Woodsmith found the Veritas Mk.II can feel bulky on narrow chisels | A smaller side-clamp guide |
| Short blade can't reach the stone | The jaws need blade behind them and projection in front | Saker off-center roller; a lower ledge on guides that have one |
| Short Japanese chisel | Short blade, per Wood Review | Woodsmith points to the Sharp Skate 2; otherwise freehand |
| Edge rounds at the corners | Narrow roller tips under uneven pressure | Wide or double roller; center your fingers |
Japanese chisels
None of the Amazon guides here is built around the short blades of Japanese chisels, though the Saker's off-center roller is the closest. Freehand is the other route, and our chisel guide covers how to set up and hone a Japanese chisel, including the hollow back.
Other designs: premium guides and off-the-stone jigs
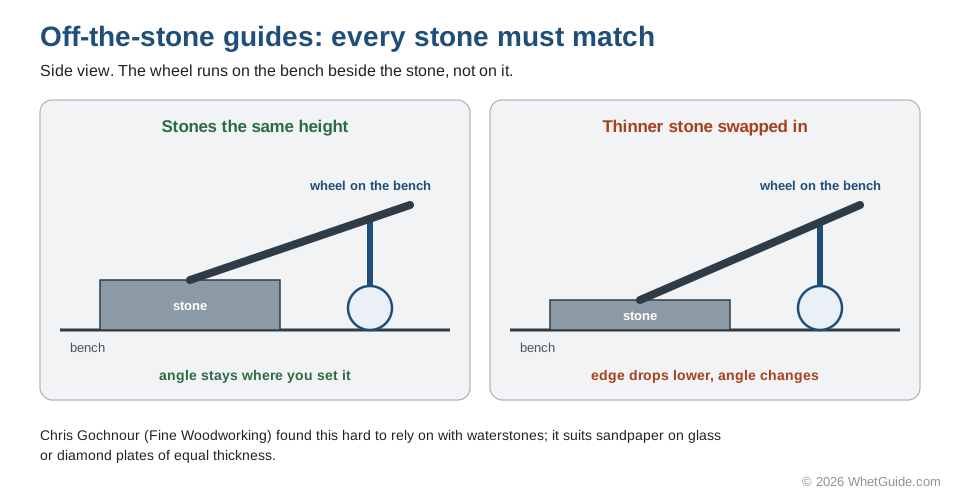
Older magazine tests also cover off-the-stone guides, where the wheels run on the bench beside the stone instead of on it. Gochnour looked at three of them (the Fritsche, the Alisam sled and the General 809) and ranked the Fritsche first. The catch is that every stone you use has to be the same height, or the angle changes when you switch grits. He found that hard to rely on with waterstones, and more workable with sandpaper on glass or diamond plates of equal thickness. If you've already settled on diamond plates, it's a design to know about.
Then there are the premium side- and face-clamp guides from Lie-Nielsen and Veritas. In Gochnour's 2019 Fine Woodworking test, the Lie-Nielsen and the Veritas Mk.II Deluxe were his top picks, and he wrote that no single guide did everything perfectly. They aren't in our cards because we stuck to guides with a long owner record on Amazon. If you sharpen every day, they're worth reading about.
↑ Back to all sectionsTroubleshooting a honing guide
| Symptom | Likely cause | Fix |
|---|---|---|
| Edge comes out skewed | Blade not square in the jaws | Square it to the guide body before tightening; see seat the blade square |
| Blade creeps back during strokes | Clamp too loose, or oily blade | Wipe the blade dry; tighten until it can't twist |
| Burr forms on one corner only | Uneven finger pressure, or skewed seating | Center the pressure; recheck square |
| Corners rounded off | Rocking on a narrow roller | Center the pressure; consider a wider roller |
| Bevel rounded front to back | Dished stone | Flatten the stone |
| No burr after many strokes | Projection changed, so you're honing a new angle; or the stone is glazed | Check projection; refresh or clean the stone |
| Roller feels gritty or jumps | Slurry and steel dust on the roller | Wipe the roller and the stone surface |
| Angle different each time | Projection set by eye | Make a stop block or use a fixture |
| Burr won't come off | Back not flat near the edge | Flatten the back; see the burr step |
| Short blade tips the guide | Not enough blade behind the jaws | Off-center roller or freehand |
Five benches, five answers
| Your bench | Guide | Add | Why |
|---|---|---|---|
| A new Amazon Basics chisel set | The one in the box | A SHARPAL 121N or a 1000/6000 whetstone, then a strop | The included 120/240 stone is too coarse to finish on. Replace the guide only if it won't clamp square. |
| Restoring flea-market hand planes | Saker off-center | A coarse stone such as the Naniwa 400 for new bevels | Reaches 2.55 in, past the ATLIN, and is listed for short blades |
| A set of mortise chisels | A face-clamping guide, or none | Nothing special | Tall square sides rule out side clamps; see mortise chisel angles |
| A finish carpenter on job sites | G Sharp Edge | Nothing | Brings its own diamond hones and fits a tool bag |
| A beginner who wants numbers | Gohelper kit or HONGDUI HD34 | A finer stone later | The fixture removes the measuring step. Plan on a finer stone once the kit plate has set the bevel. |
Looking after the guide
| When | Do this | Why |
|---|---|---|
| After every session | Rinse slurry off the roller and jaws, dry the guide | Grit under the roller lifts one side; wet steel rusts |
| When the knob feels stiff | Clean the thread and add a drop of light oil | Grit in the thread stops you clamping tight |
| When the roller drags | Clean the axle; replace the roller if it has a flat | A flat roller bumps and changes the angle |
| Before a new chisel | Check the jaws close square on a known-square blade | Bent or worn jaws skew every edge |
| When storing | Keep it with its stop block, out of the slurry | Saves resetting projections |
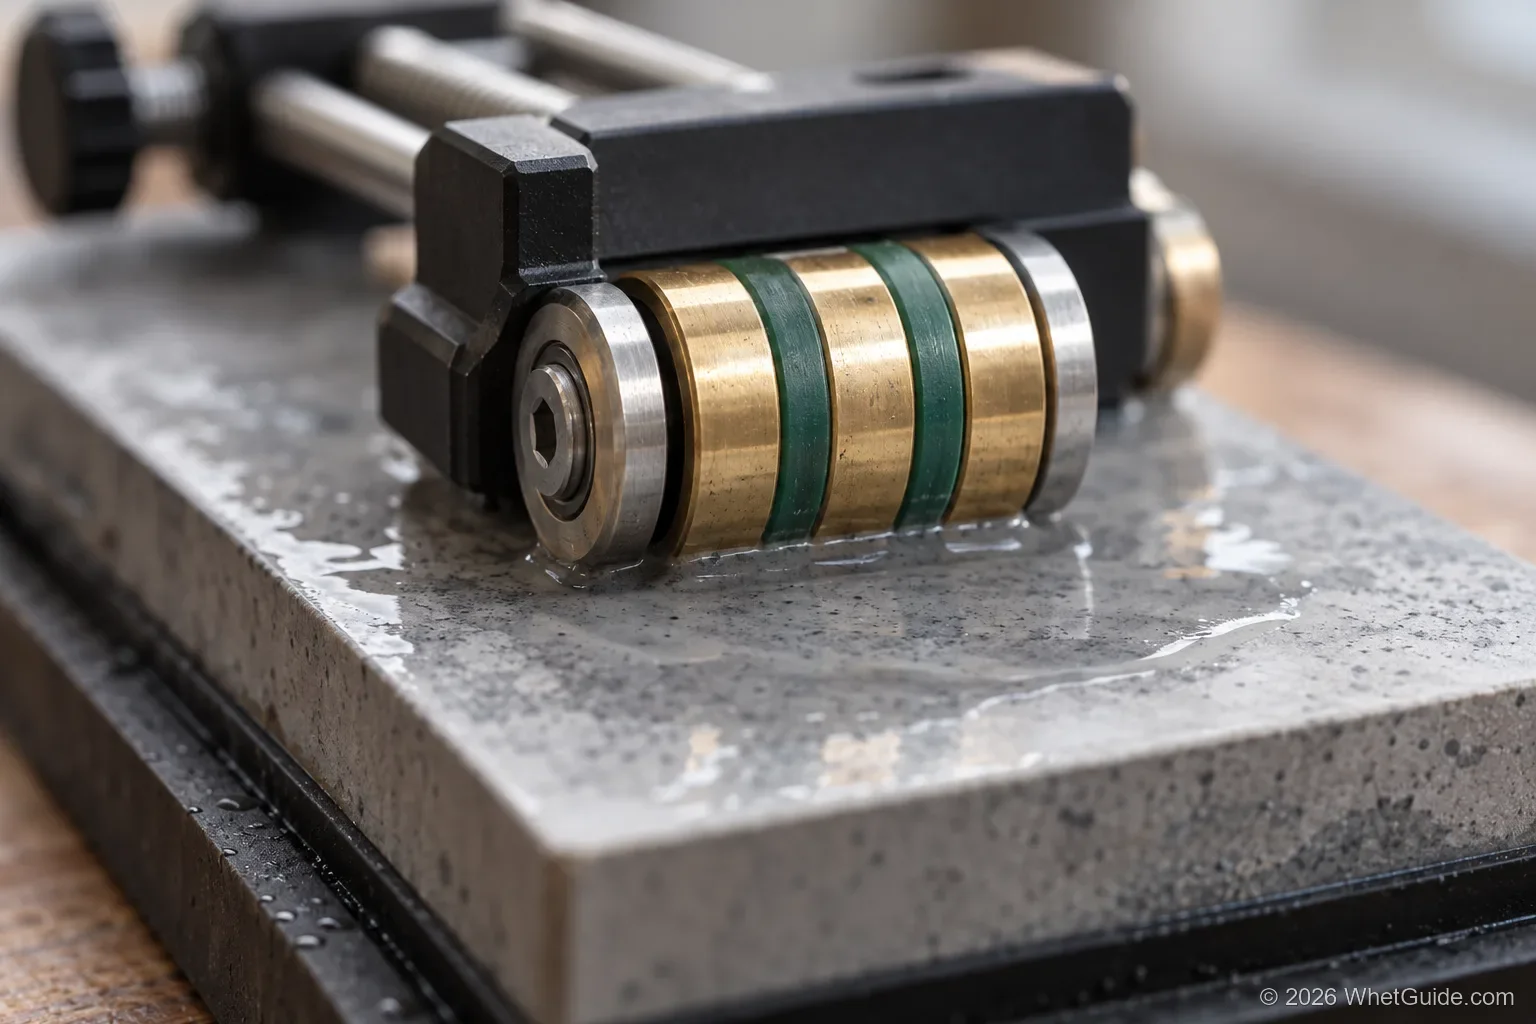
Materials make a difference to how much of that you'll do. The ATLIN's roller is hardened steel, which the listing says won't wear flat spots. The Sharp Pebble pairs a stainless body with a bronze bearing. The Saker and Gohelper bodies are aluminum alloy, which won't rust. The HONGDUI ships with spare brass rollers, the one guide here that plans for roller wear. The chisels need care too. Paste wax keeps rust off between sessions, and our chisel guide has a full section on storing chisels.
↑ Back to all sectionsDo you need a jig at all?
Plenty of good woodworkers say no. Christiana wrote in 2012 that about half the teachers he knows advise honing by hand, and that he thinks it's poor advice for hobbyists. His reasoning: a pro sharpens every day and builds the muscle memory, while a hobbyist sharpens a few times a month and never does. A guide holds the angle for the hobbyist across every grit.
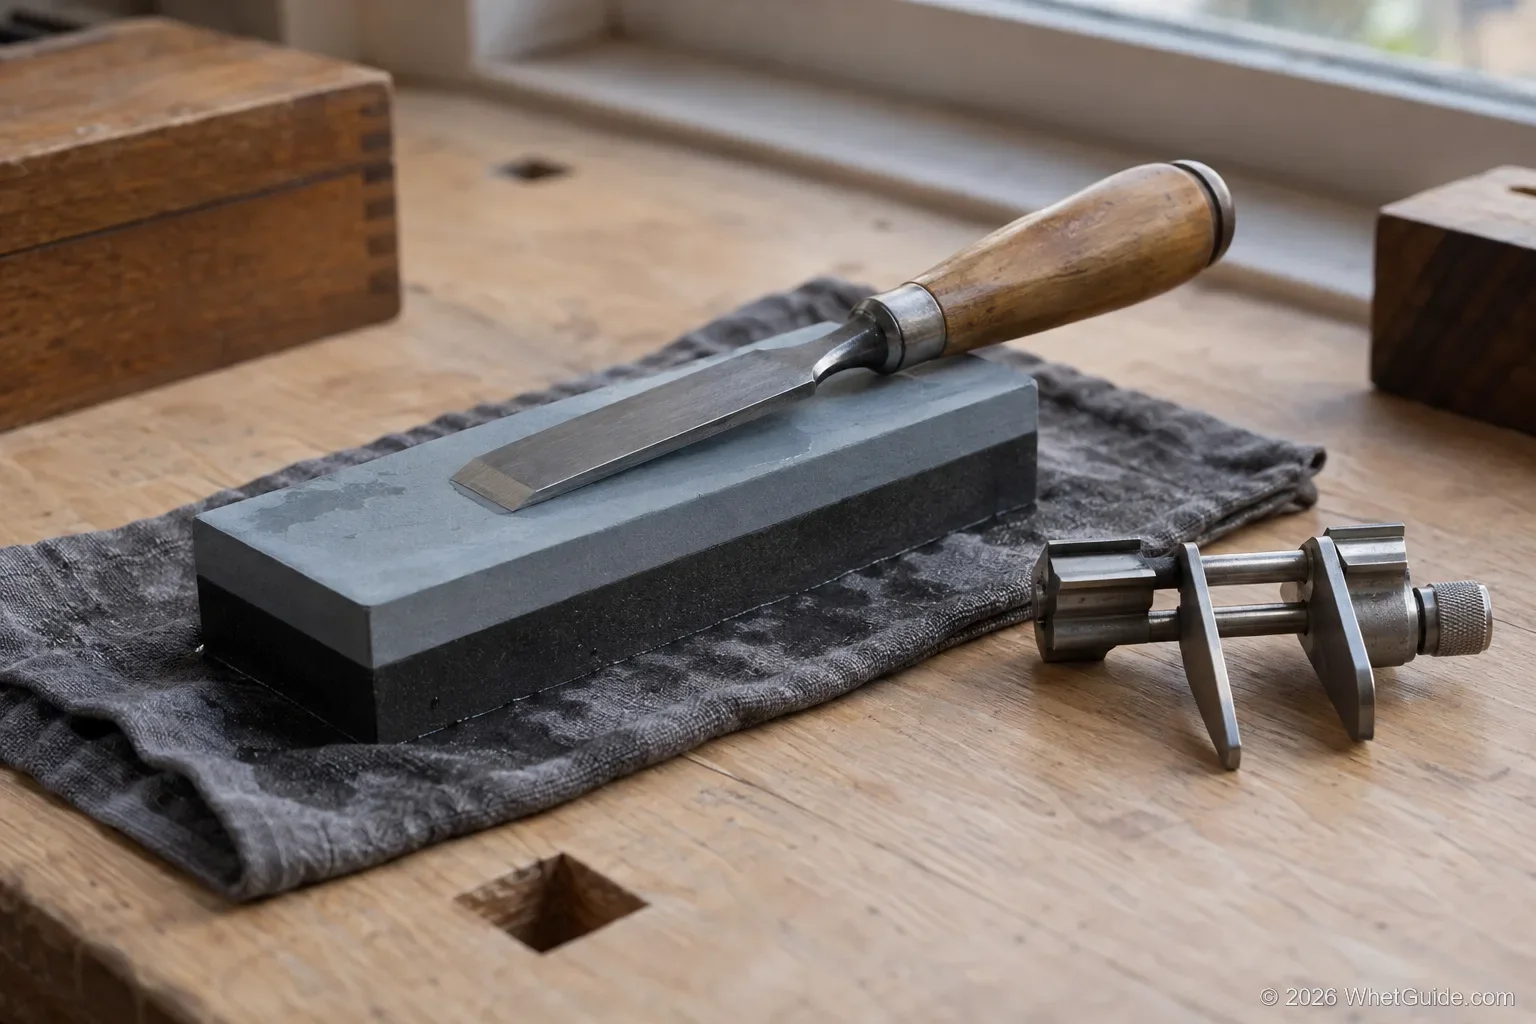
The case for freehand is speed. There's no clamping or projection to set and no stop block, so a quick touch-up takes less time. Freehand also handles the chisels guides can't hold: Japanese chisels, mortise chisels, skews. Our view: buy a guide, learn the stroke with it, and try freehand on touch-ups once you know what a correct bevel feels like on the stone. The freehand method is in our chisel guide under no honing guide.
Myths about chisel jigs, checked
| Myth | What the sources say |
|---|---|
| "Any guide fits any chisel" | Family Handyman: side clamps only grip sides that taper under 1/16 inch |
| "A good jig makes the stone less important" | The guide copies the stone. A dished stone gives a rounded edge in any jig |
| "Expensive guides are perfect" | Gochnour, testing the premium guides: no single guide did everything perfectly |
| "Kit diamond plates need flattening like waterstones" | Diamond plates don't dish; one kit listing says they never need flattening |
| "A high star rating means a better guide" | Stars from 60 owners and from 6,000 aren't comparable; read the count |
| "Projection charts work on every guide" | Schwarz: Eclipse-style guides need their own numbers |
| "A honing guide works on a grinder" | No. Grinders use tool rests and grinding jigs like the BG-GRIND4 |
Not a honing guide: grinder jigs
Search "chisel sharpening jig" and you'll also see grinder systems like the BG-GRIND4 grinding jig. Its listing says it replaces the light-duty tool rests on a bench grinder and holds lathe gouges and skews as well as chisels against the wheel. That's a shaping tool for a powered grinder. It won't roll on a stone, and it isn't a substitute for any guide on this page. If you need to regrind a chipped chisel on a grinder, our chisel guide covers fixing a chipped chisel.
How to choose
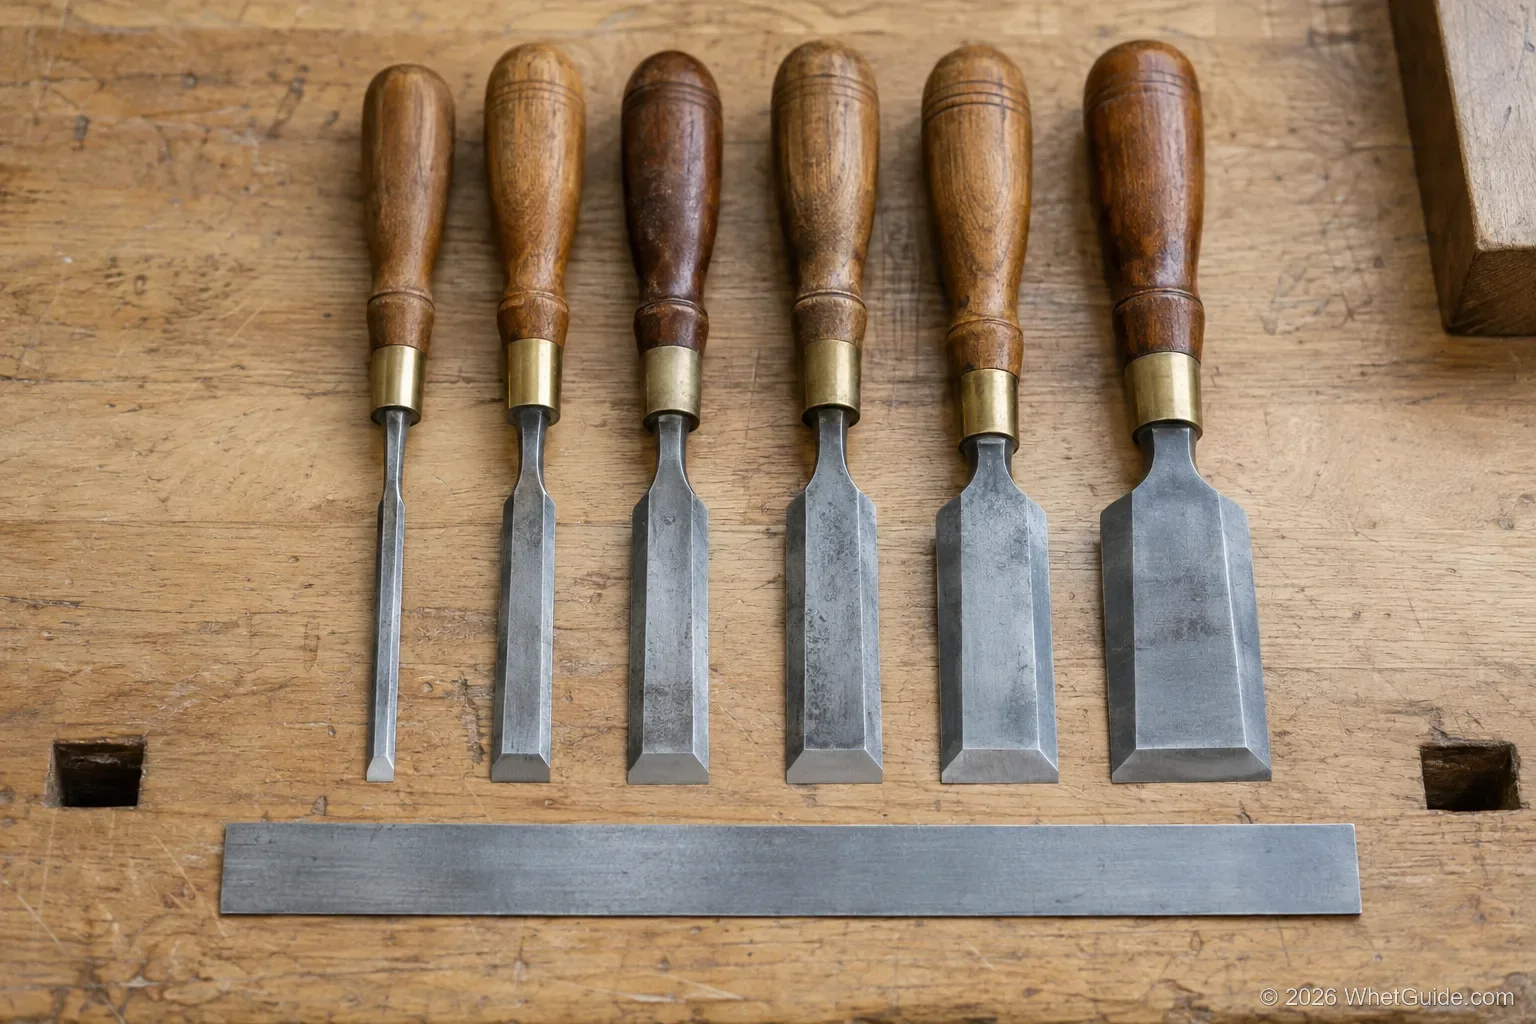
- Look at the chisel before the jig. Measure the width of your narrowest and widest, and look at the sides. If they taper, a side clamp works. If they're thick and square, look at a guide that clamps top and bottom.
- Count how many tools you sharpen. A single set of bench chisels is fine with an ATLIN. If you restore planes, the off-center Saker helps with short irons. If you sharpen on job sites, look at the G Sharp Edge.
- Decide how you'll set the angle. A ruler and a chart from the maker works but is slow. An angle fixture is faster and repeatable, and it's what the Gohelper and HONGDUI add. A bevel gauge works too. The angle chart lists common figures.
- Last, the stone: budget for a flat one, and add a strop for the final polish.
Before you click buy
- Your widest blade is inside the listed width range, with room to spare.
- Your chisels' sides taper under 1/16 inch, or the guide clamps the face.
- Your shortest blade is long enough for the jaws, or the roller is off-center.
- The roller is wide, or there are two.
- You know how you'll set projection: chart, stop block or fixture.
- You own a flat stone, or the kit includes one, and you have a way to keep it flat.
- The stone is long enough for a full stroke with the roller behind the edge. A standard 8 by 2-1/2 inch stone like the KING KW65 leaves room; the SHARPAL 162N is 8 by 3 inches for wider irons.
- The rating count is large enough to mean something, or you accept an unproven design for a feature you want.
If you only buy one
The ATLIN honing guide, with a flat diamond plate or a combination waterstone you're willing to flatten. If you sharpen plane irons over 1-7/8 inches or short block-plane irons, the Saker off-center guide instead. For the steps that come after the purchase, go to how to sharpen a chisel, and for planes and spokeshaves, how to sharpen woodworking tools.
Sources: Amazon listings and search data pulled Oct 29 and rechecked Nov 15, 2026; Wood Review, Tested: Veritas side-clamping honing guide; Fine Woodworking, Honing guides; Fine Woodworking, A honing guide is the great equalizer; Popular Woodworking, Christopher Schwarz, "Sharpening Angles for Dullards" (2013); Woodsmith, "10 precision honing guides"; Fine Woodworking, Chris Gochnour, honing guide tool test (2019) and "A Look at Off-the-Stone Honing Guides"; Family Handyman's side-clamp note as cited in our chisel guide. How we research · Affiliate disclosure. As an Amazon Associate we earn from qualifying purchases.