- 25°Primary bevel Lie-Nielsen grinds on its plane bladesLie-Nielsen
- 35°Honing angle in the guide, leaving a 10° micro bevelLie-Nielsen
- <1°Lift from the ruler trick when finishing a plane iron's backLie-Nielsen
- 4Strokes on 1,000 grit to raise a wire edge on a blade in decent shapeLie-Nielsen
- 4 to 6Times you can re-burnish a scraper before filing it againWoodcraft, Scrapers Demystified
Quick answer: five moves for every edge tool
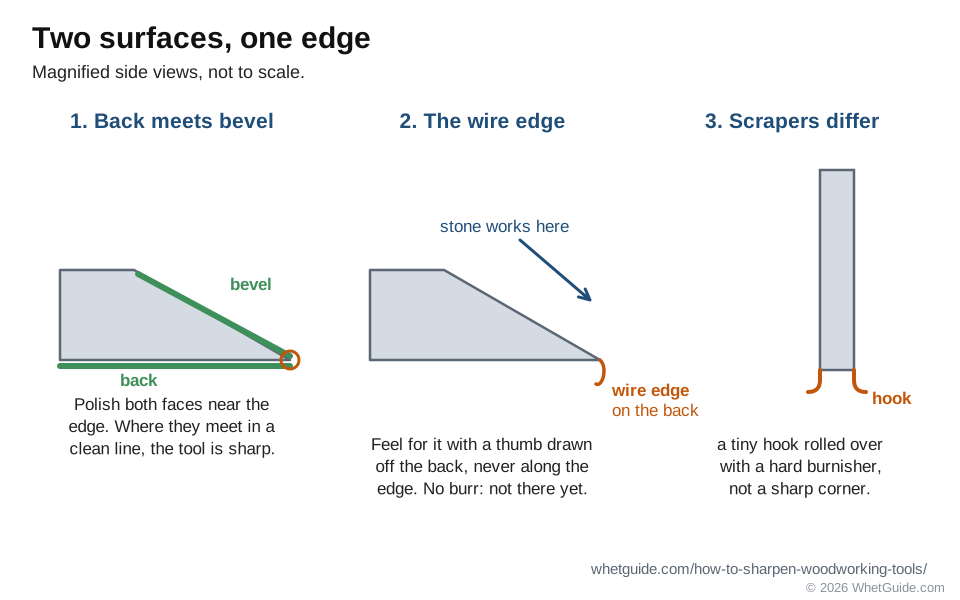
Sharpening a woodworking tool means working the two surfaces that meet at the edge, the flat back and the bevel, until they meet in a clean, polished line. Lie-Nielsen's own sharpening sheet puts it in one sentence: "A sharp edge is the intersection of two polished surfaces." Chisels, plane irons, spokeshave blades and gouges all follow the same five moves:
- Flatten and polish the back, but only the part near the edge. You do this properly once; after that it's a few strokes to remove the burr.
- Set the bevel angle, in a honing guide or by matching the existing bevel. Color the bevel with a marker so you can see where the stone cuts.
- Hone on a medium stone (about 1,000 grit) until a wire edge, also called a burr, forms across the full width of the back.
- Move to a fine stone (8,000 to 10,000 grit in Lie-Nielsen's method), take a few strokes on the bevel, then lay the back flat and stroke off the wire edge.
- Strop, test on end grain, wipe on a little oil, and put the tool away where its edge can't knock against steel.
Scrapers are the odd one out. A card scraper doesn't cut with a sharp corner. It cuts with a tiny hook, which you fold over with a hardened steel burnisher. That sequence has its own section: cabinet and card scrapers.
| Tool | Edge | Angle | Stones | Section |
|---|---|---|---|---|
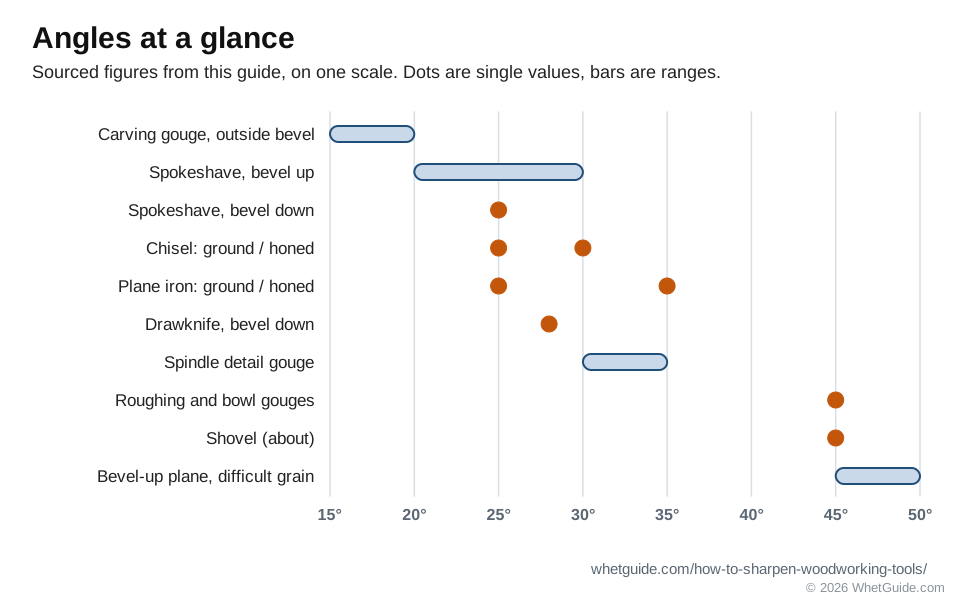
| Bench plane iron (bevel down) | Flat back, bevel, small camber on a smoother | 25° ground, 35° honed (Lie-Nielsen); 30° is the most common honing angle (Popular Woodworking) | 1,000, then 8,000 to 10,000 | Plane irons |
| Block or bevel-up plane iron | Flat back, bevel up | 25° bevel on most blades; Lie-Nielsen goes to 45° to 50° for difficult grain | Same | Plane angles |
| Bench chisel | Flat back (never beveled), bevel | 25° ground, 30° honed (Popular Woodworking) | 1,000, 3,000 for the back, then a finish stone | Chisels |
| Spokeshave (metal, bevel down) | Short flat blade | About 25° bevel down; 20° to 30° bevel up (Woodcraft) | Same as a plane iron | Spokeshaves |
| Carving gouge or V-tool | Curved bevel outside, burr removed inside | Match the bevel the maker put on | Flat stone outside, slip stone inside, strop | Gouges |
| Card scraper | Square edge, then a burnished hook | Edge filed at 90°; hook turned at 1° to 15° depending on the source | Mill file, then up to about 6,000 | Scrapers |
| Drawknife | Flat back, one bevel | 28° bevel down; 25° plus a 3° back bevel when used bevel up (Curtis Buchanan, Fine Woodworking) | Grinder, then stones held in the hand | Drawknives |
| Lathe bowl gouge | Ground on a wheel, wings swept back | 45° (Robert Sorby's jig; Oneway's general-purpose figure) | Grinder, often used straight off the wheel | Lathe tools |
| Lathe spindle and detail gouges | Fingernail grind | 30° to 35° detail gouge, 45° roughing gouge (Alan Lacer) | Grinder, slip stone in the flute | Lathe angles |
| Auger bit | Spurs and cutting lips | Keep the existing angle | Small file, inside faces only | Auger bits |
| Carbide router bit | Flat face of each cutter, never the profile | Keep the existing geometry | Fine (600 grit) diamond hone, 3 or 4 strokes per face (Trend) | Router bits |
| Shovel, hoe, mower blade | Single bevel, working edge | About 45° on a shovel (Family Handyman) | Mill file, then a finishing stone | Garden tools |
Sharpening basics: backs, bevels, burrs and angles
A dull plane skids and then digs in. A dull chisel crushes the fibers it should be slicing, so the end grain comes out fuzzy and the shoulder line wanders. You push harder to make up for it, and pushing harder is how tools slip and hands get cut. A sharp tool goes where you aim it with less force, and the surface it leaves often needs no sanding at all.
The words below come up in every section of this guide.
- The back is the flat face of a chisel or plane iron. It's the reference surface. On a chisel it stays dead flat for its whole working life.
- The bevel is the angled face that meets the back at the edge. The primary bevel is ground, usually at 25°.
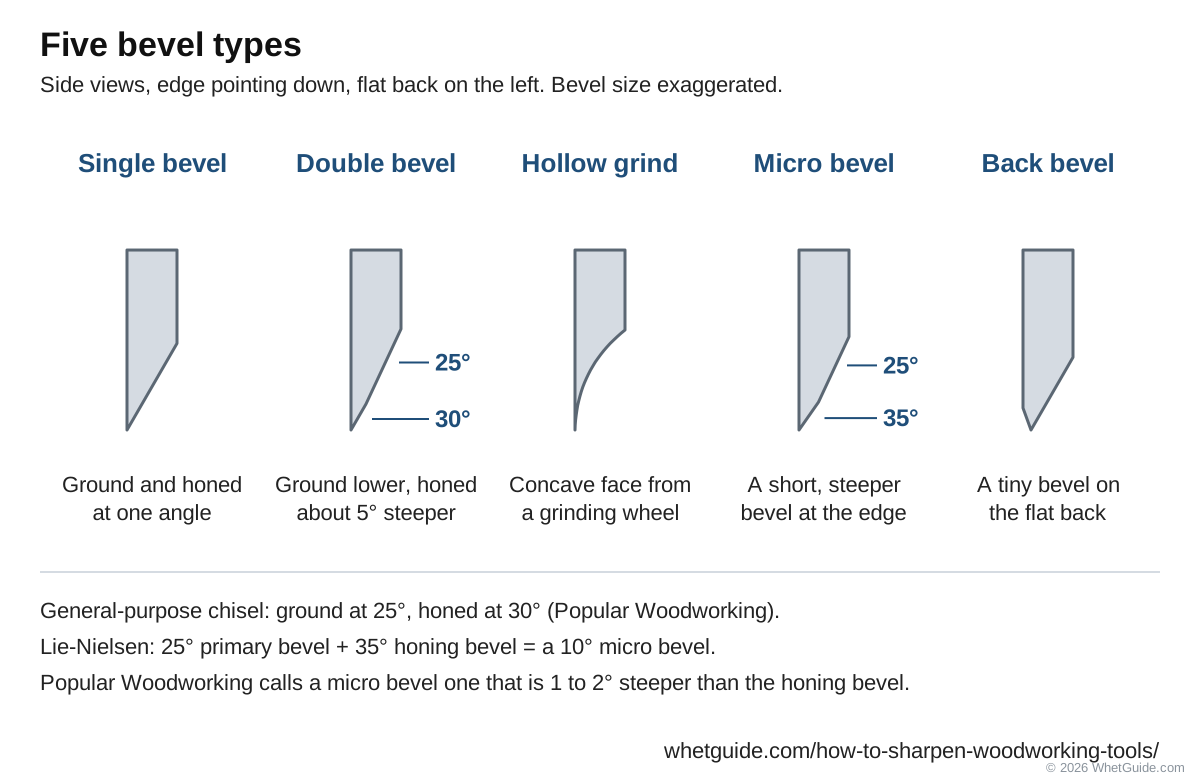
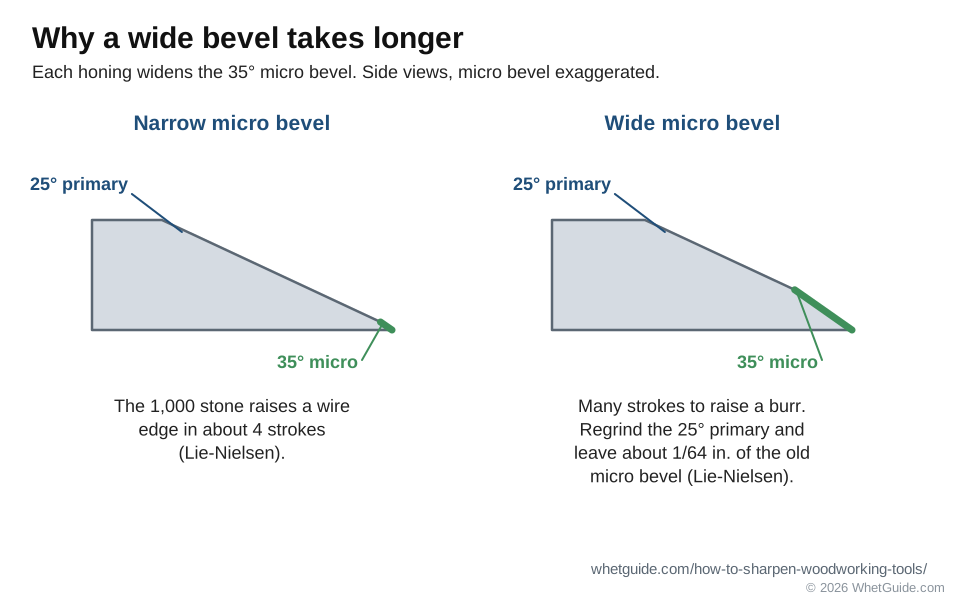
- A secondary bevel, or micro bevel, is a narrow strip honed at a slightly steeper angle at the very edge. Only that strip touches the fine stones, so resharpening is quick. Workshop Companion adds that a micro bevel makes the edge more durable and helps remove the burr, but it doesn't make the edge any sharper.
- The wire edge, or burr, is a thin lip of steel that folds over to the back when the bevel reaches the edge. Feel it with a thumb drawn off the back, never along the edge. No burr means you haven't reached the edge yet. Our guide to the sharpening burr shows what it looks like magnified.
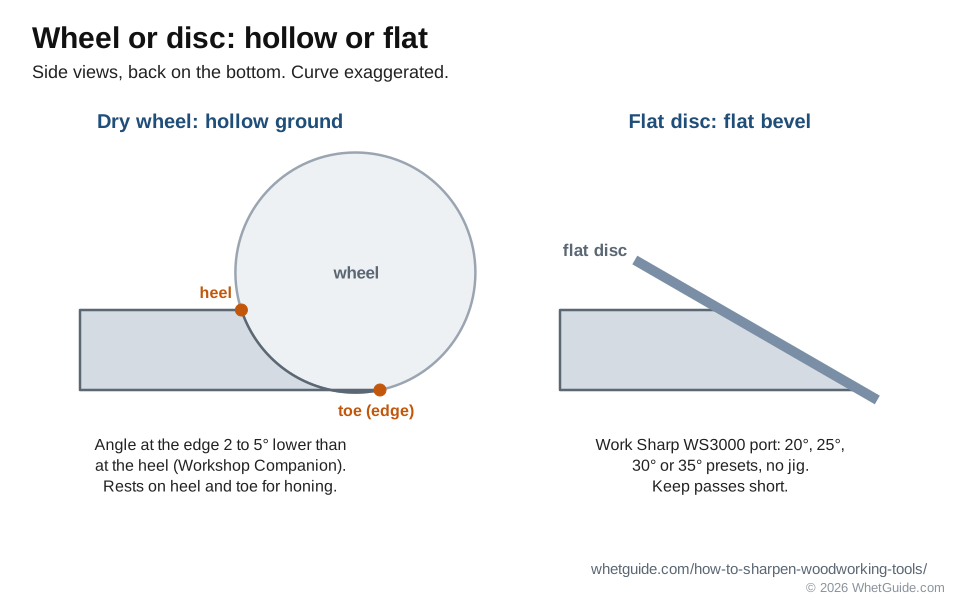
- A hollow grind is the slightly concave bevel a grinding wheel leaves. Workshop Companion's Sharpening Know-How puts the real angle at the edge 2 to 5 degrees lower than the angle you see at the heel. That takes less force to drive, but there's less steel behind the edge, so it wears faster. A back bevel is a tiny bevel on the back of a plane iron, used on purpose by some woodworkers.
- Camber is a slight curve across the width of a plane iron so the corners don't leave tracks.
The angles to remember: 25, 30 and 35
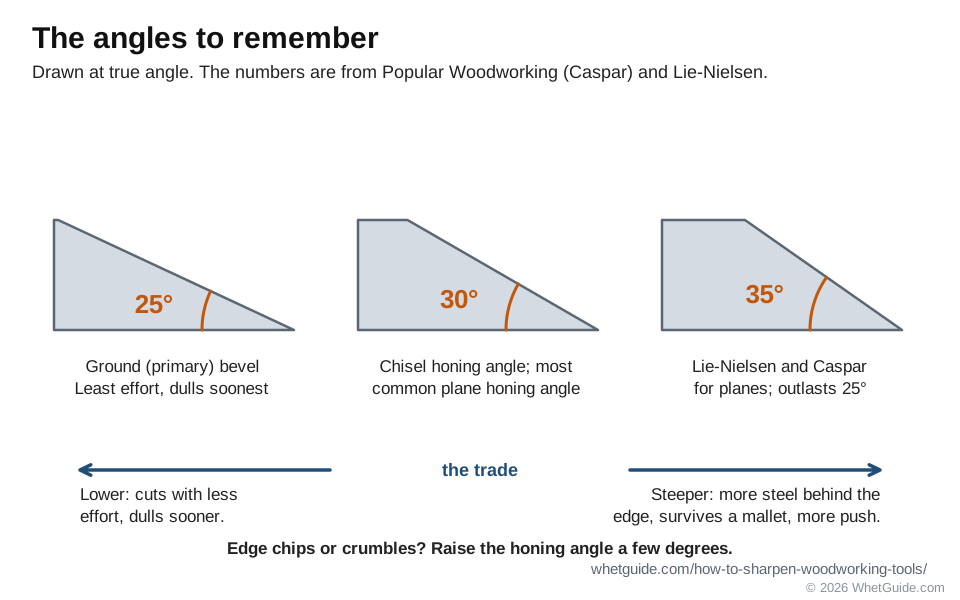
Tom Caspar's 16 sharpening tips for Popular Woodworking boil the numbers down to three. A general-purpose chisel is ground at 25° and honed at 30°. Bench plane blades are most commonly honed at 30°, and Caspar prefers 35°, because a 35° edge outlasts a 25° one. Lie-Nielsen's sheet uses the same pair: blades arrive ground at 25°, and you hone a secondary bevel at 35°, which leaves a 10° micro bevel.
The trade is simple. A lower angle cuts with less effort and dulls sooner. A steeper angle puts more steel behind the edge, so it survives a mallet and hard wood, but needs more push. When an edge chips or crumbles, raise the honing angle a few degrees. When it's fine but hard to push, a lower angle helps, as long as the edge holds. A double bevel is ground low and honed about 5° higher, and Caspar's micro bevel is 1° to 2° steeper than the honing bevel.
For knives and other tools, our sharpening angle chart lists the makers' figures, and the angle calculator turns a width into a height.
Tool steel: O1, A2 and PM-V11
Most plane irons and chisels sold today are O1, A2 or a powder steel such as Lee Valley's PM-V11. For the method on this page, the steel changes how many strokes you take, not the angles or the order of the stones. If a new blade seems to take forever to raise a burr, check the stone and the bevel width before you blame the steel.
What you need to sharpen hand tools
Lie-Nielsen's basic plane iron kit is short: a 1,000 grit honing stone, an 8,000 to 10,000 grit finishing stone, a side-clamp honing guide, a 6 in. ruler about .020 in. thick, a protractor, and a DMT Dia-Flat plate or 120 to 220 grit wet/dry paper for flattening. Everything else is a convenience.
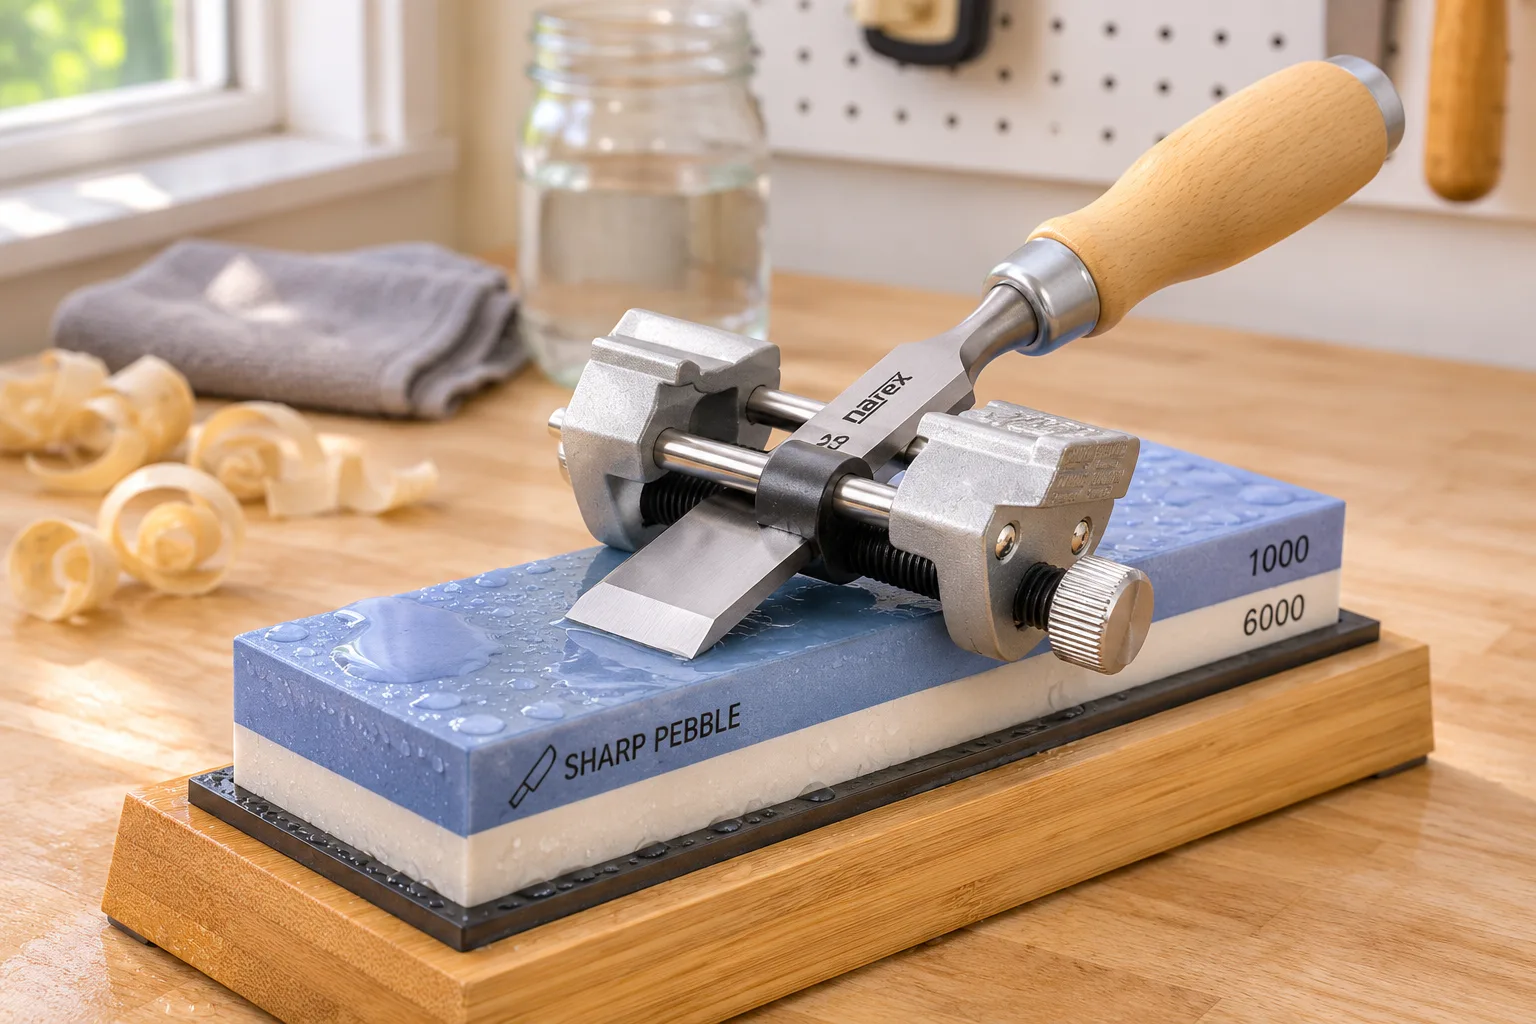
- Two stones, medium and fine. A 1,000 and an 8,000 stone cover every bench tool on this page. A 3,000 helps when you polish a chisel back for the first time.
- Something to flatten with: a coarse diamond plate, or 120 to 220 grit wet/dry paper on glass. You'll use it on new tool backs and on the stones themselves.
- A honing guide. See below.
- A fine marker, a 6 in. steel ruler, and a small square for checking edges.
- A strop: leather on a flat board, with green compound.
- Rags, a spray bottle or a dish of water, and a mat or towel so the stones don't slide. Caspar keeps his water stones on a rubber mat.
- For scrapers: a 10 in. mill file and a burnisher. For gouges: a slip stone and a shaped strop.
- For damaged edges and garden tools: a grinder, a mill file, or both.
A stone holder or sink bridge keeps the stone from moving. Our whetstone holder guide covers the options, and whetstone vs diamond stone explains which surface wears and which doesn't.
Honing guides: do you need one?
No, but a guide makes the angle repeatable while your hands learn, and it's the fastest way to sharpen a plane iron well on day one. The common side-clamp type grips the blade by its sides and rides on a narrow roller. Lie-Nielsen's instructions are written around one. Paul Sellers and plenty of other hand-tool teachers sharpen freehand, and their tools cut just fine; the steps are in honing freehand below. A common answer on woodworking forums is that the cheapest guides are good enough for a beginner, and that's a fair summary: the expensive guides clamp squarer and roll truer, and the cheap ones work once you check that the blade sits square in the jaws.
The angle a guide gives depends on how far the blade sticks out of it, which the projection table below lists. Our best chisel sharpening jig page compares the guides themselves.
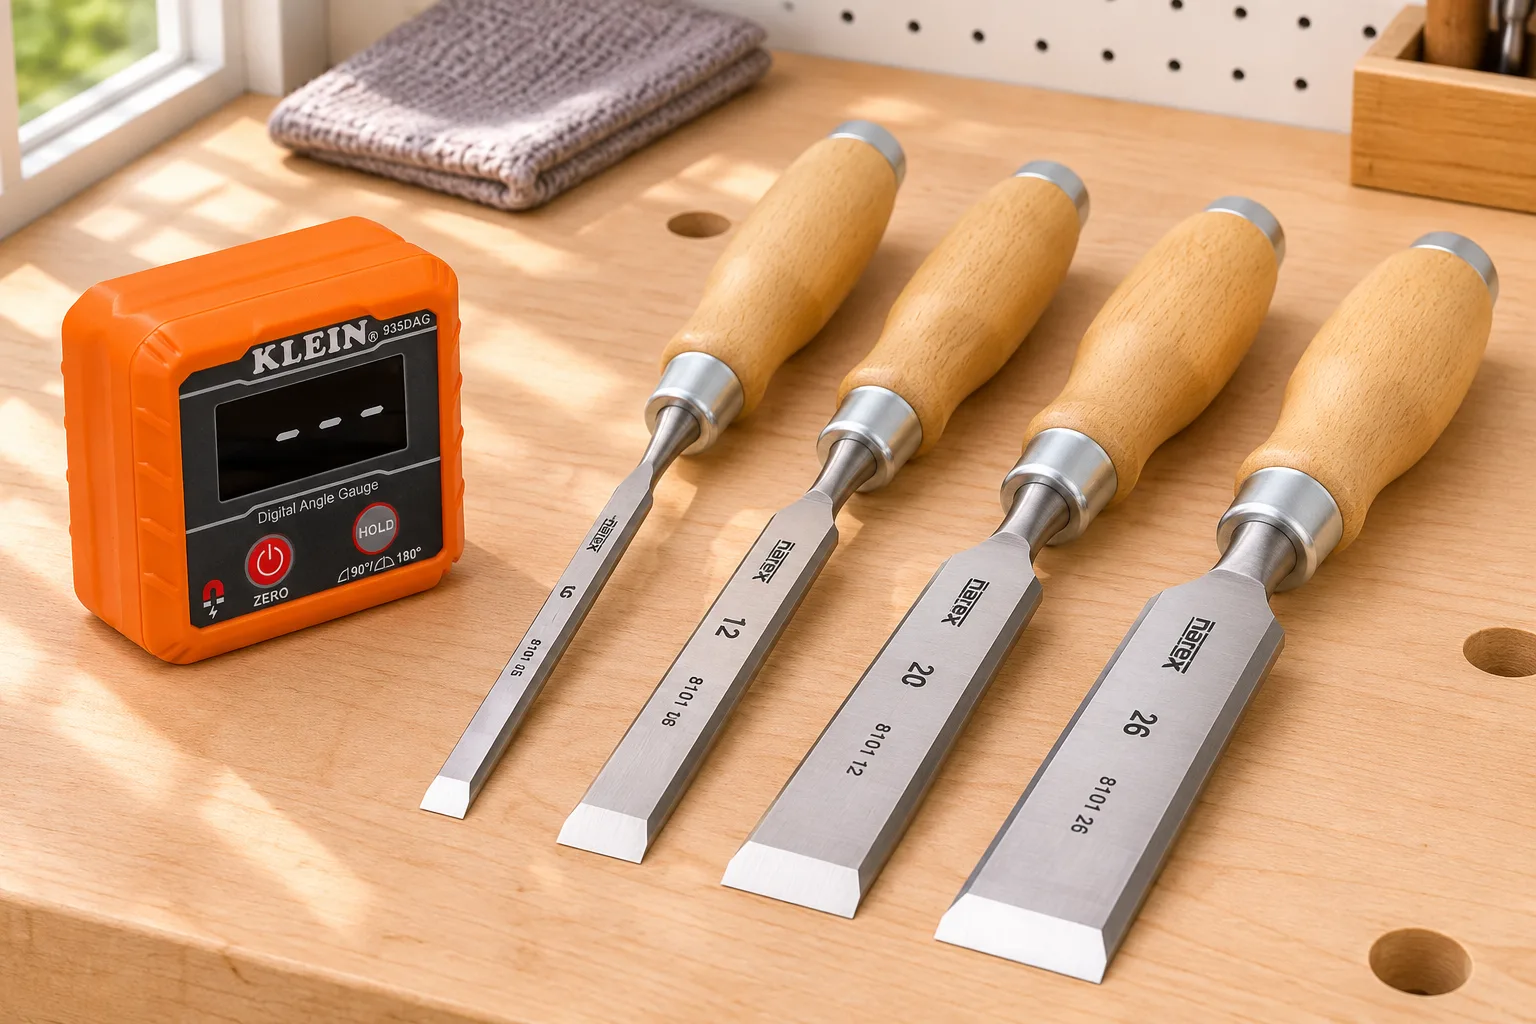
A digital angle gauge or a protractor checks the setting. Zero the gauge on the stone, set it on the blade in the guide, and adjust the projection until it reads your angle. After that, the projection itself is the setting, so a stop block screwed to a scrap board sets every blade in seconds.
The cheapest way to start: sandpaper on glass
Wet/dry silicon carbide paper on something flat works as a full set of stones. Caspar flattens his water stones on 220 grit paper laid on 1/4 in. glass with plenty of water, and gets 2 to 3 uses from each sheet. The same setup sharpens tools. Stick or spray-wet a sheet to the glass, a granite tile or the cast iron top of a table saw, and work up through the grits with a honing guide. It costs little to start, and the paper wears out, so over years stones are cheaper.
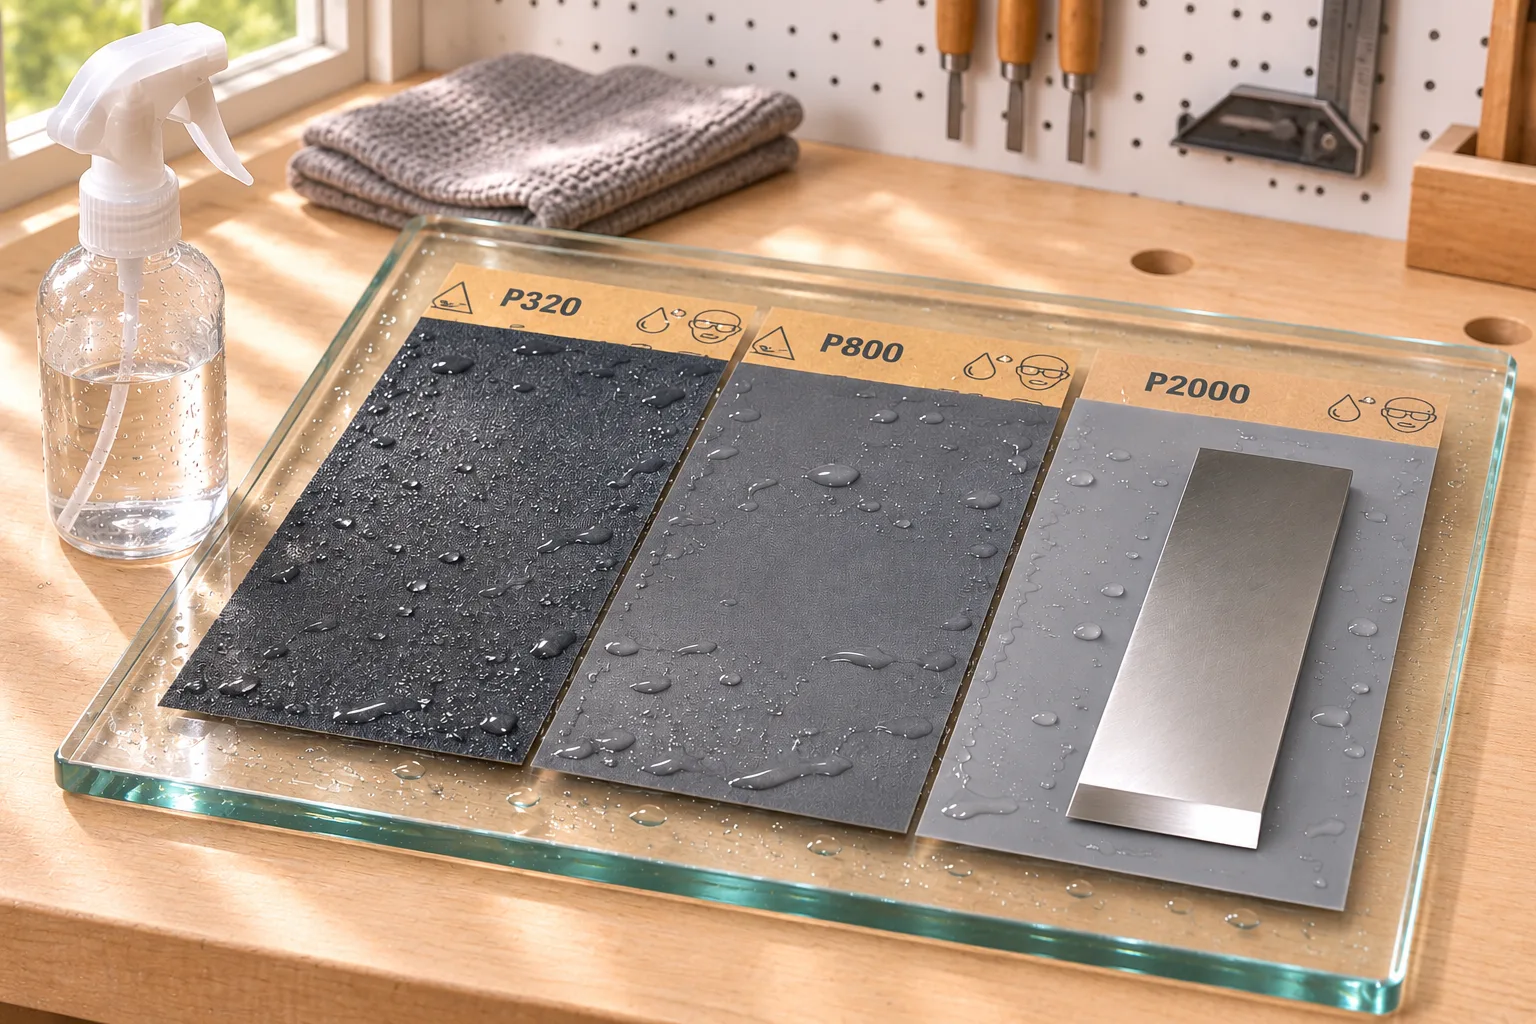
No glass? A flat ceramic floor tile works. Don't use a countertop that might not be flat; the abrasive copies whatever is under it.
↑ Back to all sectionsSharpening stones for woodworking tools
Any stone that cuts steel will sharpen a chisel. Lie-Nielsen's note on grits says any coarse, medium and fine set works, and lists Arkansas oil stones as the alternative to water stones. What changes from stone to stone is speed, and how often you have to flatten.
| Surface | Use it with | Good at | Watch out for |
|---|---|---|---|
| Water stones (synthetic) | Water | Fast cutting, fine polish, easy on hard steel | Dish quickly; flatten often |
| Oil stones (Arkansas, India) | Honing oil | Slow wear, little mess, long life | Slower; once oiled, never switch to water |
| Diamond plates | Dry or water (DMT) | Stay flat; flatten other stones and tool backs; any steel | Coarse plates scratch deep at first |
| Ceramic stones | Dry (Spyderco) | Very hard, wear slowly | Load up; Spyderco cleans its ceramics with household cleanser, a scouring pad and water |
| Wet/dry paper on glass | Water | Cheap start, any grit, curved shapes | Paper wears out; edges can lift and round a blade |
Should you wet the stone? Use what the stone is made for. DMT's FAQ says its diamond plates work dry or with water. Oil stones take honing oil, and the US Forest Service's ax manual says once a stone has been oiled, keep using oil. Wikipedia's honing oil entry adds that motor oil is too thick and WD-40 too light, and that a dry oil stone glazes. Our sharpening stone oil page and the Arkansas stone guide go deeper.
Which grits, in what order
| Grit | Job | Source |
|---|---|---|
| 80 to 220 | Flattening a badly out-of-flat back; regrinding a primary bevel on paper | Popular Woodworking (Caspar); Lie-Nielsen |
| 1,000 | Honing: raising the wire edge on the bevel | Lie-Nielsen |
| 3,000 | Polishing a chisel back between 1,000 and the finish stone | Lie-Nielsen |
| About 6,000 | The useful limit for a scraper edge | Woodcraft |
| 8,000 to 10,000 | Finishing bench edge tools | Lie-Nielsen |
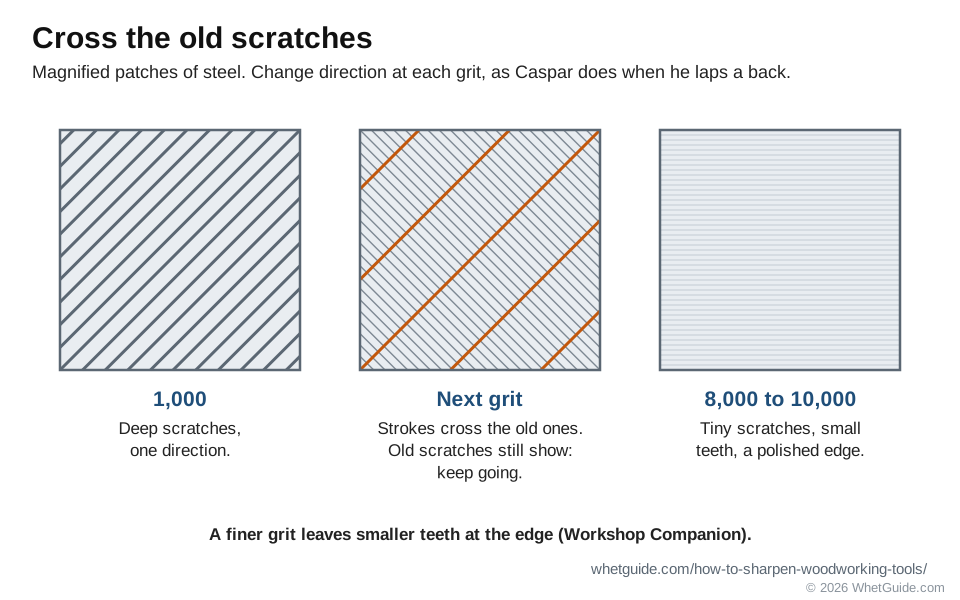
Why step through the grits at all? Every abrasive cuts small grooves in the steel, and where the grooves from the back and the bevel meet, they form the edge. Workshop Companion's Sharpening Know-How describes those grooves as tiny teeth at a microscopic level. A finer grit leaves smaller teeth, and it's faster to work up through finer grits than to jump straight to a fine stone. Change the direction of your strokes at each grit, the way Caspar does when he laps a back, so the new scratches cross the old ones and you can see when the last grit's marks are gone.
One retailer's plane guide, The Tools Pick, uses four water stones (600, 1,000, 3,000 and 8,000). That works; it's just more stones than you need. Grit numbers don't match exactly between Japanese and Western scales, so check our sharpening stone grit chart before buying a mixed set.
Flatten your stones
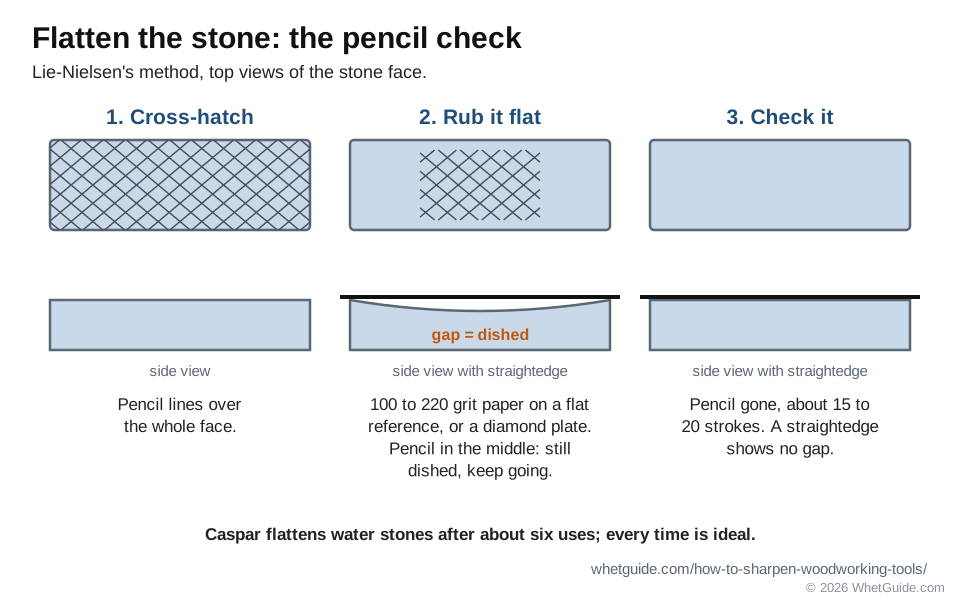
A dished stone puts a curve on whatever you sharpen, and on a plane iron or chisel back that curve is exactly what you spent an hour removing. Caspar flattens water stones after about six uses and says every time is ideal. Lie-Nielsen's method: draw a pencil cross-hatch on the stone, rub it on 100 to 220 grit wet/dry paper on a flat reference or on a DMT Dia-Flat plate until the pencil is gone, which takes 15 to 20 strokes, then check it with a straightedge. Our step-by-step for every stone type is in how to flatten a whetstone, and the plates themselves are compared in best flattening stone.
How to sharpen a plane iron
Lie-Nielsen's sharpening sheet is the backbone of this section. It's the one maker's method that gives every number: angles, grits, stroke counts and guide settings. It's written for Lie-Nielsen blades, which arrive ground flat with a 25° bevel, but it works on any bench plane, block plane or spokeshave iron. The order is back first, then bevel, then back again.
Step one: flatten and polish the back
The back is half the edge. If it's scratched or rocks on the stone, the bevel can be perfect and the edge will still be ragged where the two meet. You only have to do this once properly; after that the back gets a few polishing strokes each time.
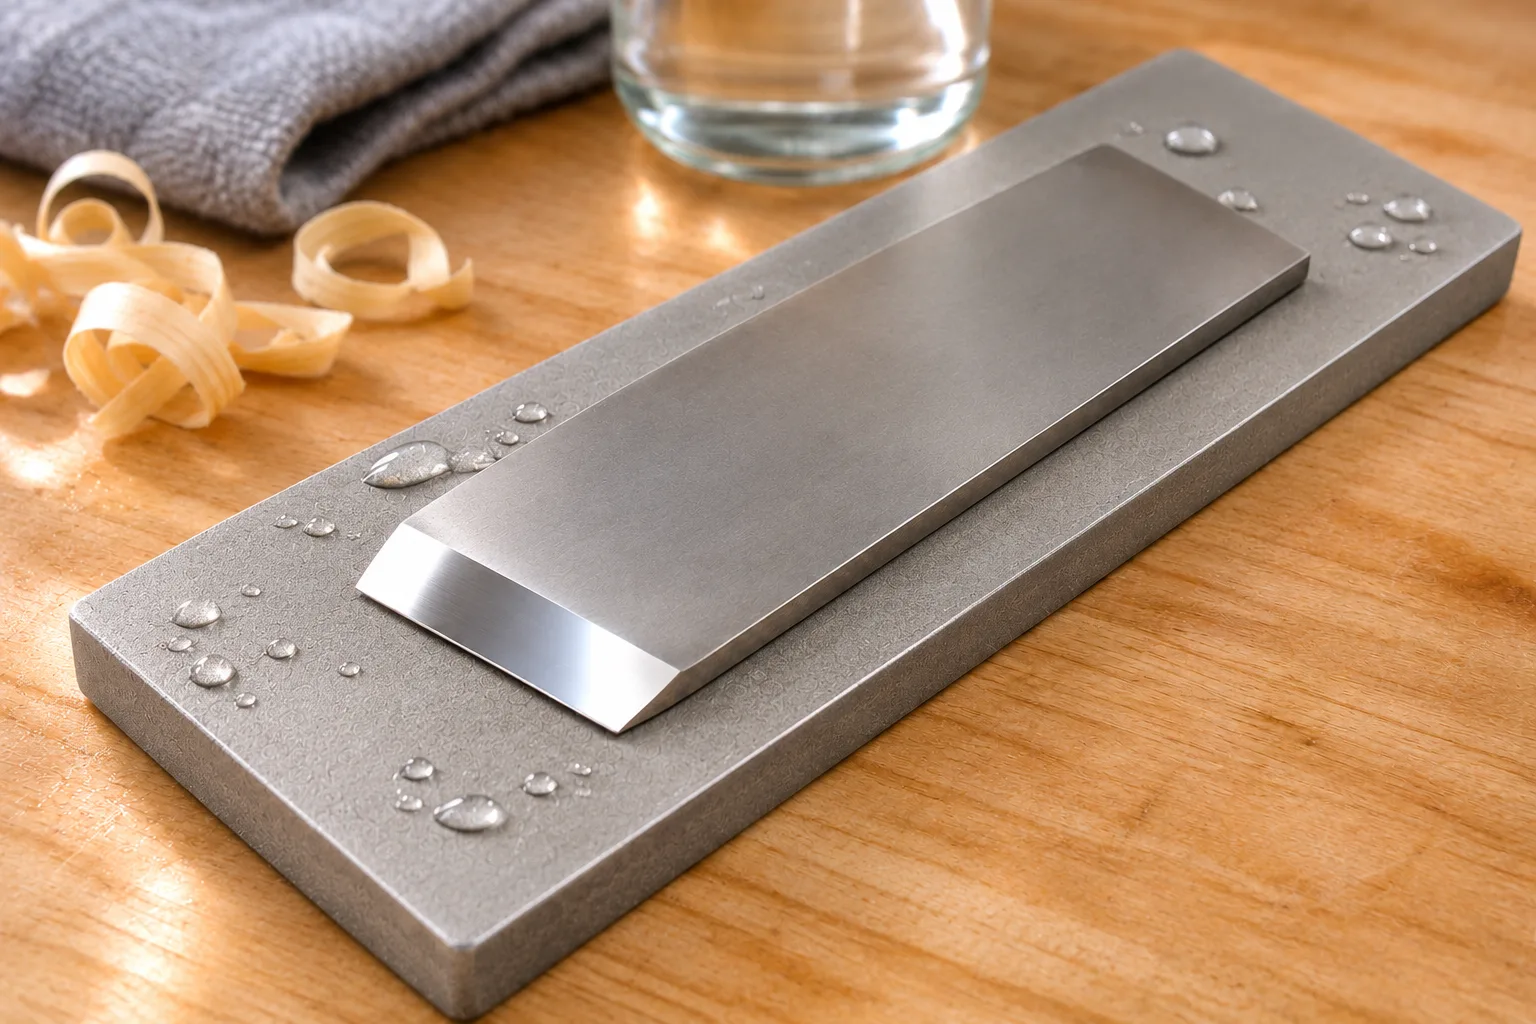
- Check it. Andy Rae colors a bevel with a dark marker and grinds until the ink is gone, and the same trick works on the back. Mark the first couple of inches behind the edge, lay the back on a flat stone or diamond plate and take a few strokes. The ink comes off where it touches, and the marks that stay show the low spots. Keep lapping until the marks near the edge are gone and the back has an even luster, which is the finish Rae looks for.
- Choose your start. Caspar starts at 220 grit, or 80 to 120 if the back is badly out, and works up through the grits to 320 on paper, with 15 and 5 micron film after that if you want a mirror. He changes the lapping direction at each grit so it's obvious when the old scratches are gone.
- Hold it flat. Press near the edge with your fingertips spread so the blade can't tip. Work the first 2 to 3 in. behind the edge, which is how much Caspar says has to be flat for accurate paring. The rest of a long chisel back doesn't need it.
- Polish. Move to the 1,000, then the finishing stone. On a plane iron you can stop the back at 1,000 and let the ruler trick polish the last sliver.
Woodcraft's Andy Rae, in his 10 essential sharpening tricks, speeds this up with a scrap of hardwood about 1-3/4 by 4 by 7-1/2 in. Lay it on the blade so it covers 1 to 2 in. behind the leading edge, press down on the block, and push the two together over the stone. The block spreads your hand pressure evenly, so the back can't tip, and you keep going until the back shows an even luster.
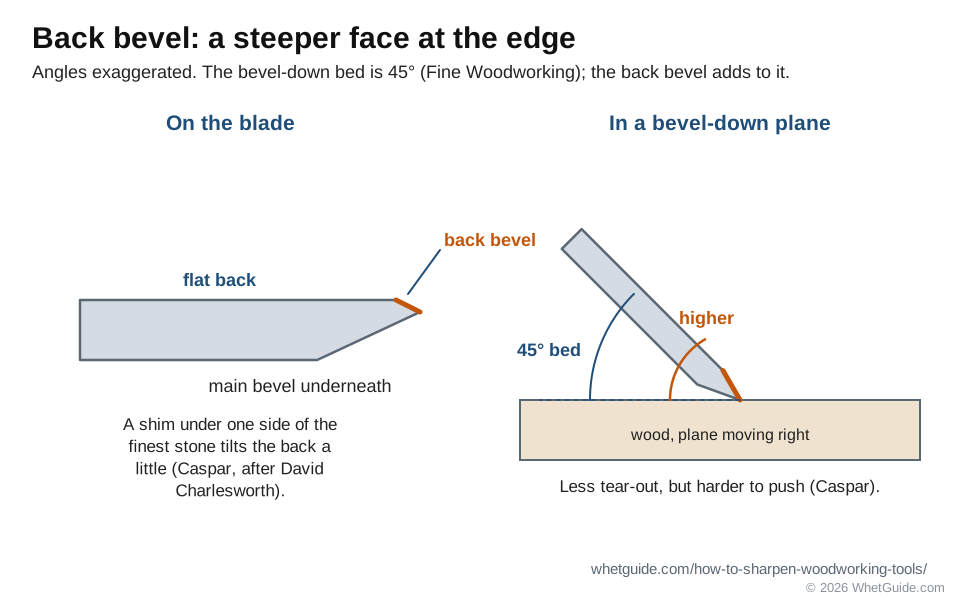
Two shortcuts save most of the work on a plane iron, and neither is for chisels. The ruler trick polishes only the last fraction of an inch of the back. A back bevel, the method Caspar credits to David Charlesworth, puts a shim under one side of the finest stone so the back is honed at a tiny angle. Caspar notes the trade-off: a back bevel reduces tear-out but makes the plane harder to push, because it raises the effective cutting angle.
Not every new iron needs flattening. One woodworker's view on a forum is that a new Hock iron is flat enough to go straight to polishing, and Lie-Nielsen grinds its blades flat. Older and cheaper irons usually need work. Two small tips from Caspar's list: a lapping jig that holds the blade flat helps on narrow irons, and vacuuming the lapping dust off the plate keeps loose grit from scratching the next grit's work.
Set the honing guide: projection distances
In a side-clamp guide, the angle depends only on how far the blade sticks out in front of the jaws. Lie-Nielsen says to record that distance so you can reset the angle without a protractor, and a stop block does it for you. These are the distances from Lie-Nielsen's table, measured for a blade .125 in. thick. Thicker or thinner blades shift a little, so check once with a gauge.
| Angle | Lie-Nielsen guide | Eclipse-style guide |
|---|---|---|
| 20° | 2-1/16 in. (52.38 mm) | not listed |
| 25° | 1-1/2 in. (38.10 mm) | 2-1/8 in. (54 mm) |
| 30° | 1-5/32 in. (29.36 mm) | 1-9/16 in. (40 mm) |
| 35° | 7/8 in. (22.22 mm) | 1-3/16 in. (29.5 mm) |
| 40° | 5/8 in. | 13/16 in. (21 mm) |
| 45° | 7/16 in. | 9/16 in. (15 mm) |
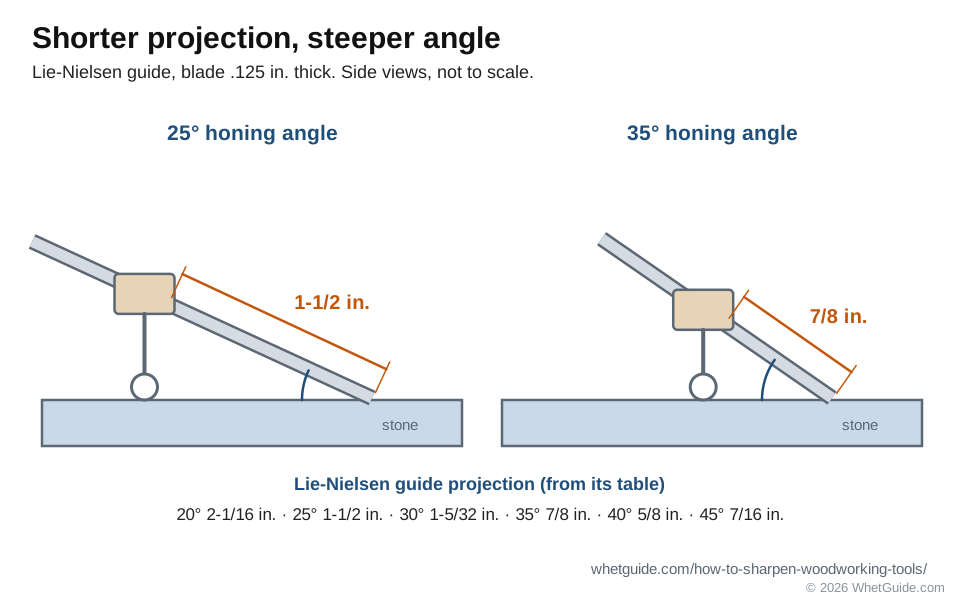
Shorter projection, steeper angle. Screw a strip of wood to a board at each distance you use and you have a setting jig that takes five seconds. Caspar's Popular Woodworking tips include his own projection figures for a cheap Eclipse-style jig, measured on his blades. Treat any table as a starting point and confirm with a gauge.
Hone the bevel: Lie-Nielsen's steps
This is the routine for a blade in decent condition: no nicks, and a secondary bevel that is still narrow.
- Clamp the blade bevel down in the guide, square to the jaws, at the projection for 35°. On a 25° primary bevel, that hones a 10° micro bevel.
- Wet the 1,000 grit stone. Color the bevel with a marker the first time so you can see that the guide is hitting the very edge.
- Hone on the 1,000 until a wire edge forms on the back, across the whole width. Lie-Nielsen puts it at about 4 strokes, pulling the blade toward you. Check both corners for a burr. If one corner has it and the other doesn't, shift your finger pressure toward the bare corner.
- Move to the 8,000 to 10,000 stone and take 4 to 5 strokes at the same setting. The new micro bevel should be a thin, even bright line.
- Take the blade out of the guide and remove the wire edge with the ruler trick.
- If the blade is for a smoothing plane, put the camber on now with the recipe in camber.
- Strop if you like, test on end grain, then wipe the blade with a little oil before it goes back in the plane. Lie-Nielsen recommends jojoba oil.
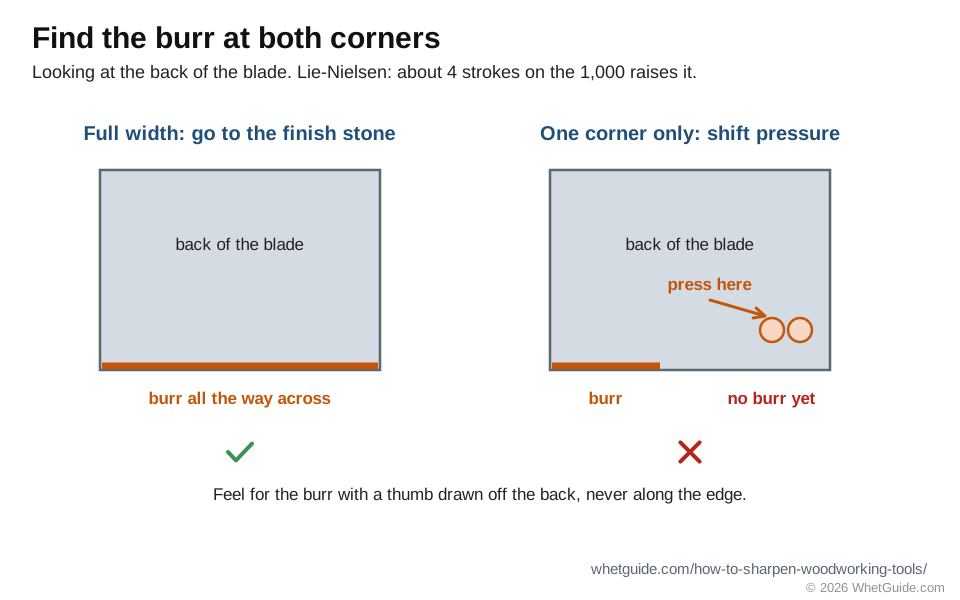
A nicked blade, or one whose micro bevel has grown wide, needs more than four strokes. Go back to a coarser stone or regrind the primary bevel (see when the secondary bevel gets big). For a quick touch-up between full sharpenings, Lie-Nielsen says the finishing stone alone is enough. When that stops working, go back to the honing stone to raise a fresh wire edge.
How it should feel. On the 1,000 you'll hear and feel the stone cutting, and a gray slurry builds. On the finish stone the stroke goes quiet and smooth. If the guide skids or the blade chatters, you're pressing too hard or the stone is dry. Keep the pressure over the edge, not on the guide's roller.
Hone freehand, without a guide
Freehand honing is faster once your body learns it, and it's the only way for blades that won't fit a guide. The trick is to stop your hands from setting the angle. Andy Rae's freehand steps in Woodcraft's 10 essential sharpening tricks and Anne Briggs's chisel guide at Anne of All Trades come down to the same moves:
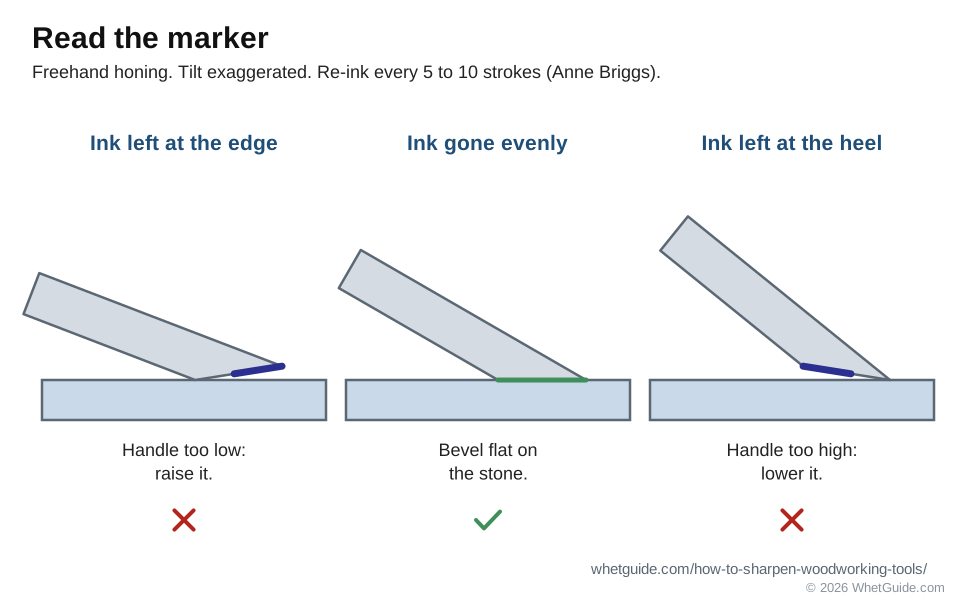
- Color the bevel with a marker. It's your only gauge, so use it.
- Seat the bevel by feel. Set the heel of the bevel on the stone and raise the handle slowly until the whole bevel lands flat. You'll feel it settle; Rae rocks it slightly until it sits firmly.
- Hold it with one to three fingers on the back near the edge, depending on how wide the blade is, and press down there, not on the handle.
- Lock your wrists and elbows. Briggs locks the handle against her wrist and lets nothing else move.
- Move from your body. Rae moves his upper body, not his arms. Briggs stands with her dominant foot forward under the bench and rocks her weight from front foot to back. Your arms just carry the blade along.
- Start with pull strokes. Briggs finds the pull far easier to control than the push.
- Check the marker after a few strokes, and re-ink every 5 to 10 strokes as Briggs does. Ink left at the edge means the handle is too low; ink left at the heel means it's too high.
- Hone until a burr runs the full width. Flip the blade, stroke the back flat, then go back to the bevel with lighter pressure each round, as Rae does, until you finish with feather-light strokes on both faces.
Bench height matters more than people expect. Rae sets his honing station 30 to 36 in. from the floor; Briggs works at about 36 in., with the stone an inch or two from the bench edge.
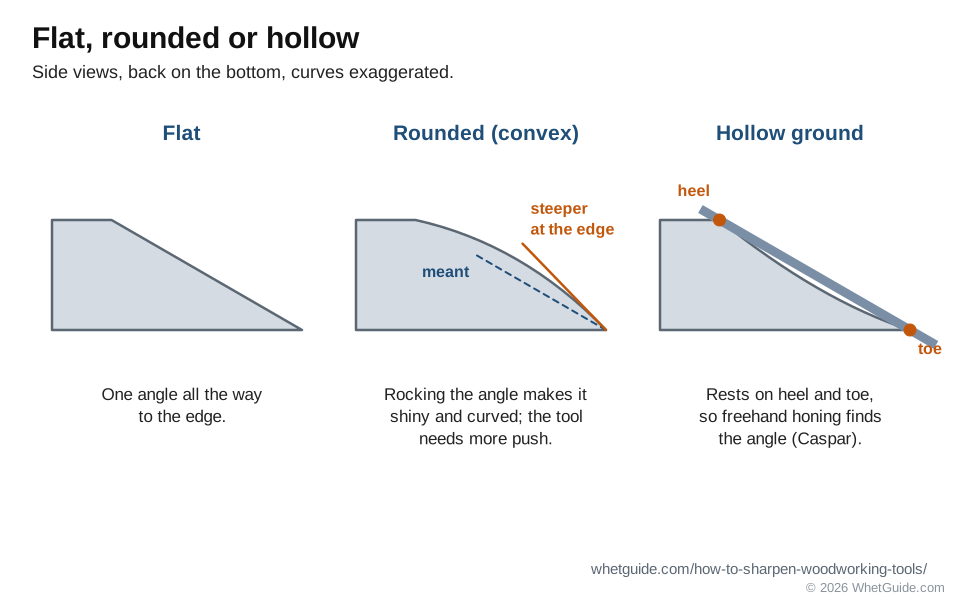
The freehand mistake: a rounded bevel. If the angle rocks during the stroke, the bevel comes out convex and the very edge ends up at a steeper angle than the one you meant to hone. The bevel comes out shiny and curved, and the tool needs more push. The fix is to lock the wrists and move from the body, and to re-check the marker. A hollow-ground bevel helps a lot: Caspar notes that the tool rocks onto the heel and toe of the hollow, so it finds its own angle.
The ruler trick
Lie-Nielsen's ruler trick finishes the back of a plane iron in about 10 strokes. Lay a thin steel ruler, about .020 in. thick, along one long edge of the finishing stone. Rest the blade bevel up across it, so the ruler lifts the back by less than 1° and only the last sliver at the edge touches the stone. Keep no more than 1/2 in. of the blade on the stone, and stroke it back and forth. About 10 passes remove the wire edge and leave a narrow polished band at the edge.
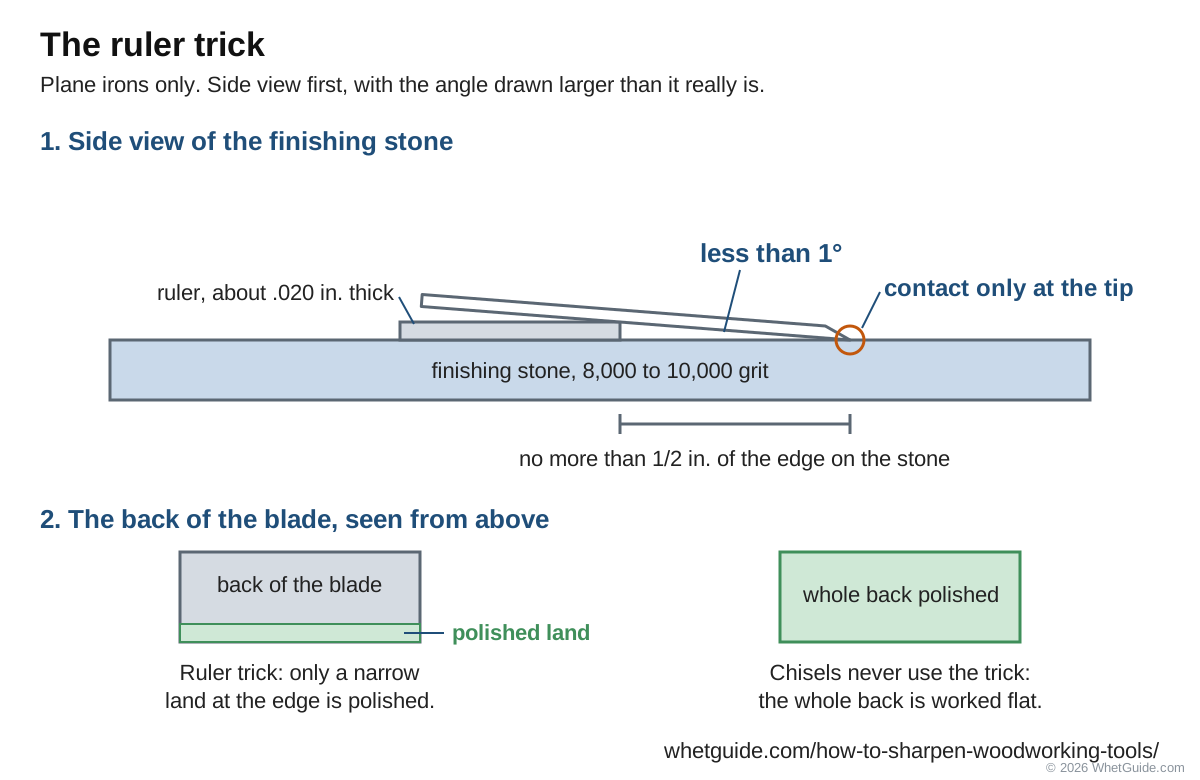
Never use the ruler trick on a chisel. Lie-Nielsen is firm about this: a chisel's flat back is the reference you pare against, and even a tiny back bevel ruins it. Keep the ruler in the same place on the stone each time, or you'll make a new, slightly different bevel every sharpening.
Camber for smoothing and jack planes
A dead-straight iron leaves a little step at each side of its cut. A slight curve across the width hides those tracks. Lie-Nielsen's recipe uses the 35° setting in the guide and finger pressure on different spots:
- Six strokes with pressure on one outside edge, then six on the other.
- Four strokes with pressure halfway between the edge and the center, on each side.
- Two strokes with pressure in the center.
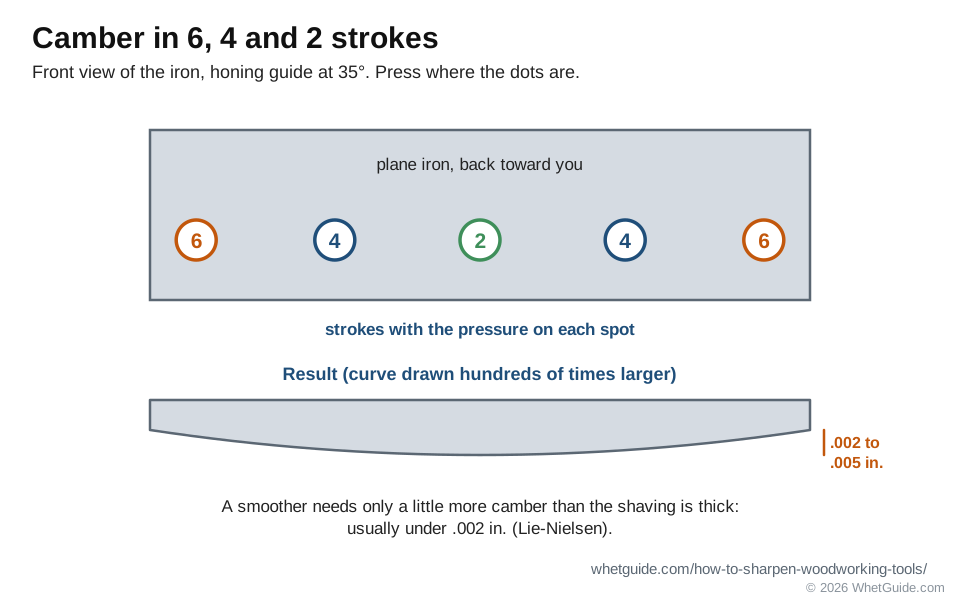
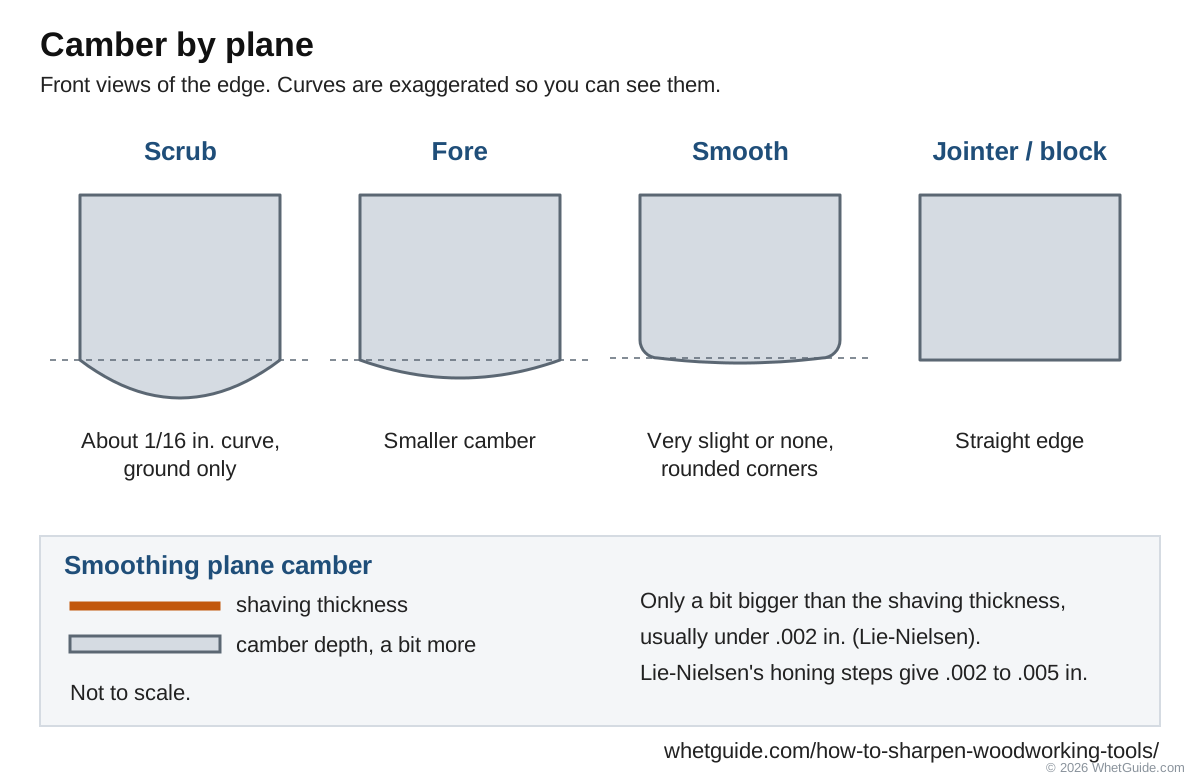
That produces a camber of .002 to .005 in. A smoothing plane needs only a little more camber than the shaving is thick, which Lie-Nielsen puts at usually under .002 in. Caspar's profiles for the other bench planes: a scrub plane gets a heavy curve of about 1/16 in., ground and not honed in, so it can take shavings up to 1/16 in. thick. A fore plane gets a smaller camber. A smoother gets a very slight camber or none, with rounded corners, and jointer and block planes stay straight.
Prefer a straight edge with dubbed (rounded) corners? Andy Rae holds the iron at about 45° across a 6,000 or 8,000 stone and drags it toward you, almost lifting it on the first pass, then gives it two or three passes under just the weight of the blade. That takes the sharp corners off, and they're what leave tracks on a wide board.
When the secondary bevel gets big
Each honing makes the 35° micro bevel a little wider. Once it's wide, the 1,000 stone takes many strokes to raise a burr. Lie-Nielsen's fix is to re-establish the 25° primary bevel on sandpaper with a stop block set for 25°, and to leave about 1/64 in. of the old secondary bevel standing. That thin strip tells you the edge is still square. Then hone a new 35° micro bevel as usual. A grinder does the same job faster; see grinders.
Plane angles: bed, bevel and cutting angle
On a bevel-down bench plane, the frog sets the cutting angle, and the honing angle only has to clear the wood. "The standard frog angle is 45°," writes Megan Fitzpatrick in Fine Woodworking's guide to choosing a smoothing plane, and Lie-Nielsen offers steeper 50° and 55° frogs for its No. 4 when the grain is difficult. Any honing angle around Caspar's common 30° clears the wood on a 45° bed. On a bevel-up plane, the bevel faces up, so the cutting angle is the bed angle plus the bevel angle. Fine Homebuilding's block plane review gives the standard block plane bed as 20° and the low-angle 60-1/2 bed as 12°, both with 25° bevels. That's a 45° cutting angle on the standard plane and about 37° on the low-angle one.
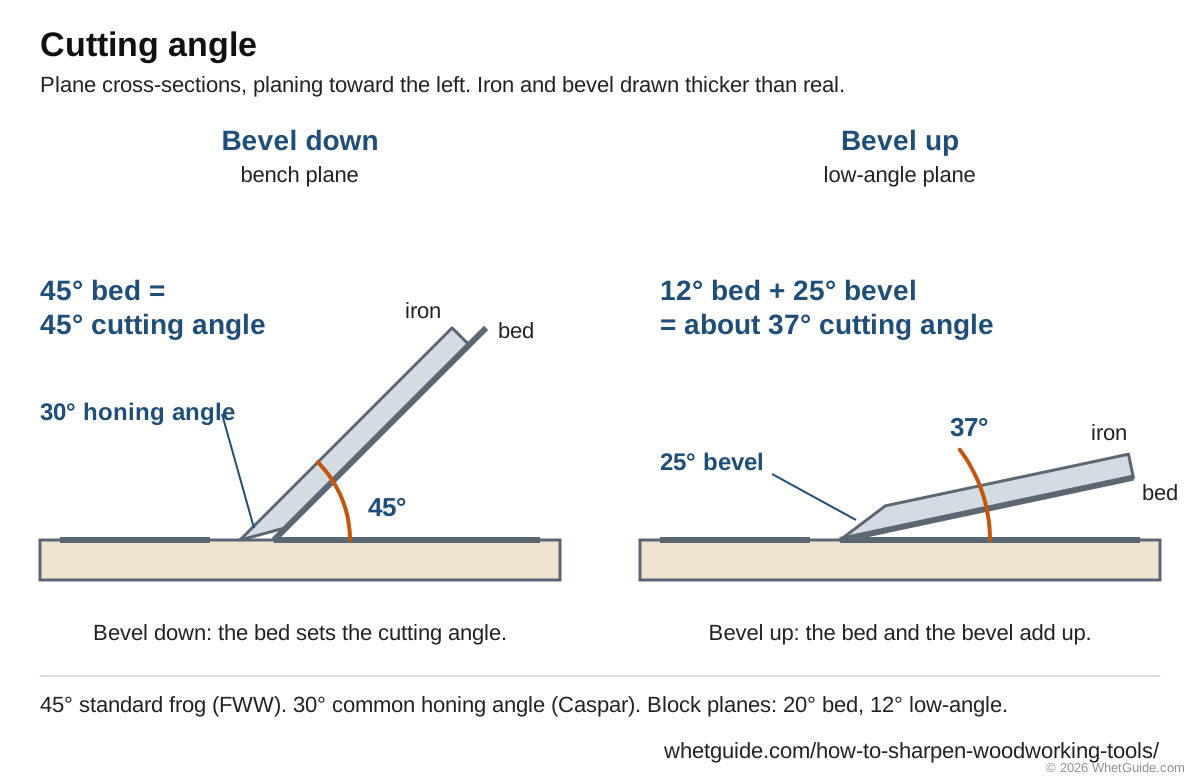
That's why a bevel-up plane is so adjustable. Honing a steeper bevel raises the cutting angle for tricky grain, and Lie-Nielsen suggests a much steeper 45° to 50° on a bevel-up plane for difficult grain. A spare iron honed steep gives you two planes in one.
Test the plane
Set the iron back in the plane, back the blade off, and sight down the sole toward a light. Advance the blade until a thin black line shows across the mouth, and use the lateral lever to make it even from side to side. Then plane the end grain of a softwood board. A sharp iron takes a thin, whole shaving that holds together and leaves a surface that looks wet. A dull or burred one crushes the end grain white and tears it.
Chisels: the same method, with three differences
Chisels get the same back, bevel and wire edge treatment as plane irons. Our full step-by-step is how to sharpen a chisel, including flattening the back, setting the angle and using a grinder. What changes, per Lie-Nielsen:
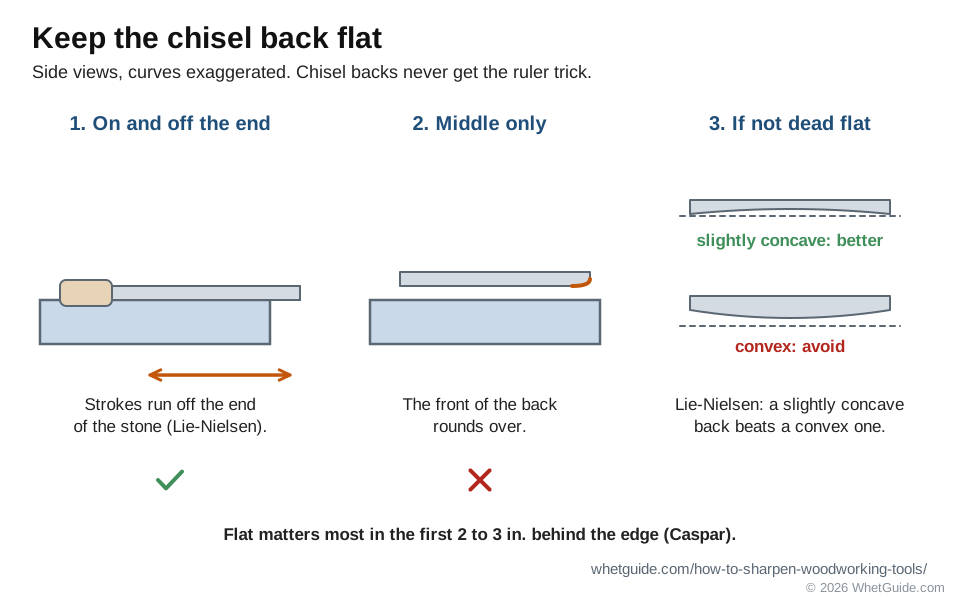
- No ruler trick, ever. The whole back is the reference you pare against, so it stays dead flat.
- The back goes 1,000, then 3,000, then the finishing stone. After that first preparation, only the finishing stone touches the back.
- Work the back on and off the edge of the stone so the front of the back doesn't round over. Lie-Nielsen adds that a slightly concave back is better than a convex one.
Popular Woodworking's general-purpose figures are 25° ground and 30° honed. Caspar adds one more exception: hollow-ground bevels are easy to hone freehand because the tool rocks onto the heel and toe of the hollow, but Japanese chisels and Western mortise chisels should be flat ground or slightly convex.
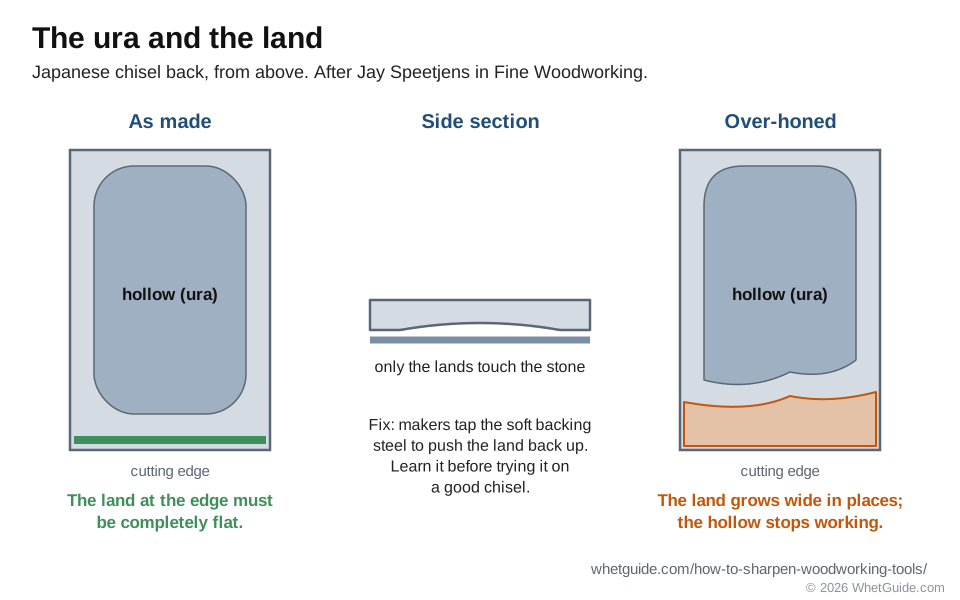
Japanese chisels and plane irons have a hollow ground into the back, called the ura, so only a narrow land around it touches the stone. That makes the back quicker to flatten, but you don't lap the whole thing. Jay Speetjens' Japanese chisel tune-up in Fine Woodworking says the land along the cutting edge is the part that has to be completely flat. Honing the whole back flat works, but the land can get wide in places and the hollow stops doing its job. Makers fix that by tapping the soft backing steel to push the edge land back up, which is a job to learn before you try it on a good chisel.
Family Handyman's old chisel tips still hold up: keep one sharp 3/4 in. chisel for general work and an old dull one for nails and caulk. A starter set of 1/2, 3/4 and 1 in. covers most jobs. When you cut a mortise, outline it with a utility knife first. Pare bevel down to take off shavings, and bevel up, with the back flat on the work, to flatten a surface you can reach from the side.
↑ Back to all sectionsHow to sharpen a spokeshave blade
A spokeshave is a tiny plane with handles, and its blade is sharpened the same way as a plane iron. The hard part is holding a blade so short that most guides can barely grip it.
Angle, and bevel up or down
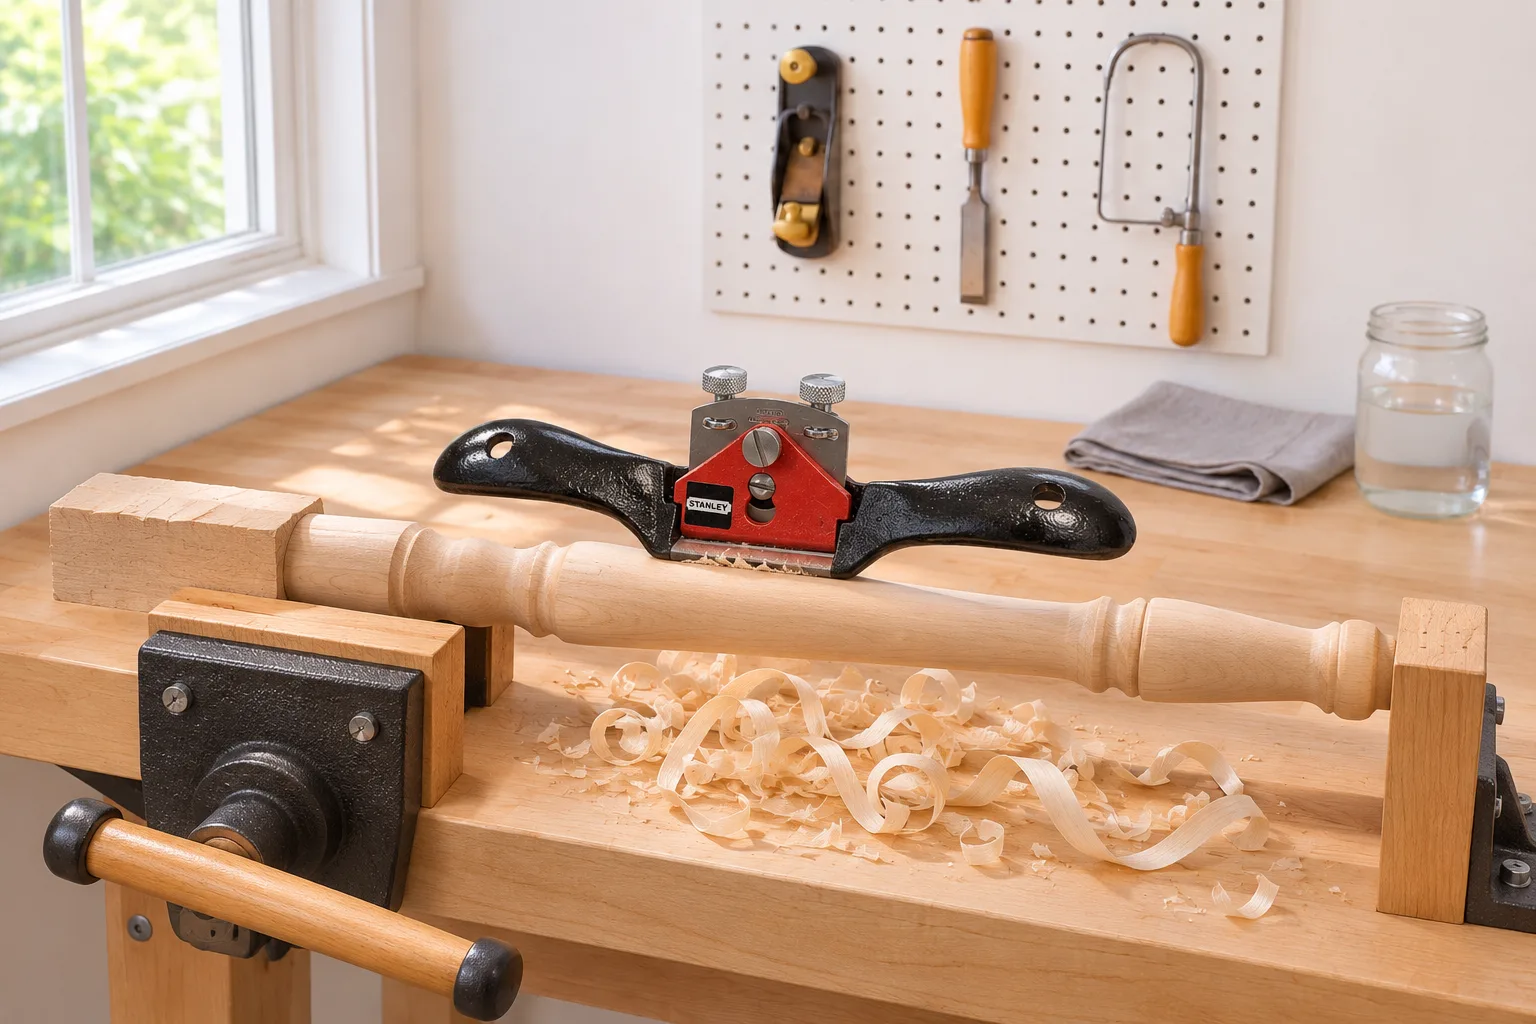
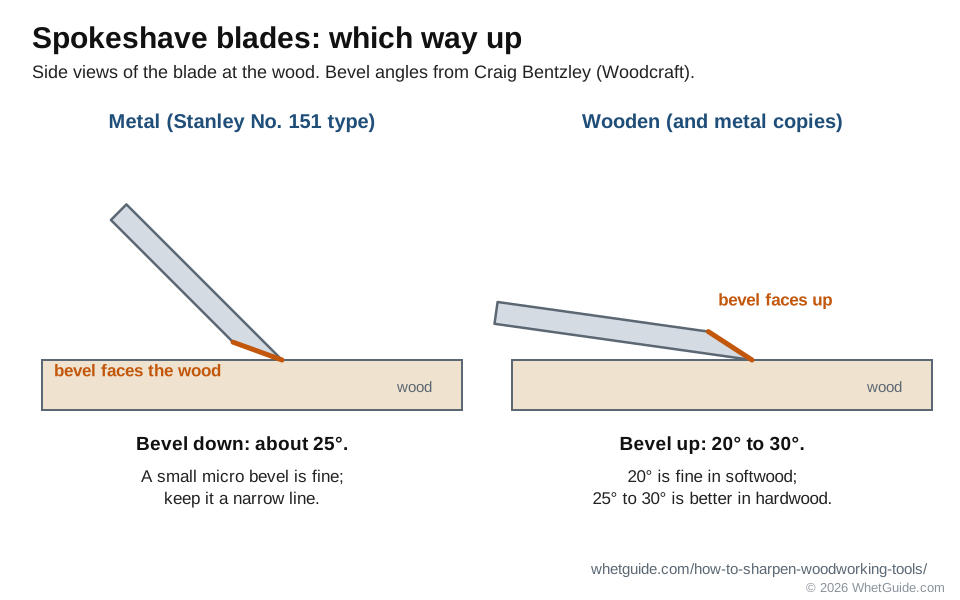
Spokeshaves come in two kinds, and Woodcraft's spokeshave guide by Craig Bentzley sorts them by blade orientation. The metal Stanley No. 151 and its copies are bevel down. The traditional wooden spokeshave, and modern metal versions of it, are bevel up. Bentzley's angles:
- Bevel down: about 25°.
- Bevel up: 20° to 30°. 20° is fine if you work mostly in softwood; 25° to 30° is better in hardwood.
He hones on stones rather than a grinder, starting only as coarse as the edge needs. On a bevel-up shave, he pinches the blade at both ends while it straddles a narrow stone, or takes a diamond paddle to the bevel. A small micro bevel is fine on a bevel-down blade. In our view a big one isn't worth it on a blade this short: keep it to a narrow line and regrind when it grows.
Old wooden spokeshaves hold the blade with two tangs that get in the way of a stone. Paul Sellers takes the blade out, sets it on a support block, and moves thin abrasive paddles over the bevel. His paddles are scrap wood about 6 by 20 by 175 mm (1/4 by 3/4 by 7 in.) with abrasive paper stuck on with mounting tape, starting at 120 grit for corrective work.
Three ways to hold a small blade
- In the honing guide, if it can reach. Many side-clamp guides grip a spokeshave blade with a short projection. Confirm the angle with a gauge, because a short blade sits differently from a plane iron.
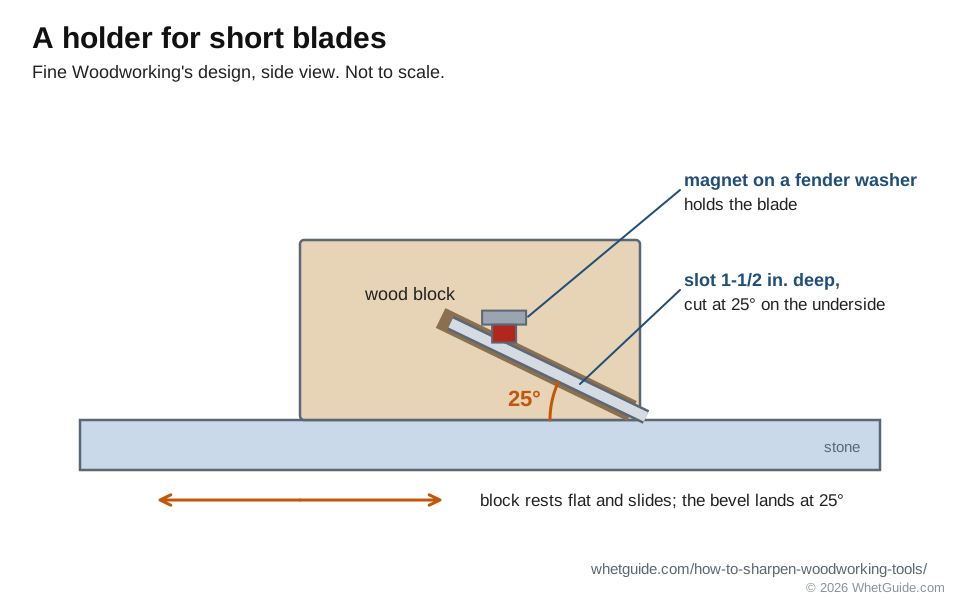
- In a shop-made holder. Fine Woodworking's blade holder is a block of wood with a slot 1-1/2 in. deep, cut at a 25° tilt on the underside, plus a magnet on a fender washer to hold the blade. The block rests flat on the stone and the blade sits at the angle.
- Freehand, or side-sharpening. Hold the blade in your fingers with the bevel flat on the stone, rock it until you feel it seat, and take short strokes. Some woodworkers stroke sideways along the stone for more control on short blades. Use the marker to check.
Remove the burr exactly as on a plane iron: lay the back flat on the finishing stone for a few strokes, or use a light ruler trick. Spokeshave blades have flat backs, so the back needs the same flattening as a plane iron.
Curved blades: round and hollow spokeshaves
Convex and concave spokeshaves have curved blades. Treat them like a shallow gouge. Hone the bevel freehand on a flat stone, rolling the blade so each part of the curve meets the stone at the same angle, or use a stick wrapped in wet/dry paper with a curve that fits the blade. Take the burr off the flat side on the finishing stone, and strop with a shaped strop if you have one. Drawknives are covered in their own section below.
↑ Back to all sectionsRouter, shoulder, skew and molding plane blades, drawknives and marking tools
Some edges won't fit a honing guide at all. Fine Woodworking's roundup "Uncommonly Sharp: How to Sharpen 13 Tools that Don't Fit in Your Honing Guide" collects its authors' methods for them. Here's the short version of each, plus what else we could source. The rule from the rest of this page still holds: flat back, consistent bevel, burr off.
Router plane blades
A router plane blade is an L-shaped cutter, and on older planes the blade and its post are one piece of steel, so there's nothing for a guide to grip and the long shank gets in the way of the stone. In the FWW roundup, Vic Tesolin puts a hollow grind on the bevel so it rests on two points (the same reason a hollow-ground chisel is easy to hone freehand), and holds the blade in a V-block while honing, a method he credits to Derek Cohen. A sanding drum in a drill press makes the hollow quickly. The flat sole side of the cutter is the back: polish it like a chisel back and take the burr off there.
Skew rabbet, shoulder and other skewed blades
A skew blade's edge is ground at an angle across the blade so it slices cross-grain cleanly, and that skew has to survive every sharpening. Tom McKenna's entry in the roundup warns that freehand honing takes practice if you don't want to alter the original skew angle, and gives two jig methods for people who'd rather not. Whatever holds the blade, the goal is the same: the edge stays parallel to the stone through the stroke, and you check it against the plane's mouth before the blade goes back in.
Shoulder planes are bevel-up planes with a blade as wide as the body. Chris Gochnour's tune-up in the same roundup flattens and squares the sole to the sides first, then sharpens and sets the blade. The edge has to come out square to the blade's sides, or the plane cuts a stepped shoulder, so a honing guide earns its keep here.
Molding plane blades
If a molding plane's blade has no nicks and still matches the sole's profile, Alfred Sharp's advice in the roundup is to hone it with slip stones shaped to fit the curves, and that may take several stones in different shapes and radii. Wet/dry sandpaper wrapped around dowels does the same job for little money. Work the bevel side so the profile keeps its shape, and take the burr off the flat face. A blade that no longer matches its sole has to be reshaped to the sole first, which is a bigger job.
Drawknives
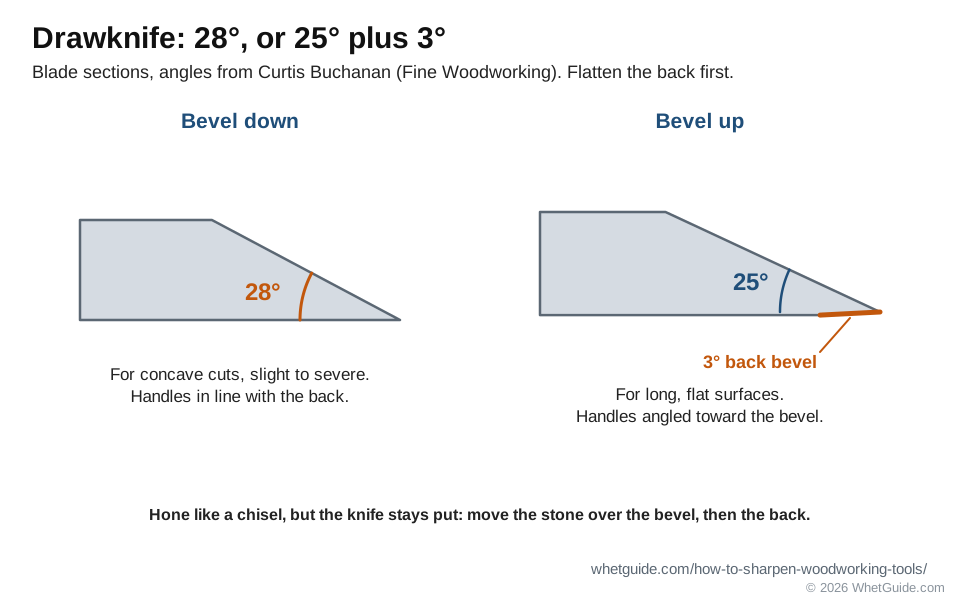
Windsor chair maker Curtis Buchanan's drawknife article for Fine Woodworking starts with which way up yours works. If the handles line up with the back of the blade, it's more comfortable bevel down. If they're angled closer to the bevel, it works best bevel up. Buchanan uses bevel up for long, flat surfaces and bevel down for concave cuts, from slight to severe.
- Flatten the back first. Buchanan grinds referencing off the back, so it has to be flat.
- Grind the bevel at 28° for a bevel-down knife. For a bevel-up knife, grind 25°; a small back bevel adds the other 3°.
- Hone it the way you'd hone a chisel, except the knife stays put. Brace it on the bench and move a stone or a paddle over the bevel, then over the back. Buchanan's point is that if you can sharpen a bench chisel, you have the skills for this.
- Watch your fingers. A drawknife is a long open edge, and the stone travels right along it.
Marking gauges and marking knives
A cutting gauge has a small blade that scores the line. In the roundup, Tim Rousseau rounds the tip of the bevel on a slow-speed grinder so the gauge can be pushed and pulled, then hones the back and the bevel on a polishing stone.
A marking knife's flat back rides against the square or rule, so it has to stay flat. In Woodworker's Journal's answer to a reader, Chris Marshall keeps the back face flat, hones it if needed, and sharpens the bevel or bevels on oil or water stones exactly as he would a chisel. Tim Inman, in the same piece, sharpens just one bevel so the cut lands right against the rule. Take the burr off on the back, on the finish stone only.
↑ Back to all sectionsHow to sharpen carving gouges and V-tools
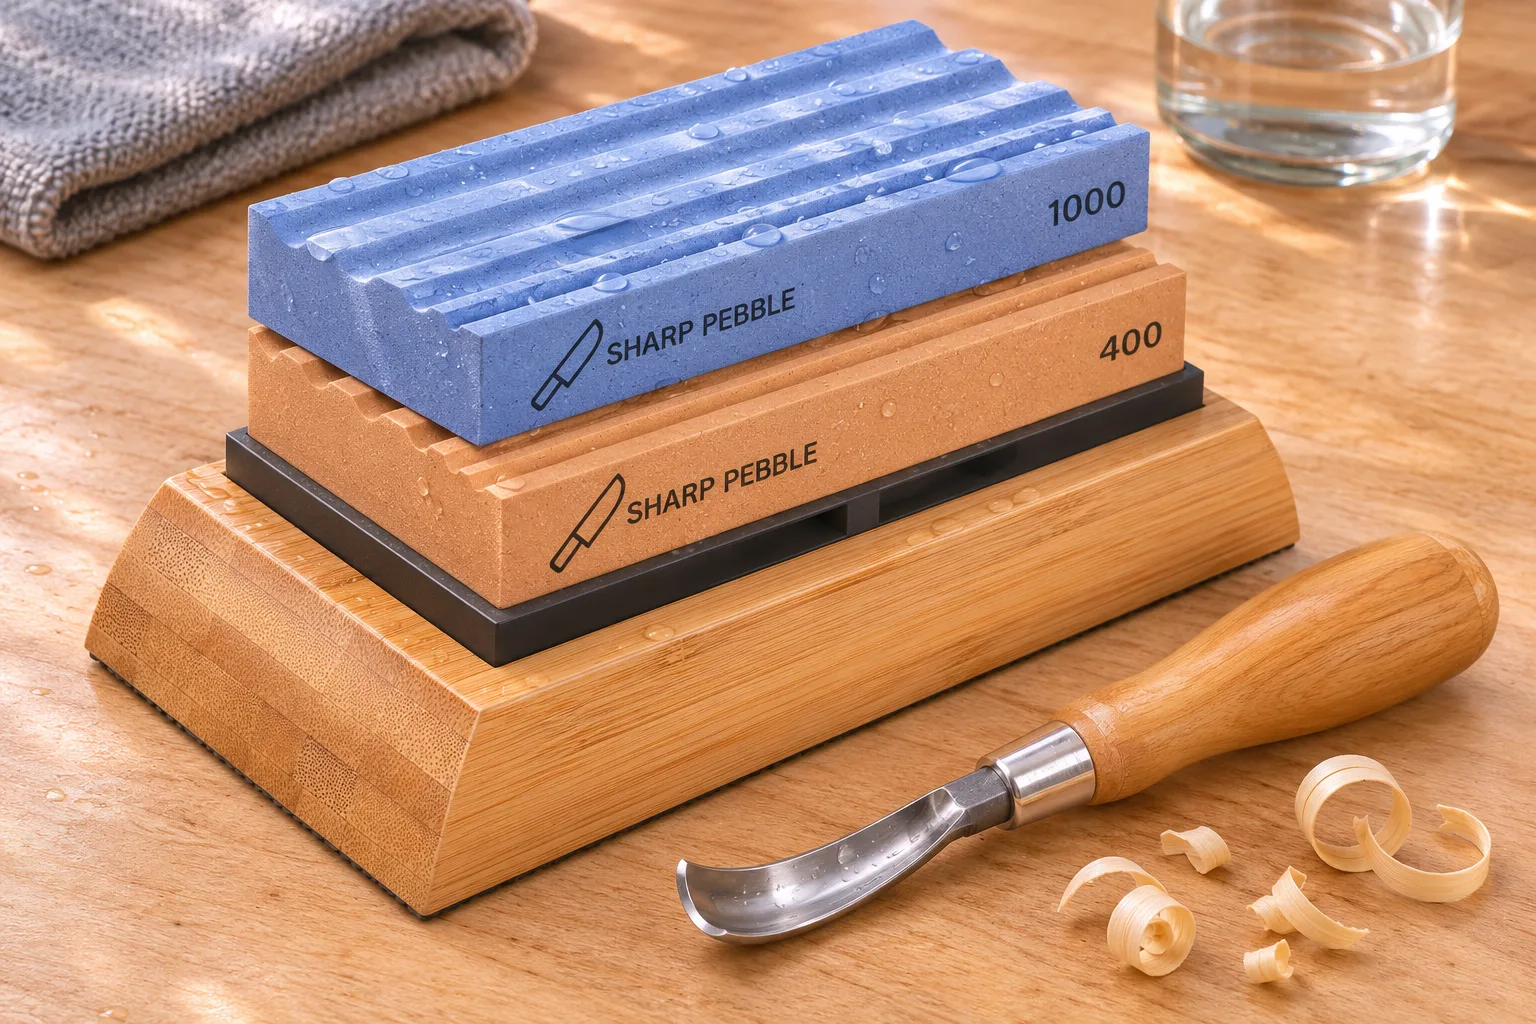
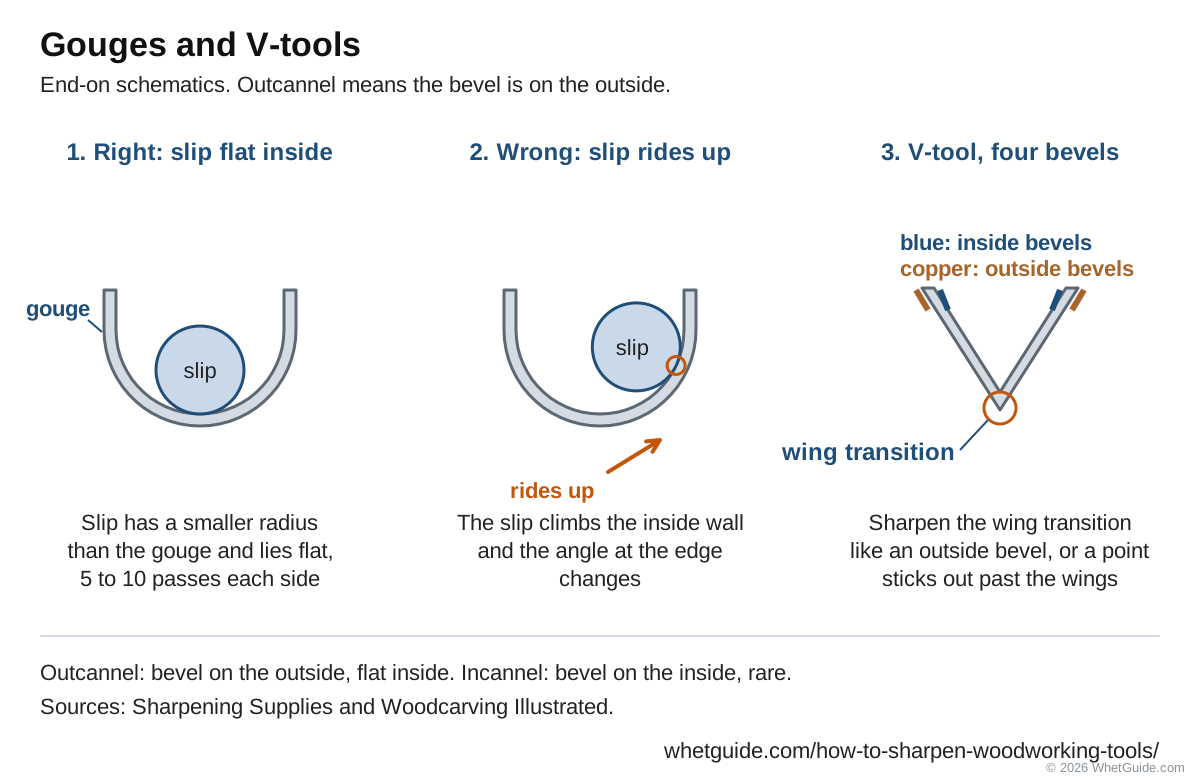
Most carving gouges are outcannel: the bevel is on the outside of the curve and the inside is left nearly flat. The method from Sharpening Supplies' gouge guide follows the same rule as everything else on this page: work the outside bevel until a burr forms inside, then take the burr off the inside.
- Color the outside bevel with a marker. Match the existing angle; there's no reason to change the bevel the maker put on unless it's damaged. If you're regrinding one, carver Chris Pye's tool-tuning guide gives a flat outside bevel at a cutting angle of 15° to 20° for most carving woods, with an optional shallower inside bevel of 5° to 10°. Carving chisels get the same 15° to 20°.
- Hone the outside on a flat stone. Hold the gouge at the bevel angle and roll it from one wing to the other as you push, so the whole curve touches. Stand so the motion comes from your arms and body, not from a twisting wrist.
- Check for a burr on the inside along the whole curve. Wherever the marker is still there, that part of the bevel didn't touch.
- Remove the burr inside with a slip stone whose radius is smaller than the gouge's curve. Lay it flat against the inside and use short strokes. Lift it a few degrees only if it isn't reaching the edge.
- Alternate. Sharpening Supplies suggests about 5 to 10 light passes on each side until the wire edge is gone.
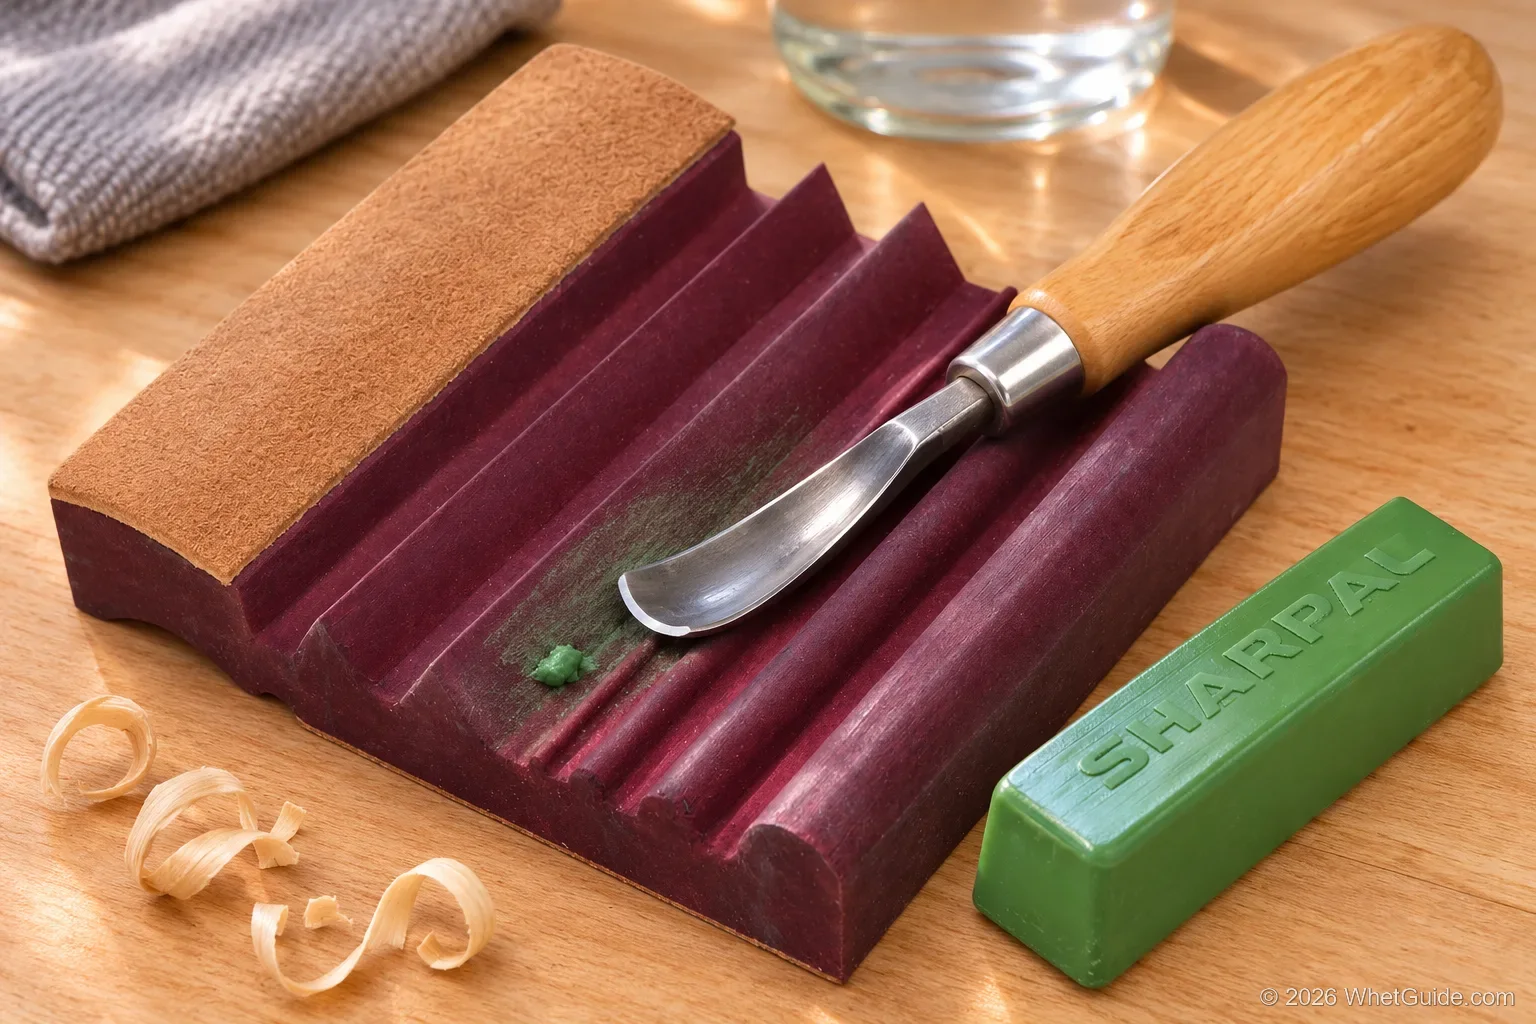
- Strop. Outside on a flat strop, rolling as you go. Inside with leather wrapped on a dowel, a shaped strop, or bent cardboard loaded with compound. Woodcarving Illustrated uses a leather shoelace loaded with compound for veiners.
Most of the time a carving tool needs stropping, not sharpening. Woodcarving Illustrated's warning is plain: don't re-sharpen unless the edge is broken or chipped or the bevel needs reshaping. Strop often and the stones stay in the drawer.
What does a sharp gouge feel like? It slices across the grain of soft basswood and leaves a shiny, polished cut with no white lines. A white streak in the cut marks a nick or a spot of burr at that point on the edge; look for a bright reflection there under a light.
V-tools
A V-tool has four bevels: two outside and two inside. Hone each outside face on a flat stone like a narrow chisel, keeping both at the same angle so the point stays centered. The tricky part is the bottom of the V where the two wings meet. That corner is a tiny gouge, and it needs the rolling stroke of a gouge. Skip it and a little point sticks out past the wings and tears the wood. Remove the inside burr with a knife-edge slip, and strop inside with a folded or shaped strop.
Gouge and V-tool mistakes
| What you see | Cause | Fix |
|---|---|---|
| Wings sharp, center dull, or the other way around | Rolling unevenly or changing angle mid-roll | Marker on the bevel; slow the roll down and hold the angle |
| An inside bevel appears | Slip stone tilted up, or a slip too big for the curve | Use a slip with a smaller radius and keep it flat |
| Sharp off the stone, dull after a few cuts | Burr left on | Alternate light passes inside and out, then strop |
| V-tool leaves a torn line at the bottom | Point sticking out past the wings | Hone the corner like a small gouge until it's level with the wings |
| Bevel keeps getting shorter and blunter | Over-sharpening and rounding | Strop instead of honing; regrind the bevel flat only when it's damaged |
Carving knives, sloyd knives and hook knives follow the same logic, with one wide bevel instead of a curved one, and they'll get their own guide here soon. For straight utility blades, see how to sharpen an X-Acto knife.
↑ Back to all sectionsHow to sharpen a cabinet scraper or card scraper
A card scraper is a flat rectangle of springy steel, and it takes fine, fluffy shavings off wood that a plane would tear. It doesn't cut with a sharp corner. It cuts with a tiny hook of steel that you roll over with a burnisher. KM Tools sums up the process in three words: square, elongate, fold. Woodcraft's Andy Rae lists the jobs it does best: smoothing tear-out in figured wood, leveling a finish between coats, cleaning off dried glue, flushing joints, and fitting drawer sides.
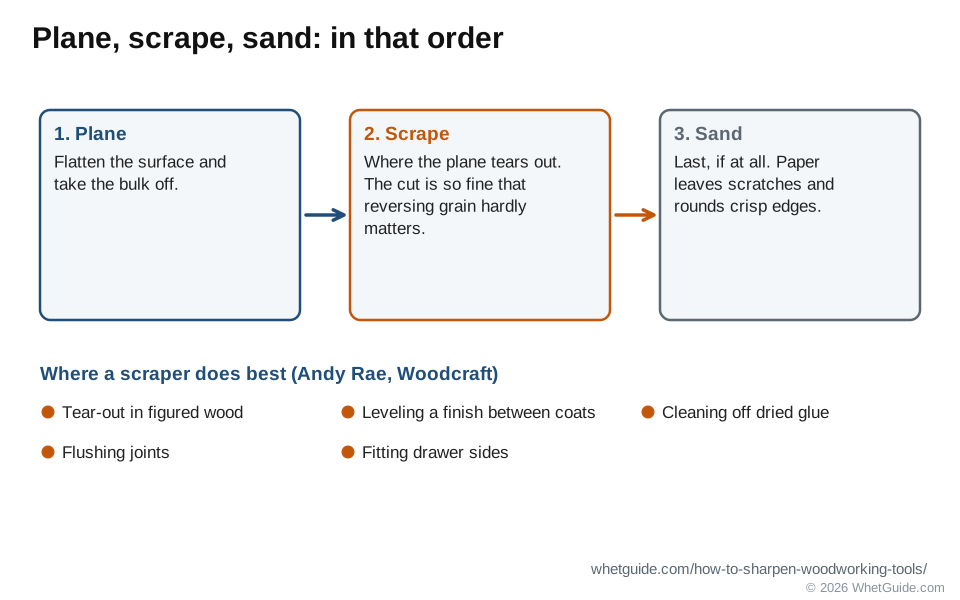
Plane, scraper or sandpaper? Plane first, to flatten and to take the bulk off. Scrape where the plane tears out, because a scraper takes such a fine cut that reversing grain hardly matters. Sand last, if at all: the scraper leaves a cut surface, and sandpaper leaves scratches and rounds crisp edges.
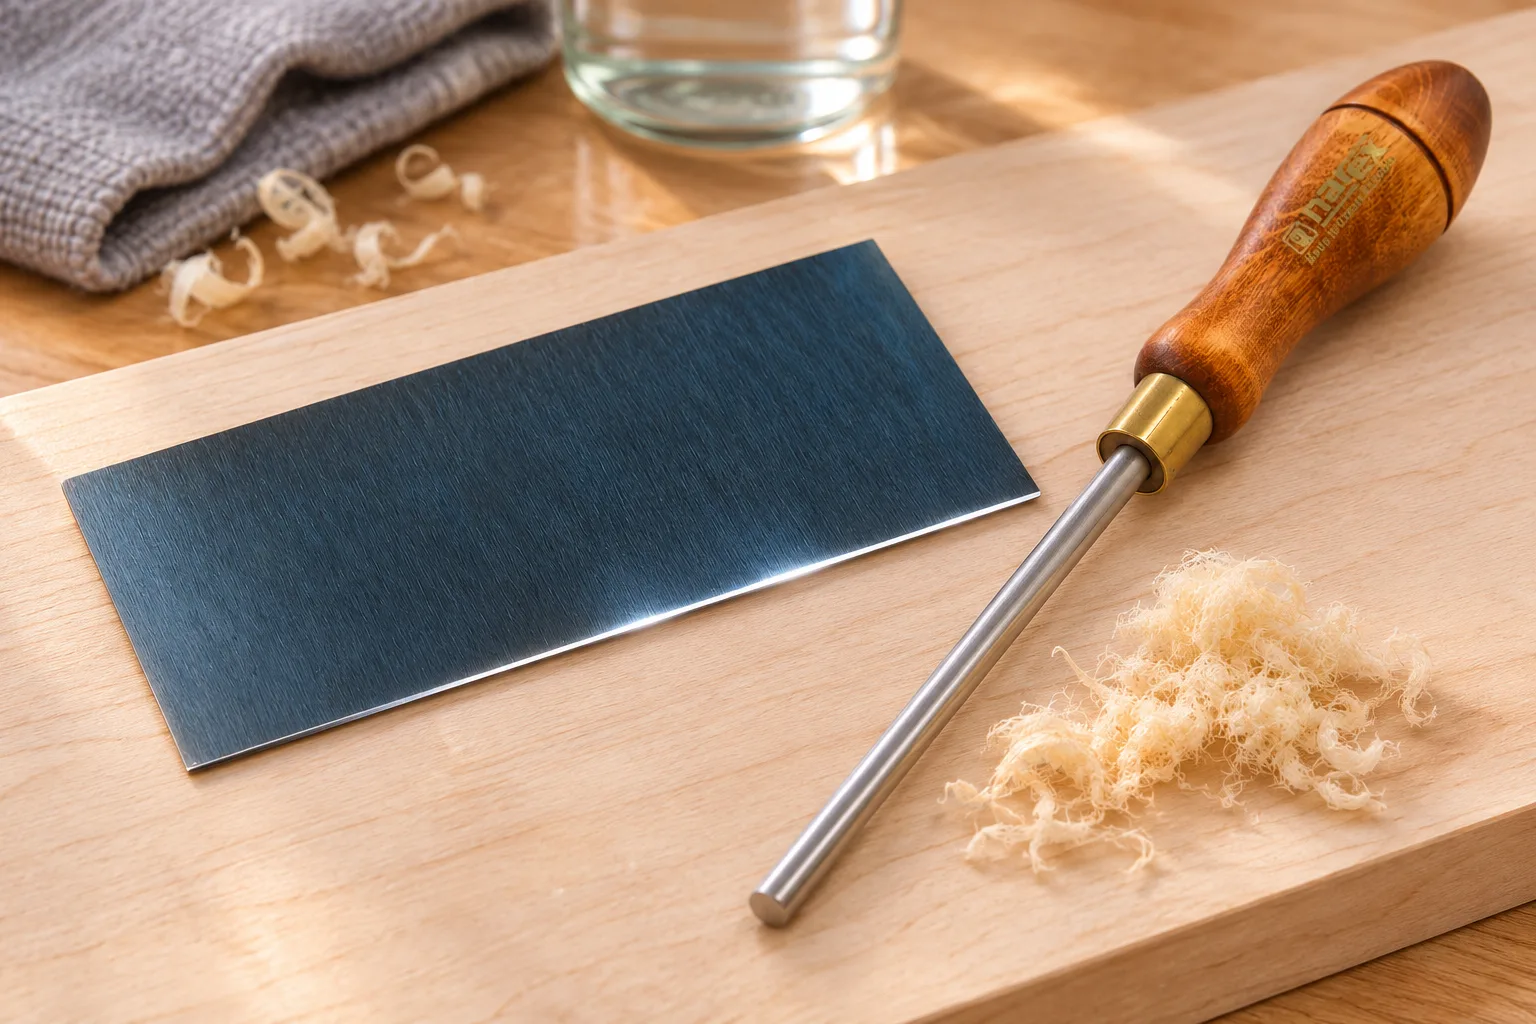
- File squareMill file, 90°
- PolishFaces and edge
- Draw the burrBurnisher flat
- Turn the hookA few degrees
- Test and useShavings, not dust
Rae says filing and honing take about four minutes, and turning the hook about 20 seconds once you know the motions. A cabinet scraper, the kind held in a two-handled body, gets the same treatment with one difference: its blade is filed and honed to a bevel instead of square, and the hook is turned from the bevel side. Follow the bevel the maker ground.
Which scraper to start with
| Scraper | Thickness | Best for | Source |
|---|---|---|---|
| Thin card scraper | 0.020 to 0.025 in. (about 0.6 mm) | Delicate work, fine finishing, flexes easily | Woodcraft (Rae; Scrapers Demystified) |
| Medium or thick card scraper | 0.030 to 0.040 in. (about 0.8 mm and up) | Heavier stock removal, stays cooler, harder to bend | Woodcraft |
| Gooseneck or curved scraper | Usually thin | Moldings, coves, the inside of bowls | Woodcraft Scrapers Demystified (optional extra) |
| Cabinet scraper (in a body) | Thicker, beveled blade | Wide flat surfaces without hot thumbs | n/a |
Woodcraft's Scrapers Demystified suggests a starter pair: one 0.6 mm and one 0.8 mm rectangular scraper. Rae's figures in his Woodcraft article put thin at 0.020 to 0.025 in. and thick at 0.030 to 0.040 in.
Step 1: file the edges square
- Clamp the scraper low in a vise, long edge up, so it can't chatter.
- Hold a 10 in. mill file flat across the edge at 90° to the faces and push it along the length. Rae uses 4 to 5 strokes. Fine Woodworking's fast method uses a mill bastard file the same way.
- Keep the file square. A block of wood with a saw kerf that holds the file upright is an easy jig. Check the edge with a small square.
- Stop when the old hook and any rounding are gone and the edge shows an even, bright filed line along its length.
Can you skip the file? For light use, yes. KM Tools and Woodcraft both say you can re-burnish an old edge a few times before it needs filing. Once re-burnishing stops working, file.
Step 2: polish the faces and the edge
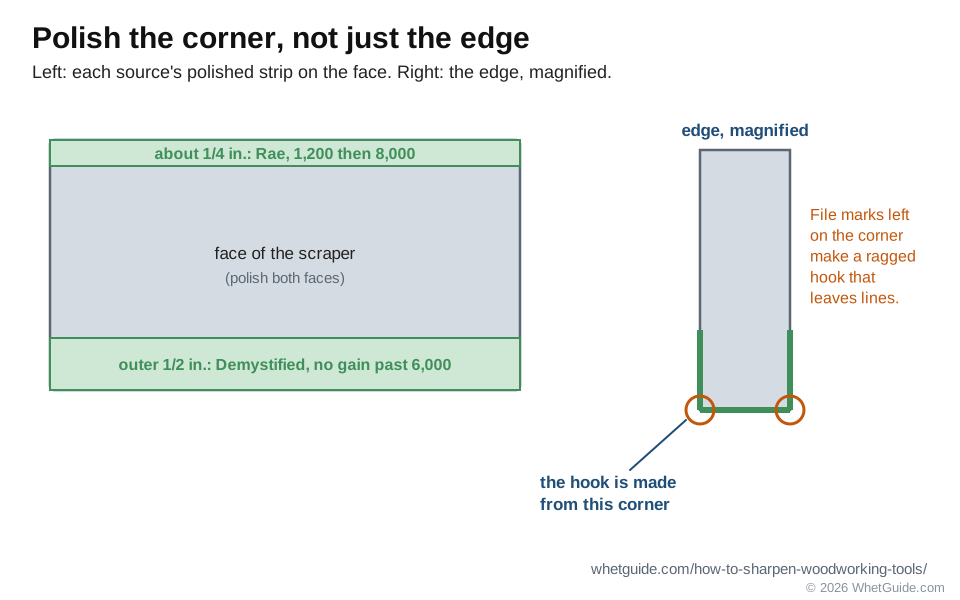
The hook is made from the corner where the edge meets the face, so both surfaces need to be smooth. File marks left on the corner turn into a ragged hook that leaves lines.
- Rae hones the faces and edge on a 1,200 grit water stone, then polishes on an 8,000. He polishes a mirror strip about 1/4 in. wide along each long edge of both faces.
- Woodcraft's Demystified author hones the outer 1/2 in. of each face and sees no gain past a 6,000 grit water stone.
- Fine Woodworking polishes from 320 to 600 grit on a fine diamond plate or wet/dry paper on glass, with single long strokes. Short strokes can leave an uneven surface.
- Caspar hones scraper edges on an extra-fine diamond paddle, about equal to a soft Arkansas or 1,000 water stone, with 3-in-One oil. He clamps the scraper level and rests the paddle on a small stick so it stays at 90°.
Why diamonds? Running a thin steel edge back and forth on a water stone cuts a groove in the stone. A diamond plate doesn't groove. On a water stone, Lee Valley's instructions say to use the edge of the stone, since the scraper will scratch the face. Or move the scraper over the whole surface so the wear spreads out.
Step 3: draw the burr with a burnisher
A burnisher is a hard, polished steel rod. It doesn't cut. It pushes steel around. Lee Valley's cabinet scraper instructions say any burnisher will do, as long as it's harder than the scraper and polished, because a scratched burnisher leaves a ragged hook. Family Handyman's old article said a screwdriver shank or the back of a chisel works too, as long as it's harder than the scraper.
- Lay the scraper flat on the bench with the polished edge just over the edge of the bench. Fine Woodworking's fast method has it about 1 in. past.
- Put a drop of oil on the face. Rae burnishes flat first, with a little oil, to consolidate the burr.
- Hold the burnisher flat on the face, or tilted a degree or two as Scrapers Demystified suggests, and draw it along the edge with firm pressure. This stretches the corner out past the edge. KM Tools uses about 10 passes per edge; Fine Woodworking uses 4 to 5 passes held square to the edge to mushroom it.
- Flip the scraper and do the other face. Repeat on the second long edge if you're hooking all four corners.
Step 4: turn the hook
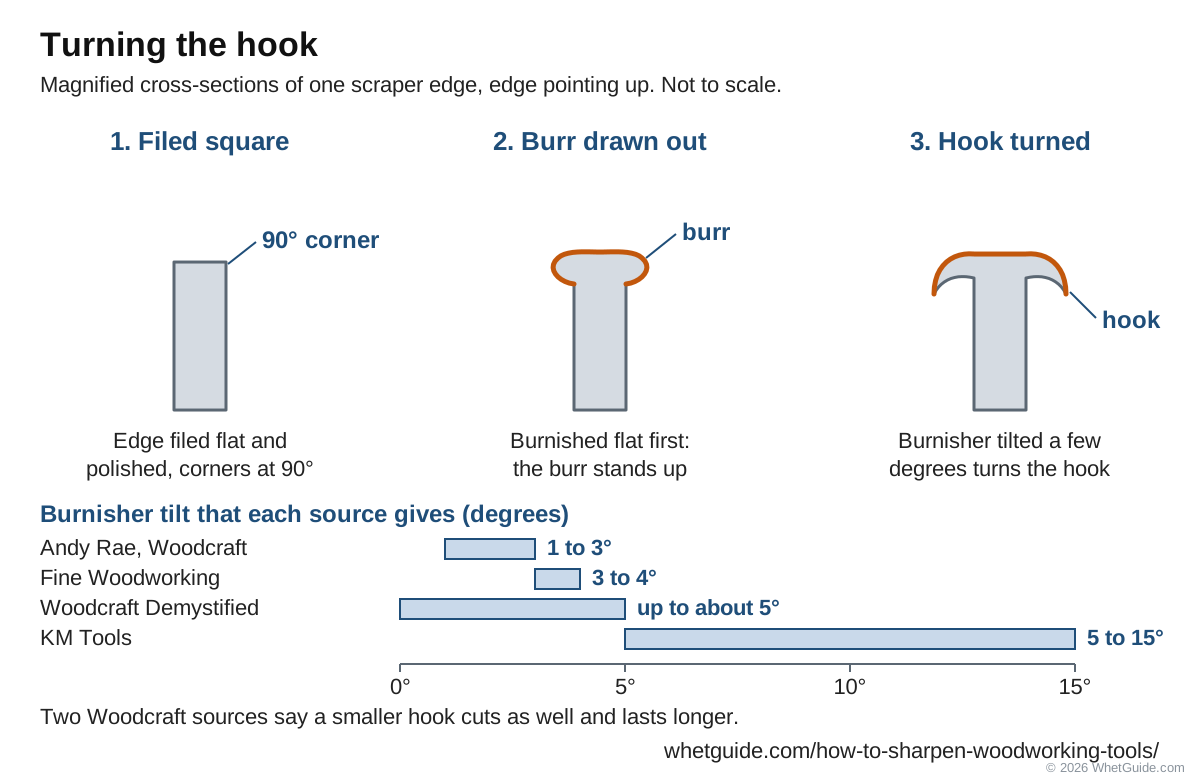
Clamp the scraper upright in the vise. Start with the burnisher square across the edge, then tilt it a few degrees with each stroke so the stretched corner folds over into a hook. Use light pressure. KM Tools compares it to pressing an elevator button, and Fine Woodworking cites Tage Frid at about 4 oz. Too much pressure makes a big, coarse hook that cuts rough and wears out fast.
How far to tilt is where the sources disagree. Here are four of them side by side.
| Source | Tilt | Passes |
|---|---|---|
| Woodcraft, Andy Rae | 1° to 3° | 2 to 3 strokes |
| Fine Woodworking | 3° to 4° | 2 to 3 light passes |
| Woodcraft, Scrapers Demystified | Square, rising to about 5° | 2 to 3 passes |
| KM Tools | 5° to 15° | 6 to 8 passes per edge |
Our advice: start small, around Rae's 1° to 3°. Both Woodcraft sources favor a small hook. Rae says it performs better and lasts longer, and Demystified says small hooks cut as well as 15° hooks and last longer. A bigger tilt is a fix for a scraper that won't bite, not a starting point.
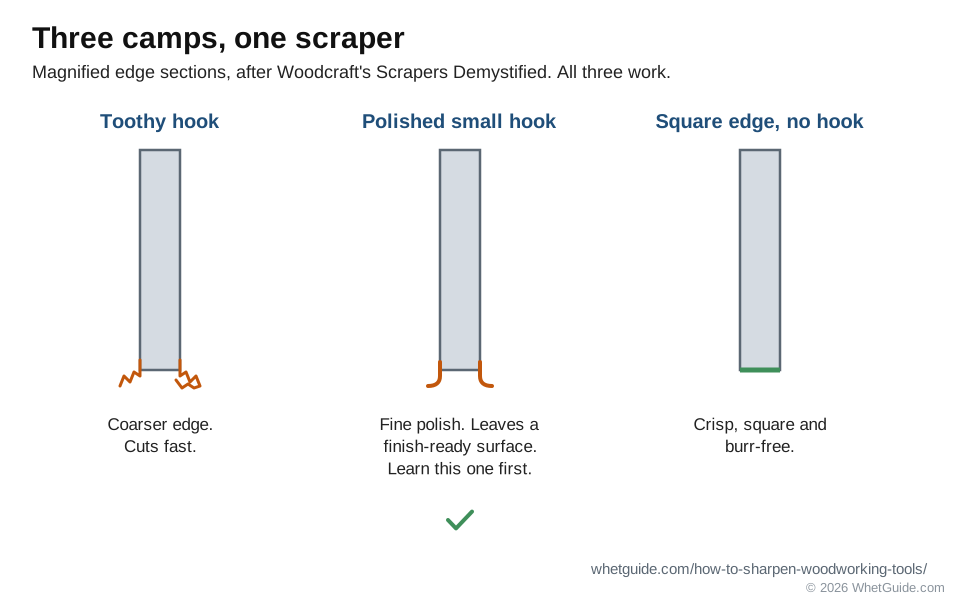
Not everyone even turns a hook. Scrapers Demystified describes three camps: woodworkers who leave a coarser edge for a toothier hook that cuts fast, those who polish fine for a smooth hook that leaves a finish-ready surface, and those who skip the hook and scrape with a crisp, square, burr-free edge. All three work. The polished small hook is the one to learn first.
Step 5: test the hook
Draw a fingertip off the face across the edge (never along it). You should feel the hook catch your skin. Then scrape a scrap of hardwood. A good hook takes fine, curly shavings. Rae's rule: dust instead of shavings means the hook is gone or was never turned. KM Tools suggests drawing marker arrows on the scraper next to each hooked edge, so you know which edges are sharp and which are used up.
How to use a card scraper
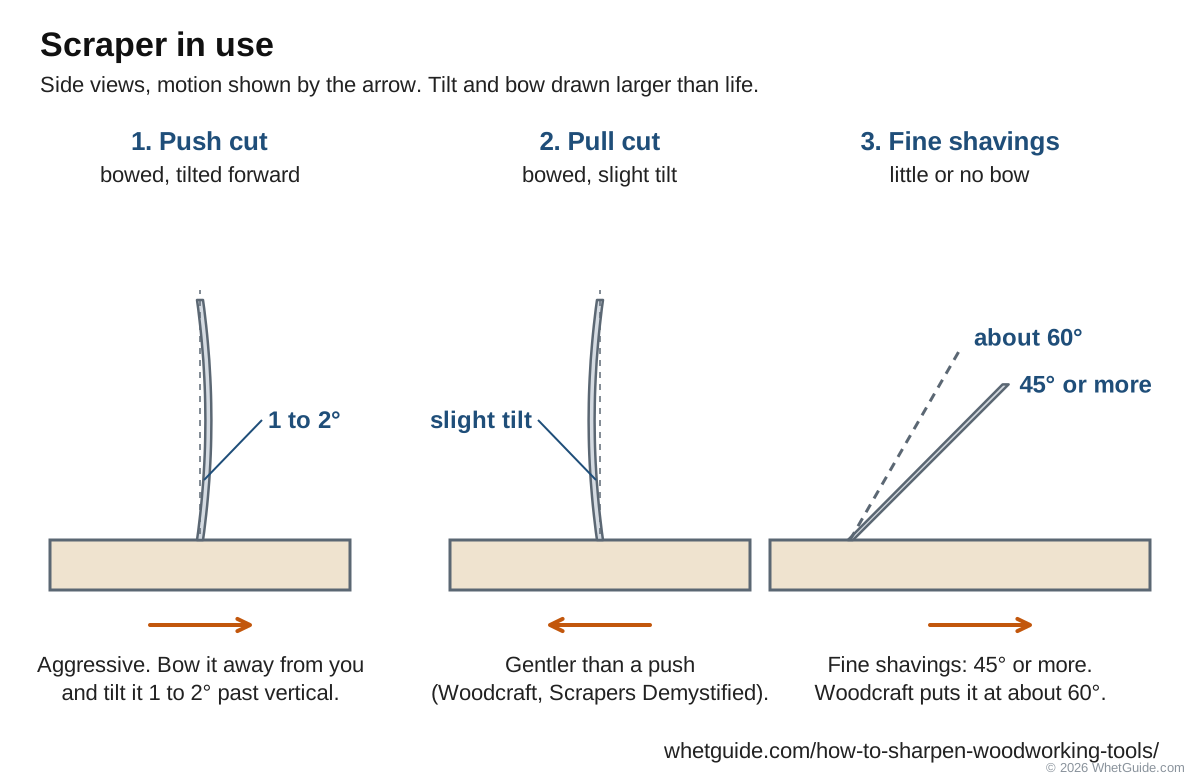
Hold the scraper in both hands with your fingers on the ends and your thumbs pressing the middle so it bows slightly away from you. That bow focuses the cut in the middle and keeps the corners from digging in.
- Aggressive push cut: Rae bows the scraper and tilts it forward 1° to 2° past 90°, then pushes. It removes material fast and can dish the surface if you stay in one spot.
- Fine shavings: little or no bow, tilted to 45° or more, per Rae. Scrapers Demystified scrapes at about 60°.
- Push or pull: Demystified says pulling is gentler. Pull for final passes and for thin veneers.
- Work at a slight skew to the grain, and change direction if tear-out appears.
Scrapers get hot. A thick scraper stays cooler, a cabinet scraper keeps the heat off your thumbs, and rubber fingertips or a magnetic holder help on long sessions. Fine Woodworking says to expect 5 to 10 minutes of cutting from a fresh hook.
How many times can you re-burnish?
When the shavings turn to dust, you can usually roll a new hook without filing. Flatten the old hook with the burnisher flat on the face, draw the burr again, and turn it again.
| Source | Re-burnish before filing again |
|---|---|
| Woodcraft, Scrapers Demystified | 4 to 6 times |
| Fine Woodworking | 5 to 6 times, before the edge gets brittle |
| KM Tools | About 4 times |
| Woodcraft, Andy Rae | Once or twice |
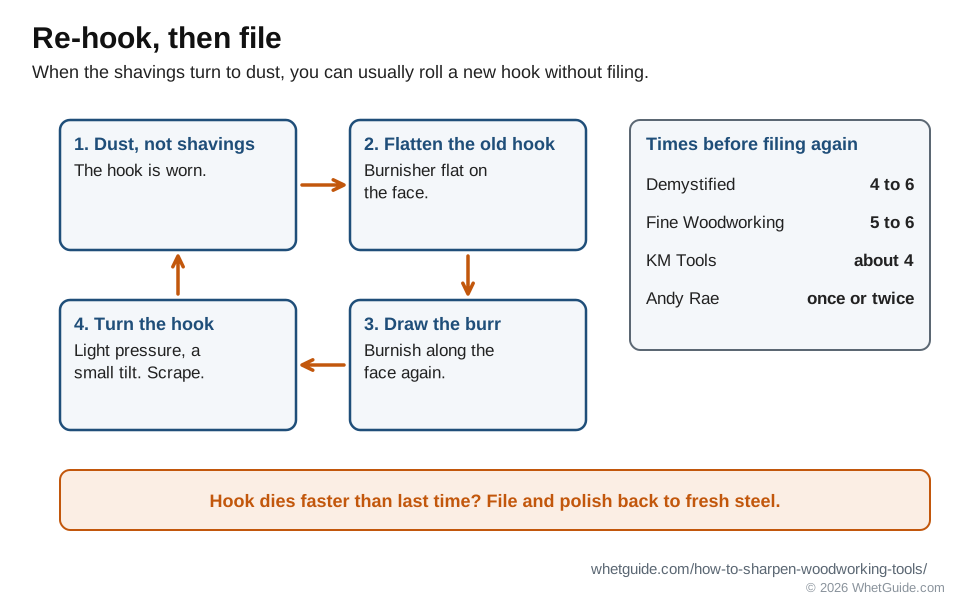
Each re-hook uses up steel that has already been work-hardened and stretched. When the hook goes faster than it did the time before, file and polish back to fresh steel.
Curved and gooseneck scrapers
A gooseneck or curved scraper is sharpened the same way, but the file and stone have to follow the curve. File the edge square with a half-round file, or wrap wet/dry paper around a dowel that fits the curve, keeping the file at 90° to the faces. Polish the faces flat on a plate as usual. Burnish with a round burnisher, rolling it around the curve so every point gets the same tilt. Tight inside curves are easier with a small-diameter or pointed burnisher.
Scraper troubleshooting
| Problem | Likely cause | Fix |
|---|---|---|
| Dust, not shavings | Hook worn out, never turned, or flattened by too much pressure | Re-burnish; if that fails, file and polish again (Rae) |
| Only one edge cuts | Uneven filing or burnishing on the other edge | Check both edges with a square; re-file the weak one |
| The burr won't form | Burnisher softer than the scraper, or an oily, scratched burnisher | Use a harder burnisher (KM Tools readers report this often); polish the burnisher |
| Rough cut with lines in it | File marks left on the corner, or the hook too big | Polish the faces and edge further; use a smaller tilt and lighter pressure |
| Hook too large, chatters | Too much tilt or too much pressure | File square and start again, lighter |
| Tear-out while scraping | Scraping against the grain, or too aggressive a hook | Change direction or skew; use a finer hook and less bow |
| Grooves worn in the stone | Honing the thin edge in one spot | Use a diamond plate, or move the scraper across the whole stone |
| Scraper too hot to hold | Friction on long sessions, thin scraper | Thicker scraper, cabinet scraper, or finger guards |
| Thick scraper won't hook | More steel to move | More burnishing passes when drawing the burr, same light pressure on the hook |
Carbide scrapers, the kind used for paint and engineering work, are a different job. Carbide is too hard for oil or water stones. Trend, which makes diamond hones, uses its fine 600 grit diamond for tungsten carbide, and one scraper maker's guide adds honing oil on the diamond, or a diamond wheel to grind. Many people simply replace the carbide edge.
↑ Back to all sectionsStropping woodworking tools
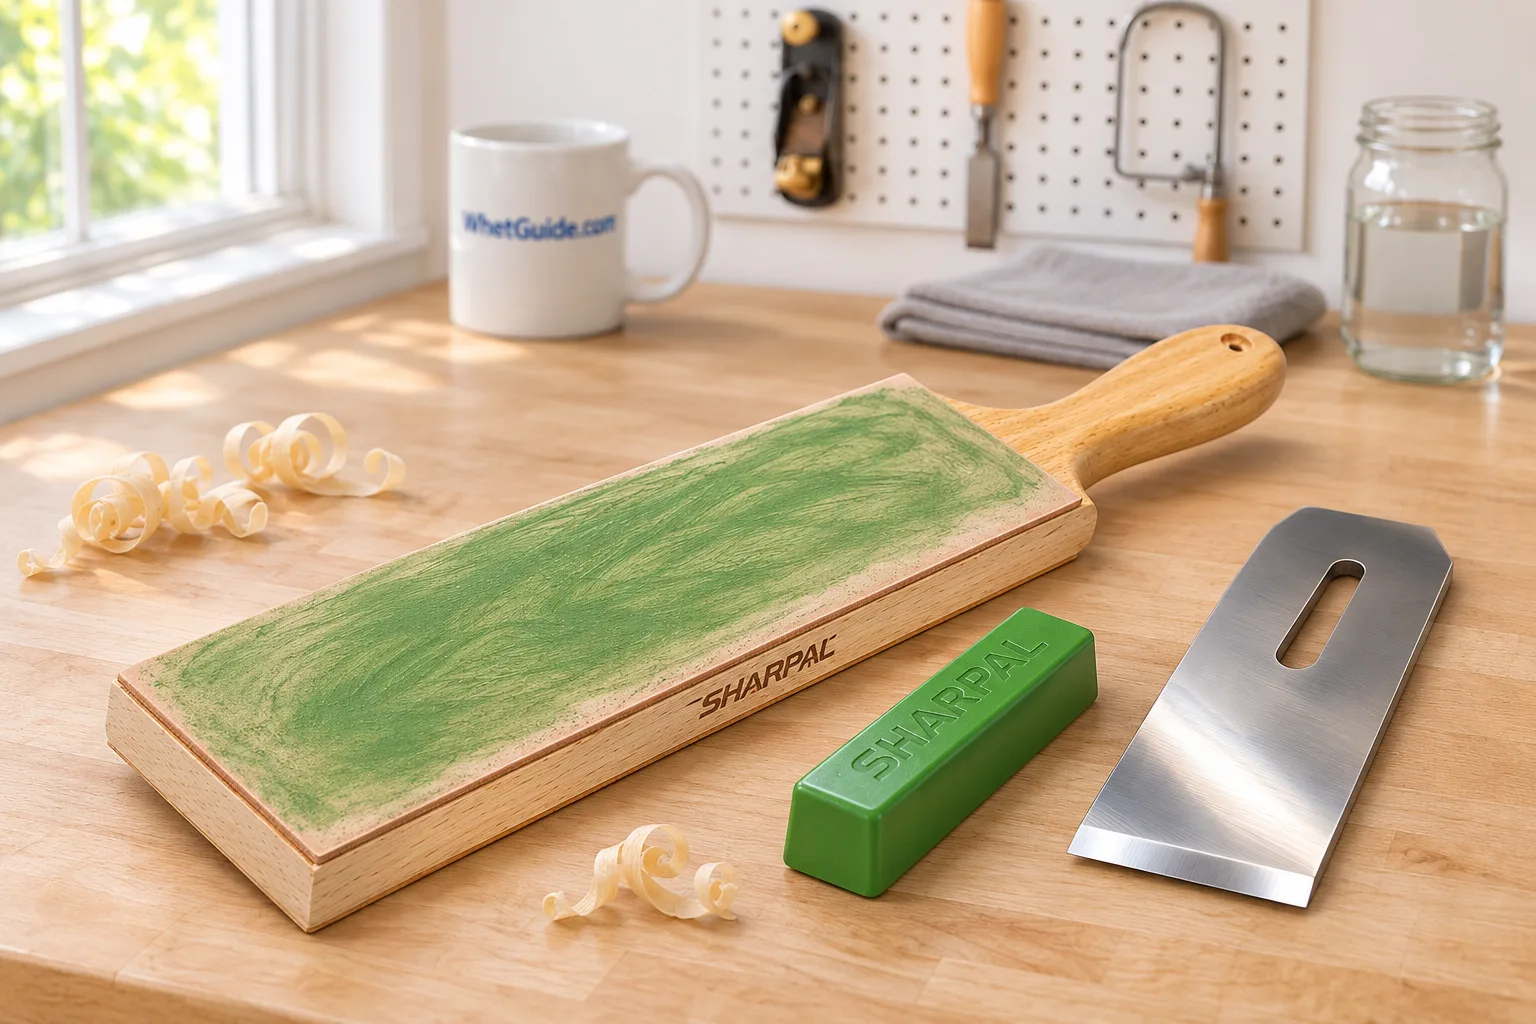
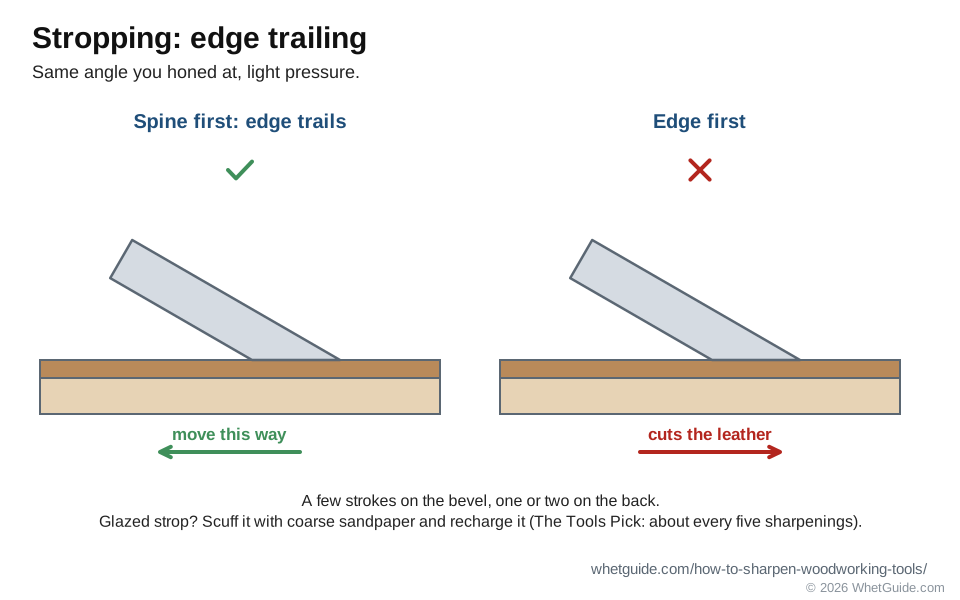
A strop is leather glued to a flat board and rubbed with a fine polishing compound. It takes off the last of the wire edge and polishes the micro bevel. Always draw the tool away from the edge (spine or heel first), never edge-first, or you'll cut the leather. Hold the same angle you honed at, with light pressure, and alternate: a few strokes on the bevel, one or two on the flat back.
On a plane iron, the strop is optional after an 8,000 stone. On carving tools it's the main tool: carvers strop often and hone only when the edge is chipped. The Tools Pick's plane guide says to re-texture a strop about every five sharpenings, because a glazed strop stops working; scuff it with coarse sandpaper and recharge it. Diamond paste is the other polishing route. Brian Boggs, in Fine Woodworking's Get Sharp the Diamond Way, polishes the bevel and the back with diamond paste on a steel lapping plate, then strops the burr off on a wooden block charged with paste. For more on compounds and strokes, see how to strop a knife (the method is the same) and our leather strop picks.
Grinders: when you need one, and how not to ruin steel
You don't need a grinder to sharpen a plane iron in good shape. Lie-Nielsen ships its blades with the 25° bevel already ground, so they only need honing. A grinder earns its place for three jobs: removing a nick, reshaping a damaged or wrong bevel, and resetting a secondary bevel that has grown too wide.
A powered flat-disc sharpener is the in-between option. The Work Sharp WS3000 spins a tempered glass wheel faced with stick-on abrasive discs, and a port under the wheel holds chisels and plane irons up to 2 in. wide at preset angles of 20°, 25°, 30° or 35°, so no jig is needed (A Concord Carpenter's review). Because the wheel is flat, the bevel comes out flat rather than hollow ground. Keep the passes short so the edge doesn't heat.
Set the grinder up first
Andy Rae's first trick in Woodcraft's 10 essential sharpening tricks is the setup, and it's the cheapest improvement you can make:
| Setting | Rae (Woodcraft), bench edge tools | Turners |
|---|---|---|
| Speed | Slow speed, 1,750 rpm; it makes less heat than a 3,450 rpm grinder | Lacer: 1,725 or 1,800 rpm. Ditmer: 1,750 rpm |
| Wheel | 6 or 8 in.; a bigger wheel cuts faster but heats the edge more | Lacer and Ditmer: 8 in., 1 in. wide |
| Grit and bond | 120 grit, vitrified bond | Lacer: 60 grit, with 36 or 46 for heavy shaping. Ditmer: 80 to rough, 120 to finish. Oneway: 80 and 120 for small tools and finishing gouges |
| Dressing | Diamond dresser, then a silicon carbide stick, leaving the face with a slight belly so narrow tools are easier to control | Lacer: gray stick, star wheel or diamond dresser to keep it true |
| Height | Wheel center about 44 to 48 in. from the floor, so you can lock your elbows | Ditmer: grinder base about 40 in. from the floor |
Turners' figures come from Alan Lacer's gouge sharpening article (first printed in American Woodworker, hosted by Popular Woodworking), Judy Ditmer's sharpening for woodturners in Popular Woodworking, and Oneway's Wolverine jig instructions. A dry wheel leaves a slightly hollow bevel, which Rae and Caspar both like: the tool rests on the heel and toe of the hollow, so freehand honing finds the angle on its own. Japanese chisels and mortise chisels should stay flat ground.
Grind to a line, then check it
- Square the edge first if it's out. Rae sprays the back near the edge with fast-drying layout fluid (machinists' bluing), scribes a square line across it with an awl, and grinds to the line. Denatured alcohol or a few strokes on the stone take the coating off afterward.
- For a bad nick, Caspar sets the rest at 90° and grinds the edge square and blunt past the nick, then grinds the bevel back to the edge.
- Color the whole bevel with a dark marker. Grind with light pressure, moving across the wheel, until the color is gone evenly. Leftover ink shows where the rest is set wrong.
- Look at the edge under a pocket magnifier or a photographer's loupe. Rae uses one to check that the grind is even and that no big chips are left.
- Dress the wheel whenever it glazes. Caspar says a glazed or clogged wheel cuts slowly and overheats, which can draw the temper.
Heat: quench it or not?
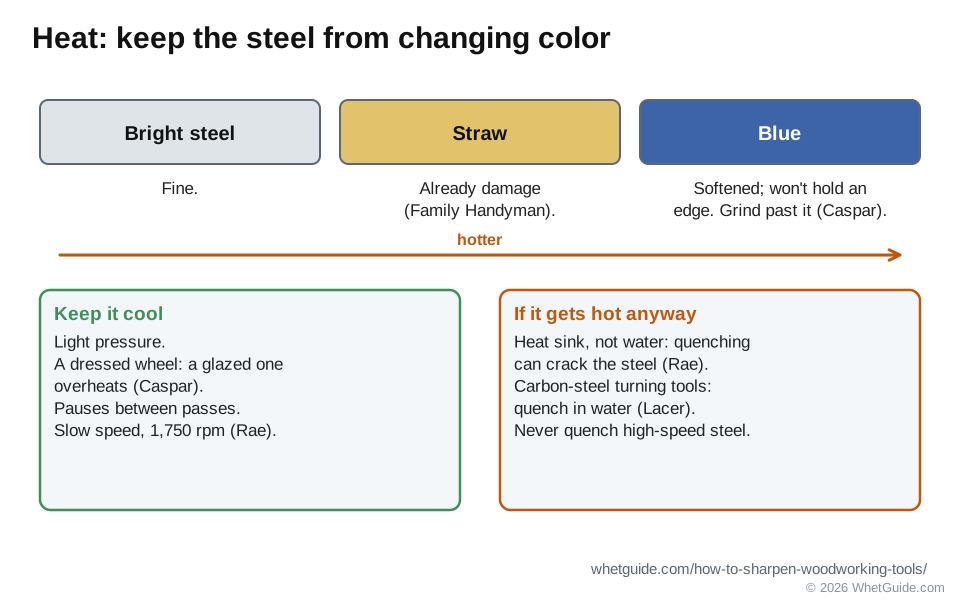
Everyone agrees on the danger. Caspar warns that overheating turns steel blue, and blued steel is softened and won't hold an edge, so you have to grind past it. Family Handyman's garden-tool article said a straw color already means damage. Where the sources split is what to do with a hot tool.
| Source | How to cool a hot tool |
|---|---|
| Andy Rae, Woodcraft | Don't quench a hot blade in water: the thermal shock can crack the steel. Set it on a heat sink (he uses a computer heat sink) to draw the heat out. |
| Alan Lacer, American Woodworker | Quench carbon-steel turning tools in water, but never quench high-speed steel. |
| Oneway, Wolverine instructions | Cool chisels often, since most are carbon steel and soften when they turn blue; keep a skew cool by dipping it in water. |
| Family Handyman (2016) | Keep a bucket of water by the grinder and cool the tool after every pass (garden tools). |
Our take: keep the steel from getting hot in the first place, with light pressure, a dressed wheel and pauses between passes, and you rarely have to choose. If a thin edge does get hot anyway, we'd set it on a heat sink rather than risk a crack. Never quench high-speed steel.
Slow wet grinders such as the Tormek run through a water bath, which keeps the edge cool. Tormek's manual says its SE-77 square edge jig takes plane irons and chisels up to 77 mm (3 in.) wide and 9 mm (3/8 in.) thick, per the T-8 instruction manual. Our Tormek T1 vs T2 vs T4 vs T8 comparison covers the models. Knife-focused technique for a dry wheel and a belt is in sharpening on a bench grinder and sharpening on a belt sander.
Rotary tools like a Dremel spin small stones fast, and a thin edge heats up in a second. For gouge flutes there's a gentler rotary method using sandpaper on a dowel; it's in lathe tools.
Grinder safety
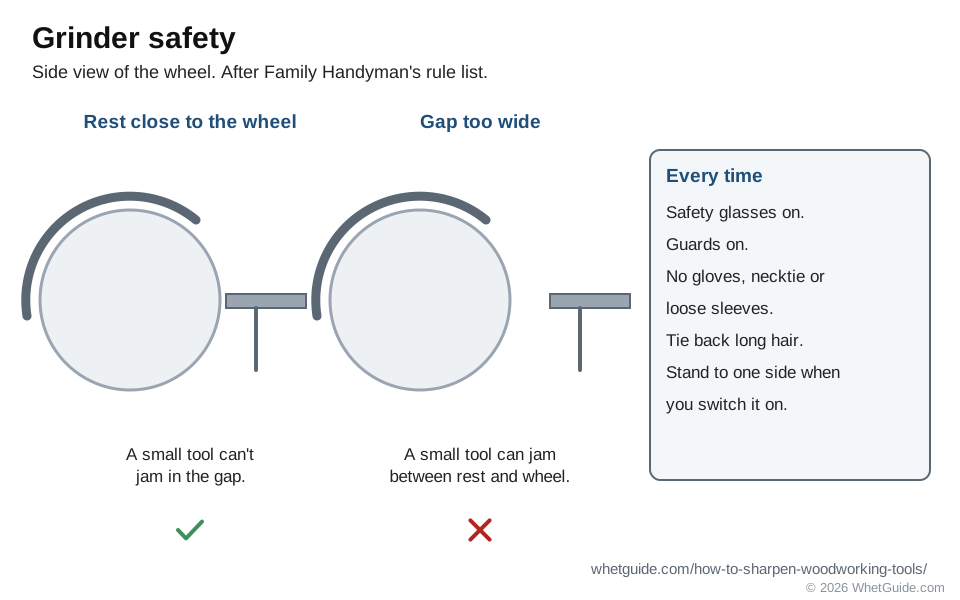
Family Handyman's rule list still applies: never wear gloves, a necktie or loose sleeves near a spinning wheel, and tie back long hair. A glove can be grabbed and pulled in faster than you can let go.
Also wear safety glasses, keep the guards on, keep the tool rest close to the wheel so a small tool can't jam between them, and stand to one side when you switch the grinder on.
The three-tool method: grinder, mill file and stone
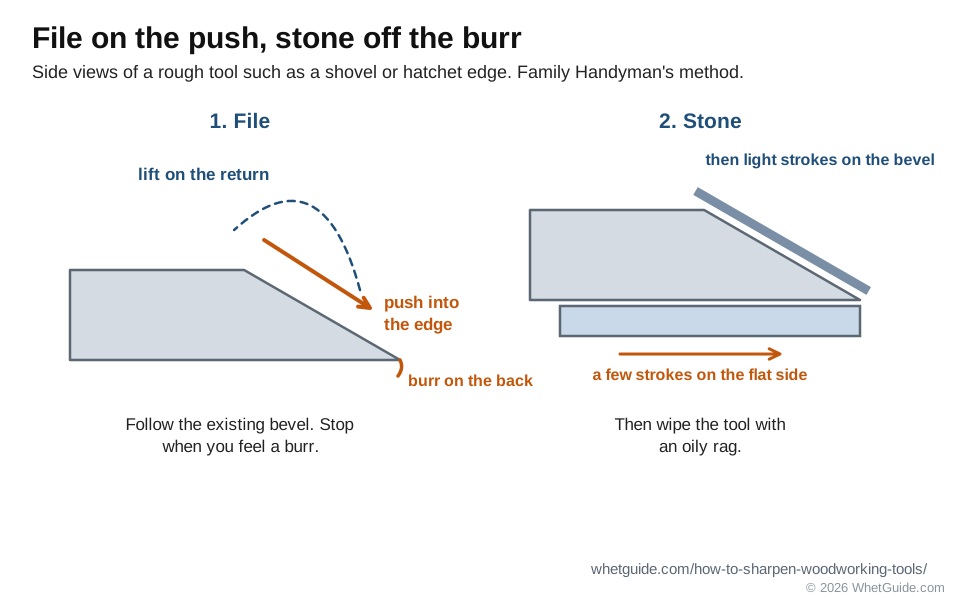
For rough tools, Family Handyman's step-by-step "How to Sharpen Tools" used three tools, and the method still works. A 10 in. mill bastard file plus a synthetic finishing stone covers most garden and rough shop tools. The grinding wheel is only for removing larger amounts of steel, like a badly chipped hatchet or a mower blade that has hit rocks.
- Clamp the tool so it can't move, edge up or edge out.
- File into the edge, on the push stroke only, following the existing bevel. Lift the file on the return; dragging it back dulls the teeth.
- Keep going until you feel a burr along the back side of the edge.
- Take the burr off with a few strokes of the finishing stone on the flat side, then a few light strokes on the bevel.
- Wipe the tool with an oily rag before putting it away.
File work leaves a coarser edge than a stone does, and on a shovel or mattock that's what you want. On a hatchet or hand axe, follow the file with a stone; our axe guide has the details.
Saws and saw blades: clean, file or send them out
Clean a blade before you decide it's dull. Paul Anthony, answering a reader in Woodcraft Magazine, says pitch buildup can make a blade perform as if it's duller than it is, and that a clean blade's teeth don't overheat. His method: lay the blade on a scrap, spray a citrus degreaser on the teeth, give it a few minutes, scrub with a brass brush, rinse, dry it well and wipe on a rust protectant.
Hand saws are sharpened tooth by tooth with a small triangular saw file, with the blade clamped in a saw vise, and then the set (the alternating lean of the teeth) is restored with a saw set. It's a skill of its own, and most people send saws to a sharpening service. Hardpoint saws and many Japanese-style pull saws have hardened teeth that a file won't cut, so their blades are replaced instead. Carbide-tipped circular and table saw blades need diamond wheels, which means a sharpening service. Woodart.studio's sharpening guide treats ordinary circular and miter saw blades as more of a disposable item.
Most people replace a dull bandsaw blade. Highland Woodworking's staff say bandsaw blades are typically thrown away when they get dull, because with that many teeth a service charges nearly what a new blade costs. The exception is a carbide-tipped band, which costs well over $100, so paying a third of its price to have it sharpened can make sense.
↑ Back to all sectionsSharpening lathe tools
Turning tools are sharpened on a grinder, and most of them are used straight off the wheel. A turner may resharpen several times in one session, and Oneway's advice is to sharpen a dull tool before you put it away so every tool on the rack is ready. What makes turning tools manageable is a jig that puts the tool back at the same angle every time: a platform for flat tools and a vee-arm or gouge jig for anything you roll.
Grind angles by tool
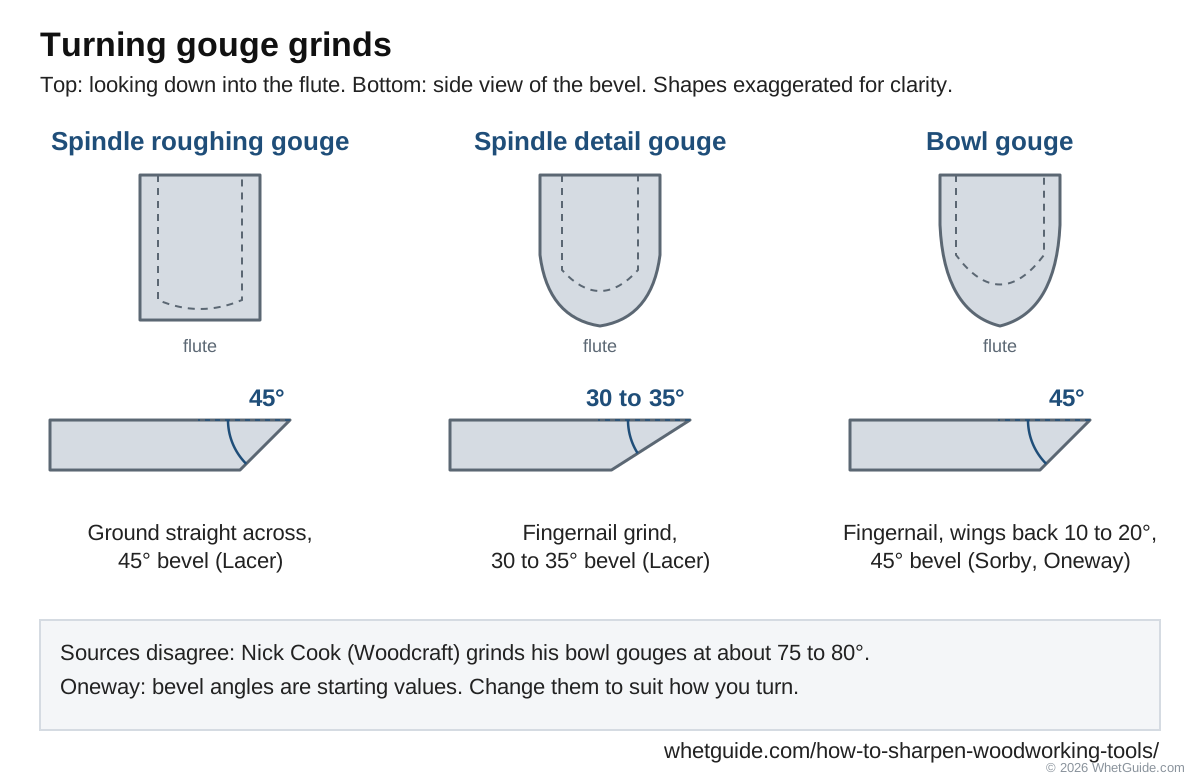
The sources agree on the method and disagree on the numbers, so here they are side by side. Oneway's own note is the honest one: bevel angles are starting values, and you change them to suit how you turn.
| Tool | Grind | Angle, and who says so |
|---|---|---|
| Bowl gouge | Fingernail, wings swept back | 45° in Robert Sorby's fingernail jig, with the gouge 2 in. (50 mm) out of the clamp. Oneway calls 45° a good general-purpose bevel, with the corners ground back about 10° to 20°. Nick Cook (Woodcraft) grinds his own at about 75° to 80° for more steel under the edge. |
| Spindle roughing gouge | Square across, not swept back | 45° (Lacer). Cook: anything from 40° to 55° works, so start from the factory angle. Oneway: grind it like a bowl gouge but leave the end square. |
| Spindle or detail gouge | Fingernail | 30° to 35° (Lacer). Cook's photo caption shows 25° to 30°. |
| Skew chisel | Two flat bevels, then honed | Cook's caption: 35° to 40°; he says to follow the factory bevel. Oneway grinds it like a gouge with a small sideways slide, turning it over often. |
| Diamond parting tool | Two bevels meeting at the point | Factory bevels meet at 50° (Cook). Lower cuts cleaner but breaks down faster. |
| Scraper | Ground, then the burr is the cutting edge | Cook's caption: a 70° burr angle. He grinds until sparks start landing on the top face, which raises the burr. |
Cook's figures are from Woodcraft's Sharpening Turning Tools Made Simple; Lacer's from his gouge article; Oneway's from the Wolverine instructions.
Fingernail or traditional grind?
A traditional grind runs straight across the end of the gouge, so the edge is mostly at the tip. A fingernail grind sweeps the wings back along the sides, so the edge is shaped like a fingernail and you can cut with the side as well as the nose. Spindle detail gouges and most bowl gouges get a fingernail; roughing gouges stay square. Oneway sells its Vari-Grind jig for exactly this shape, plus the long side (Irish) grind that's popular on deep-fluted bowl gouges. How far back the wings go is personal preference, and the further you roll the tool, the further back they end up.
Set up the jig
- Set the jig's rest to the same height as the lathe's tool rest if you can, as Cook suggests, so the bevel you grind is the one you cut with.
- Set the projection. Sorby has the bowl gouge 2 in. (50 mm) out of the clamp; Cook starts a bowl gouge in the Vari-Grind about 2 in. out from the front of the jig. Write your number down and use it every time.
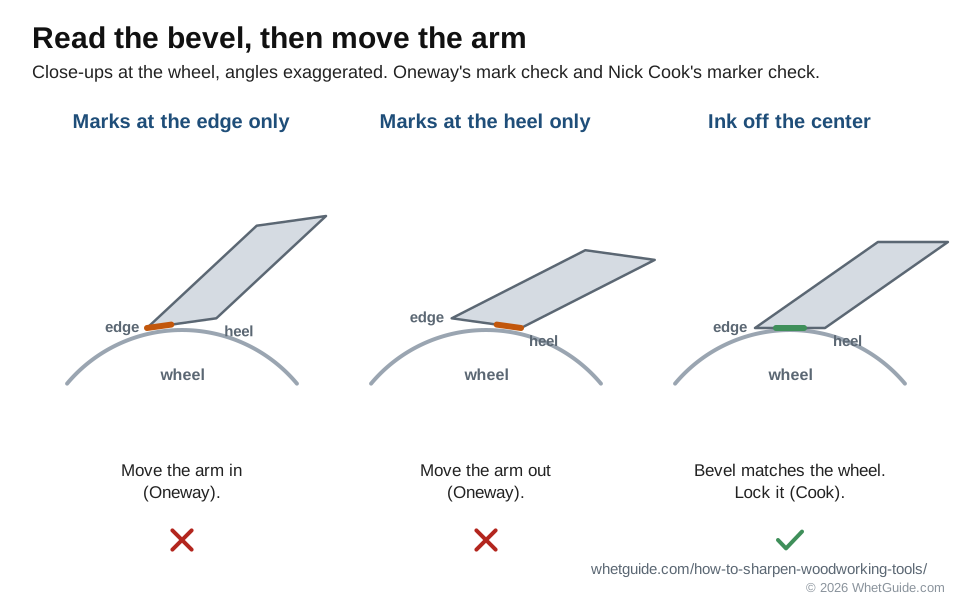
- With the grinder off, rest the tool in the vee-arm or clamp and slide the arm until the bevel lies flat on the wheel, then lock it. Cook's check is to color the bevel with a marker and touch it to the wheel: adjust until the ink comes off the center of the bevel. Oneway's check is to lift the tool off after a light touch and read the grind marks: marks only at the cutting edge, move the arm in; marks only at the heel, move it out.
- Grind. Sorby grinds each wing first with light forward pressure, then rolls the jig smoothly from side to side until there's one facet over the whole grind. Lacer stops on each area when sparks begin to run lightly over the top of the tool.
- Leave the arm clamped while you're mid-project. Oneway's tip: the setting then repeats exactly and takes off the least steel.
Hone, and touch up the flute
- Skews and scrapers get honed. Oneway says they're the only turning tools that need stropping or honing after the grinder; a few strokes on a strop take off the grinding burr on a skew. Cook hones his skews on an oilstone to a mirror and touches up with a diamond paddle.
- Gouges are often left with the grinder's burr, but if you hone, Lacer's way is to work the bevel with the flat of a slip stone, letting the hollow grind set the angle the way a jig would, and the flute with the stone's curved edge held completely flat inside. Hone the bevel and the flute, never the edge itself.
- Rotary-tool flute touch-up: Kirk Hopkins' Fine Woodworking tip wraps wet/dry paper tightly around a 1/8 in. dowel about 2-1/4 in. long and chucks it in a Dremel; a 1/4 in. rod in a die grinder, or a drill at its highest speed, handles bigger gouges. He starts at 800 grit (400 on a badly scratched flute), works to 2,500, keeps a cup of water handy to dip the paper, and stops just short of the side where the spinning paper wants to catch the gouge. Tear off the worn wrap to expose fresh paper.
A rotary tool with a grinding stone is a different matter: it heats a thin edge in a second. Keep stones for shaping and the sandpaper dowel for the flute, and finish on a hone.
↑ Back to all sectionsHow to sharpen auger bits
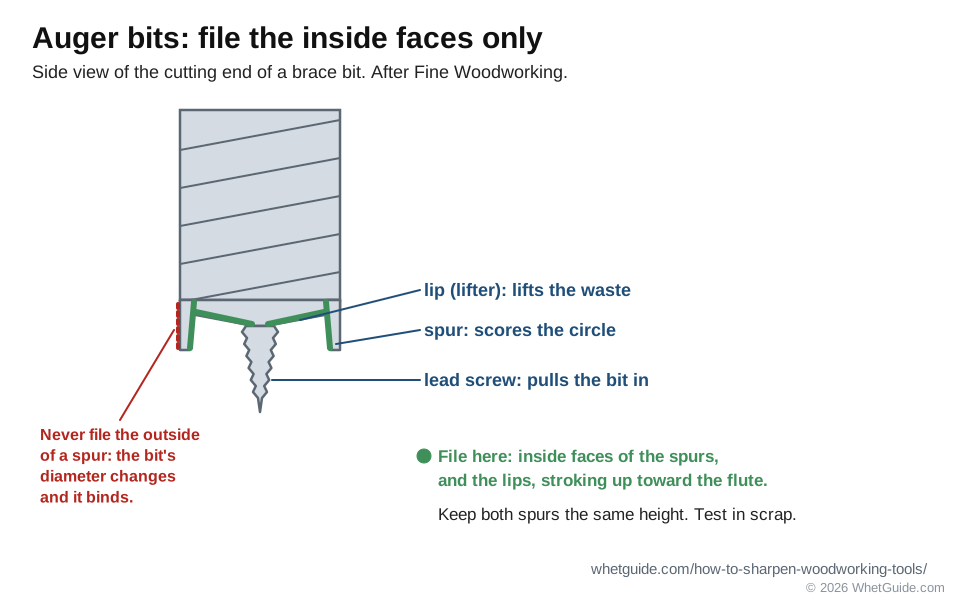
A hand auger bit, the kind used in a brace, has a lead screw, two spurs that score the circle, and two cutting lips (lifters) that lift the waste. Dull spurs tear the hole's rim; dull lips make the bit stall.
- Clamp the bit or hold it on the bench with the lead screw up.
- File the spurs on the inside faces only. Fine Woodworking uses a small triangular file. Filing the outside of a spur changes the bit's diameter, and the bit starts binding.
- Keep the two spurs sharp and the same height, so both score at once.
- Sharpen the lips (Fine Woodworking calls them ramps) with the triangular file, stroking upward along each ramp toward the flute and following the existing angle. Like the spurs, work only the faces inside the bit, never the outside.
- Check the lead screw. Fine Woodworking straightens a bent one with needle-nose pliers and cleans up the threads with a feather file.
- Drill a test hole in scrap. Both spurs should start scoring together and the bit should pull itself in.
Router bits and CNC bits: clean first, hone the flat face
Most shop router bits today are carbide, and carbide is too hard for oil or water stones, so the tool is a small diamond hone. A dull bit rubs instead of cutting. ToolsToday's resharpening guide lists the signs: scorch marks on the wood, more feed pressure to keep the cut moving, and more whine or chatter. Pitch causes the same symptoms, which is why its advice is to clean the bit before you decide it needs sharpening.
- Take the bearing off. Axminster's router bit care guide removes it before cleaning so the cleaner doesn't wash the lubricant out of it.
- Clean off the pitch with a bit and blade cleaner and a stiff brush. Axminster cleans while the bit is still warm, when resin is softer. Dry the bit.
- Look at the carbide under a bright light. ToolsToday's rule is to replace a bit when the carbide is badly chipped, cracked or missing. Honing can't fix that.
- Hone only the flat face of each cutter, the face that leads into the cut. Trend's diamond sharpening guide says to always sharpen the flat side and never touch the profile, or you change the shape of the cutter. Trend uses a fine (600 grit) diamond hone on carbide.
- Count your strokes. Trend starts with three or four light strokes on one face, then gives the other face the same number so the bit stays balanced.
- Put the bearing back, tighten its screw, and make a test cut in scrap.
Hone little and often. Trend says to hone before the bit goes blunt, because a blunt bit needs too much honing or a professional resharpen. For CNC and router bits alike, woodart.studio's habit is a few strokes on a diamond paddle before and after each use. Once honing stops working, ToolsToday's rule applies: resharpen for edge wear, replace for structural damage or geometry loss. Saw blades get the same clean-first treatment; see saws and saw blades.
Forstner bits are honed the same "flat on flat" way. Trend lays the flat of a small tapered diamond file on the flat face of each tooth and takes 3 or 4 strokes, then hones the two straight cutting edges from the back.
Twist drill bits
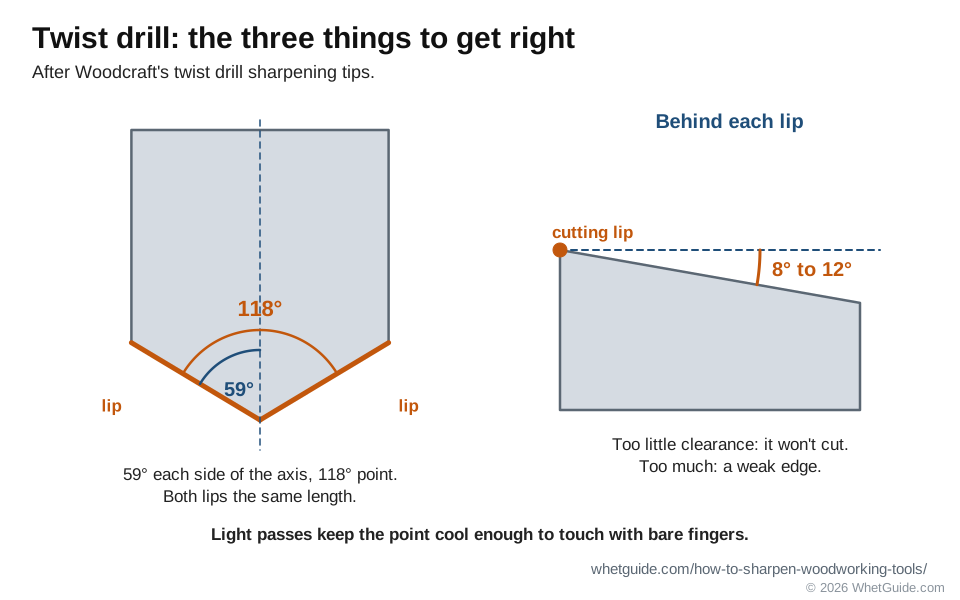
Twist bits are ground on a wheel, not filed. Woodcraft's twist drill sharpening tips give the three things that have to be right: both lips at the same angle, usually 59° each for a 118° point; both lips the same length; and about 8° to 12° of clearance behind each lip. Too little clearance and the bit won't cut; too much weakens the edge. Hold the bit on your forefinger with the lip level and the bit at about 59° to the wheel, then swing the shank left, rotate it clockwise and drop it, all in one light motion. Keep the passes light so the point stays cool enough to touch with bare fingers. A handyman's adjustable protractor checks the angle and the lip lengths. Forstner bits are in the router bit section above.
Garden, shop and homestead tools
Shovels, hoes, axes and mower blades don't need a polished edge. They need a clean, durable one, so a mill file and a stone are the right tools (see the three-tool method).
- Shovels and spades: Family Handyman files a shovel at about 45°, up to 20 strokes per side. A steeper edge on a digging tool survives rocks.
- Hoes: same file method, on the bevel the hoe already has.
- Axes and hatchets: file, then stone. See how to sharpen an axe, the axe sharpening angle guide and axe sharpeners.
- Pruners and loppers: one bevel, the flat side only deburred. See how to sharpen pruning shears; shop and household scissors are in how to sharpen scissors with a whetstone.
- Mower blades: take the blade off, file both cutting edges evenly, and check the balance before you put it back. On a gas mower, disconnect the spark plug wire first. A mower blade guide is on the way.
Where can you get them sharpened? We found no knife sharpening service on Home Depot, Lowe's or Harbor Freight pages when we checked in November 2026, and we have no source on whether any of them sharpen garden or shop tools, so call the store first. Separately, Hunker reported that neither Home Depot nor Lowe's sharpens mower blades in store. Ace's Resharp kiosks handle kitchen knives only (see does Ace Hardware sharpen knives). Local sharpening shops are the usual answer; what sharpening services cost and mail-in services list the options.
↑ Back to all sectionsHow to tell when a tool is sharp
- End grain. The best test for chisels and plane irons. Pare or plane across the end of a softwood board. A sharp edge leaves a shiny surface and a whole shaving. A dull one crushes the fibers white.
- Paper. A sharp chisel slices the edge of a sheet of printer paper cleanly. A tear or snag marks a dull spot.
- Light. Hold the edge toward a single bright light. A sharp edge shows nothing. A bright line or speck is a rounded or dull spot.
- The burr is gone. Run a fingertip off the back across the edge. A drag means a wire edge is still hanging on.
- Scrapers: shavings, not dust.
- Gouges: a polished cut across the grain with no white streaks.
How often to sharpen, and how to store tools
Sharpen when the tool tells you. The plane needs more push, the surface goes from shiny to dull, the end grain starts to crumble, or the scraper makes dust. Strop or touch up on the finishing stone at the first sign; Lie-Nielsen says a quick touch-up needs only the finishing stone. Go back to the honing stone only when the touch-up stops working. On a long carving project, a few strokes on the strop whenever the cut starts to drag keep a gouge going for days.
Storage
Edges get dull fastest in a drawer. Family Handyman's chisel tip is to keep chisels in a sock or a canvas tool roll so the edges don't knock against each other. Plane irons stay in their planes, with the iron retracted and the plane laid on its side so the edge doesn't sit on the bench.
Rust and cleaning
Wipe every tool with a little oil after sharpening, because the water from the stones starts rust quickly. Lie-Nielsen recommends jojoba oil. Before sharpening an old or rusty tool, clean pitch and grime off with mineral spirits, and take light surface rust off the back with fine wet/dry paper and a drop of oil. Pitting right at the edge has to be ground or honed past; pitting farther back can stay.
↑ Back to all sectionsCommon sharpening mistakes and fixes
| Symptom | Likely cause | Fix |
|---|---|---|
| Edge never gets truly sharp | Back not flat or polished | Flatten and polish the back near the edge; Lie-Nielsen's two polished surfaces rule |
| Rounded, shiny bevel | Rocking the angle freehand | Use a honing guide, or lock the wrists and move from the body (see freehand) |
| Edge out of square | Uneven pressure, or the blade skewed in the guide | Square the blade in the jaws; shift finger pressure to the low side |
| Sharp off the stone, dull after one cut | Wire edge left on | Ruler trick or flat back strokes, then strop |
| Front of a chisel back rounded | Back lapped only on the middle of the stone | Work on and off the edge of the stone, per Lie-Nielsen |
| Edge chips in hard wood | Angle too low for the steel or the job | Raise the honing angle a few degrees, toward 35° |
| Blued spot after grinding | Overheating | Grind past the blue (Caspar); lighter pressure, a dressed wheel, and pauses to let the steel cool (see quench or not) |
| Honing takes forever | Secondary bevel too wide, or stone glazed | Regrind the 25° primary; flatten and refresh the stone |
| Plane leaves tracks | No camber, or square corners | Add the Lie-Nielsen camber, or dub the corners (see camber) |
| Curve on the back or bevel | Dished stone | Flatten the stone: pencil hatch, 15 to 20 strokes |
| Scraper makes dust | Hook gone or never formed | See scraper troubleshooting |
The burr won't form
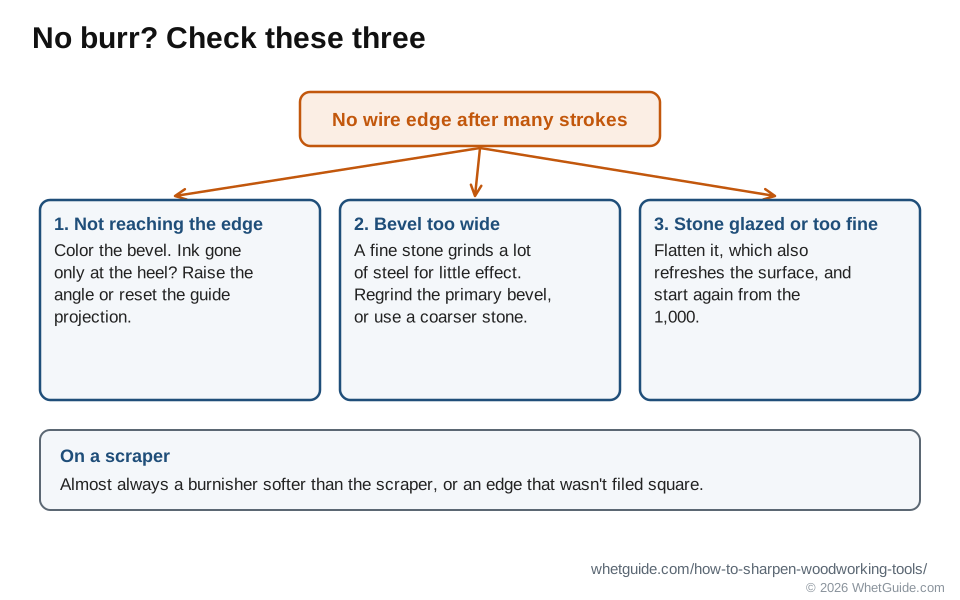
It's a common question, and it has three usual causes. First, the stone isn't reaching the edge: color the bevel with a marker and look. If the ink is only gone at the heel of the bevel, raise the angle or reset the guide projection. Second, the bevel is too wide, so a fine stone is grinding a lot of steel for little effect; regrind the primary bevel or drop to a coarser stone. Third, the stone is glazed or too fine for the job. Flatten it, which also refreshes the surface, and start from the 1,000. On a scraper, a burr that won't form almost always means the burnisher is softer than the scraper, or the edge wasn't filed square.
Woodworking sharpening cheat sheet
The whole method on one card. Print it and pin it over the bench.
Sharpening woodworking tools: one-page cheat sheet
| The rule | Sharp = two polished surfaces meeting. Back first, bevel, then back again. |
|---|---|
| Angles | Plane iron: 25° ground, 35° honed (Lie-Nielsen). Chisel: 25° ground, 30° honed. Spokeshave: about 25° bevel down, 20° to 30° bevel up. Drawknife: 28° bevel down. Bevel-up difficult grain: 45° to 50°. |
| Guide setting | Lie-Nielsen guide: 25° = 1-1/2 in. projection, 30° = 1-5/32 in., 35° = 7/8 in. |
| Stones | 1,000 to raise the wire edge (about 4 strokes), 8,000 to 10,000 to finish (4 to 5 strokes). Chisel backs: 1,000, 3,000, finish. |
| Ruler trick | Plane irons only. Ruler about .020 in., no more than 1/2 in. of blade on the stone, about 10 strokes. Never on chisels. |
| Camber | 6 strokes each edge, 4 strokes each half-way, 2 strokes center = .002 to .005 in. |
| Freehand | Seat the bevel by feel, lock wrists and elbows, move from the body, re-ink the marker every 5 to 10 strokes. |
| Lathe | Bowl gouge 45°, 2 in. out of the Sorby clamp. Detail gouge 30° to 35°, roughing gouge 45° (Lacer). Hone skews and scrapers only. |
| Gouges | Roll the outside bevel on a flat stone; slip stone flat inside; 5 to 10 alternating passes; strop often, sharpen rarely. |
| Scraper | File square (4 to 5 strokes), polish faces and edge, burnish flat, turn the hook at a small tilt (start 1° to 3°) with light pressure. Re-hook up to 4 to 6 times (Woodcraft, Scrapers Demystified), then file. |
| Grinder | Slow speed (1,750 rpm), 120 grit vitrified wheel (Rae). Light pressure; don't let it get hot. Blue = soft steel, grind past it. Never quench HSS. No gloves, ties or loose sleeves. |
| Stones care | Pencil hatch, flatten 15 to 20 strokes on 100 to 220 paper or a diamond plate. About every six uses. |
| Test and store | End grain shaving, no white crush. Wipe with oil (jojoba). Chisels in a roll; planes on their side. |
whetguide.com/how-to-sharpen-woodworking-tools/
Sources: Lie-Nielsen, sharpening and honing guide instructions (Rev. 4-15-19; angles, grits, stroke counts, projection table, ruler trick, camber, stone flattening, chisel notes, jojoba oil); Tom Caspar, Popular Woodworking, 16 sharpening tips (bevel types, 25/30/35 angles, back flattening, camber profiles, grinding heat, wheel dressing, back bevel, diamond paddle); Lee Valley cabinet scraper instructions; Woodcraft, Andy Rae on scrapers, Scrapers Demystified, Craig Bentzley on spokeshaves, Andy Rae's 10 essential sharpening tricks (grinder setup, heat sink, layout fluid, freehand honing, lapping block, dubbing), Nick Cook's turning tools and twist drill tips; Anne Briggs, Anne of All Trades; Paul Sellers on wooden spokeshaves; Oneway Wolverine instructions; Alan Lacer on turning gouges and Judy Ditmer on turning tools; Woodworker's Journal on marking knives; Fine Woodworking on card scrapers, 13 tools that don't fit a honing guide, drawknives, smoothing plane frogs, honing gouges with a dowel and auger bits, and Jay Speetjens on the Japanese chisel ura; KM Tools; Fine Homebuilding block plane review; Sharpening Supplies and Woodcarving Illustrated on gouges; Robert Sorby; Tormek T-8 manual; Family Handyman, "How to Sharpen Tools" (archived 2016 copy) and wood chisel tips; DMT FAQ; Spyderco ceramic benchstones; Trend diamond sharpening guide (router and Forstner bits); Axminster router bit care; ToolsToday when to resharpen; Workshop Companion Sharpening Know-How; Lee Valley How to Sharpen; Paul Anthony in Woodcraft Magazine on saw blade cleanup; Highland Woodworking on bandsaw blades; woodart.studio; Wikipedia, Honing oil; US Forest Service ax manual. All read November 14, 2026. How we research