- Faint yellow176 C / 349 F
- Light straw205 C / 401 F
- Dark straw226 C / 439 F
- Brown260 C / 500 F
- Purple282 C / 540 F
- Dark blue310 C / 590 F
- Light blue337 C / 639 F
- Gray-blue371 C+ / 700 F+
See straw or blue at the edge while grinding and that part has lost hardness (Red Label, Noblie). Temperatures from Wikipedia's tempering table; colors are a visual guide only. Details in the grinder section.
Quick answer: the whole job in 8 steps
Use a mill bastard file or a sharpening puck at the machete's existing angle, usually 20 to 30 degrees per side, until a burr forms along the whole edge. Flip, do the same on the other side, remove the burr, and oil the blade. A file is for a new machete, a dull edge or dings. A puck is for keeping it sharp.
- Clean and lookWipe off sap and dirt. Check the edge under a light for nicks and shiny flat spots.
- Clamp itEdge up in a vise, padded jaws, with the section you're working close to the jaws.
- Mark the bevelColor the edge bevel with a permanent marker so you can see where you're taking metal off.
- File side onePush strokes only, at the factory angle, heel to tip, until the marker is gone and you feel a burr on the far side.
- File side twoFlip and give the other side the same angle and about the same number of strokes.
- Remove the burrLight alternating strokes with a fine stone, puck or rod until the edge feels the same on both sides.
- TestSlice paper or a green stalk, heel to tip. A snag marks the spot to go back to.
- Wipe and oilWipe off the filings, dry the blade and give carbon steel a thin coat of light oil.
That's the core of it. The rest of this page is the why and the feel: which angle suits your work, what to do with a kukri belly, how hot is too hot on a grinder, and what's going wrong when a machete won't get sharp. If you read one more section, read the file method.
↑ Back to all sectionsMachete types, and how each one changes the sharpening
A machete is a long, thin chopping blade. Wikipedia puts the blade at 30 to 66 cm (12 to 26 in) and usually under 3 mm (1/8 in) thick. Inside that, the shape varies a lot, and the shape decides where the file goes and how the bevel should look.
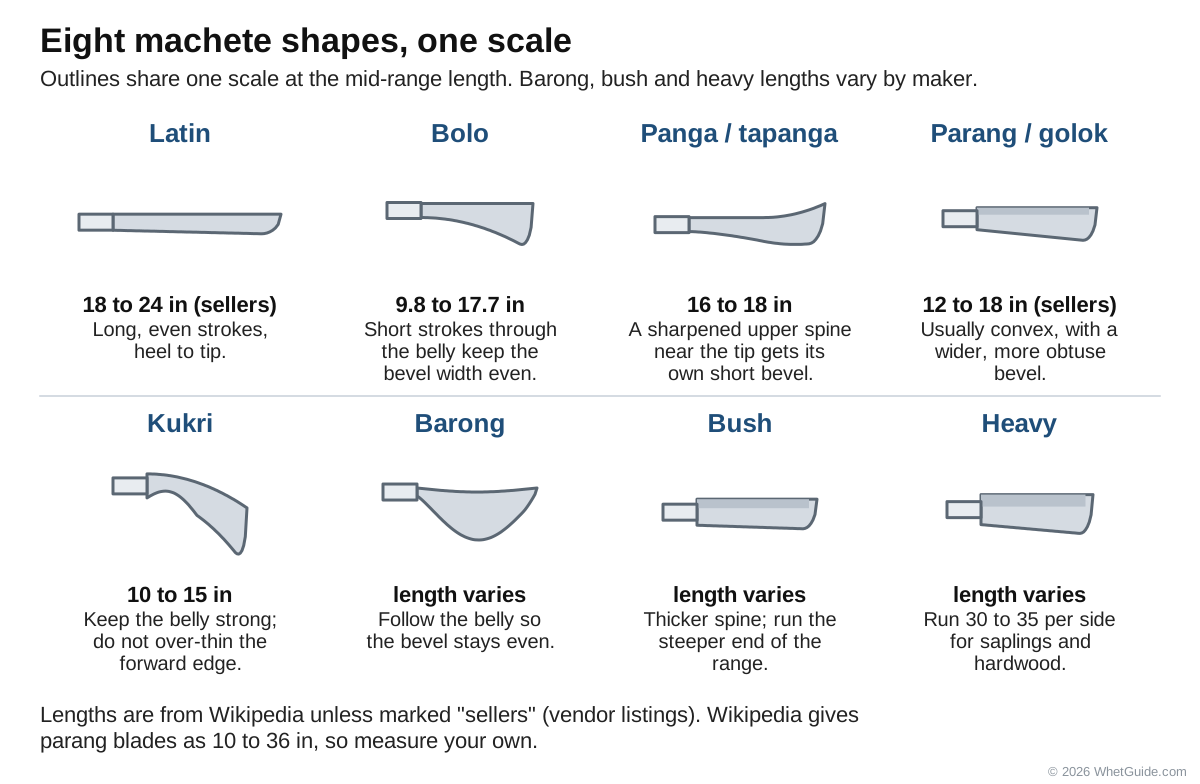
| Type | Shape and size | Built for | Sharpening note |
|---|---|---|---|
| Latin (the classic) | Straight, wide blade; sellers list 18 to 24 in (Red Label). Ontario's 1-18 is an 18 in blade, 24 in overall. | Grass, vines, light brush | The easiest to sharpen: long, even file strokes heel to tip. |
| Bolo | About 25 to 45 cm (9.8 to 17.7 in), curved edge, shorter than most machetes (Wikipedia) | Chopping with the weight forward | Shorter strokes through the belly so the bevel stays the same width. |
| Panga and tapanga | 41 to 46 cm (16 to 18 in), broadening toward the back; the upper inclined part may be sharpened (Wikipedia) | Thick brush, farm work | If the top of the spine near the tip is sharpened, it gets its own short bevel. |
| Parang and golok | Shorter and thicker than most machetes; Wikipedia lists parang blades from 25 to 91 cm (10 to 36 in) and up to 0.91 kg (2 lb). Sellers list 12 to 18 in. | Woody growth | Usually convex, with a wider, more obtuse bevel. See parang and bolo. |
| Kukri | Blade 26 to 38 cm (10 to 15 in), forward-curved with a notch near the handle (Wikipedia) | Chopping, with a belly that bites on a draw cut | The concave inner curve needs a rod or the puck's edge. See kukri. |
| Barong | Leaf-shaped, widest in the middle | Chopping and slicing | Follow the belly so the bevel width stays even (Noblie). |
| Bush and heavy machetes | Thicker spine, often shorter | Saplings, branches, hardwood | Run the steeper end of the angle range, 30 to 35 per side. |
| Bowie machete | Clip-point tip on a machete-length blade | Camp tasks and rough utility cutting | Keep the main edge durable and the tip controlled, not needle-thin (Noblie). |
| Colima and other regional patterns | Varies by maker | Mixed clearing | Match whatever bevel the maker put on. |
Parang length is one place the sources disagree: sellers list 12 to 18 in, while Wikipedia's range runs from 10 to 36 in, because "parang" covers a family of regional blades. Measure your own.
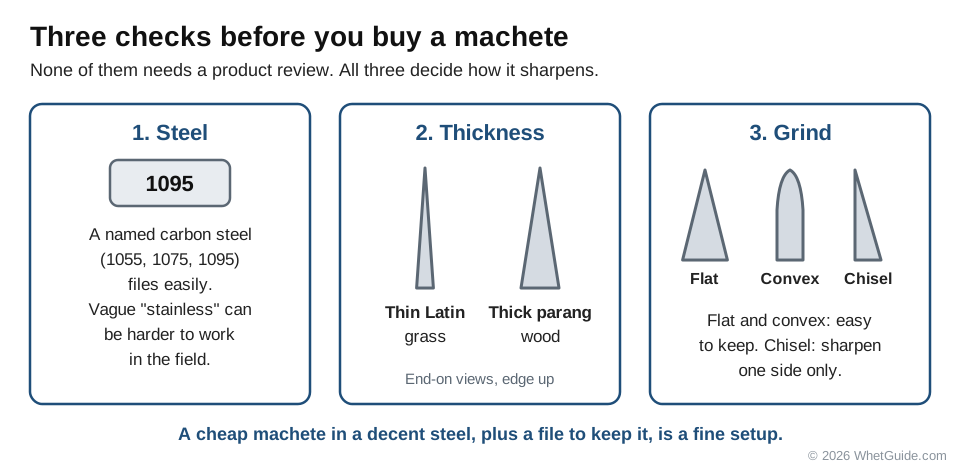
A short buying note, since one of the old pages people still link to was a "best machete" list. You don't need a review to pick a machete that sharpens well. Look at the steel: a named carbon steel like 1055 or 1095 files easily, while vague "stainless" can be harder to work in the field. Look at the thickness, because thin Latins clear grass and thick parangs chop wood. And look at the grind. Flat and convex are both easy to keep; a chisel grind needs the one-side method. A cheap machete in a decent steel plus a file to keep it is a fine setup. Even the Brazilian jungle machete, a 25 cm clip-point blade, was issued with a sharpening stone in the scabbard (Wikipedia).
Machete steel: 1055, 1075, 1095 and stainless
The steel decides how fast the file bites, how long the edge lasts and how much rust care you owe it. Most machetes are plain carbon steel. Here's what the makers' own listings say about the machetes you're most likely to own.
| Machete | Steel | Published spec | At the file |
|---|---|---|---|
| Ontario 1-18 (Latin) | 1095 carbon | 50 to 55 HRC, 18 in blade, zinc phosphate finish (Ontario's listing) | Holds an edge longer; takes more strokes to file |
| Cold Steel Latin D-Guard 18 in | 1055 carbon | Baked-on anti-rust finish (Cold Steel's listing) | Files easily; dulls sooner |
| Cold Steel Kukri Plus | 1055 carbon | 13 in blade, 2.8 mm thick (Cold Steel's listing) | Easy to file; the curve is the work |
| Condor El Salvador and Bushcraft Parang | 1075 carbon | 3 mm (El Salvador), convex grind (dealer spec, Condor's listings) | Between the two; keep the convex shape |
| Gerber Gator Bolo | "High carbon stainless" | 15.5 in blade, 22 in overall (Gerber's listing) | Rusts less; field effort depends on who you ask |
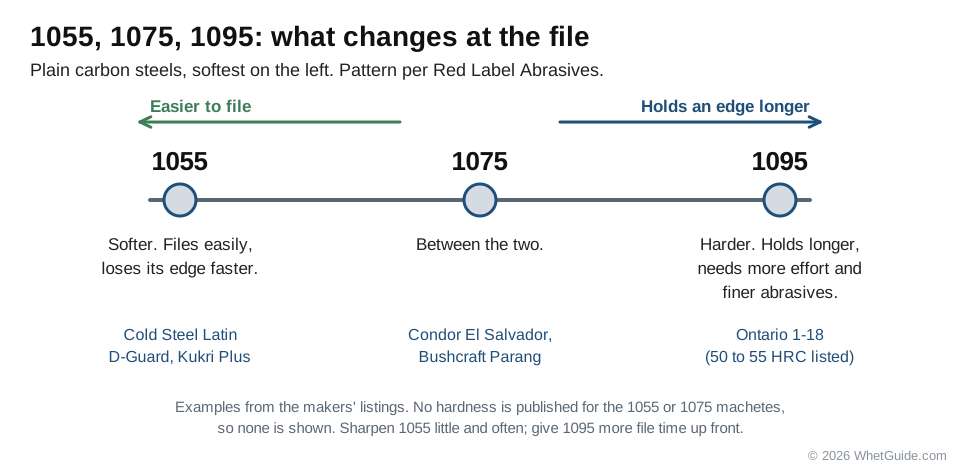
The pattern, as Red Label Abrasives puts it: 1055 is softer and files easily but loses its edge faster. 1095 is harder and holds longer, and it needs more effort and finer abrasives. 1075 sits between them, and one Tormek forum poster found Condor's 1075 noticeably harder to file than Cold Steel's 1055. None of the makers above publish a hardness for their 1055 or 1075 machetes, so we don't print one.
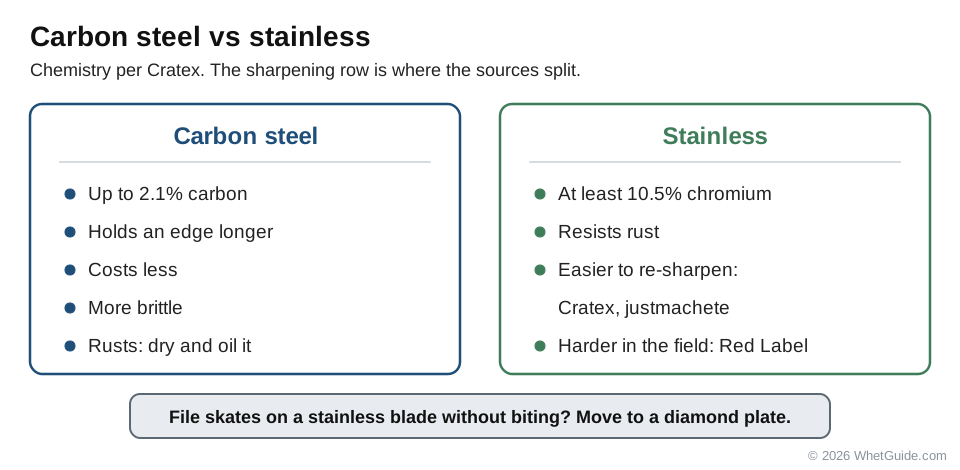
Cratex gives the chemistry: carbon steel runs up to 2.1% carbon, holds an edge longer, costs less, is more brittle and rusts. Stainless has at least 10.5% chromium and resists rust.
Is stainless easier or harder to sharpen? Cratex and justmachete say stainless is easier to re-sharpen. Red Label says it's harder to sharpen in the field. Both can be true, since "stainless" covers soft budget steels and hard premium ones. On a stainless machete, try the file and see; if it skates without biting, move to a diamond plate.
What it means at the bench. With 1055, sharpen little and often and don't be surprised when the edge rolls on a knot. With 1095, budget more file time up front and less in the field. With any carbon steel, rust care is part of sharpening, which is covered under care. If your machete is homemade from an old mower blade (a common Facebook question), you don't know the steel or its temper, so start at 25 to 30 per side and see how it holds.
↑ Back to all sectionsThe right angle for a machete, by job
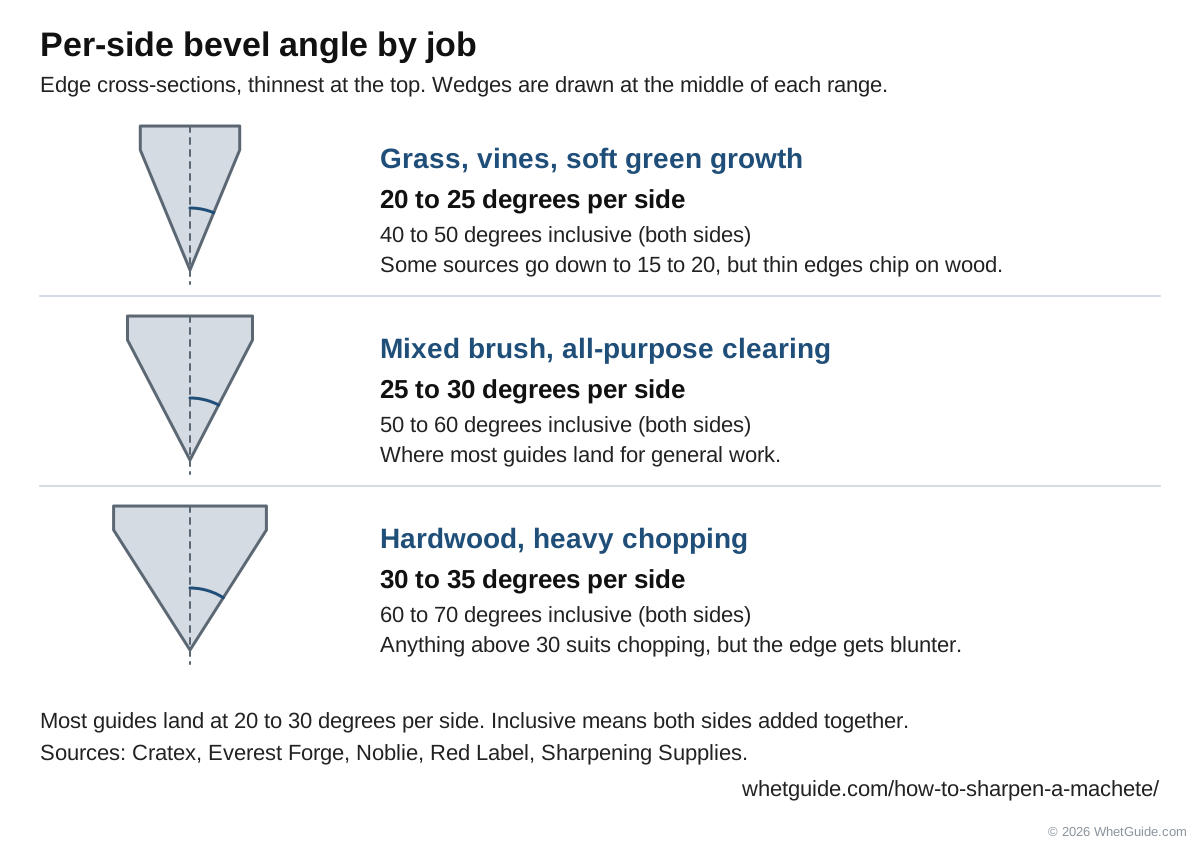
Most guides land between 20 and 30 degrees per side. Grass and soft vines sit at the low end, mixed brush in the middle, and hardwood chopping at 30 to 35. Thinner cuts easier but chips or rolls on wood; thicker survives wood but drags in grass. If your machete came with a good edge, the simplest answer is the one BladeHQ gives: machetes usually leave the factory with a good all-around grind, so stick with it.
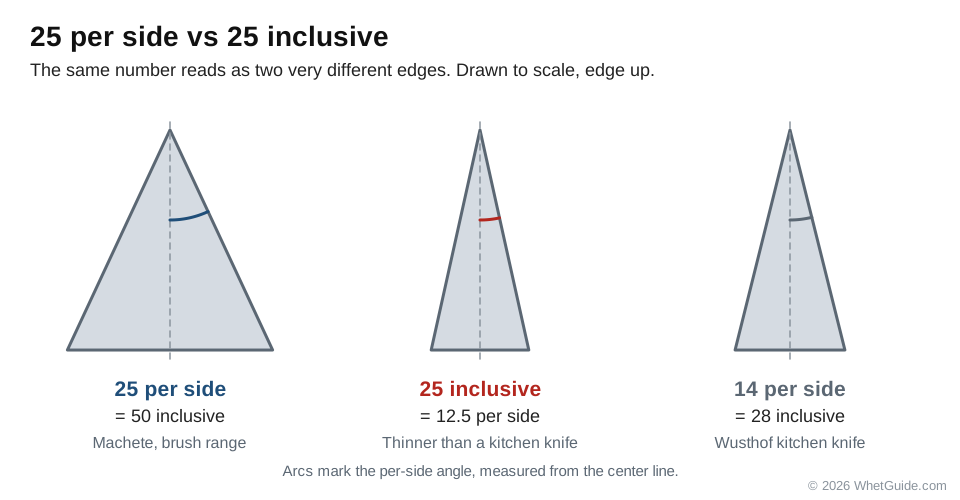
Only Noblie, Red Label and the Gun Shop Essex say "per side". The others don't say whether their figure is per side or inclusive, which is a real gap: 25 per side and 25 inclusive are very different edges. Read in context, they all seem to mean per side, because a 25 degree inclusive edge is only 12.5 degrees per side, thinner than the 14 degrees per side Wusthof puts on its standard kitchen knives (see our angle chart).
| Your work | Per side | Inclusive | Why |
|---|---|---|---|
| Grass, soft vines, green growth | 20 to 25 | 40 to 50 | A thin edge slices soft stems without tearing. Noblie goes as low as 18 for grass. |
| Trail clearing, mixed brush, farm work | 25 to 30 | 50 to 60 | The all-purpose middle (Everest Forge). Noblie splits it: 22 to 25 per side for trail clearing, 25 to 30 for woody brush. |
| Hardwood, bamboo, heavy chopping | 30 to 35 | 60 to 70 | Thick enough not to chip or roll on knots. Cratex puts wood chopping at about 30 to 32. |
Two numbers you'll see that don't fit. The Gun Shop Essex says 15 to 20 per side is typical, and an old Blade Forums thread suggests 10 for grass. Both are the thin end. They'll cut well in soft growth and dent or chip the first time you hit a hard stem; Red Label warns that lower angles chip on hardwood.
Why chopping tools run steeper
The US Forest Service's ax manual has the best government numbers on chopping edges. It puts an ideal ax bevel at about 18 degrees with a microbevel of about 25 at the very edge, and its figure shows 17 to 21 for the bevel and 25 to 32 for the microbevel (USFS, Part 8: Sharpening). Those are ax figures, not machete specs, but the physics carries over. A chopping edge hits things, so the last bit of steel needs to be steeper than a slicing edge. Our axe sharpening angle page has the rest.
Finding the angle without a protractor
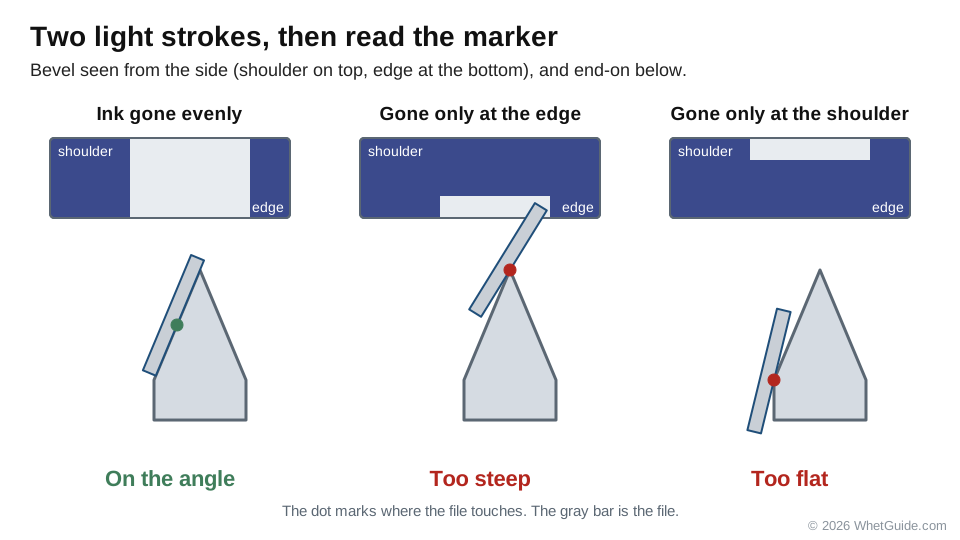
- Match the factory bevel. Color it with a marker, take two light file strokes, and look. Ink gone evenly from the shoulder to the edge means you're on it. Gone only at the edge: you're too steep. Gone only at the shoulder: too flat.
- The finger trick from Cratex: lay your little finger against the blade, and about two thirds of the finger's width marks about 30 degrees.
- The halving trick from SOFREP's field sharpening article: picture a right angle, halve it to 45, halve it again to 22.5. It's an eyeballing aid, not a measurement, and it puts you inside the grass-to-brush range.
The sharpest edge comes from the lowest angle, and that's also the most fragile. For a machete, "sharpest" loses to "still sharp after an hour of brush". Every brand's knife angles are on our knife sharpening angle chart.
↑ Back to all sections"Hold the file at 45 degrees": file angle vs bevel angle
Old machete advice is full of 45s, and it confuses people. The 2007 Terrierman post says to draw a flat bastard file "at a 45 degree angle away from the center of the knife." The Khukuri House says to hold the file at roughly 45 to 60 degrees to the edge. Neither one is telling you to grind a 45 degree bevel. They're describing how the file crosses the edge when you look down on it from above.
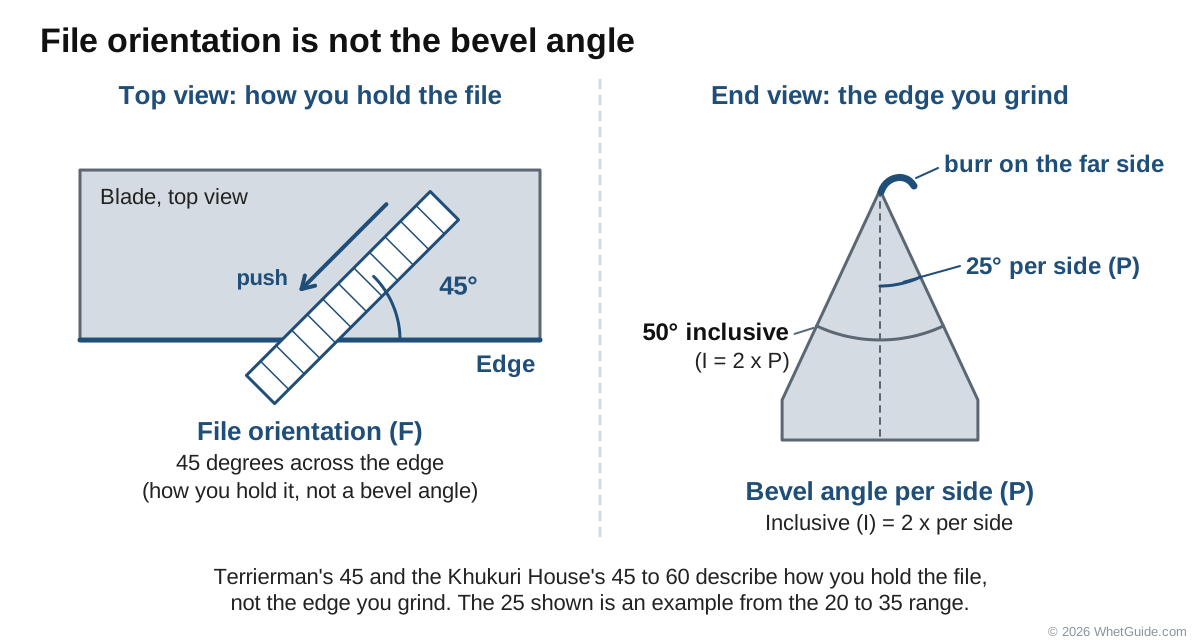
Sharpening talk mixes three different angles:
- File orientation: the angle between the file and the edge line, seen from above. Angling the file across the edge gives a slicing cut. 45 is a normal number here.
- Bevel angle per side: the angle between one bevel face and the center of the blade, seen end-on. This is the 20 to 30 in the guides.
- Inclusive angle: both sides added. A 25 per side edge is 50 inclusive.
So the Terrierman author and the commenter who argued that 45 is too steep and the edge should be a convex 20 were both partly right. The author meant file orientation. The commenter read it as a bevel angle, and as a bevel, 45 per side would be a splitting wedge. The same mix-up shows up on Blade Forums, where one owner reports reprofiling a Condor to "just above 25" and another reader has to ask whether that was per side or inclusive.
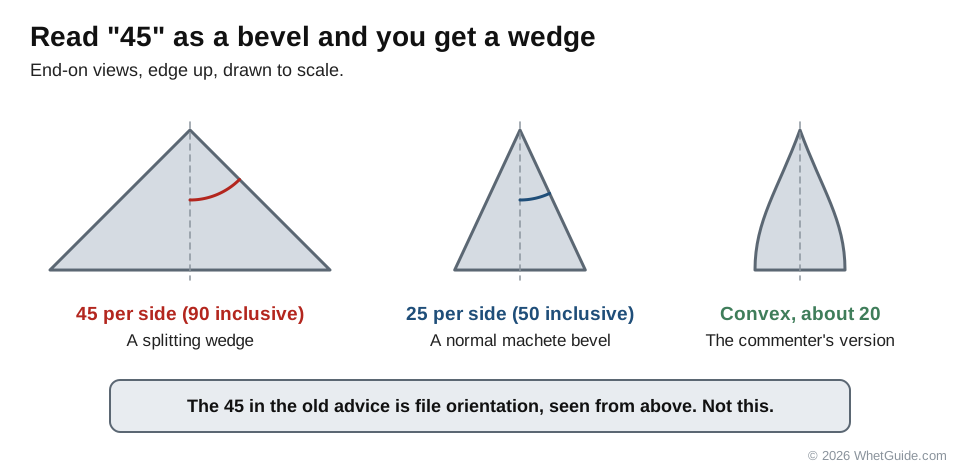
Ask which way you're looking. From above, along the edge: file orientation, fine. End-on, through the blade: a bevel, and far too steep for a machete. If it gives a number between 15 and 35 without "per side" or "inclusive", read it as per side.
Convex vs flat edges (plus chisel and microbevel)
Look at your machete's edge end-on, or color it with a marker and watch where a file touches. You'll find one of four shapes.
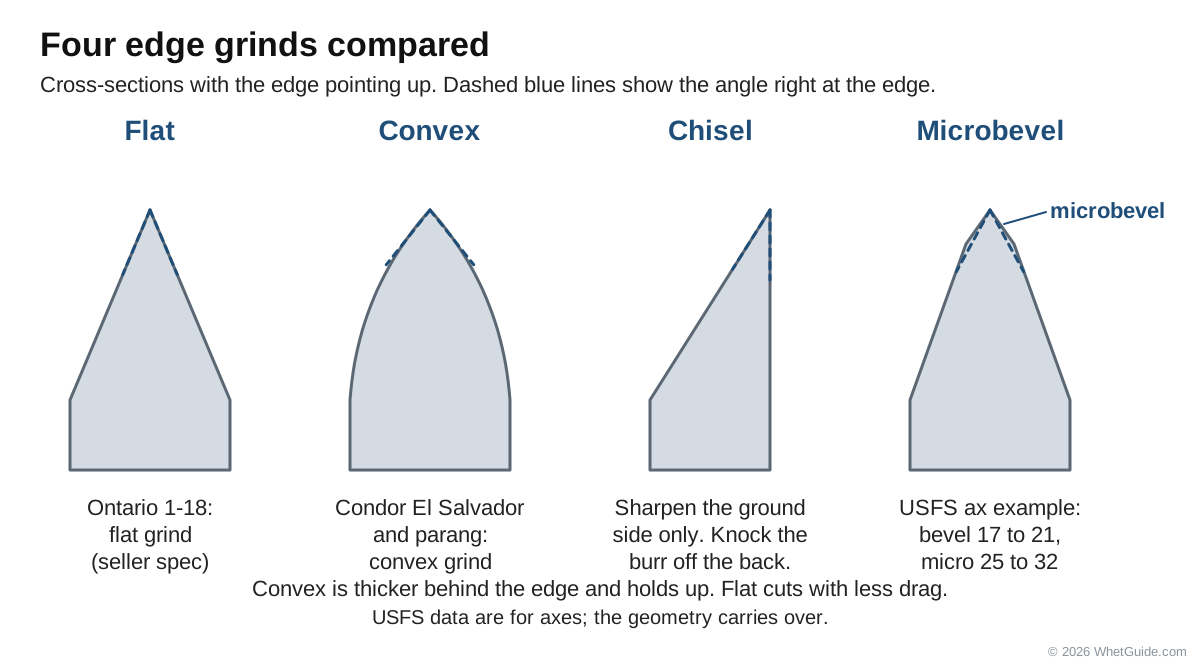
| Edge | Example | How to keep it |
|---|---|---|
| Flat bevel | Ontario 1-18 (flat grind) | File or stone held at one angle. The easiest to keep. |
| Convex | Condor El Salvador and Bushcraft Parang | Roll the file or puck slightly over the shoulder, or use sandpaper on a soft backing. |
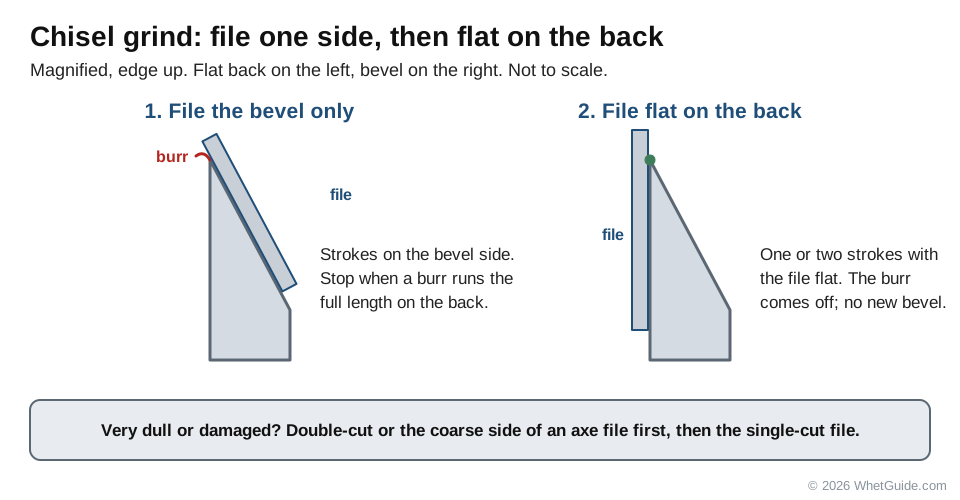
| Chisel (single bevel) | Some budget and specialty machetes | Sharpen only the ground side; knock the burr off the flat side with a file or stone (BladeHQ, techwriteredc). |
| Microbevel | A field fix on any of the above | A few light strokes a little steeper than the main bevel, right at the edge. Fast, and it toughens a thin edge. |
Why convex for chopping? The Forest Service ax manual says convex profiles tend to be thicker and more durable, while flat profiles penetrate better but are more likely to bend or break on hard knots or frozen wood, and can bind (USFS). That's written for axes, and the same trade-off holds on a heavy machete.
Keeping a convex edge is easier than people think. Cratex suggests sandpaper wrapped around a soft backing, or one of its abrasive sticks glued to a paint stirrer, which follows the curve without leaving a flat microbevel. CuisineBank notes that a belt with some slack in it makes a convex edge on its own.
Does convex vs flat matter much? Sharpeners on Blade Forums tend to say the thickness right behind the apex counts for more than the curve of the shoulders. A thick flat edge chops like a convex one; a thin convex edge cuts like a flat one. Keep whatever your machete came with, and spend your effort on the angle.
↑ Back to all sectionsHow sharp should a machete be?
Not razor sharp. BladeHQ, Everest Forge and Red Label all say the same thing: a shaving edge on a machete is fragile and folds or chips on wood, and a slightly convex, durable working edge does better. Cratex calls it a chopping edge, not a razor edge.
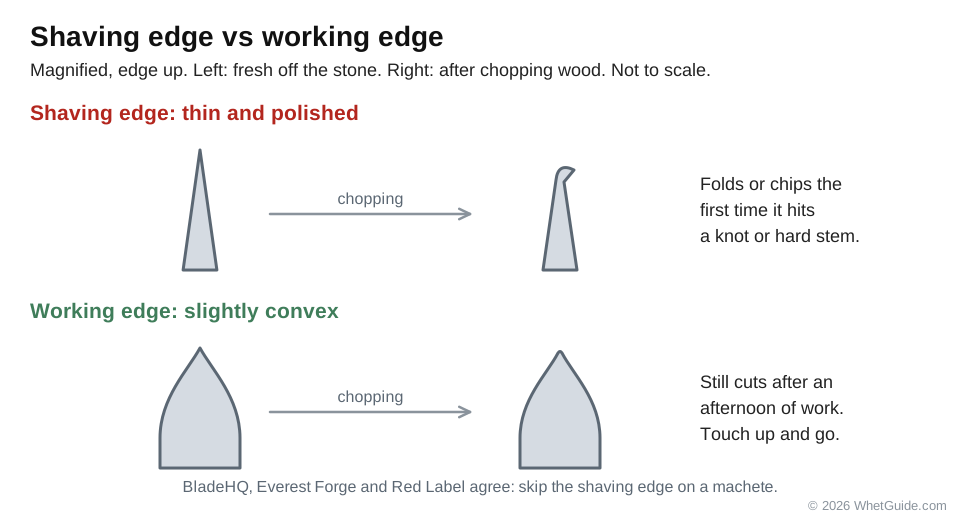
The goal is an edge that slices paper cleanly and cuts a green stalk in one swing, then still does it after an afternoon of work. Cratex's 80/20 rule fits: put in about 20 percent of the effort to get about 80 percent sharp, and sharpen often and lightly instead of chasing a mirror. Shave-sharp kukris are a hobby goal, not a working one. People who chase it do it on the forward belly only; see kukri.
↑ Back to all sectionsSigns your machete needs sharpening
- Stalks bend instead of cutting, and vegetation tears.
- The blade bounces off branches it used to bite into.
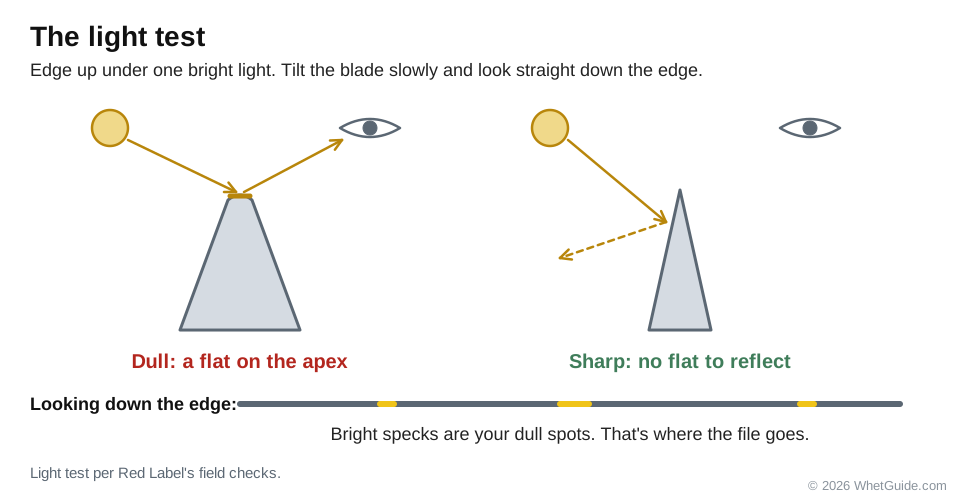
- Shiny flat spots along the edge. A sharp apex doesn't reflect; a rounded one does.
- Visible chips, dents or a rolled section.
- One part of the edge works and another doesn't, usually a sharp middle with a dull tip or heel.
The first three come from Red Label's field checks. The fastest check is the light test: hold the machete edge-up under one bright light and tilt it slowly. Bright specks or a shiny line are your dull spots, and they're exactly where the file goes.
A new machete counts too. Noblie says many arrive with a rough utility edge or an unfinished bevel, and the Terrierman post says store-bought machetes come dull. Some brands ship sharp. Check it before the first job, not halfway through it.
↑ Back to all sectionsWhich tool to sharpen a machete with
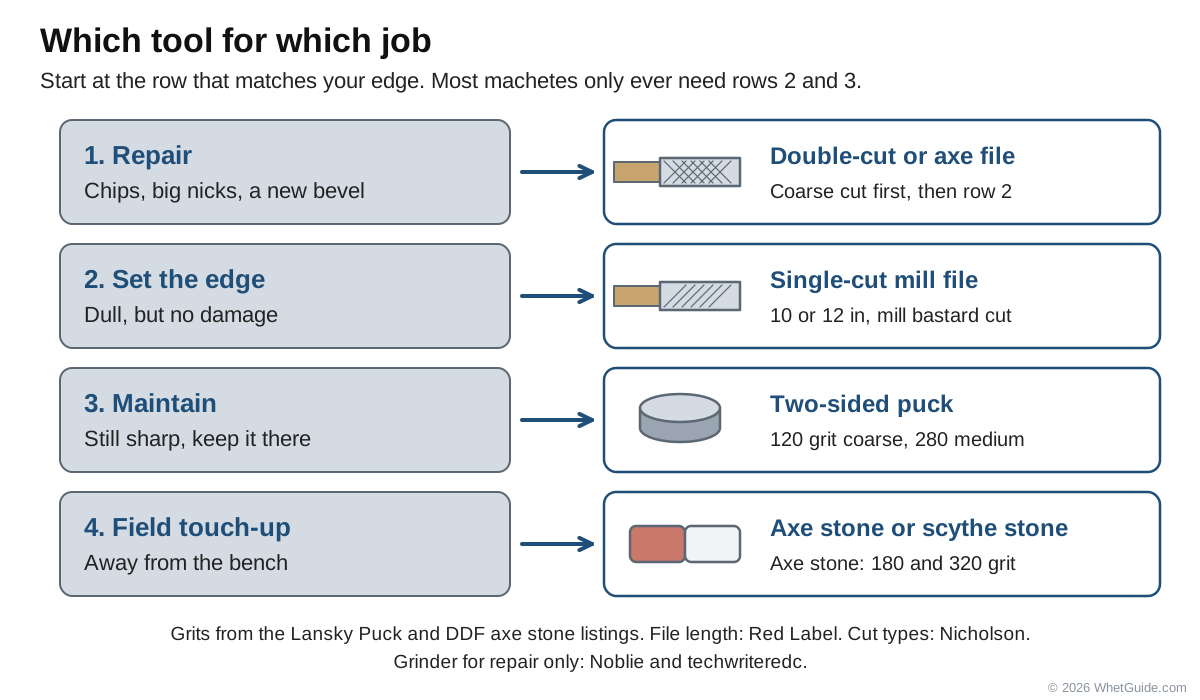
For most people: a 10 or 12 inch single-cut mill bastard file to set the edge, then a coarse and medium puck to keep it. That pair handles every machete shape and can't burn the temper out of the steel. Everything else is either faster with more risk, or a field convenience.
| Tool | Use it for | Speed | Risk to the edge | Who should pick it |
|---|---|---|---|---|
| Mill bastard file (10 to 12 in) | New machetes, dull edges, dings, reshaping | Fast by hand | Low. Can't overheat. | Everyone. The default. |
| Puck (coarse and medium) | Routine upkeep, curves, field touch-ups | Medium | Low | Everyone, after the file |
| Scythe stone (about 9 to 10 in) | Erasing file marks, honing the full length of a long or curved edge | Medium | Low | Anyone with a long blade; the classic long-blade hone |
| Bench stone or diamond plate | Refining after a file; a cleaner edge | Slow on a long blade | Low | People who already own stones |
| Belt sander | Fast reprofiling, convex edges | Very fast | Medium: heat, and the belt can grab the blade | Owners of many blades, with practice |
| Bench grinder | Big nicks, heavy rust, a new bevel | Fastest | High: overheating and loss of temper | Repair jobs only |
| Dremel | One chip or one bad spot | Fast, but in sections | Medium: uneven edge | Spot repair |
| Guided system | Short machetes and kukris | Slow | Low | People with a large rig already |
| Pull-through kitchen sharpener | Not machetes | n/a | Wrong size and angle | Nobody, for this job |
The "who" column is our reading of what the guides say. Everest Forge names the file and the puck as the beginner tools and advises against pull-through kitchen sharpeners because the slots don't fit a long, thick blade. The people on the Permies sharpening thread came out in the same place: a file is enough for hoes and spades, axes, kukris and machetes do better with a puck stone, finer knives go on wet stones, and one poster warned that a grinder at high speed can strip the heat treatment. More on kitchen pull-throughs in are pull-through knife sharpeners bad.
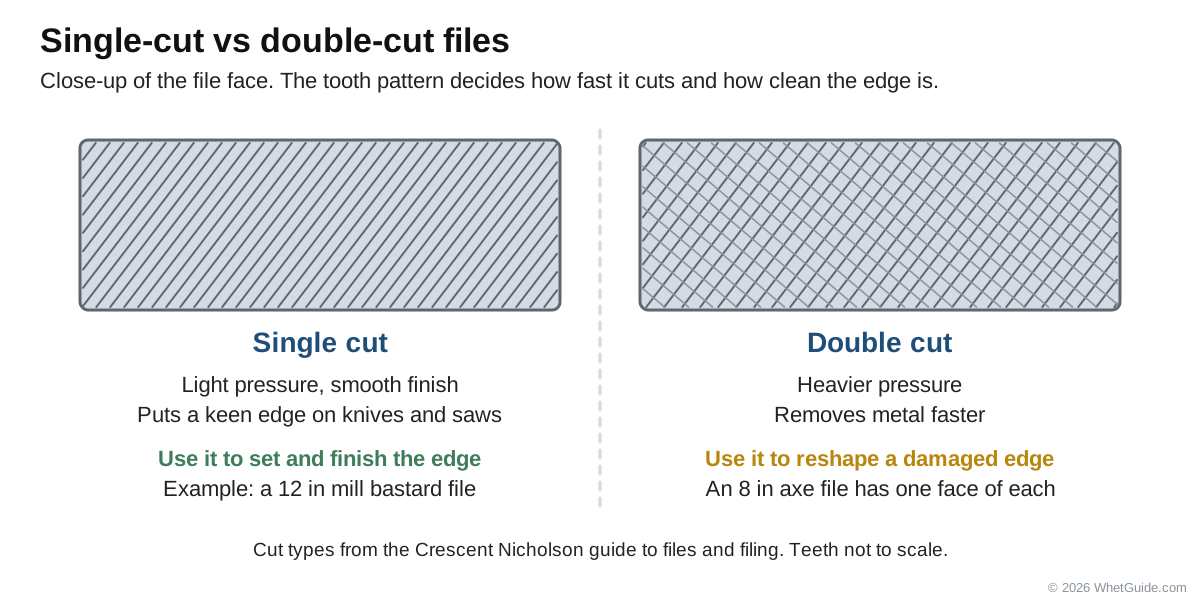
Which file? Nicholson's own guide says single-cut files are used with light pressure for a smooth finish "or to put a keen edge on knives, shears, or saws", while double-cut files take heavier pressure and remove metal faster (Crescent Nicholson guide to files). So a single-cut mill bastard file is the edge tool, and a double-cut or an axe file with a coarse side is for rough reshaping a badly damaged edge. Buy one with a handle, or fit a handle to the tang.
Safety: clamp, gloves, glasses, stroke direction
A machete is a long edge with not much handle, and sharpening puts your hands right next to it. Set up so the blade can't move and your hand can't slip past the abrasive onto the edge.
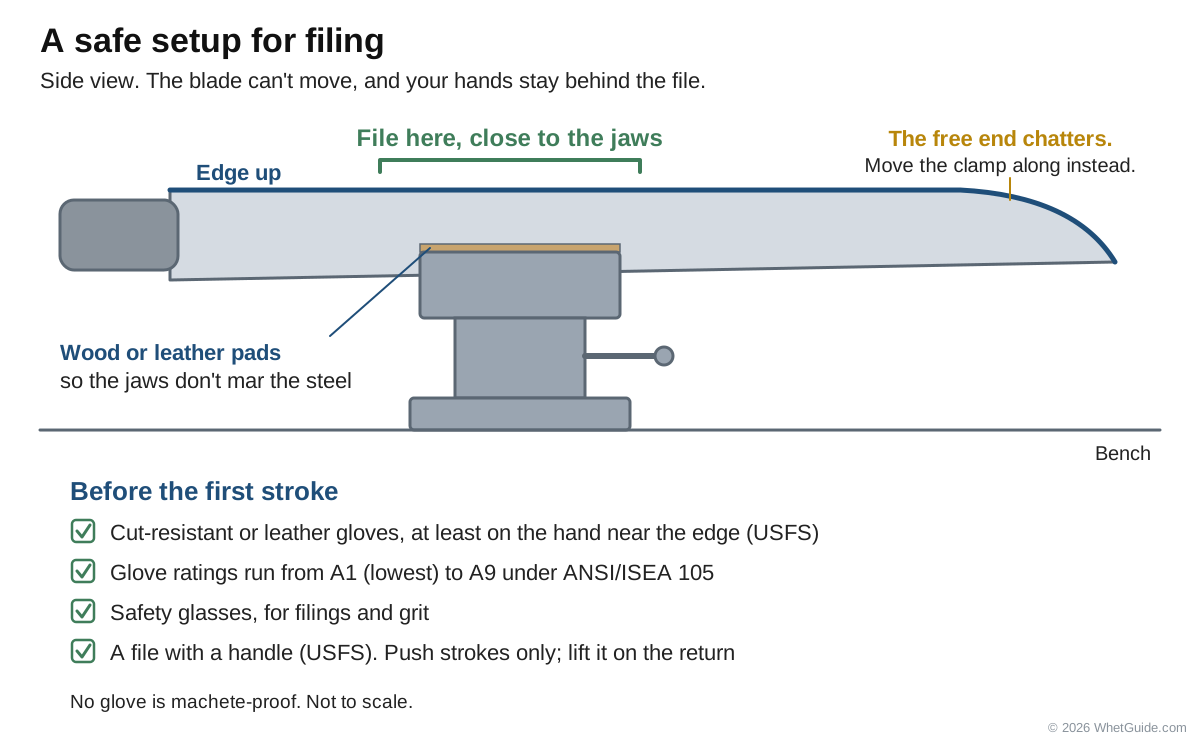
- Clamp the blade. Edge up in a vise, with wood or leather in the jaws so they don't mar the steel. Work near the jaws and move the clamp along a long blade rather than filing out at the unsupported tip, where it chatters.
- Gloves. The Forest Service ax manual says to wear cut-resistant or leather gloves, at least on the hand that could touch the edge (USFS). In the US, cut-resistant gloves are rated A1 (lowest) to A9 under ANSI/ISEA 105 (ANSI). A low-rated work glove helps against a slip, and no glove is machete-proof.
- Eye protection. File filings are fine, but grinder and belt sparks and a puck's grit fly. Wear safety glasses for any power tool and it's a good habit by hand too.
- A handle on the file, with a guard. USFS asks for one, and a bare tang in the palm is how files stab people.
- Push away or along the edge, never toward yourself. Keep the fingers of the guiding hand behind the abrasive, on the top of the file or the back of the puck.
- Work at bench height in good light. Keep kids and pets out of the shop.
- Test on paper or a stalk, never on a hand or by hitting something hard.
One bad line still floats around: an older machete guide, reposted on forums, tells you to "cut into the blade". Don't. Stroke into the edge with the abrasive, as in the steps below, and keep your hands out of the path of the blade.
↑ Back to all sectionsLeave the first few inches above the handle dull
Cratex recommends leaving a few inches of edge right above the handle dull. It gives you a place to choke up for fine work, and it keeps the part of the edge closest to your body from opening up a knee, thigh or hand on a follow-through. CuisineBank gives the same tip from the other direction: start sharpening a few inches above the base.
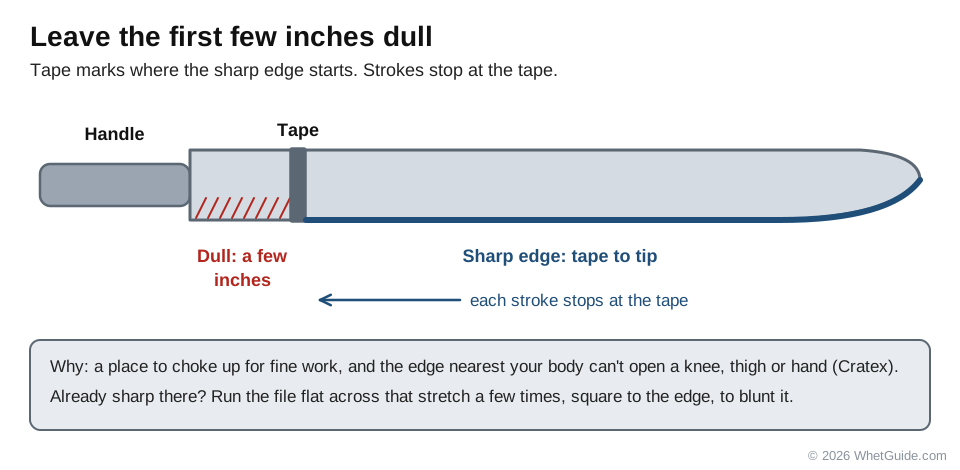
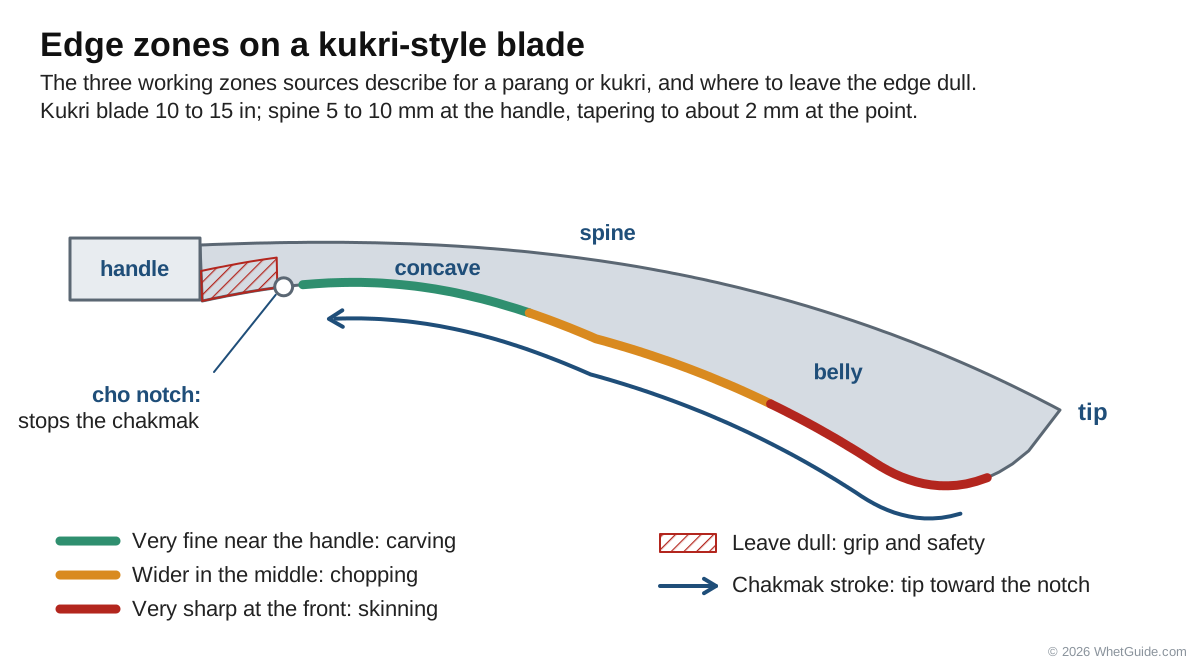
- Wrap a band of black tape around the blade at the point where you want the sharp edge to start. The kukri and parang diagram below shows the zone.
- Sharpen as normal, stopping each stroke at the tape.
- If the base is already sharp, run the file flat across that section a few times, square to the edge, to blunt it.
A machete that's already been blunted at the base by its maker tells you where to stop; keep it that way.
↑ Back to all sectionsHow to sharpen a machete with a file, step by step
The file is the tool we'd reach for first. It takes metal off fast, it can't overheat the blade, and you can feel exactly what it's doing. A 10 to 12 inch single-cut mill bastard file is the standard choice. Red Label says a 10 or 12 inch file "has enough length to maintain a consistent stroke", such as Nicholson's 12 inch mill bastard.
- Clean the blade. Sap and dirt clog the file's teeth. Wipe it down, and scrub off any rust on the bevel.
- Clamp it edge up, with the section you're working close to the vise jaws.
- Color the bevel with a permanent marker, on both sides.
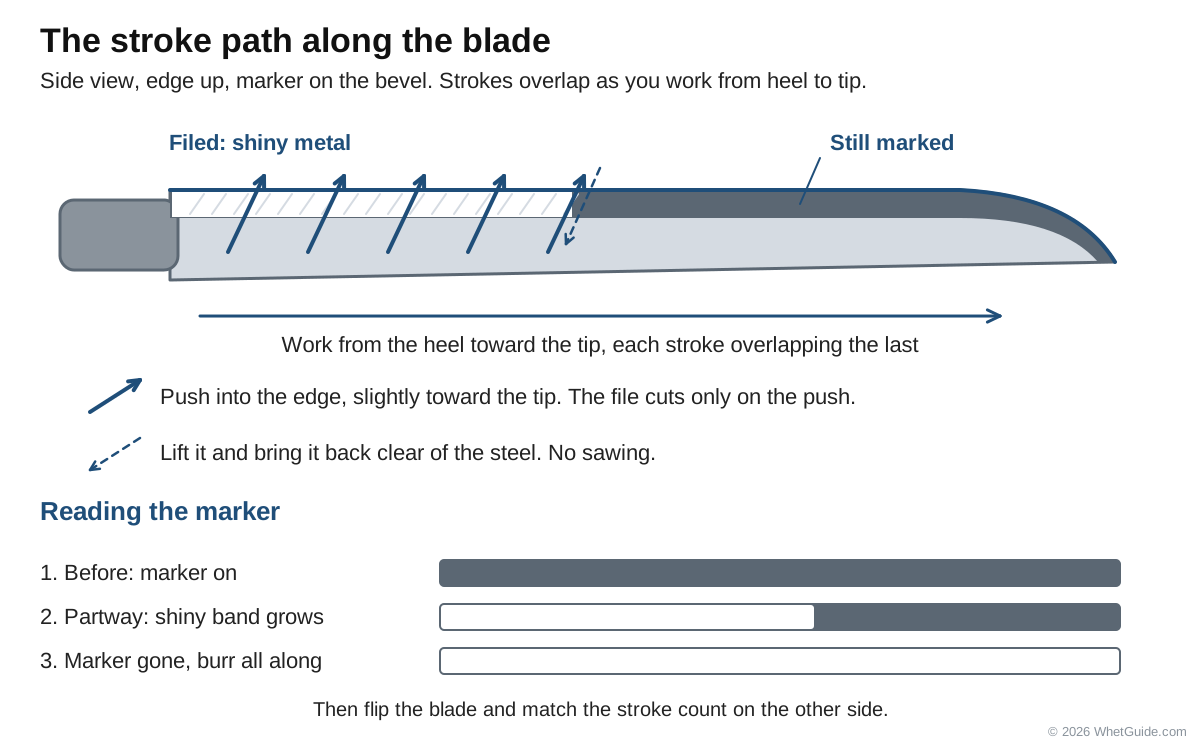
- Hold the file in both hands: the handle in your dominant hand, the fingertips of the other on the far end of the file, away from the edge. Lay it on the bevel at the angle that's already there. Two light strokes and a look at the marker tell you whether you've matched it.
- Push the file into the edge, across and slightly along it, from heel toward tip. Files cut only on the forward stroke; lift it off at the end and bring it back clear of the steel (Nicholson). The Forest Service puts it plainly: don't saw back and forth, because "the bastard file only cuts as you push it" (USFS).
- Use firm, even pressure. Hard enough that the teeth bite and you hear a clean cut; not so hard the angle wobbles. Lift the file clear on the return stroke. Nicholson's guide says overloaded teeth "chip or clog", and that too much pressure and reverse filing break them.
- Overlap your strokes as you move along the blade, so each one covers part of the last. Work the whole edge, then go back to the start.
- Tap the filings out of the file every few strokes. If the teeth pin up with steel, clean them with a file card.
- Keep going until the marker is gone from shoulder to edge and you can feel a burr on the far side along the whole length. There's no stroke count that fits every machete; the burr tells you when.
- Flip the blade in the vise and do the other side at the same angle. Try to match the number of strokes, so the edge stays centered.
- Remove the burr with lighter, alternating strokes, then with a fine stone, puck face or rod. See the burr.
A fresh file on carbon steel feels grabby and sounds like a crisp scrape. A file that slides and squeaks is either dull, clogged, or skating on hardened or stainless steel. Shiny new metal should appear as a clean, even band along the edge. A band that's wide at the heel and thin at the tip means your angle drifted as you moved along.
Chisel-ground machete? File only the beveled side, then lay the file flat on the back and take a stroke or two to knock the burr off. Very dull or damaged edge? Start with a double-cut or the coarse side of an axe file to take the dings out, then switch to the single-cut file to set the final edge. If the edge has a chip deeper than you want to file out by hand, see the grinder or beyond repair.
A file leaves a coarse, toothy edge, and for a lot of brush work that's all you need. For a cleaner finish, follow with a puck or stone. The whetstone side of deburring is in how to use a whetstone.
↑ Back to all sectionsHow to sharpen a machete with a puck
A puck is a round, two-sided stone sized for your hand. The Lansky Puck is the common one: silicon carbide, 120 grit on the coarse side and 280 on the medium side, and Lansky lists machetes, axes and lawn mower blades among its uses. It's the upkeep tool, and on a curved blade it's easier than a file.
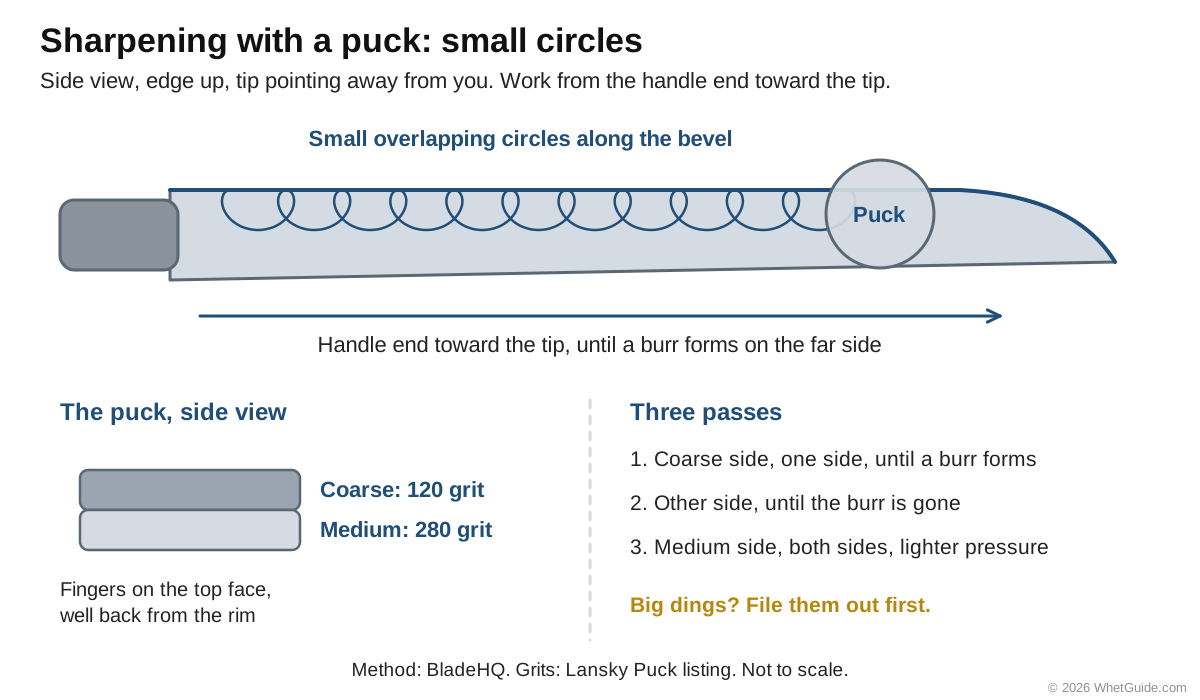
- Lay or clamp the machete edge up, tip pointing away from you.
- Hold the puck in your dominant hand, fingers on the top face, well back from the edge of the puck.
- Set it on the bevel at the factory angle.
- Move it in small circles or short sweeping strokes along the edge, from the handle end toward the tip.
- Keep going until you can feel a burr on the opposite side.
- Swap hands (or turn the blade) and do the other side until the burr is gone.
- Turn the puck over to the medium side and repeat with lighter pressure.
That's BladeHQ's method, and it adds one condition: if the edge has large dings, take them out with a file or coarse stone first, because a puck is slow on damage. Use it the way Lansky's packaging says, dry or with the lubricant it names. Whatever you use, keep your fingers behind the puck's leading edge; on the circle back toward you, the edge is right there.
The Lansky sharpener guide covers the clamp kit, which is a knife system and too small for most machetes.
↑ Back to all sectionsHow to sharpen a machete with a whetstone or diamond plate
A bench stone gives a cleaner, more even edge than a file, and it's what you'd use after filing if you want the machete to slice well. The catch is length. A long blade won't cross a bench stone in one stroke, and swinging a long blade over a bench stone is awkward. Three ways around that:
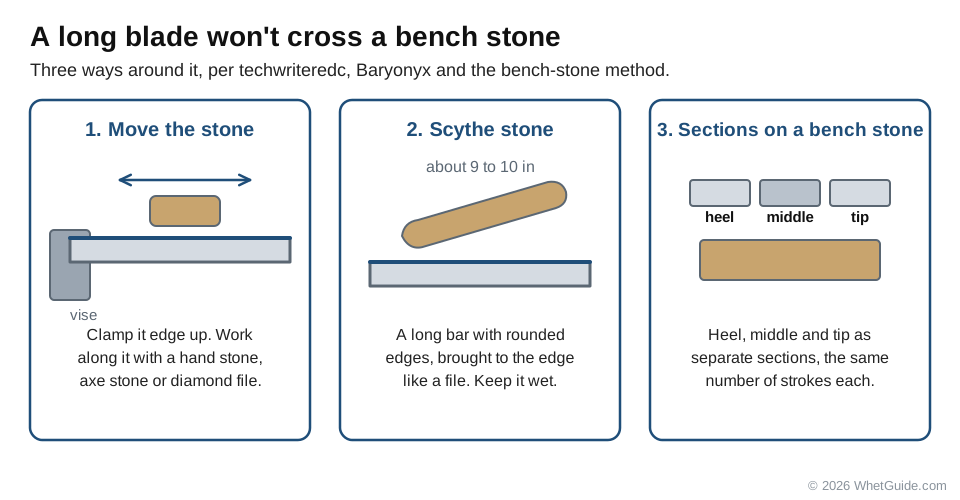
- Move the stone, not the blade. Clamp the machete edge up and work along it with a handheld stone, a combination axe stone or a diamond file. techwriteredc says a handheld stone suits machetes better than a fixed one, and for a full-length Latin it's the only sane way.
- Use a scythe stone. It's the old long-blade hone: a bar about 9 to 10 inches long with rounded edges, brought to the blade like a file. Baryonyx makes the Bull Thistle, a 10 inch American-pattern stone in ANSI 120 grit that its maker says works "like an abrasive file or steel" and hugs forward-curving and recurved blades, with machetes on its list of uses (Baryonyx). Its finer partner, the Arctic Fox, is 9 inches long and ANSI 400 (Scythe Cymru). On Blade Forums, the stones' maker, who posts as FortyTwoBlades, says he files first, then goes over the edge with the Bull Thistle and then the Arctic Fox, and he suggests scythe stones over a puck for finer work. Clamp or brace the blade, work the stone in overlapping strokes along the edge, and keep it wet.
- Work in sections on a bench stone. Rest the stone on a towel, lay the blade across it, and sharpen heel, middle and tip as separate sections with the same number of strokes each.
Grits: Everest Forge uses 200 to 400 to shape the edge and 800 to 2000 to polish. Red Label says about 400 restores an edge and 800 to 1000 refines it. After a file, a 120 to 240 stone takes out the file marks, and FortyTwoBlades says on Blade Forums you can jump to about 400 from there. Those two numbers match the Bull Thistle and Arctic Fox scythe stones above. Grit numbers don't line up exactly between Japanese and Western scales; our sharpening stone grit chart converts them.
- Prepare the stone the way its maker says: soak a soaking water stone, splash a splash-and-go stone, oil an oil stone, and use a diamond plate dry or with water. Don't put oil on a water stone.
- Find the duller side. CuisineBank starts there, and so should you.
- Hold the angle. Smith's says a consistent 25 to 30 degrees on a stone, light pressure, full length of the blade.
- Small circles or long strokes along the edge, keeping the stone wet so the slurry builds. That gray slurry is doing the cutting.
- Raise a burr along the whole edge, including the tip. CuisineBank's reminder is a good one: the tip should end up as sharp as the rest.
- Flip, repeat, then move to the finer side with lighter strokes.
Should you wet the blade before sharpening? Wet the stone, not the blade, and only if the stone calls for it. Diamond plates and water stones run wet; files and most pucks work dry. The full whetstone technique is in how to use a whetstone, keeping a stone flat is in how to flatten a whetstone, and diamond vs whetstone is covered in whetstone vs diamond stone.
↑ Back to all sectionsHow to sharpen a machete on a belt sander
A belt sander is the fastest way to put a clean, slightly convex edge on a machete, and the fastest way to ruin one if you push too hard or linger. Keep a bucket or tray of water next to the machine.
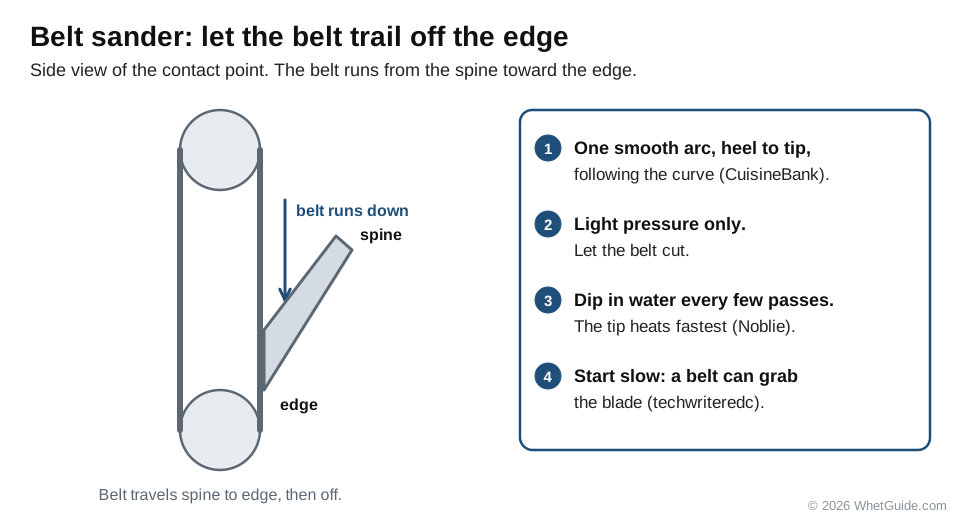
Start the blade on the belt flat and gently, edge pointing the same way the belt runs off it (so the belt trails off the edge, not into it). Draw the machete across the belt in one smooth arc from the heel to the tip, following the curve so the whole edge gets the same contact. CuisineBank describes this hilt-to-tip arc. Light pressure only; let the belt cut. Dip the blade in water every few passes, and pay attention near the tip, which Noblie notes heats faster than the thicker part of the blade. techwriteredc warns that a belt can grab the blade and pull it out of your hands if you go in too fast, so start slow.
| Source | Rebuild a bad edge | Sharpen | Finish |
|---|---|---|---|
| Red Label Abrasives | 80 | 120 to 220 | 400 and up |
| Everest Forge | n/a | 120 to 220 | 400 to 600 |
| techwriteredc (belt sharpener) | n/a | 150, then 240 | 400 |
They agree more than they differ: start in the low hundreds, finish around 400 or a bit finer. Use 80 only if the edge is damaged; Cratex calls 80 grit fast, and on a thin machete fast means you can grind past the bevel in seconds. None of these sources gives a belt speed, so we don't either. If your sander has a variable speed, slower is easier to control.
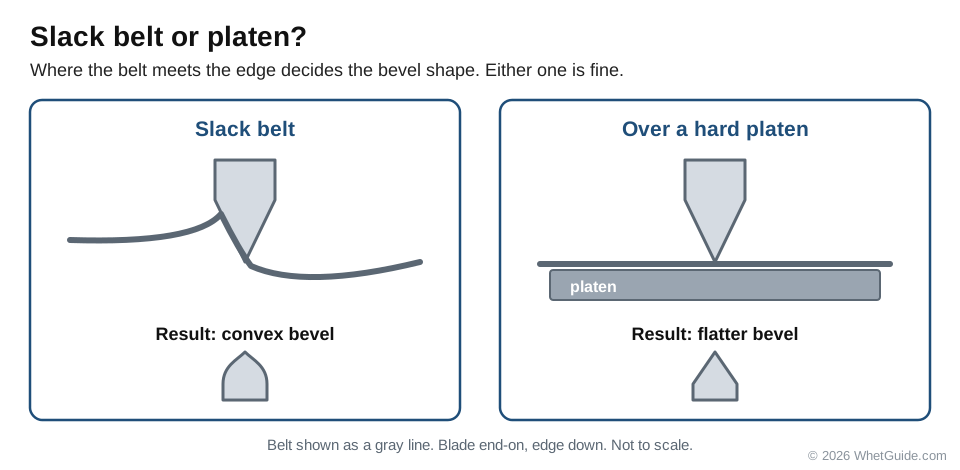
A slack belt naturally rounds the edge into a convex profile; a belt run over a hard platen gives a flatter bevel. Either is fine. The knife version of this is in how to sharpen a knife on a belt sander.
↑ Back to all sectionsCan you sharpen a machete with a bench grinder?
Yes, with conditions. A grinding wheel is a repair tool, not a sharpening routine (Noblie, techwriteredc). Use it to take out a deep nick, grind off heavy rust, or rough in a new bevel, then finish with a file or stone. The danger is heat. A machete edge is thin, a wheel puts a lot of friction into a small spot, and steel that gets hot enough to change color has lost the hardness its heat treatment gave it.
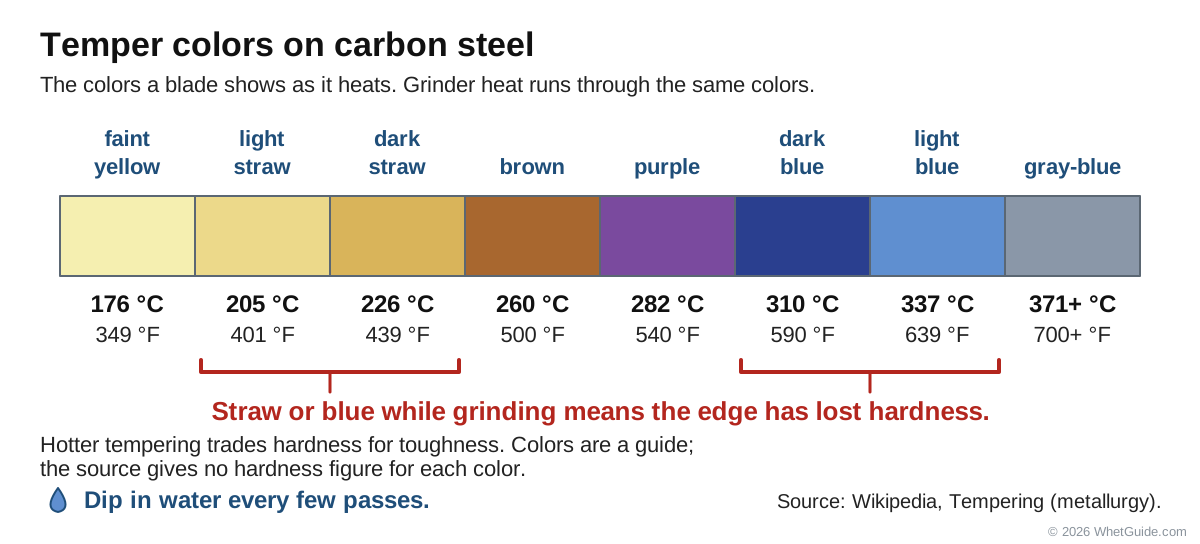
The colors come from Wikipedia's tempering table: faint yellow at 176 C (349 F), straw from about 205 to 226 C, brown at 260 C, purple at 282 C, blue from 310 to 337 C, and gray-blue from 371 C (700 F). Higher tempering temperatures trade hardness for toughness. The colors are a visual guide, and the source gives no hardness figure for each color, so we can't tell you how soft a blued edge is. Red Label and Noblie agree on the working rule: if the steel turns straw or blue while grinding, it has lost hardness. Grind past the colored steel to fresh metal, more carefully this time.
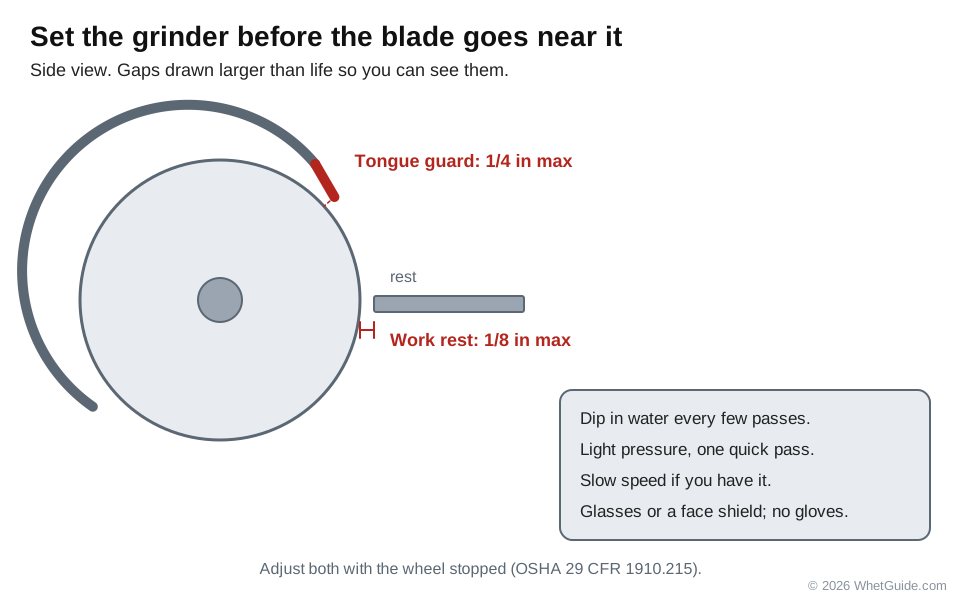
- Keep a container of water right at the grinder and dip the blade every few passes, before it gets too warm to hold.
- Light pressure, one direction, one quick pass at a time. Never park the edge on the wheel.
- Use the slow speed if your grinder has two. Slower is easier to control, and you still dip the blade in water every few passes.
- Set the tool rest close. OSHA's rule for shop grinders is a gap of no more than 1/8 inch between the work rest and the wheel, adjusted with the wheel stopped, and a tongue guard no more than 1/4 inch from the wheel (OSHA 29 CFR 1910.215). A wide gap is where a thin blade gets pulled in.
- Safety glasses or a face shield, and no gloves near the spinning wheel where they can catch.
Plenty of experienced people simply say don't. The Terrierman post says not to use a grinder or belt sander on a machete because you'll likely get it wrong and may burn the blade, and the Permies thread warns the same. If you're asking "did I overheat my machete?", look for colors along the edge. No color and the edge still files normally: you're probably fine. Blue edge that files soft: grind back past it. The knife version, with wheel choices, is in how to sharpen a knife on a bench grinder.
↑ Back to all sectionsCan you sharpen a machete with a Dremel?
For a single chip or a bad spot, yes. For the whole edge, no. A rotary tool sharpens a small section at a time, and three guides say the same thing (justmachete, Cratex, techwriteredc): it's fine for spot repair or a field touch-up and leaves an uneven edge if you run it along the whole blade. Use a grinding stone or sanding drum at the lowest speed that cuts, keep it moving, watch for color as you would on a grinder, and blend the repaired spot into the rest of the edge with a file or puck afterward.
↑ Back to all sectionsHow to sharpen a machete without a sharpener
If you're out with a dull machete and nothing to sharpen it with, you can still improve the edge. Noblie lists the options, and they're the same ones people have used for centuries.
- A smooth, fine-grained river stone. Find a flat one, wet it and use it like a puck in small circles at your usual angle. It won't be fast, but it works.
- Unglazed ceramic. The rough ring on the bottom of a coffee mug, a plate or a tile is a fine abrasive. Short strokes along the edge, both sides.
- Sandpaper. Wrapped around a stick or over a soft pad, it follows a convex edge, as Cratex describes. On a flat board it makes a flat bevel.
- Concrete. A curb or step will raise a crude edge in an emergency, and Noblie calls it exactly that: crude. Clean it up with something finer when you can.
What doesn't work: cutting aluminum foil (it may knock a burr off, but it doesn't grind an edge), and knocking a rock into a blade, which is flintknapping, a different craft entirely.
↑ Back to all sectionsGuided sharpening systems and long blades
Clamp-and-rod guided systems hold the angle for you, and on a knife that's wonderful. On a machete they run out of room. Sharpeners on r/sharpening keep asking what to use on large machetes, and the answer they land on is the honest one: most guided kits are knife-sized, and a full-size Latin is unwieldy on a bench stone.
There are exceptions. TSPROF's K03, from the company whose old store page some sharpening threads still link to, takes blades from 60 to 450 mm long (450 mm is about 17.7 in, so still short of an 18 inch Latin) and up to 7 mm thick, and TSPROF's own guide shows a marker trick for long blades: color the bevel, take a few passes, and move the clamp along the bar until the marker comes off evenly from heel to tip (TSPROF). Long diamond plates on a guide, like the SHARPAL setup shown in one popular video, are another way to keep a fixed angle on a long blade.
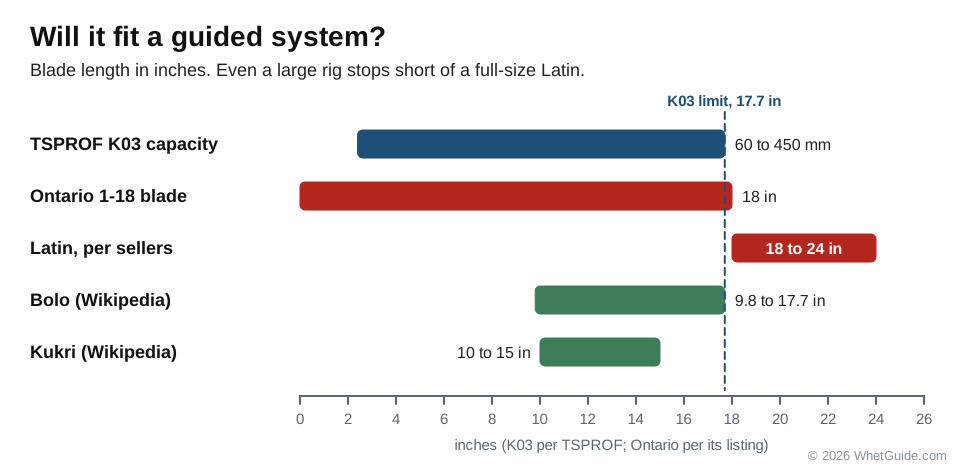
Small belt sharpeners made for kitchen knives, like the Work Sharp MK2, are built around knife-length blades. Our view: one is fine on a short bolo or camp machete, but awkward on a full-length Latin. The Work Sharp Guided Field Sharpener has 20 and 25 degree guides, coarse 220 and fine 600 diamond plates, ceramic rods and a strop, all sized for knives, so on a machete it's a touch-up tool for the belly of a short blade, not the full edge. Our Guided Field Sharpener review covers it on knives. For a full-size machete, the file is still the best guide there is: your own two hands.
↑ Back to all sectionsHow to sharpen a kukri
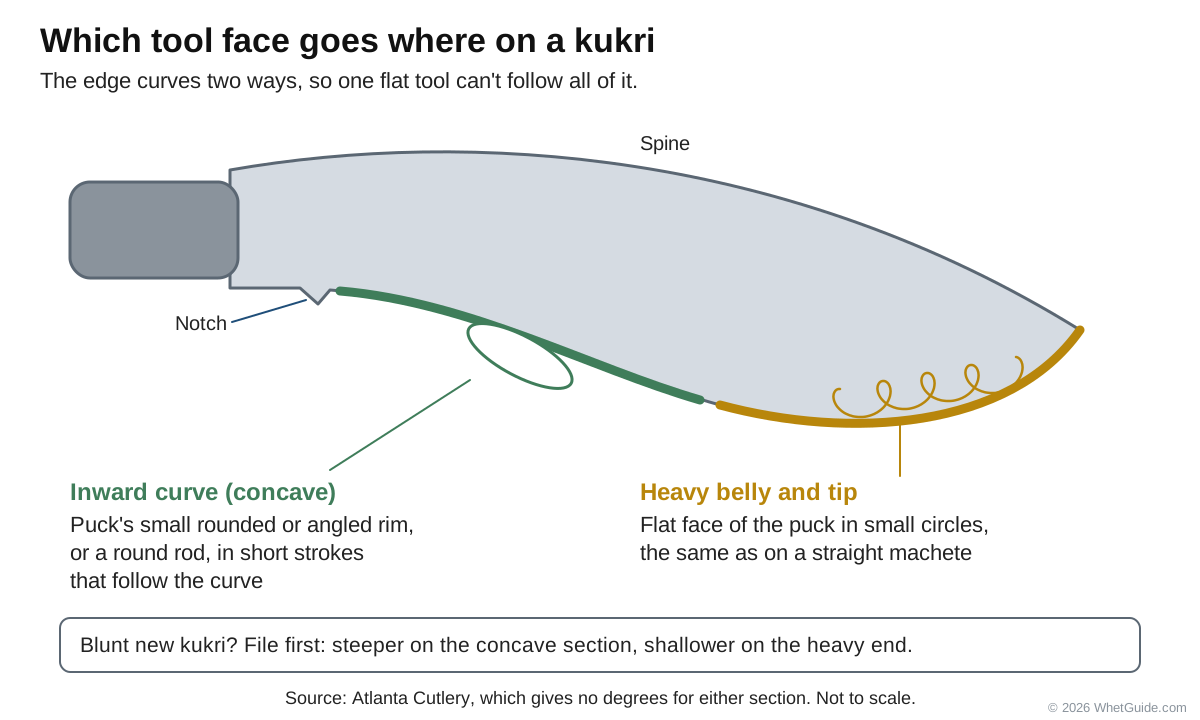
A kukri is the hardest machete-family blade to sharpen, because its edge curves two ways. Near the handle the edge is concave (it curves inward), and toward the tip it swells into a heavy convex belly. A flat file or flat stone can't reach the inward curve, so the kukri needs its own approach.
Some anatomy first. Wikipedia gives a traditional kukri a 26 to 38 cm (10 to 15 in) blade and a weight of 450 to 900 g, with a spine 5 to 10 mm thick at the handle that tapers to about 2 mm at the point. The belly flares so the blade bites in on a draw cut. The little notch near the handle is the cho (also called karda or kauda). Wikipedia lists several explanations for it and the one it sources is simple: it's a stopper when you sharpen with the chakmak. The blunt stretch between the notch and the handle is the ricasso.
With the chakmak
The chakmak is the small, unsharpened steel rod that rides in a traditional kukri's sheath. It doesn't grind; it burnishes the edge back into line, like a chef's honing steel (Wikipedia). Atlanta Cutlery describes the method:
- Rest the tip of the kukri on a wooden surface, edge facing away from you.
- Draw the chakmak along the edge from the tip toward the notch, with firm pressure, at the bevel angle.
- Repeat on the other side.
- A regular honing steel works the same way with lighter pressure.
That's maintenance. A chakmak won't fix a dull or chipped kukri.
With a puck, file or stone
- The concave section: use the small, rounded or angled edge of the puck, or a round diamond or ceramic rod, in short strokes that follow the curve (Atlanta Cutlery).
- The belly and tip: the flat face of the puck in small circles, the same as a machete.
- A blunt new kukri: some ship unsharpened and need a file first. Atlanta Cutlery says to file steeper on the concave section and shallower on the heavy end. The Khukuri House holds a fine or medium file at roughly 45 to 60 degrees to the edge and strokes from the notch toward the tip, then flips. That 45 to 60 is how the file crosses the edge, not a bevel angle; here's the difference.
- A convex kukri edge: sandpaper over a soft backing, such as a mouse pad or folded leather, follows the curve. BushcraftUK forum members describe the same trick.
Shaving-sharp kukri? Blade Forums owners who want one get it on the forward belly with fine stones and a strop. Leave the heavy chopping section at a sturdier angle, because that part hits wood hardest. The Cold Steel Kukri Plus is a modern kukri-style blade in 1055 steel, 13 in long and 2.8 mm thick, and Red Label says that with 1055 steel "you can sharpen them easily with a file." Kukri care is under care.
↑ Back to all sectionsHow to sharpen a parang, bolo, barong or Latin machete
The parang is the Malay and Indonesian chopping blade, and Wikipedia describes its edge in detail. It's single-edged with a convex grind, beveled more obtusely than a knife so it doesn't bind in green wood. Traditionally it has three working zones: very sharp at the front for skinning, a wider, heavier bevel in the middle for chopping, and very fine near the handle for carving. The SAS Survival Handbook describes a similar three-angle setup.
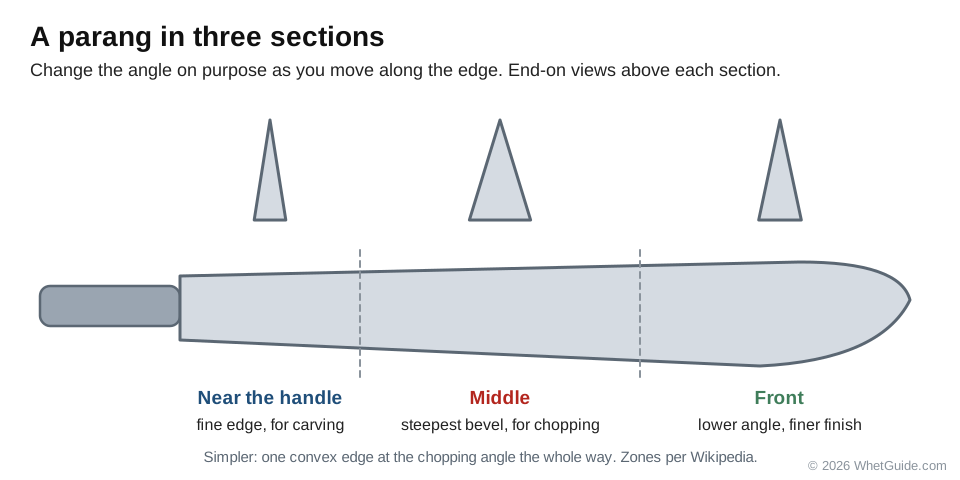
To keep those zones, sharpen the parang in three sections and change your angle on purpose: a slightly lower angle and finer finish at the front, your steepest, toughest bevel in the middle, and a fine edge near the handle. Use a puck or soft-backed sandpaper so you keep the convex shape. If that sounds fussy, give the whole parang one convex edge at the chopping angle; it'll still work, and you can refine the zones later.
- Bolo: the weight sits forward in a curved belly (Wikipedia gives 25 to 45 cm blades). Shorten your strokes through the belly and lift the handle slightly as you go so the stone stays at the same angle on the curve.
- Barong: a leaf shape, widest in the middle. Follow the belly so the bevel stays the same width all the way around (Noblie).
- Latin and bush machetes: straight edges, the easiest of all. Long overlapping file strokes heel to tip, then a puck.
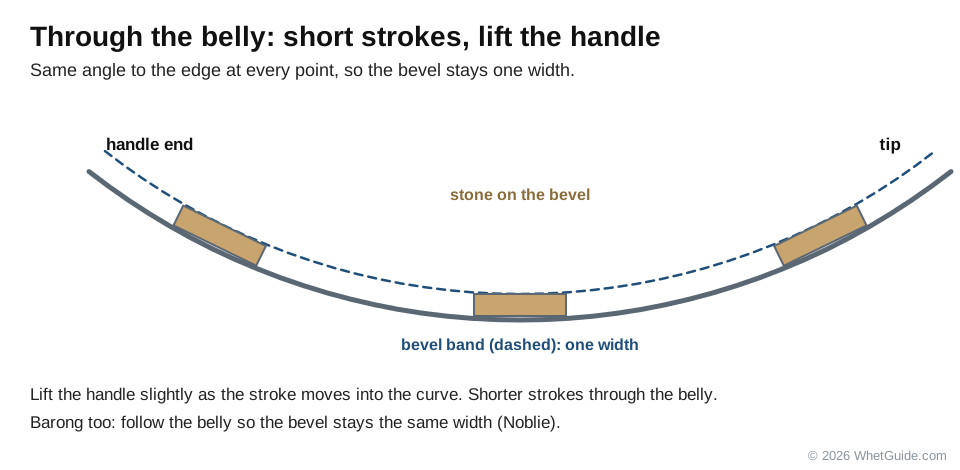
Condor's Bushcraft Parang is 1075 carbon steel with a convex grind, and keeping that convex is most of the job.
↑ Back to all sectionsThe burr: how to feel it and how to remove it
The burr is a thin lip of steel that folds over to the far side when your two bevels meet at the edge. It's your proof that you've sharpened all the way to the edge. No burr, no sharp machete, however long you've been filing. The full explanation is in our guide to the sharpening burr.
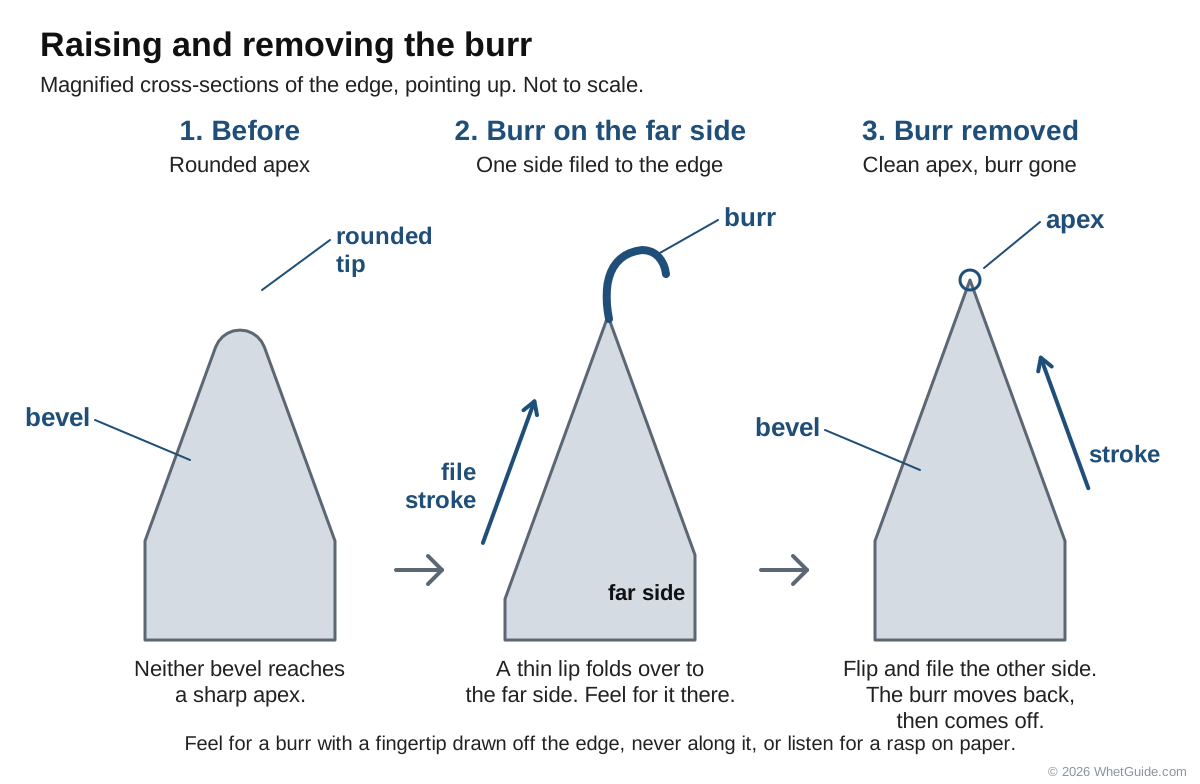
To feel it, draw a fingertip across the edge from the spine side out over the edge, on the side opposite the one you've been working. Off the edge, never along it. A burr feels like a slight catch, rough compared with the smooth side. Check the heel, the middle and the tip separately. CuisineBank gives a no-touch check: drag a sheet of paper along each side of the edge and listen. A rough, rasping sound means a burr is there.
Removing it:
- On the same tool, lighten up and alternate sides with fewer strokes each time.
- Finish with a few light strokes on a fine stone, the medium side of a puck, or a ceramic rod.
- Draw the edge lightly through the end grain of a scrap of soft wood to pull off what's left.
- On a chisel-ground blade, lay the file or stone flat on the back and take a stroke or two.
A burr left on the edge feels sharp and folds over in the first few cuts, which is the most common reason a "freshly sharpened" machete goes dull almost at once. Noblie's answer to "why is my machete not getting sharp?" points the same way: no burr, wrong angle, or a clogged stone.
↑ Back to all sectionsFinishing: toothy or polished
A machete edge doesn't need a mirror. Noblie says a slightly toothy finish often cuts fibrous vegetation better than a polished one, because the tiny teeth left by a coarser abrasive grab stems. Red Label suggests matching the finish to the job: a more polished edge for sugar cane and grasses, a coarser one for hardwood.
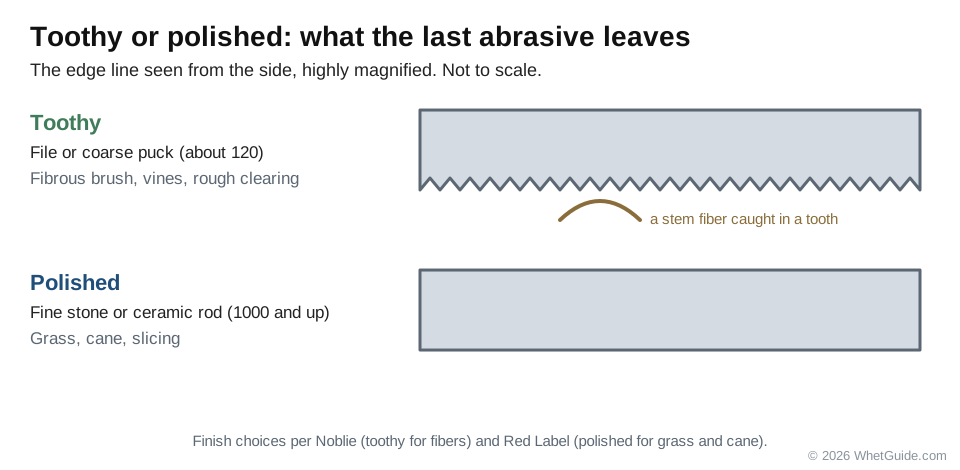
| Finish | Last abrasive | Good for |
|---|---|---|
| Toothy | File, or a coarse puck (around 120) | Fibrous brush, vines, rough clearing |
| Working | Medium puck or stone (about 280 to 400) | Most mixed work |
| Refined | Fine stone or ceramic rod (1000 and up, per Red Label) | Grass, cane, slicing |
| Stropped | Leather, bare or with compound | Cleaning up the last of the burr |
A honing rod or ceramic rod is the quick way to bring back an edge that has rolled in use without removing metal. Strop with edge-trailing strokes only (spine first) so you don't cut the leather; how to strop a knife covers it. Cratex also mentions a buffing wheel for a final polish, with the edge laid flat against the wheel. Treat it like a grinder for heat, and always with the edge trailing.
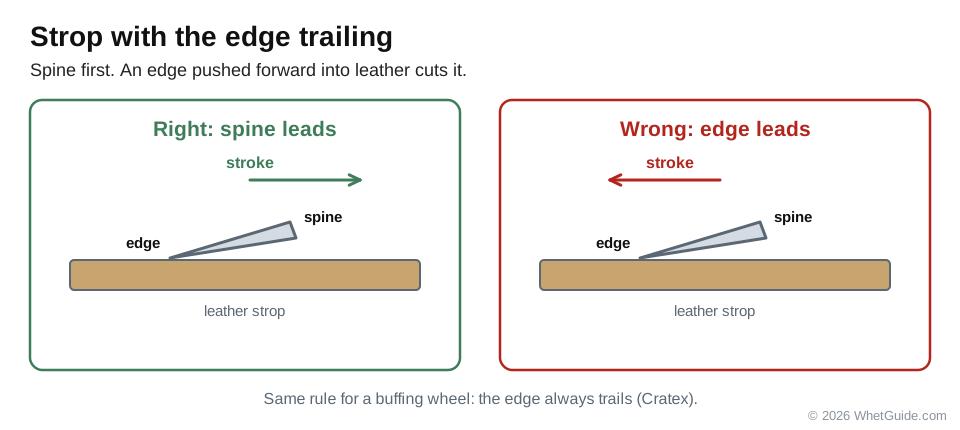
The last thing you do after sharpening: remove the burr, wipe the filings and grit off the blade, dry it, and oil carbon steel. Then put the file and puck away clean.
↑ Back to all sectionsField sharpening: what to carry and how to touch up
In the field you're maintaining an edge, not rebuilding one. Everest Forge and Noblie both frame it that way: a few strokes to bring back the bite, then back to work. Save reprofiling and nick repair for the bench.
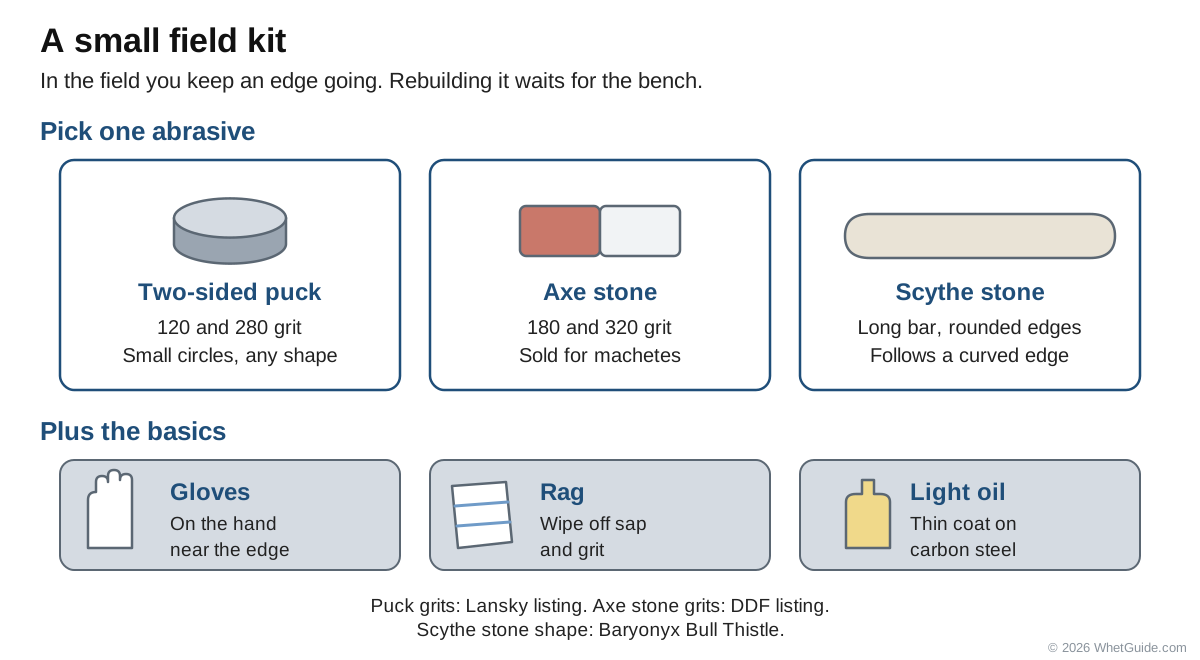
- A puck or combination axe stone. The DDF axe stone is 180 grit on one side and 320 on the other and is sold for machetes and hatchets. A Lansky Puck is 120 and 280.
- Or a scythe stone. Its rounded edges and long faces follow a curved machete edge the way a file does, and it packs flat.
- A small diamond stone or diamond file, which cuts fast and needs no water.
- A compact field sharpener, for short blades and the belly of a kukri.
- A rag and a small bottle of oil.
How to touch up: brace the machete with the spine on your knee or a log, edge up and away from you, tip pointing away. techwriteredc gives a second hold: the handle under the crook of your non-dominant arm, edge facing up. Either way, keep your stone hand moving along and away from the edge. Small circles with the puck along the edge at your usual angle, a few on each side, alternating. Check with a light stroke on a stalk. A few strokes a side, then a test cut, is usually all a working edge needs.
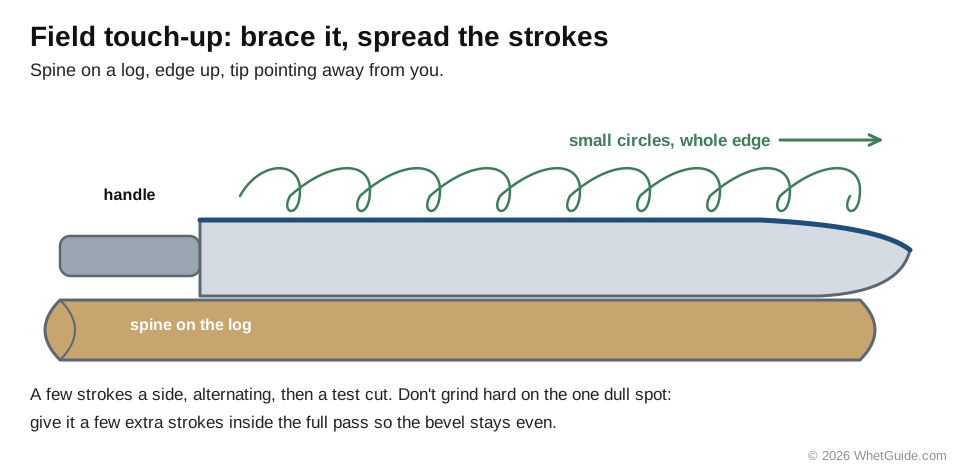
One habit to avoid in the field: grinding hard on the one spot that's dull. It leaves a short, uneven patch of bevel that's steeper or thinner than the rest. Spread the strokes along the whole edge, a few extra on the dull spot.
↑ Back to all sectionsHow to test a machete's edge safely
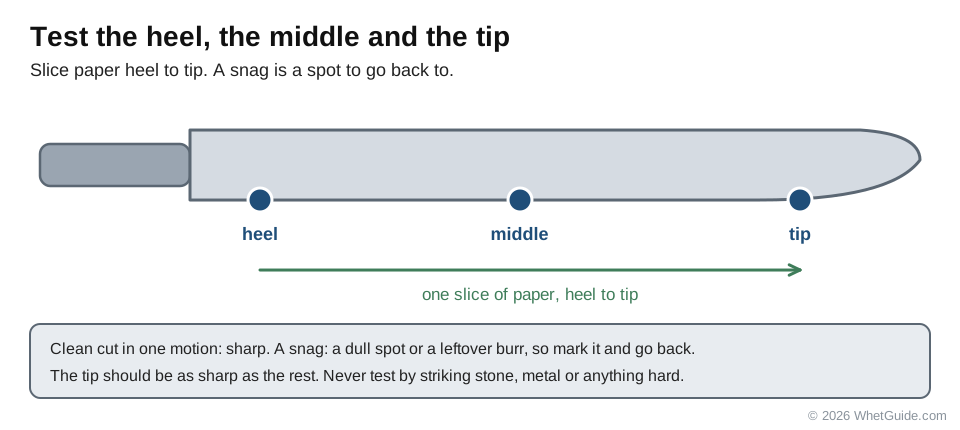
- Paper. Hold a sheet by one corner and slice down from heel to tip. A sharp machete cuts it in one motion. A snag marks a dull spot or a leftover burr.
- A green stalk or small vine. Red Label's field test: a sharp machete cuts a sheet of paper, a corn stalk or a small vine in one stroke.
- A green stick. Shave a curl off a green branch held away from your body. A sharp edge bites; a dull one skates.
- The light test. Edge up under one bright light. No bright line means no flat, dull spots.
- A board. CuisineBank chops a 2x4 as a check. If you do, clamp the board down, stand clear of the swing, and treat it as a chopping check, not a hardness test.
Test the heel, middle and tip. The tip should be as sharp as the rest. Never test by striking stone, metal or anything hard; Noblie warns against unsafe impact tests, and a chip from one undoes the session.
Common mistakes and fixes
| Problem | Likely cause | Fix |
|---|---|---|
| Machete won't get sharp | Never raised a burr; or the angle is too low and you're grinding the shoulder | Marker on the bevel; keep going until a burr runs the full edge. |
| Rounded, wide or wavy bevel | Angle changing between strokes | Lock your wrists, move from the shoulders, and recheck with marker. |
| File slides and squeaks | Dull or clogged file; or pulling it back under pressure | Clean with a file card; push strokes only, lift on the return. |
| Sawing back and forth | Habit from knife sharpening | One push, lift, return. The file cuts only going forward. |
| Razor edge that chips or rolls early in the job | Angle too low, or polished too fine for the job | Go steeper (25 to 30 per side for brush) and stop at a working finish. |
| Blue or straw color on the edge | Overheated on a grinder or belt | Grind past the colored steel slowly, with water at hand. |
| Sharp in the middle, dull at heel and tip | Only the easy part got the strokes | Start each pass at the heel, finish at the tip; check the burr in three places. |
| Sharp off the file, dull after a few cuts | Burr left on | Lighter alternating strokes, then a fine stone or rod. |
| Stone clogs and stops cutting | Sharpening a dirty, sappy blade | Clean the blade first; rinse or scrub the stone. |
| Edge ruined in a kitchen sharpener | Pull-through slots don't fit a machete | File the bevel back to an even angle and use a puck from then on. |
| Rust spots on the edge | Put away wet or in a damp sheath | Remove rust before sharpening; dry and oil after every use. |
| Cut hand near the handle | Sharp edge right up to the grip | Blunt the first few inches above the handle (how). |
All of these are fixable with more sharpening, except heat damage, which is fixable only by grinding past it. Learning on a cheap machete first takes the pressure off.
↑ Back to all sectionsMachete care: rust and storage
Sharpening and rust care go together. A carbon steel machete left wet will pit at the edge, and pitting is the one kind of dull you can't always sharpen out.
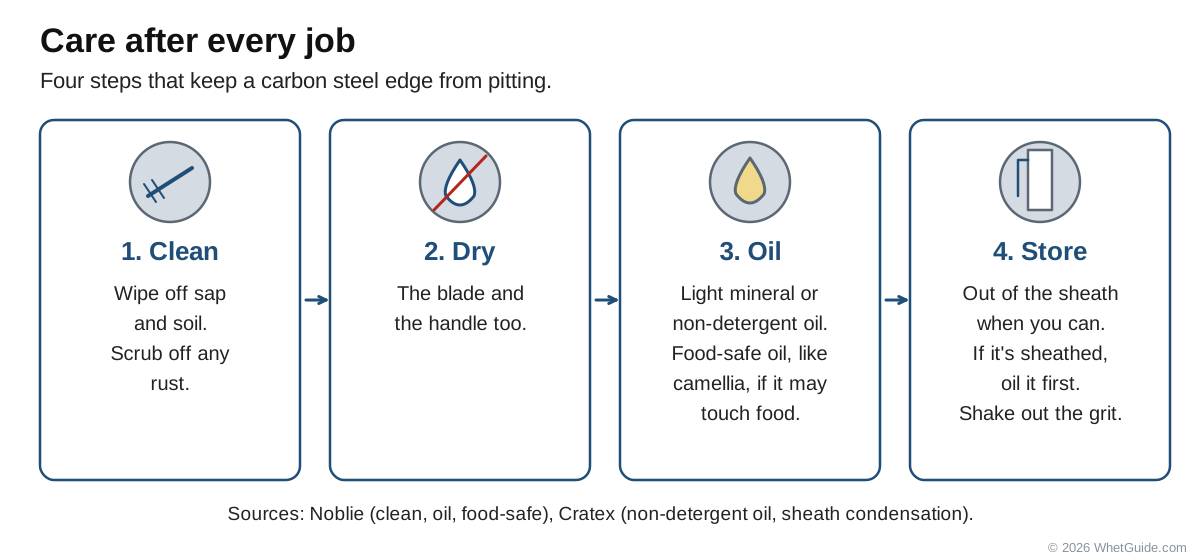
- Clean after use. Wipe off sap and soil. Noblie says to clean off sap, soil and rust before you sharpen, too.
- Dry it, handle included.
- Oil carbon steel with a light mineral oil, and use a food-safe oil on anything that might touch food (Noblie). Cratex says to keep carbon steel dry and lightly oiled with a non-detergent oil. Camellia oil, the traditional Japanese blade oil, works well; Böker sells it as "food safe" (Böker). The 2007 Terrierman post uses motor oil, and we wouldn't: it's messy, gets on your hands and plants, and isn't made for blades.
- Store it out of the sheath when you can. Cratex warns that sheaths trap condensation; if you do store it sheathed, oil it first. Shake the grit out of the sheath now and then, since grit dulls the edge every time you draw it.
- Kukri: the Khukuri House says to oil it monthly or after each use.
Removing rust
Light surface rust comes off with fine sandpaper or a fine abrasive pad and a little oil. For heavier rust, the Khukuri House uses gasoline (it says petrol) and fine sandpaper, and Atlanta Cutlery uses kerosene or turpentine and then machine oil. Neither source gives a warning, so here's ours: these are flammable solvents. Work outdoors or with strong ventilation, nowhere near a flame, pilot light or grinder sparks, wear chemical-resistant gloves, and let the rags dry flat outdoors before you throw them away.
What dulls a machete fastest
Dirt, stones, wire and metal, which Noblie lists, plus bamboo and knots, which Everest Forge adds. Most dull machetes got that way by hitting the ground at the end of a swing. Keep swings above the soil line in brush and the edge lasts much longer.
↑ Back to all sectionsWhen sharpening isn't enough
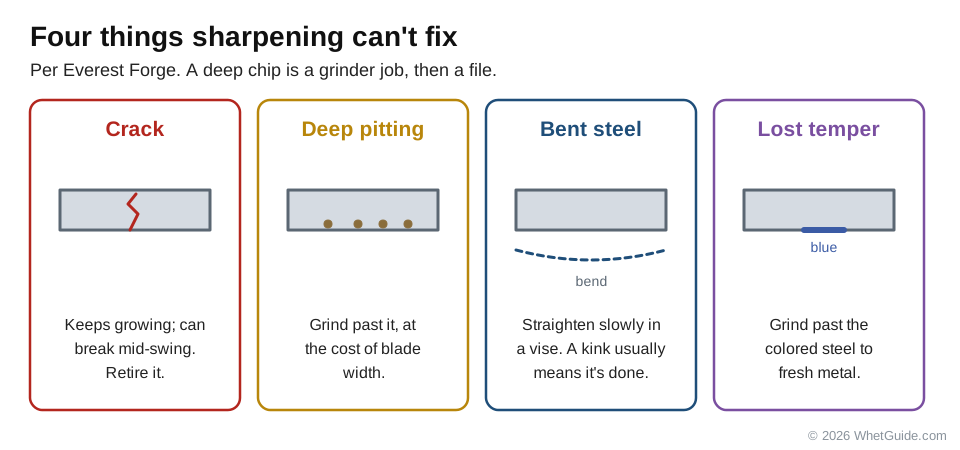
Everest Forge names four things sharpening can't fix. Cracks. Deep rust pitting. Bent steel. Lost temper. A crack running in from the edge will keep growing, and a cracked machete can break mid-swing. Retire it. A bent blade can sometimes be straightened slowly in a vise, but a kink usually means it's done. Deep pits at the edge can be ground past, at the cost of a lot of blade width. A large, deep chip is a grinder job (see the grinder), then a file.
If you'd rather hand it off, mower shops and knife sharpeners often take machetes, but not all of them do long blades; call first. See what knife sharpening costs and whether Ace Hardware sharpens.
↑ Back to all sectionsHow often to sharpen a machete
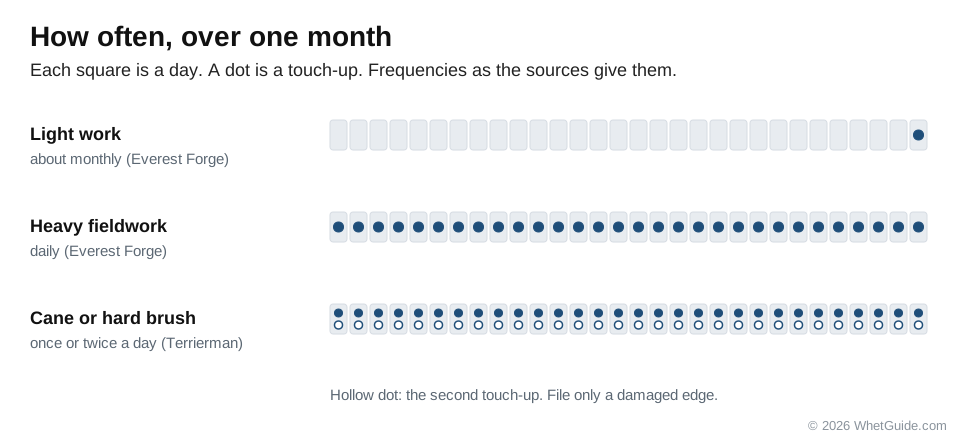
As often as it stops cutting cleanly. As a guide, Everest Forge says about monthly for light work and daily touch-ups for heavy fieldwork. The Terrierman post says heavy users in sugar cane or hard brush may sharpen once or twice a day. Both describe the same thing: light, frequent touch-ups with a puck, and a full file session only when the edge is damaged or badly worn. Cratex's 80/20 rule is the right mindset.
Machete sharpening cheat sheet
The whole method on one card. Print it and pin it over the bench.
| Angle (per side) | Grass and vines 20 to 25. Mixed brush 25 to 30. Hardwood 30 to 35. Or match the factory bevel. Inclusive = 2 x per side. |
|---|---|
| "45 degrees" | Means how the file crosses the edge from above, not the bevel. |
| Tools | Set the edge: 10 to 12 in single-cut mill bastard file. Keep it: puck, coarse then medium, or a scythe stone. Grinder for repairs only. |
| Safety | Clamp edge up. Cut-resistant gloves. Glasses. Handle on the file. Fingers behind the abrasive. Leave a few inches above the handle dull. |
| File | Marker on the bevel. Push only, lift on return, no sawing. Heel to tip, overlapping. Tap out filings. |
| Burr | Fingertip across and off the edge, never along. Full length before you flip. Same strokes on side two. |
| Deburr and finish | Lighter alternating strokes, fine stone or rod, end grain of soft wood. Toothy for brush, finer for grass and cane. |
| Heat | Straw or blue = lost hardness. Dip in water every few passes. Rest gap no more than 1/8 in. |
| Test | Paper, green stalk, light test. Heel, middle, tip. Never hit anything hard. |
| After | Wipe, dry, oil carbon steel. Store out of a damp sheath. |
Related guides
An axe is a machete's heavier cousin, and the file-and-puck method carries straight over: see how to sharpen an axe and the axe sharpening angle page. For the theory behind this page, read about the burr, stropping and the knife sharpening angle chart. If you want to take the edge further on stones, start with how to use a whetstone.
Sources: Wikipedia, Machete, Kukri, Parang and Tempering (blade sizes, the kukri notch, parang zones, temper colors); US Forest Service, ax manual, Part 8: Sharpening (ax bevel and microbevel, convex vs flat, file technique, gloves); OSHA 29 CFR 1910.215 (grinder rest and guard gaps); Crescent Nicholson guide to files (single vs double cut, forward stroke, tooth damage); the Nicholson 8 inch axe file listing; Baryonyx's Bull Thistle scythe stone announcement and FortyTwoBlades' machete sharpening thread; ANSI/ISEA 105 (glove cut levels); Ariens mower manual (blade balance); Böker (camellia oil); maker listings from Ontario, Cold Steel, Condor, Gerber, Lansky, Work Sharp and DDF (steels, sizes, grits); TSPROF; sharpening guides from BladeHQ, Red Label Abrasives, Everest Forge, Noblie, Cratex, techwriteredc, CuisineBank, Smith's and Sharpening Supplies; kukri care from Atlanta Cutlery and the Khukuri House; field voices from the Terrierman blog and the Permies forum. Sources read November 14, 2026. Forum comments are quoted as anecdotes, never as the only source for a number. How we research