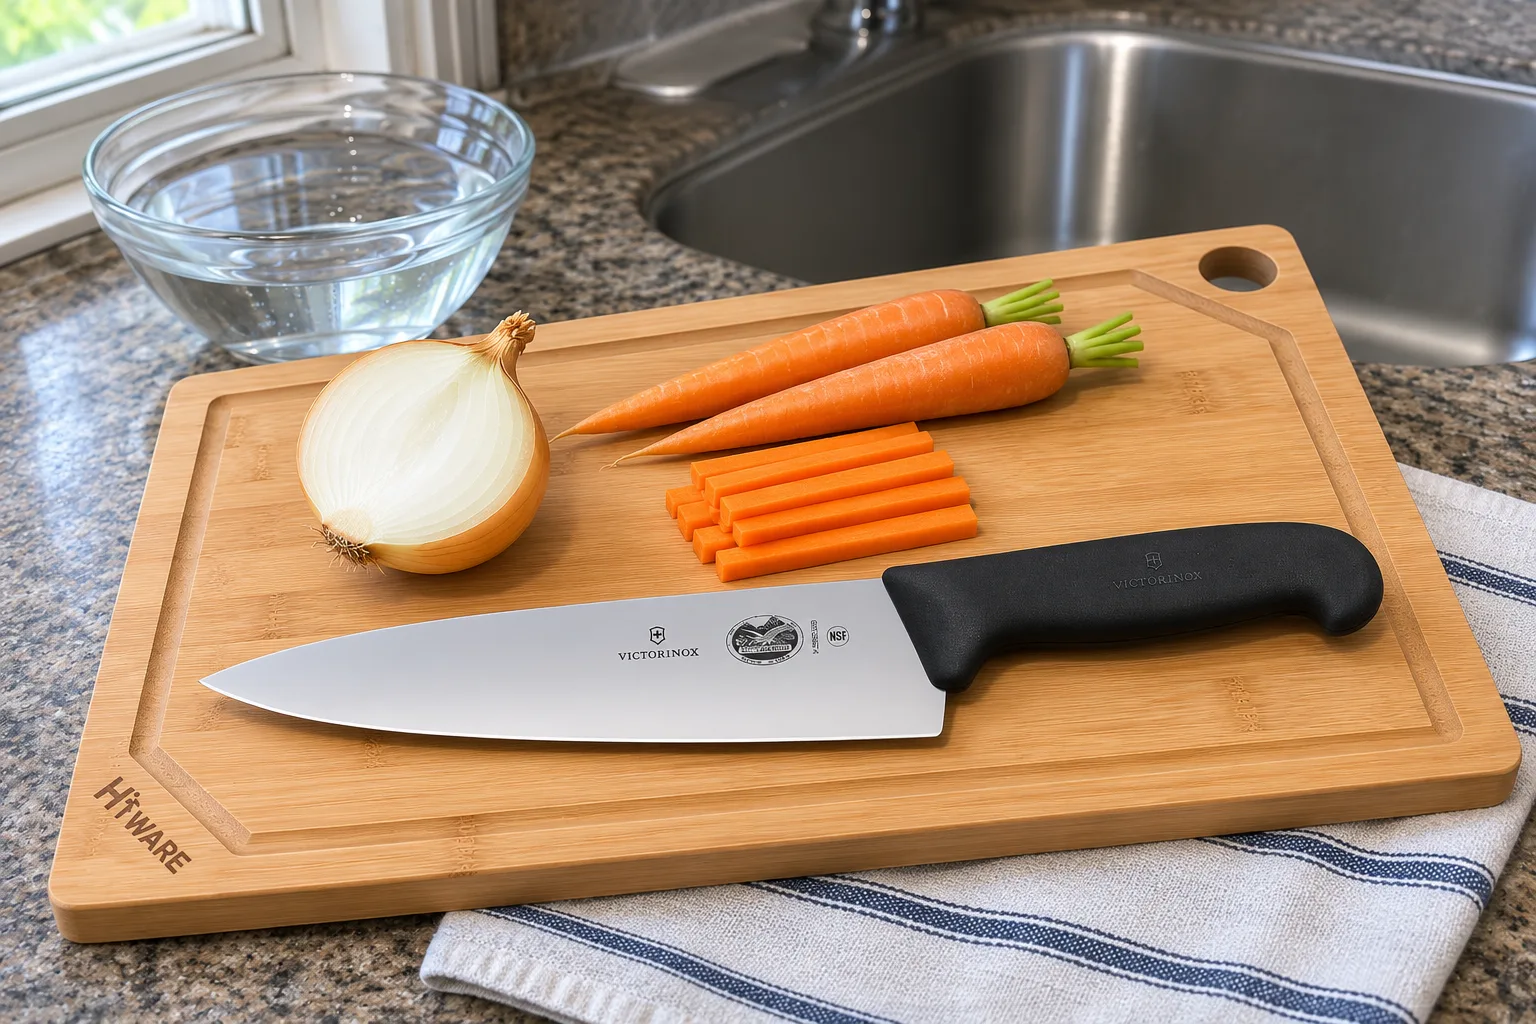
- 45°Blade entry for a push cut, gliding down and forwardper Cutlery and More
- 1/8–1/16 inA true mince, for garlic, shallot and gingerper Victorinox
- 8 inChef's knife length that balances reach and controlper America's Test Kitchen
- ~61 HRCSkip cross chops on steel harder than this. Wusthof Classic is 58.per Cutlery and More; Wusthof
- A1–A9Cut-resistance levels for kitchen glovesANSI/ISEA 105, per MCR Safety
Quick answer: knife skills in 8 steps
- Grip
- Pinch the blade just in front of the handle with your thumb and bent index finger. The other three fingers wrap the handle.
- Guide hand
- Curl it into a claw: fingertips tucked, knuckles forward, the flat of the blade riding against them.
- Motion
- Slice forward or back through the food. Don't press straight down.
- Size
- Same size pieces cook at the same speed. Pick a size and stick to it.
- Safety
- A sharp knife and a board that can't move. A damp towel underneath does it.
- Set up. Damp towel or non-slip mat under a big board, a bowl for scraps, a bowl for finished food, and nothing else on the board.
- Check the edge. A knife that snags on a sheet of paper needs honing or sharpening before you start.
- Grip. Pinch grip on the knife, relaxed, wrist straight.
- Make it stable. Cut a flat face on anything round and lay it on that face. Halve big items first. For the first cut through small round food, arch your guide hand over it in a bridge.
- Claw. Curl the guide hand, knuckles against the blade, thumb tucked behind the fingers.
- Move. Push the blade forward and down, or rock it with the tip on the board. Let the knife do the work.
- Walk the claw back. After each slice, slide the guide hand back by the width of the next slice. That's how you control size.
- Clear and repeat. Move finished food off the board with the back of the knife or a bench scraper, never the edge.
Every step has its own section below. If you only read two, read the grip and the claw; every cut on this page uses both.
↑ Back to all sectionsWhy knife skills are worth an hour of practice
Three reasons, and none of them is about looking like a chef on TV.
- Even pieces cook evenly. Escoffier's culinary school and Wusthof both make the point: a pan of carrots cut to one size finishes at one time, while mixed sizes give you some mushy and some raw. Wusthof's example is roasting vegetables, which should be kept similar in size.
- The cut changes the flavor. Wusthof notes that finer cuts of garlic and onion release more flavor, which is why a recipe says "minced" in one place and "sliced" in another.
- Good technique is safer. A sharp knife held properly needs less force and slips less, according to Escoffier and America's Test Kitchen. A dull blade that skids and a round onion that rolls are how cuts start.
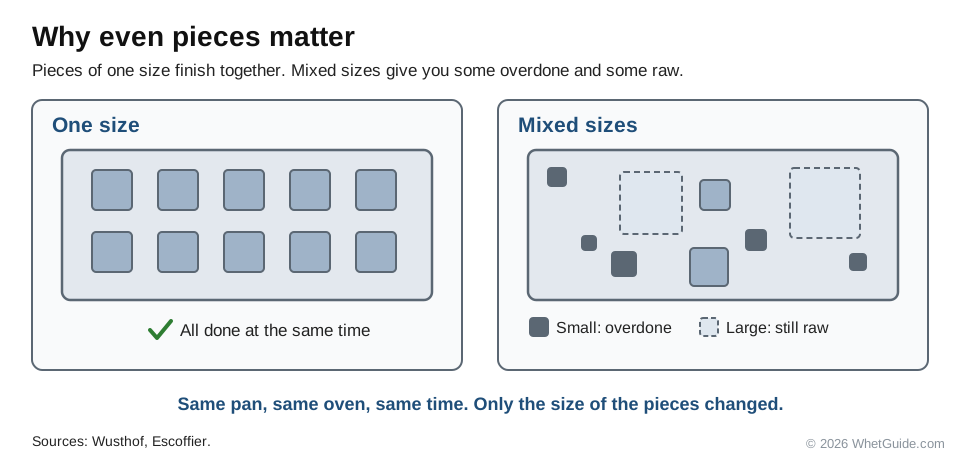
There's a fourth, smaller one. Prep goes faster and you waste less of the vegetable when you square it off on purpose instead of hacking at it. That shows up the first week.
↑ Back to all sectionsSet up the board station
A lot of knife trouble starts before the first cut: a board that slides, a cluttered counter, an onion that rolls. Fix the station and half the safety rules take care of themselves.
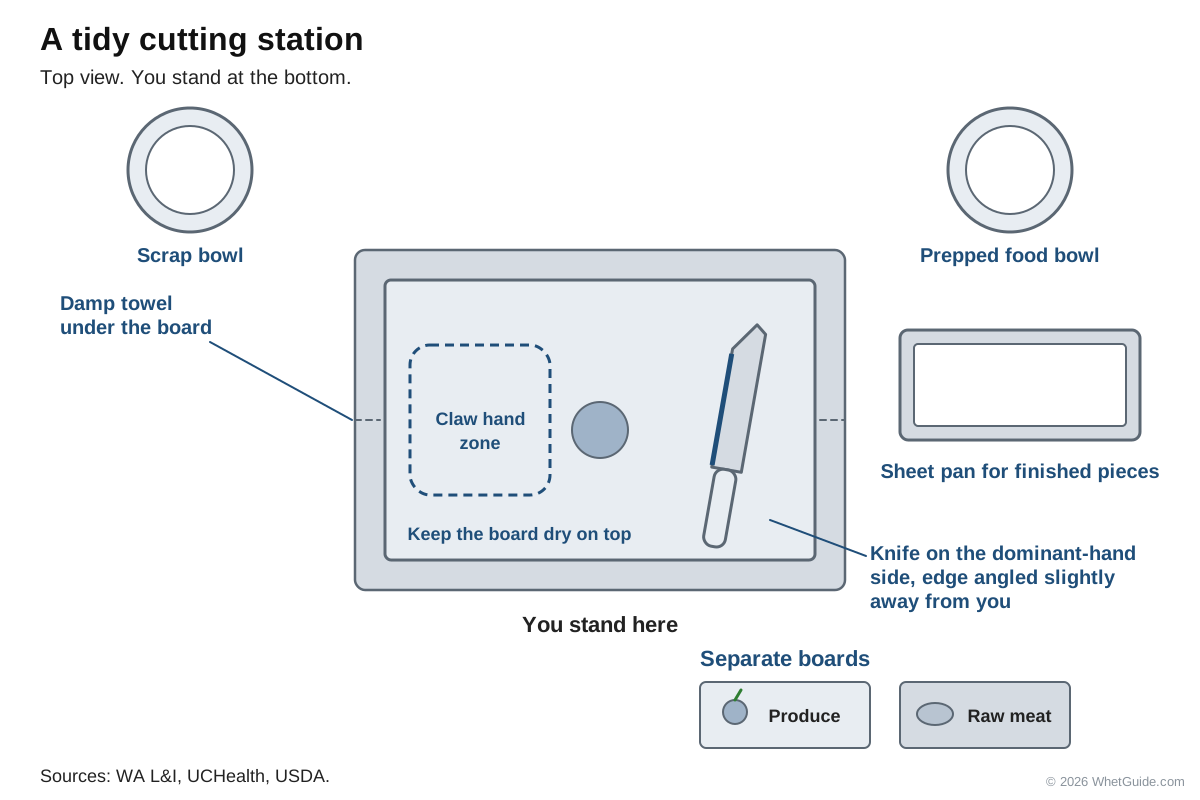
- Lock the board down. Put a damp towel or a damp paper towel under it so it can't slide. Washington State's Department of Labor and Industries puts this on its list of ten safe knife handling rules, and Escoffier, UCHealth and Tasting Table all say the same. A rubber non-slip mat does the same job.
- Keep the top dry. A wet board or a wet handle is how a knife slips, as UCHealth points out. Wipe it between jobs.
- Bowls, not piles. One bowl for scraps, one or more for prepped food. A cluttered board means cutting around things, which is how fingers end up in the wrong place.
- Work at the right height. Stand square to the counter, feet apart, close enough that your elbow can move freely and your forearm can travel straight forward. If the counter is high for you, a sturdy mat to stand on helps more than leaning.
- Prep before you cook. Cut everything for the recipe before the pan goes on. Chefs call it mise en place. Cutting while something burns is the fastest way to rush.
Which board, and keeping it clean
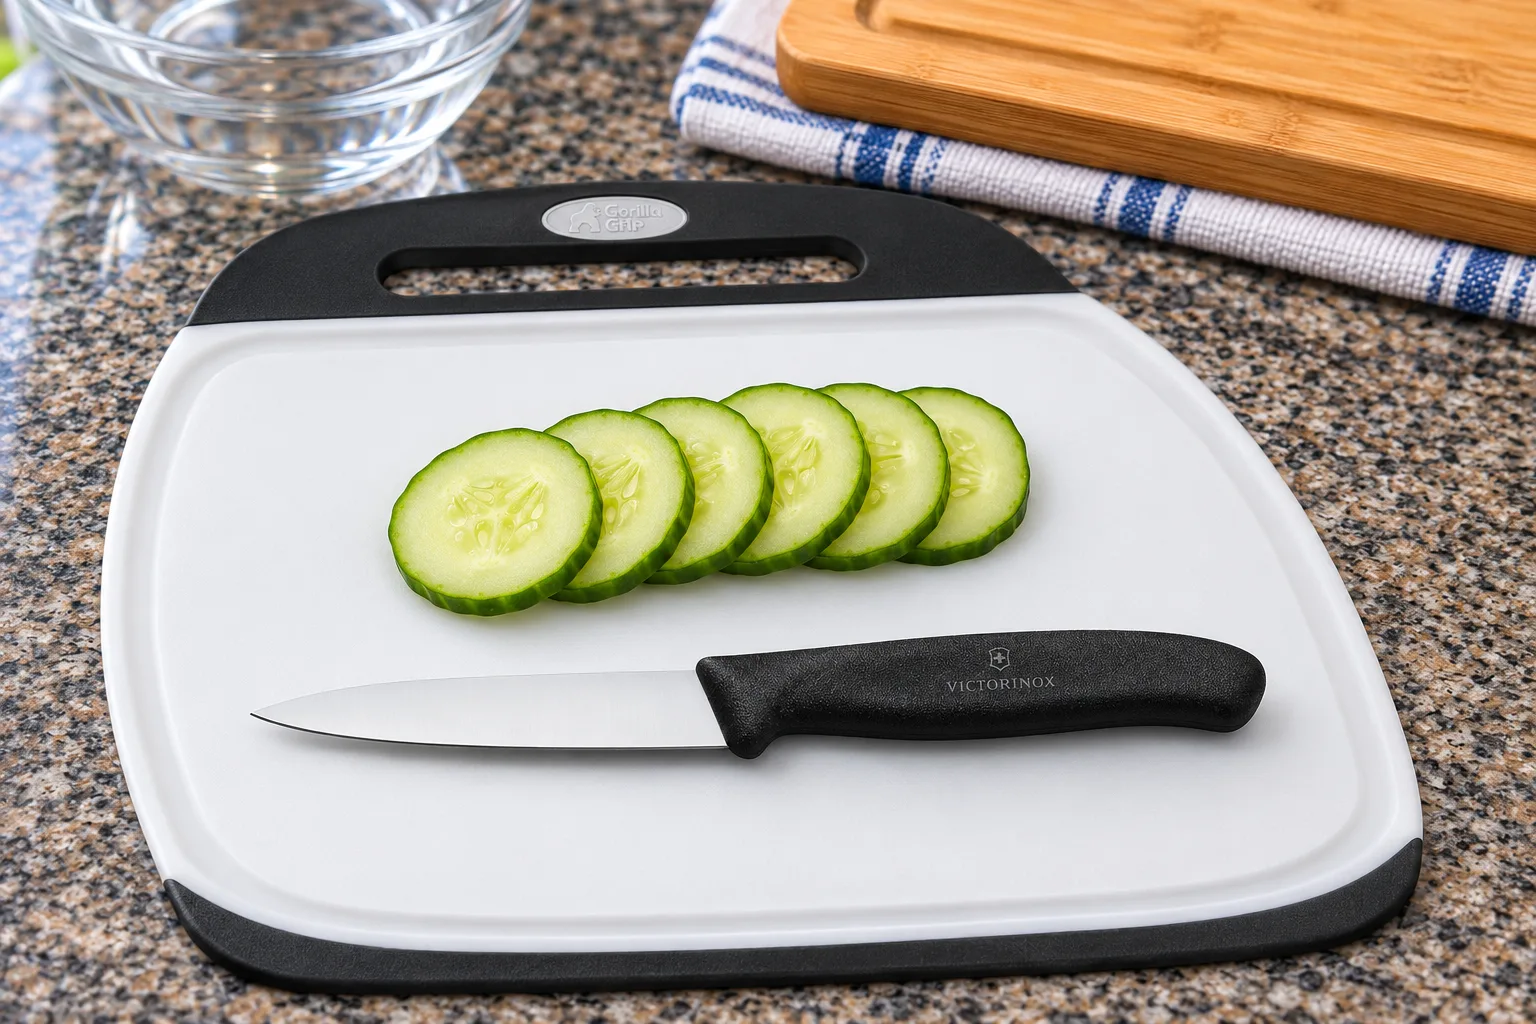
Wood and plastic are the two materials worth owning. Tasting Table notes that wood is gentler on edges, while plastic is non-porous. Skip glass, marble and stone boards. They're slick and hard, so the edge skids instead of biting, and a skidding edge is a safety problem as much as an edge problem. Get a board bigger than you think you need. You want room to push finished food to one side and keep cutting.
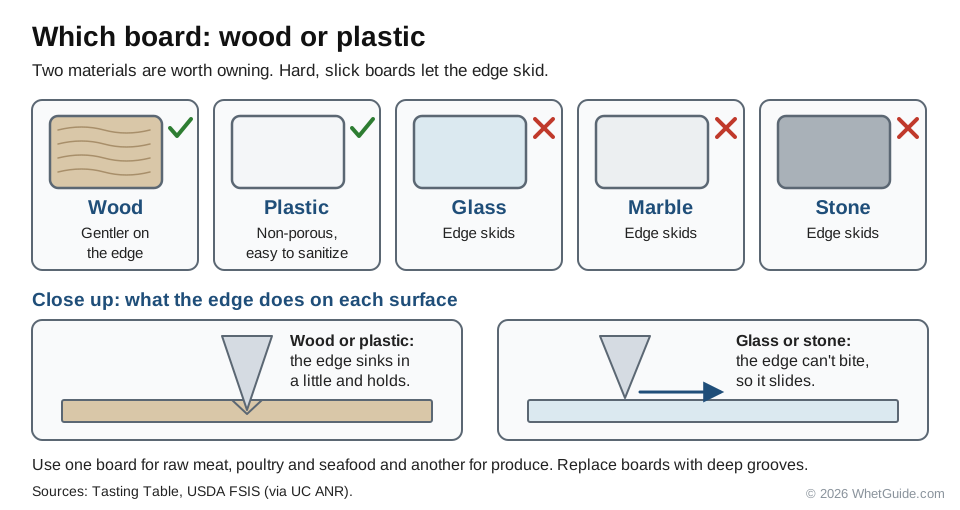
Food safety rules from the USDA's Food Safety and Inspection Service are simple:
- Use one board for raw meat, poultry and seafood, and a different one for produce and ready-to-eat food.
- Wash boards in hot, soapy water after each use. To sanitize, the University of California's food safety sheet, citing FSIS, gives 1 tablespoon of unscented liquid bleach per gallon of water, left on for several minutes, then rinsed.
- Replace boards that are worn or have deep grooves, which are hard to clean, per the archived FSIS fact sheet.
The three knives you need
A chef's knife, a paring knife and a serrated knife. That's the list Tasting Table, Forks Over Knives and Wusthof all give, and it holds up. Everything on this page is done with the first one unless it says otherwise.
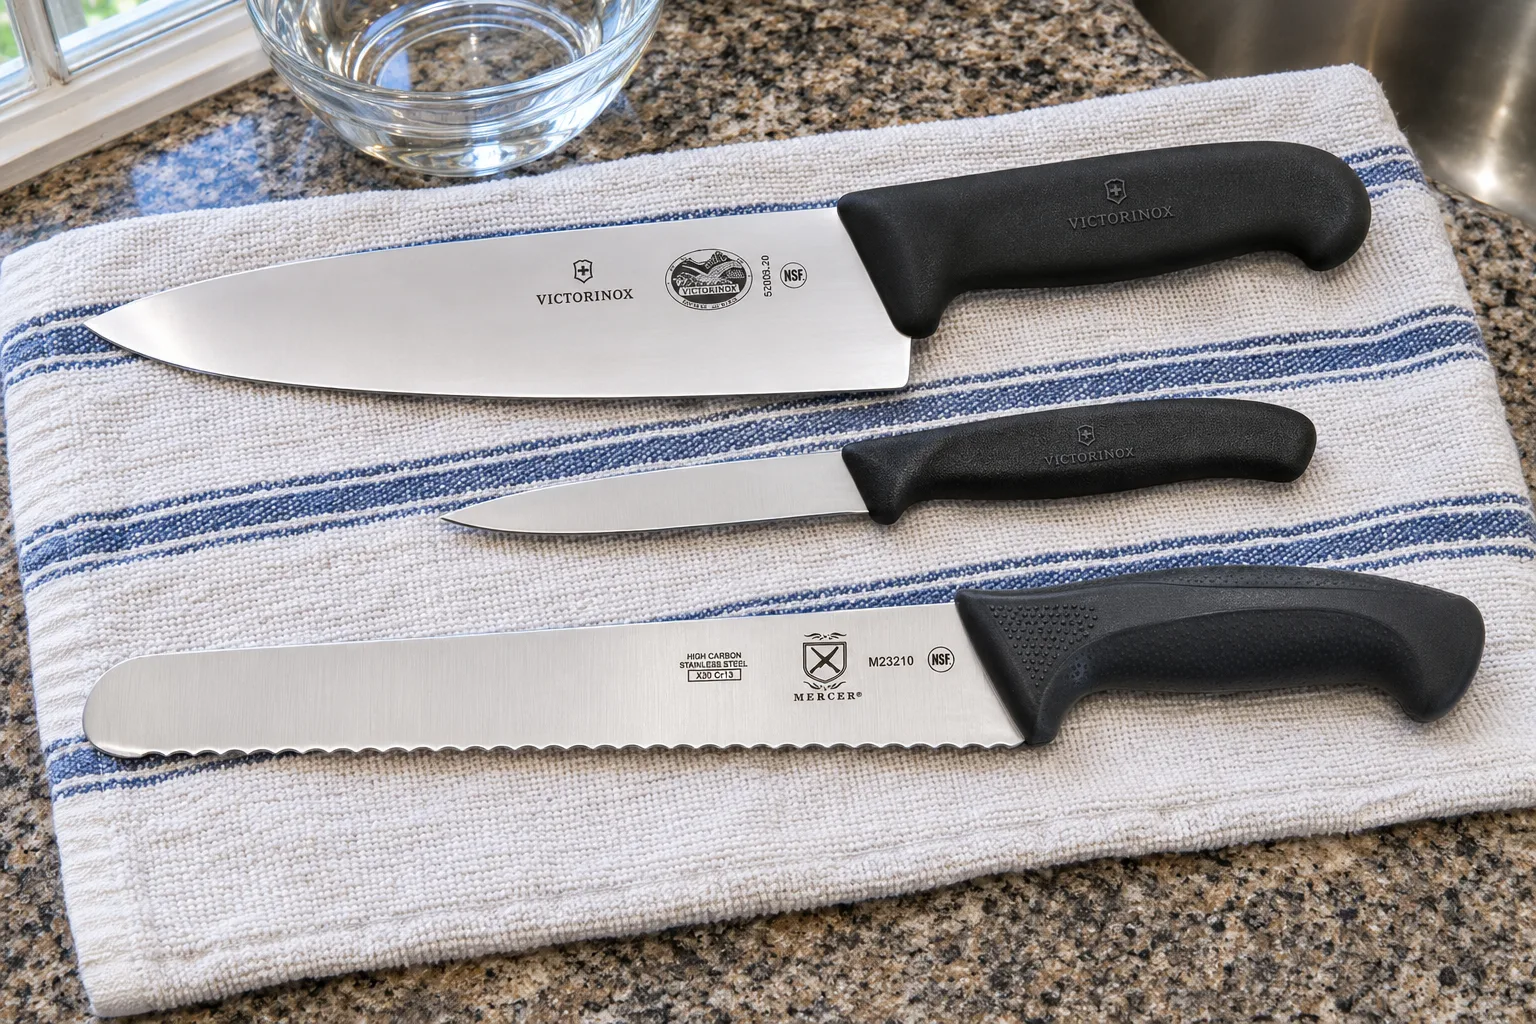
| Knife | What it does | Size to look for |
|---|---|---|
| Chef's knife | Nearly everything: chopping, dicing, slicing, mincing, crushing garlic with the flat | 8 in. America's Test Kitchen calls it the balance of length and control |
| Paring knife | Small, in-hand work: peeling, trimming, coring, hulling strawberries, supreming citrus | About 3 in; Victorinox lists its Swiss Classic paring knife blade at 3.1 in |
| Serrated (bread) knife | Crusty bread, tomatoes, soft fruit with tough skins, cake layers | Long enough to cross a loaf; Mercer makes its Millennia bread knife at 10 in |
| Nice extras | A utility knife (between paring and chef's), a boning knife for meat, a santoku or nakiri for push cuts | Add them when a job keeps coming up |
Steel matters less for learning than sharpness and comfort. Stainless resists rust, carbon steel takes a keen edge but rusts if you leave it wet, and ceramic is very hard but brittle (Tasting Table covers the trade-offs). Our guide to kitchen knife steel goes through the alloys, and how to choose a chef's knife covers weight, balance and handle shape.
↑ Back to all sectionsParts of a knife, and which part does which job
Knowing the names makes every instruction below easier to follow: "rock on the belly," "pinch at the heel." Shun's knife anatomy guide is the source for most of these terms.
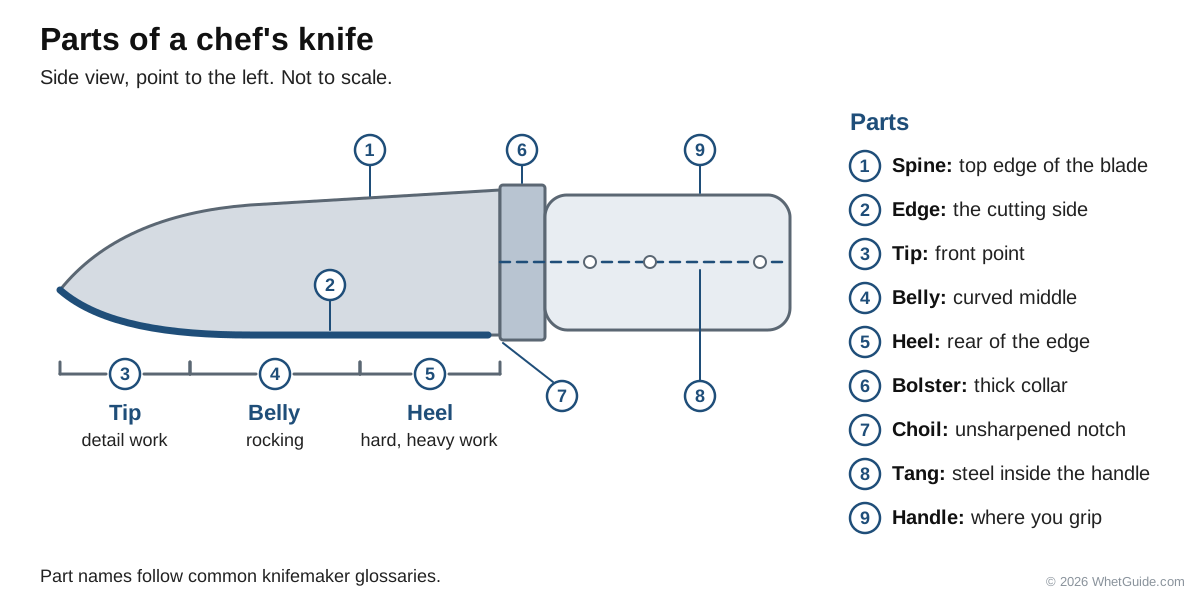
| Part | Where it is | What it's for |
|---|---|---|
| Tip | The front of the blade | Detail work: scoring, trimming, slicing small things, the first cuts into an onion |
| Belly | The curved middle of the edge | Most slicing, and the rocking motion for herbs and garlic |
| Heel | The back of the edge, nearest the handle | Force. Shun describes it as giving stability for stronger cuts through dense food: squash, carrots, chicken joints |
| Cutting edge | The sharpened bottom of the blade, tip to heel | The part that does the cutting, and the part you keep off the board when scraping |
| Spine | The unsharpened top of the blade | Where the guide hand presses for a cross chop; the side to scrape food with |
| Bolster on forged knives (part 6 on the diagram) | The thick metal where blade and handle meet | Weight and balance; it also keeps your fingers off the edge |
| Choil | A small curve or recess where the edge ends at the handle | Shun notes it helps in a pinch grip by giving your finger a place to sit |
| Tang | Steel that runs into the handle | Strength and balance; a full tang runs the length of the handle |
| Handle and endcap | What your three back fingers hold | Grip. Pick one that fits your hand when it's wet |
If someone asks you for the "six parts of a knife," the usual answer is tip, edge, heel, spine, tang and handle. The belly isn't in Shun's list; the term comes from cooking glossaries, and it's the most useful word on this page for anyone learning to rock a knife.
↑ Back to all sectionsA sharp knife is the safe knife
Every technique below assumes the edge is sharp. A dull blade needs more force, slips off onion skin and tomato, and crushes food instead of cutting it. Escoffier, America's Test Kitchen and Gear Patrol all say so, and none of the sources behind this page disagree.
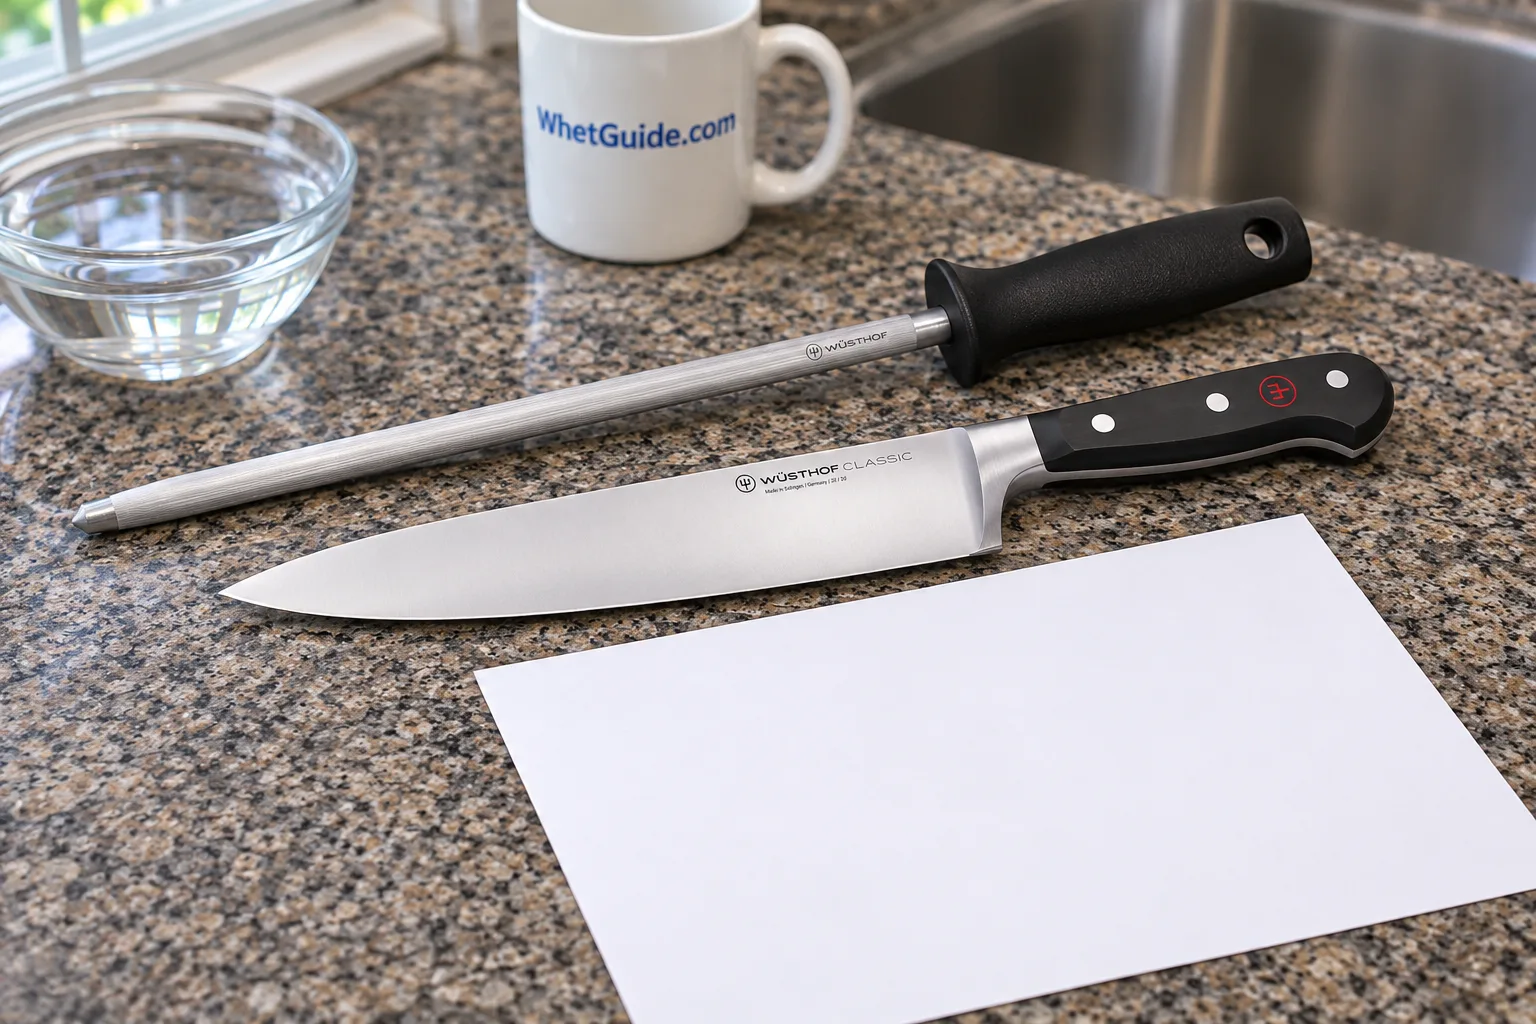
The paper test. Hold a sheet of printer paper by one corner and draw the edge down through it. If it snags or tears instead of slicing, America's Test Kitchen says to hone, and sharpen if honing doesn't fix it.
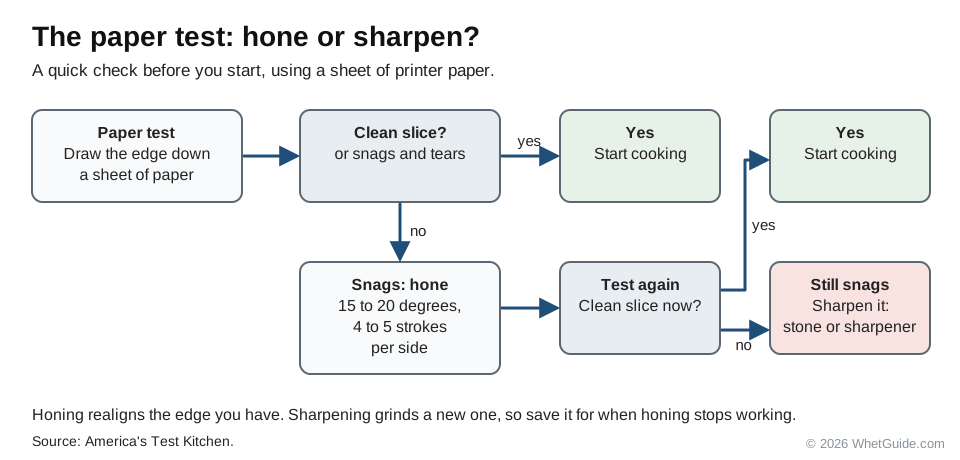
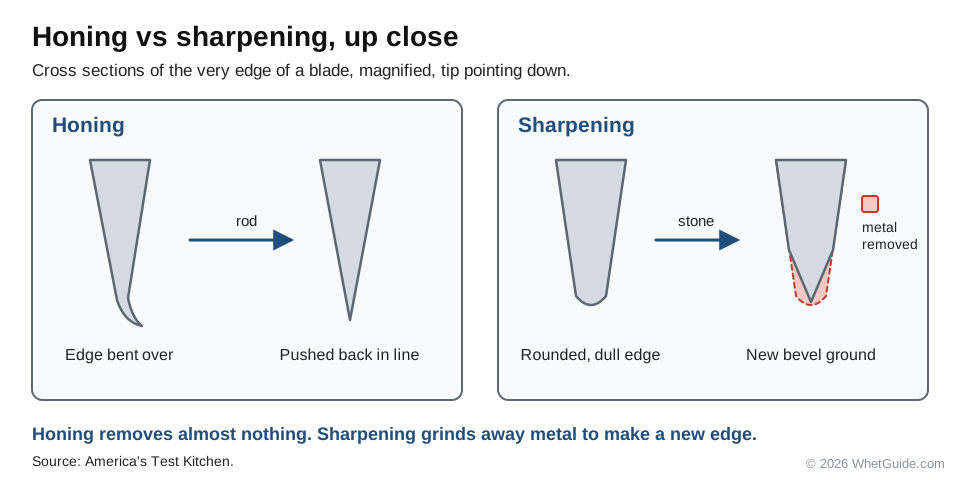
Hone vs sharpen. Honing pushes a slightly bent edge back into line and removes almost nothing. Sharpening grinds new metal to make a new edge. ATK suggests honing every time you start cooking and during heavy cutting, at 15 to 20 degrees with 4 to 5 strokes per side. Better still, match the angle your knife was sharpened at; our knife sharpening angle chart lists each maker's figure. Technique for the rod is in how to use a honing rod, and the schedule is in how often to sharpen knives.
When honing stops bringing the edge back, it's time for a stone or a sharpener. Start with how to sharpen kitchen knives, or go straight to how to use a whetstone if you want to learn it by hand.
One tip we don't pass on: honing on the unglazed ring under a coffee mug. It shows up in plenty of articles. It does work a little, but you can't hold a consistent angle on a curved ring, and you have no idea what the ceramic's grit is. If you're stuck without a rod, our no-sharpener guide covers the options honestly. Buy a rod; they're cheap.
↑ Back to all sectionsHow to hold a chef's knife: the pinch grip
Most people pick up a knife the way they'd hold a hammer, with the whole fist on the handle. It feels strong, and it gives you almost no control over where the edge goes. The pinch grip moves your hold forward onto the blade itself. America's Test Kitchen calls it the go-to grip for most cutting, and Victorinox, Wusthof and Great British Chefs teach the same hold.
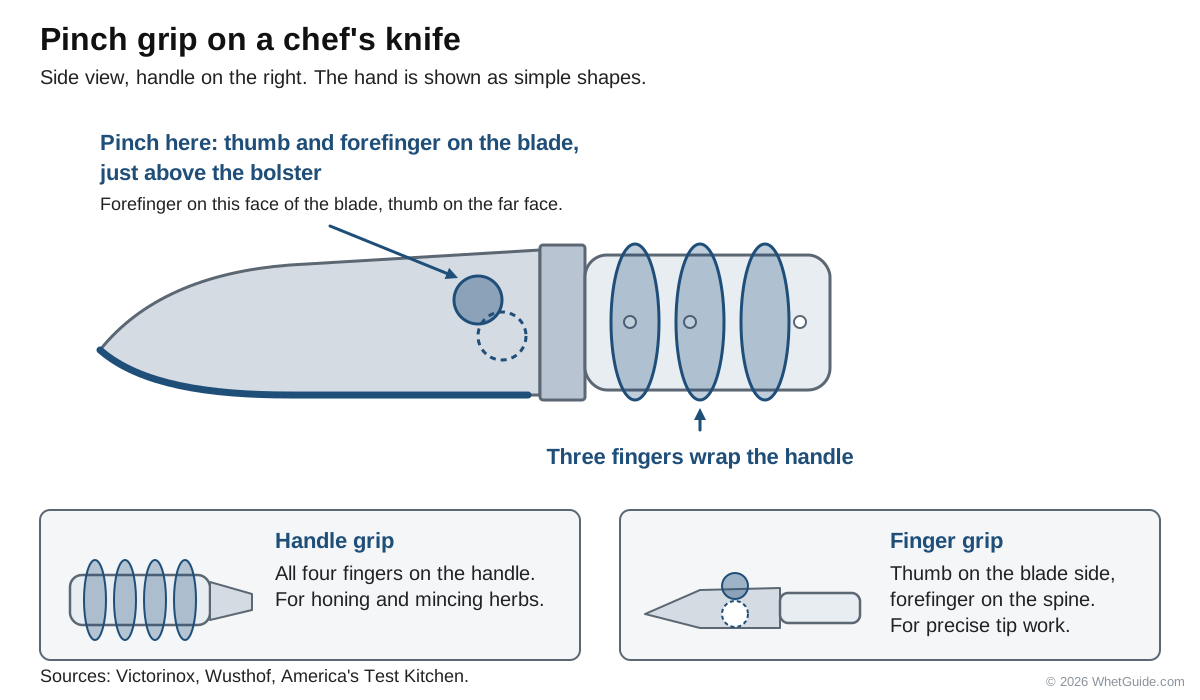
- Shake hands with the handle. Hold it loosely, the way you'd hold it to pick it up.
- Slide your hand forward until your middle finger rests against the back of the bolster (part 6 on the diagram), or in the choil on a knife without one.
- Pinch. Put the pad of your thumb flat on one side of the blade, just in front of the handle. Curl your index finger and put the side of its middle segment on the other side of the blade, opposite the thumb.
- Wrap the other three fingers around the handle. They hold it; they don't squeeze it.
- Keep your index finger off the spine. A pointing finger on top feels precise, but it pulls the blade off line and tires the hand on long jobs.
- Line up your forearm, wrist and knife. Escoffier describes the knife as an extension of your arm. The feel you want is one unit from elbow to tip, wrist straight, not cocked down.
What it should feel like: the blade won't twist when you push it through a carrot, but someone could pull the knife out of your hand without much effort. If your knuckles go white, you're holding too hard.
Four grips and when to use each
| Grip | How | Use it for |
|---|---|---|
| Pinch grip | Thumb and bent index finger on the blade, three fingers on the handle | Almost everything on a board: slicing, dicing, rocking, push cuts |
| Handle (handshake) grip | Whole hand on the handle, nothing on the blade | Honing on a rod and mincing a pile of herbs, per ATK. Forks Over Knives calls it the most intuitive and strongest grip, and the least precise |
| Finger (point) grip | Thumb on the side of the blade, index finger on the spine | Precise tip work, such as scoring or cutting around a small bone (ATK). Culinary Schools describes a variant for julienne, index finger on one side of the blade and thumb on the other |
| Hammer grip | Full fist around the handle | Heavy, straight-down chops with a cleaver or through a squash. Not for everyday slicing |
The Sharp Cook names a fifth, the thumb grip, for small in-hand work with a paring knife. Learn the pinch first. The others come with use.
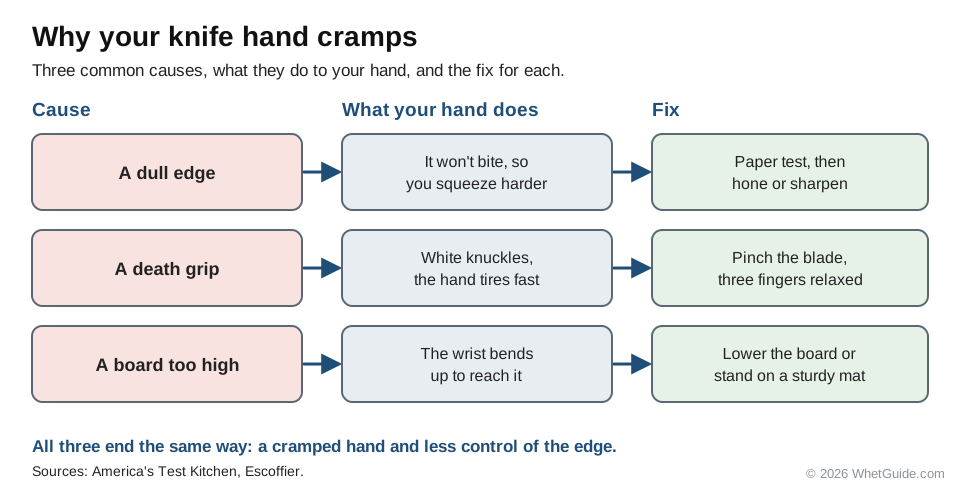
Hand cramping? A cramp almost always means a death grip, and a death grip almost always means a dull knife. When the edge won't bite, your hand compensates by squeezing. Run the paper test, hone, then try again with a loose hold. A board that's too high for you causes the same thing, because the wrist bends to reach it.
↑ Back to all sectionsThe claw: guarding the hand that holds the food
The knife hand gets the attention, but the other hand is the one that gets cut. The claw puts your knuckles, not your fingertips, nearest the blade, and turns them into a guide fence that sets the width of every slice.
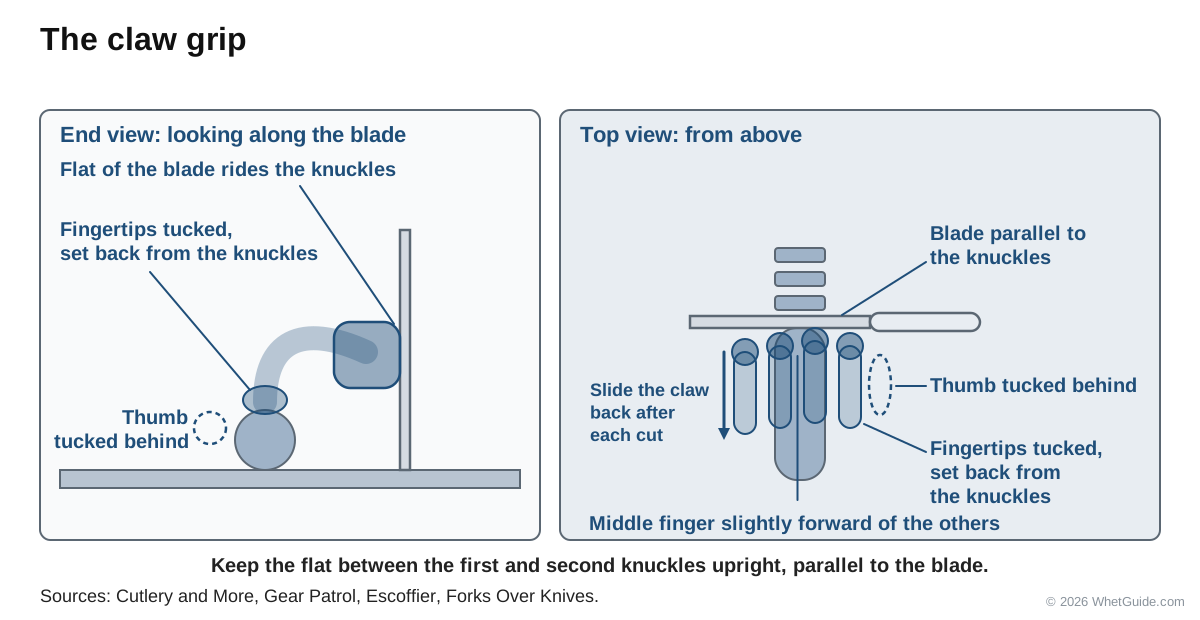
Six steps, the same sequence Escoffier's school teaches:
- Curl your fingertips under, as if you were holding a ball against the board. Your fingertips should sit farther back than your knuckles, as Forks Over Knives puts it.
- Tuck your thumb behind your fingers. A thumb sticking out to the side sits right in the path of the blade.
- Push your middle finger slightly forward of the others, as the instructor in Gear Patrol's guide suggests. Its middle knuckle becomes the guide.
- Set the flat of the blade against that knuckle. Keep the edge low, below the knuckle, with the blade's flat side touching it.
- Cut. The blade slides along the knuckle as it moves. Your knuckle never moves into the blade.
- Walk the claw back. After each cut, slide the hand back by the width of the next slice, and cut again. Start slowly and build speed only once the motion is automatic (Escoffier).
The detail that makes the claw click comes from Cutlery and More: the flat area of your finger between the first and second knuckles should stay perpendicular to the board and parallel to the blade. When it does, the blade has a flat wall to slide against. When your hand tips forward, that wall turns into a fingertip.
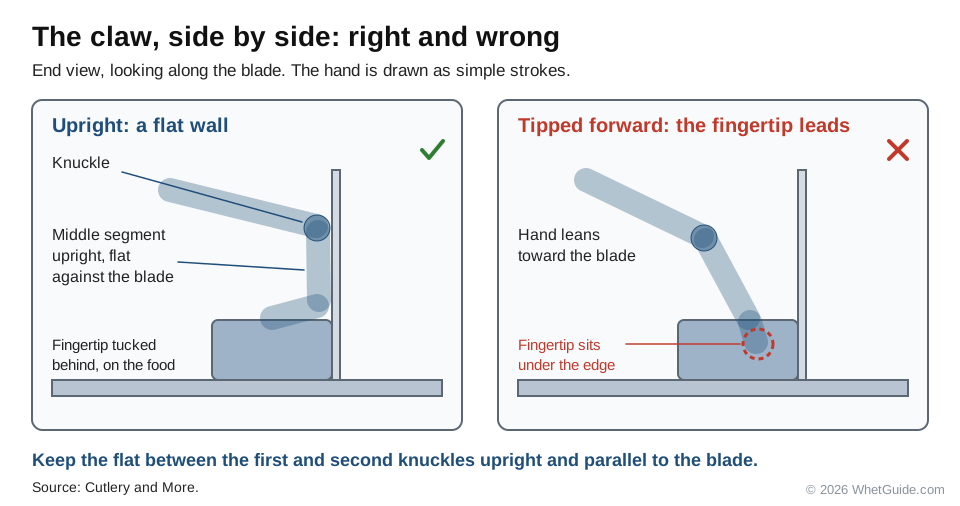
Two more rules. Don't push food toward the knife; let the claw guide it, and move the hand, not the food (Great British Chefs). And when the piece gets too small to claw safely, stop. Turn the last stub on its side and slice it flat, or save it for stock.
Knuckles hurt? You're lifting the edge above the knuckle, or pressing the knuckle into the blade instead of letting the blade brush past it. Keep the edge low and the motion forward. A light touch is enough. The knuckle is a guide, not a stop.
The bridge hold: the first cut through round food
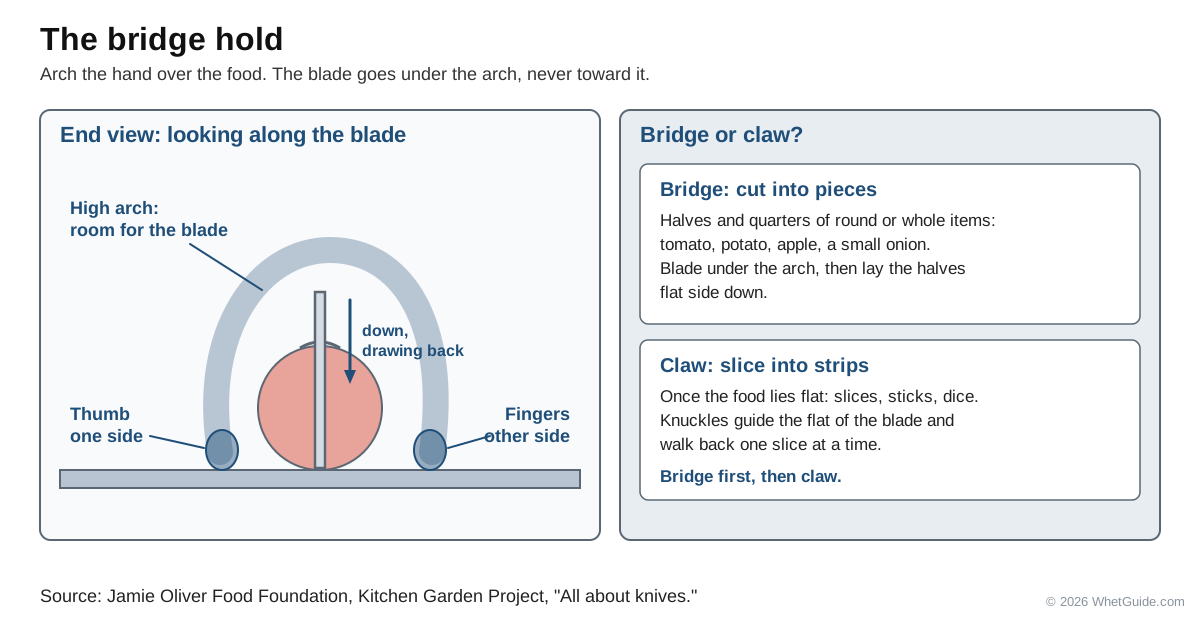
The claw needs food that lies flat. The first cut through a tomato, a potato or an apple comes before there's a flat face, and that's the job of the bridge, the other standard guide-hand position. UK school cooking lessons teach the two as a pair, "bridge and claw." The steps below follow the Jamie Oliver Food Foundation's Kitchen Garden Project, whose teachers' "All about knives" handout is hosted by Food for Life.
- Set the food on the board. If it has a flat side, put that side down.
- Make a bridge over it with your guide hand: fingers on one side, thumb on the other, holding it securely. Keep the arch high, so there's plenty of room for the knife underneath.
- Pick up the knife with the edge facing down, and guide it under the middle of the bridge.
- Cut through the middle by pressing down while sliding the knife back toward you, out of the bridge.
- Lay each half flat side down. Bridge each half again to cut quarters, or switch to the claw to slice.
- Stop between cuts and check that your fingers are clear. The handout's own words are "never rush."
Bridge or claw? The handout's rule is short: the bridge cuts food into smaller pieces, and the claw slices it into strips. In practice, bridge for the first one or two cuts through something round (halving a tomato, a potato, an apple, a small onion through the root), then claw for everything after, once the pieces lie flat. Keep the bridge for food small enough to arch over comfortably. Big, hard items like winter squash get halved with the method below, flat side down, before your hand goes near the cutting line.
↑ Back to all sectionsMake the food stable before you cut it
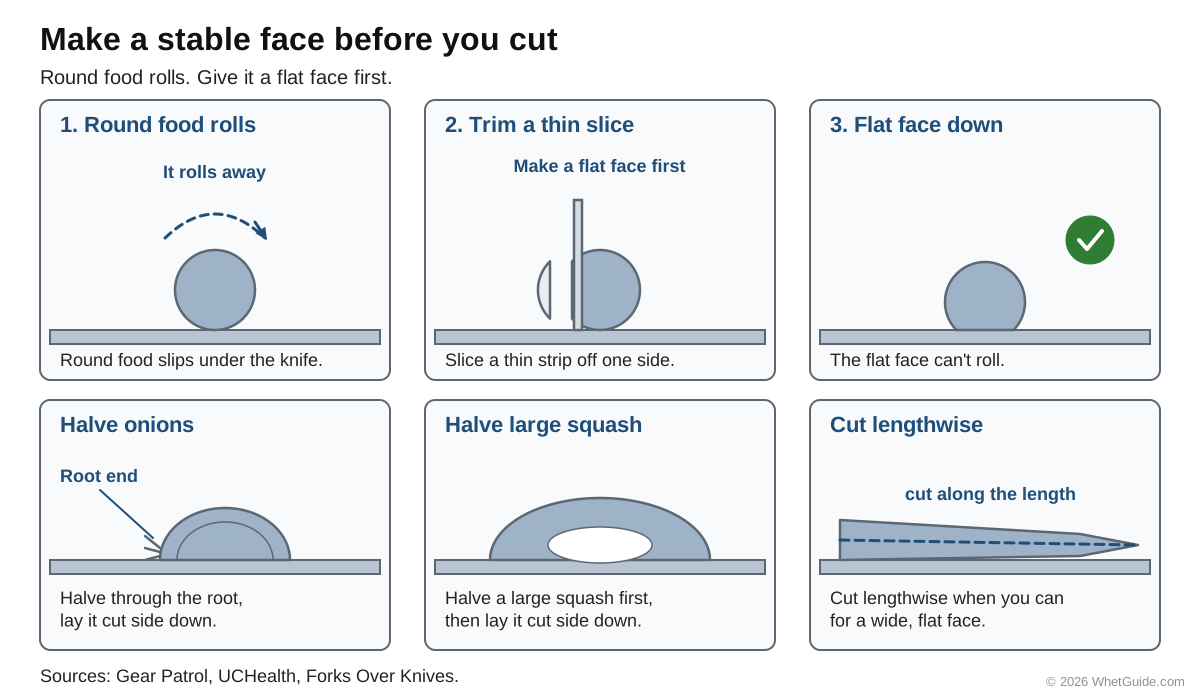
Round food rolls, and rolling food is how the claw fails. The fix takes one cut: make a flat face. Gear Patrol, Cook Smarts and UCHealth all teach it early.
- Carrots, potatoes, cucumbers, zucchini: trim a thin slice off one long side and lay them on it.
- Onions and shallots: halve through the root, using the bridge hold for that first cut, and lay each half on its cut face.
- Big, hard items (winter squash, celery root, cabbage, melon): halve or quarter them first, then work with flat sides down. Never try to slice a whole squash balanced on its curve.
- Cut lengthwise when you can. Gear Patrol passes on a tip from chef David Siegel: one long cut down a carrot does the work of many short ones across it, so you repeat fewer steps.
The cutting motions: rock, push, pull, tap, chop and saw
A straight-down press crushes food and jars your hand. Every good cut moves the blade along its length as well as down. Cooks give the motions different names. The Sharp Cook lists chop, rocking chop, push slice, pull slice, locomotive, sawing and horizontal. Here they are with what each is for.
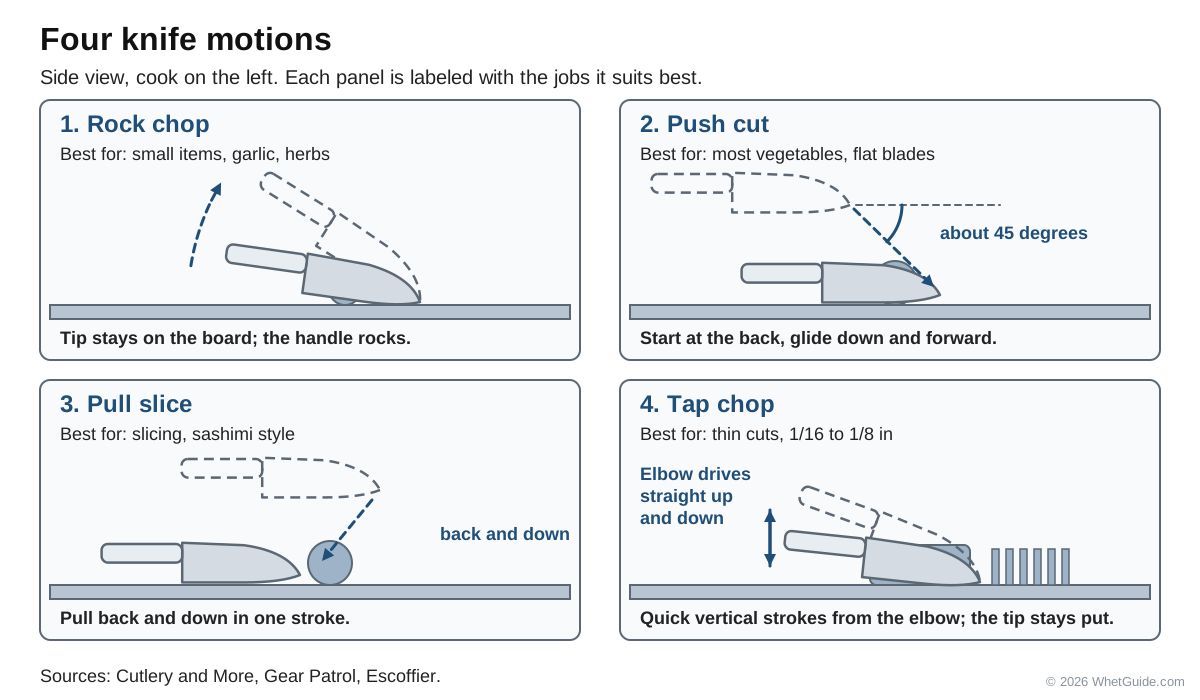
Rock chop
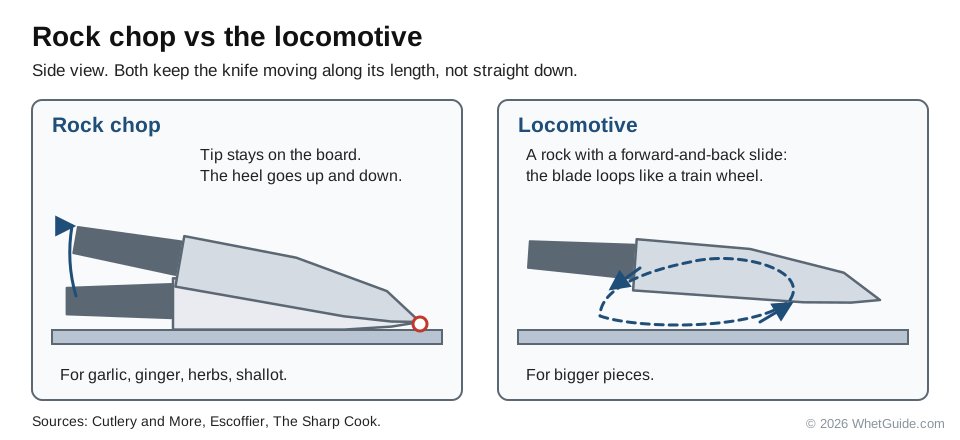
Keep the tip touching the board and lift and lower the heel, moving the blade along the food as it rocks. It's fast on small things: garlic, ginger, herbs, a pile of shallot. Cutlery and More and Escoffier both warn against it on large items, where it tires the wrist, and the twisting stresses the blade. It suits a curved Western chef's knife best. Great British Chefs describes rocking the knife up and over so you use the full length of the blade.
The locomotive motion is a rock with a forward-and-back slide added, so the blade travels in a loop like a train wheel. Think of it as the rock chop for bigger pieces.
Push cut (push chop)
Cutlery and More calls this the one to master. It's the main motion for flat-edged Japanese knives like the santoku and nakiri, and it works on any chef's knife.
- Set the food flat side down and put your claw on it, knuckles forward.
- Start with the blade over the back of the food, the side farthest from you.
- Push down and forward at about 45 degrees. Gear Patrol describes the same "rock and glide" entry.
- Let the blade glide through and finish on the board several inches forward of where it went in. The length of the edge does the cutting, so press lightly.
- Lift the knife, bring it back over the food, slide the claw back by one slice width, and go again.
If the knife stops halfway or the food tears, you pressed down instead of forward. Push more and press less.
Pull slice and the single-stroke slice
Set the tip on the food and draw the knife back toward you and down in one long stroke. The Sharp Cook calls it the sashimi motion. It's the cleanest way to cut raw fish, a cooked roast or a ripe tomato, because nothing gets pressed. On cooked meat, slice against the grain. Cutlery and More splits slicing into single-motion slices (one long stroke, push or pull), two-motion slices (forward then back) and sawing.
Tap chop
Keep the tip roughly in place and make quick, short vertical strokes, driven from the elbow. Cutlery and More uses it for very thin julienne, about 1/16 to 1/8 inch, once a block is squared and stable. It's loud and it looks fast. It's also the motion most likely to clip a careless knuckle, so learn it last.
Cross chop (pivot chop)
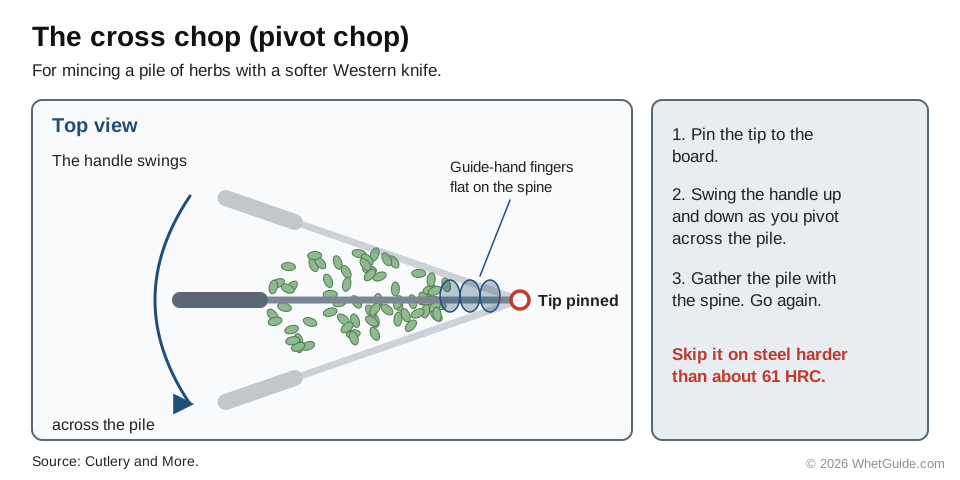
Rest the fingers of your guide hand flat on the spine near the tip, pin the tip to the board, and swing the handle up and down as you pivot across a pile. Gather the pile with the spine and go again. It's the classic way to mince parsley. Cutlery and More says to keep it to softer Western knives and avoid it on blades above about 61 on the Rockwell scale, because the sideways twist can chip hard steel.
Sawing, and the horizontal cut
A sawing motion, back and forth with light pressure, is right for crusty bread, cake, and a brisket or roast that would tear under a single stroke. It's wrong for vegetables. If you have to saw a carrot, the knife is dull or you're pressing too hard. Use a serrated knife for bread and let its teeth do the work.
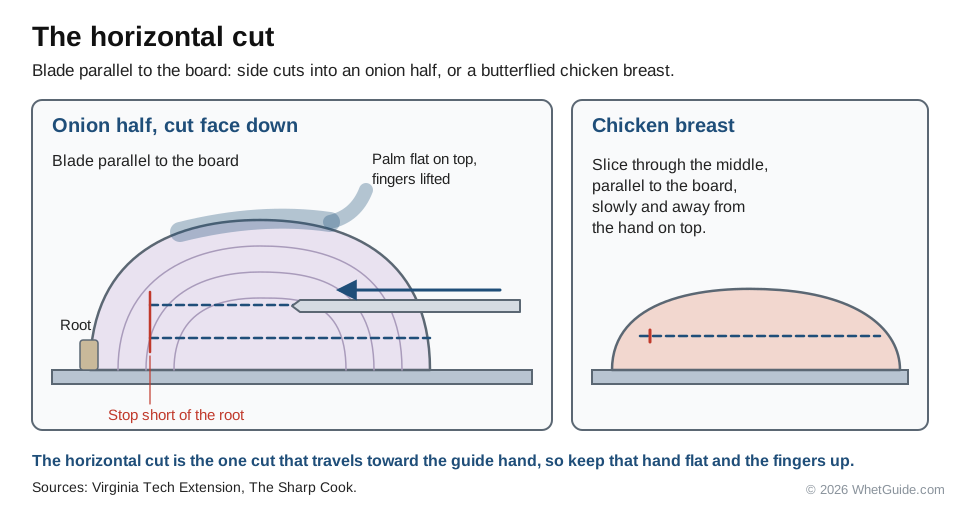
The horizontal cut is a slice with the blade parallel to the board, used for the side cuts into an onion half or to butterfly a chicken breast. Lay your guide hand flat on top of the food, fingers lifted away from the cutting line, and slice away from that hand, slowly.
Tip cuts and paring knife jobs
Some jobs need the tip, not the belly. ATK's tip cut keeps the tip of the chef's knife down and makes short slices, for scoring or cutting around small things. A paring knife takes over for work in your hand: peeling an apple, trimming beans, coring a tomato, hulling strawberries, cutting the eyes out of a potato. Keep strokes short and controlled, and keep the thumb of the holding hand behind the food, never in front of the edge. Escoffier's list of basic techniques puts trimming and peeling here.
Japanese vs Western knives: which motions fit which blade
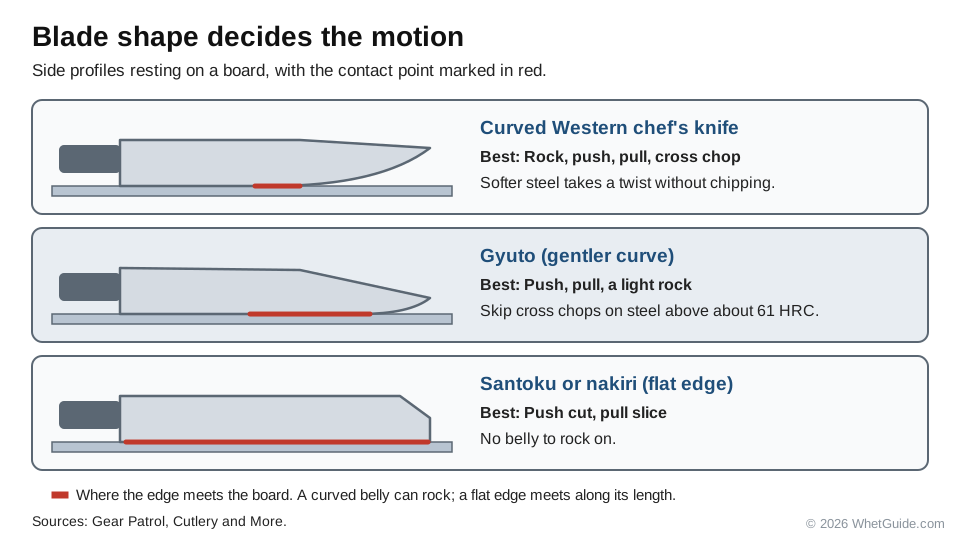
Western chef's knives (Wusthof, Victorinox, Henckels) have a curved belly and softer steel. Japanese knives (gyuto, santoku, nakiri) are often harder and flatter. The shape decides the motion: flat blades such as the santoku and nakiri suit push cuts, and curved Western blades suit rocking, as Gear Patrol and Cutlery and More both note.
| Knife shape | Best motions | Go easy on |
|---|---|---|
| Curved Western chef's knife (Wusthof, Victorinox, Henckels) | Rock chop, push cut, pull slice, cross chop | Little. Softer steel takes a twist without chipping |
| Gyuto (Japanese chef's knife, gentler curve) | Push cut, pull slice, a light rock | Cross chops and twisting, if the steel is harder than about 61 HRC |
| Santoku or nakiri (flat edge) | Push cut, pull slice | Rock chop. A flat edge has no belly to rock on |
| Paring knife | Tip cuts, peeling and trimming in the hand | Big items on the board. Switch to the chef's knife |
| Serrated bread knife | Saw, back and forth with light pressure | Vegetables, which want a smooth edge |
Wusthof lists its Classic chef's knife at 58 HRC. Shun sharpens its Classic 8 in chef's knife to 16 degrees per side. Shun's page gives no hardness figure; a retailer listing puts it at 60 to 61 HRC. Those few points change how the edge behaves: harder steel holds a keen edge longer but chips more readily if you twist it, slam it through bone or drag it sideways.
- On a hard Japanese knife, push cut and pull slice. Rock gently if the blade has some curve (a gyuto does; a nakiri doesn't). Skip cross chops and hard twists.
- Use a softer board, wood rather than plastic, if you can. Cutlery and More recommends it for hard steel.
- Don't scrape food across the board with the edge, on any knife. Flip the blade and use the spine.
Angles differ too. See the Shun and Wusthof sharpening angles, or the full angle chart.
How to chop: when shape doesn't matter
Chop when shape doesn't matter, as Chowhound's old knife skills videos put it: vegetables for a stock, a soup you'll blend, a sauce that will be strained. You're after pieces of roughly the same size, not neat cubes.
- Make the food stable: flat face down, big items halved.
- Cut it into slabs or long pieces with a push cut.
- Turn them and cut across into pieces, using the claw.
- Check the size. For a soup you'll blend, Wusthof gives a rough chop of about 1-inch pieces as the example.
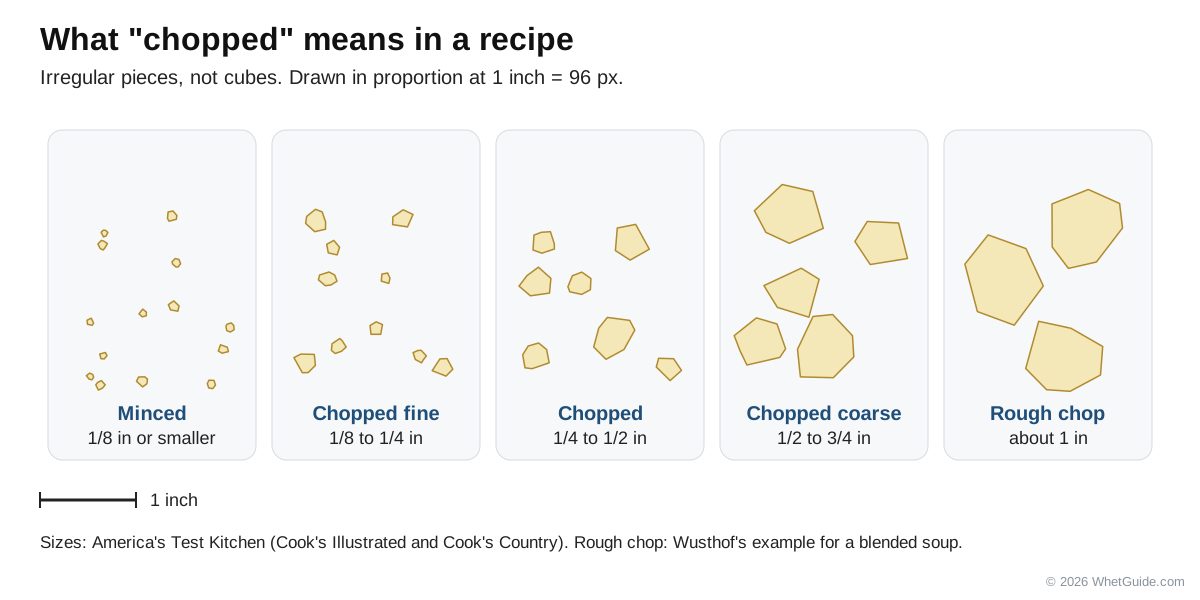
Recipe language decoded. The words describe piece size, and America's Test Kitchen puts numbers on them:
| The recipe says | Piece size | Shape |
|---|---|---|
| Minced | 1/8 in or smaller (ATK); Victorinox says 1/8 to 1/16 in | Tiny bits |
| Finely chopped, chopped fine | 1/8 to 1/4 in | Irregular |
| Chopped | 1/4 to 1/2 in | Irregular |
| Coarsely chopped | 1/2 to 3/4 in | Irregular |
| Roughly chopped | About 1 in in Wusthof's example; treat it like coarse | Irregular, bite-size |
| Diced | A set size: 1/4, 1/2 or 3/4 in | Cubes; see dice |
ATK's own two magazines differ on the smallest one: Cook's Illustrated says a mince is 1/8 inch or smaller, and Cook's Country says 1/16 inch. Both agree it's smaller than anything you'd call chopped.
↑ Back to all sectionsHow to slice
A slice is a cut across the food into flat pieces: rounds of cucumber, half-moons of onion, planks of zucchini. ATK boils it down to a push or a pull, never a straight chop.
- Small items, like a scallion or a strawberry: keep the tip down on the board and lift only the heel, rocking forward through the food.
- Larger items, like an onion half or a sweet potato: lift the whole blade and push it forward and down through the food.
- For even slices, let the claw set the thickness. Forks Over Knives and Victorinox both suggest the middle knuckle as the width guide. Move it back the same amount each time.
Slicing on an angle is a bias cut, which gets its own section below.
↑ Back to all sectionsKnife cuts chart: names and sizes
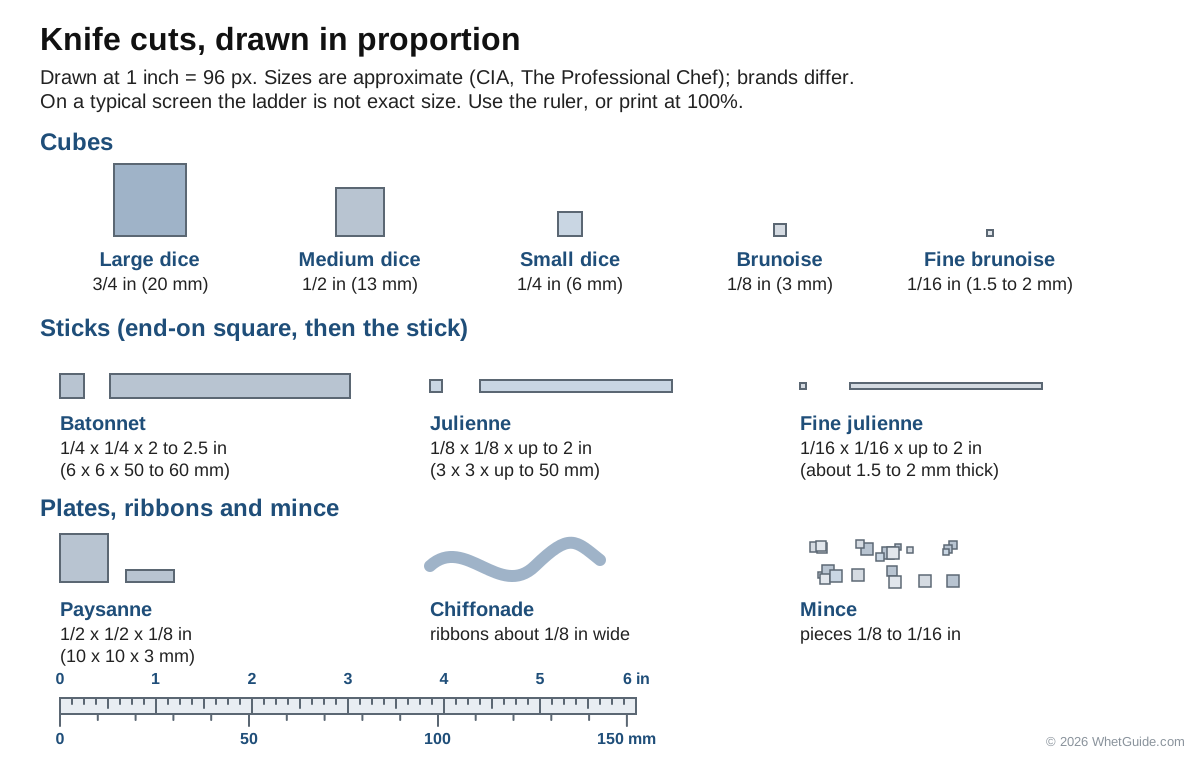
The French cut names are a shared vocabulary for size. When a recipe says "small dice," it means a cube about 1/4 inch on a side, and the reason it says so is that the cooking time depends on it. The sizes below are the Culinary Institute of America's, from The Professional Chef, as listed in Wikipedia's list of culinary knife cuts and Wekiva Culinary's cut guide. Brands and teachers vary a little; where they disagree, the table says so.
| Cut | Size | Made from | Typical use |
|---|---|---|---|
| Large dice (carre) | About 3/4 in (20 mm) cubes | 3/4 in sticks | Stews, roasted root vegetables, stock |
| Medium dice (parmentier) | About 1/2 in (13 mm) cubes | 1/2 in sticks | Soups, hash, the everyday dice in most recipes |
| Small dice (macedoine) | About 1/4 in (6 mm) cubes | Batonnet | Sauces, salsas, fillings, quick saute |
| Brunoise | About 1/8 in (3 mm) cubes | Julienne | Garnish, fine sauces, vinaigrettes |
| Fine brunoise | About 1/16 in (1.5 to 2 mm) cubes | Fine julienne | Garnish; sources differ between 1.5 and 2 mm |
| Batonnet | 1/4 x 1/4 x 2 to 2.5 in (6 mm x 6 mm x 5 to 6 cm) | 1/4 in planks | Crudites, stir-fry, the start of small dice. Wusthof's guide makes it thicker, about 1/2 in wide |
| Julienne (allumette) | 1/8 x 1/8 x 1 to 2 in (3 mm x 3 mm x 3 to 5 cm) | 1/8 in planks | Slaws, salads, stir-fry, garnish |
| Fine julienne | About 1/16 x 1/16 x 1 to 2 in | 1/16 in planks | Garnish; the start of fine brunoise |
| Paysanne | 1/2 x 1/2 x 1/8 in (10 x 10 x 3 mm) plates | 1/2 in sticks, sliced thin | Rustic soups; quick-cooking flat pieces |
| Rondelle | Discs 1/8 to 1/2 in (3 to 10 mm) thick | Carrots, cucumbers, zucchini | Sautes, salads, braises |
| Chiffonade | Ribbons 4 to 10 mm wide (CIA); about 1/8 in per Wekiva | Rolled leaves | Basil, mint, sage, lettuce, greens |
| Mince | 1/8 to 1/16 in pieces (Victorinox) | Slices or a rough chop | Garlic, shallot, ginger, herbs |
| Bias | Slices cut on a diagonal | Long vegetables | Stir-fries, scallions, celery |
| Roll (oblique) cut | Angled wedges, rolled between cuts | Carrots, parsnips, zucchini | Roasting, braising, glazing |
| Rough chop | Irregular, about 1 in in Wusthof's example | Anything | Stock, soups to be blended |
The dice size you'll use most is the 1/2 inch medium dice; Tasting Table names it the most common. Wusthof's guide describes dice as "about 1/4 to 1/2 inch," which covers the small and medium sizes.
Other cuts you'll see named
- Pont-neuf: thick-cut fries. Wikipedia's list gives a range from about 1/3 x 1/3 x 2.5 in up to 3/4 x 3/4 x 3 in.
- Jardiniere: a stick cut that some charts list alongside batonnet and julienne.
- Lozenge, fermiere and tourne: chef-school cuts. A lozenge is a flat diamond, fermiere is a rustic slice of even thickness (1/8 to 1/2 in), and tourne is a football-shaped carved vegetable. You'll meet them on culinary exams more than in home recipes.
- Wedges, mirepoix and the other aromatic bases: covered under wedges and aromatics.
How to dice: three sizes, one method
Every dice comes from the same three moves: square the vegetable, cut it into planks, cut the planks into sticks, cut the sticks into cubes. The plank thickness sets the dice size, so get that right and everything after it follows. This is the method Wusthof, Victorinox and Wekiva all teach.
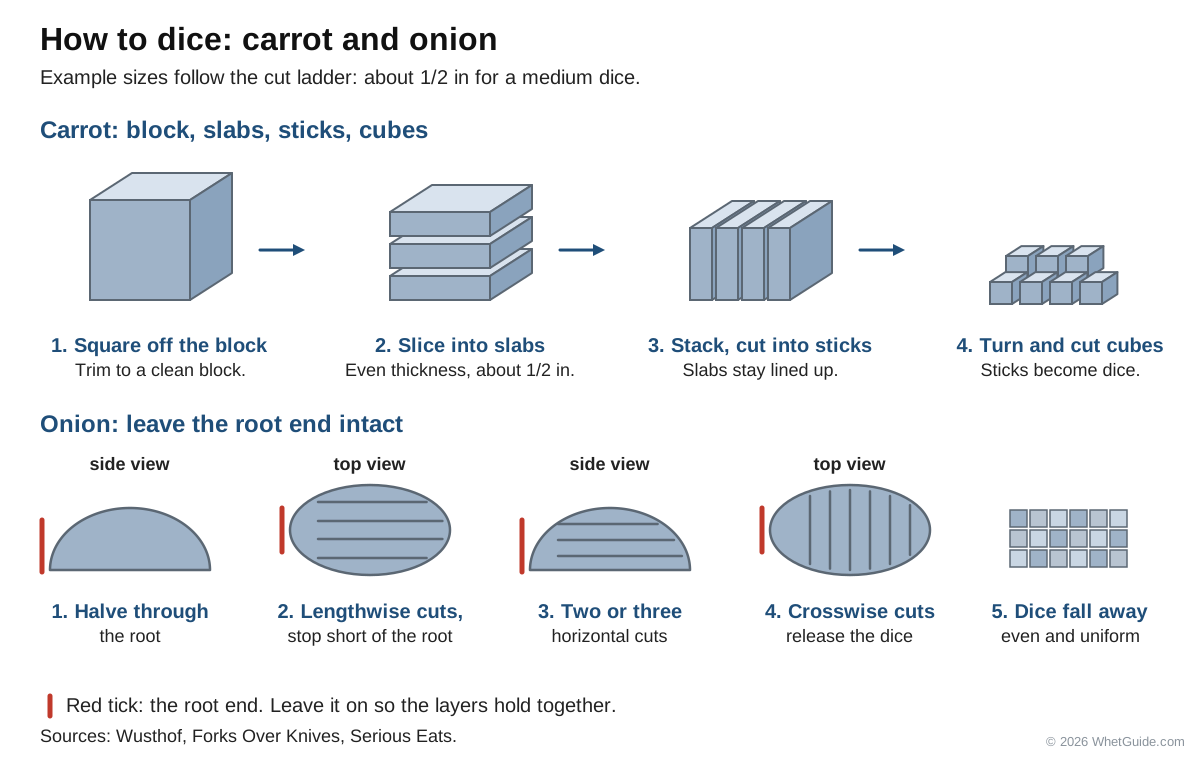
- Square it. Trim the rounded sides off a carrot, potato or other root so you have a rectangular block. The trimmings go in the stock bowl, not the bin.
- Cut planks. Lay the block flat and cut it into even planks as thick as your dice: 1/4 inch for small, 1/2 for medium, 3/4 for large.
- Cut sticks. Stack two or three planks, claw on top, and cut them into sticks the same width as the planks are thick. For small dice, these sticks are batonnet.
- Cut cubes. Line the sticks up side by side, turn them 90 degrees, and cut across at the same width.
- Check one. Pick up a cube. If it's a flat tile or a long brick, the planks or the sticks were off; adjust on the next one.
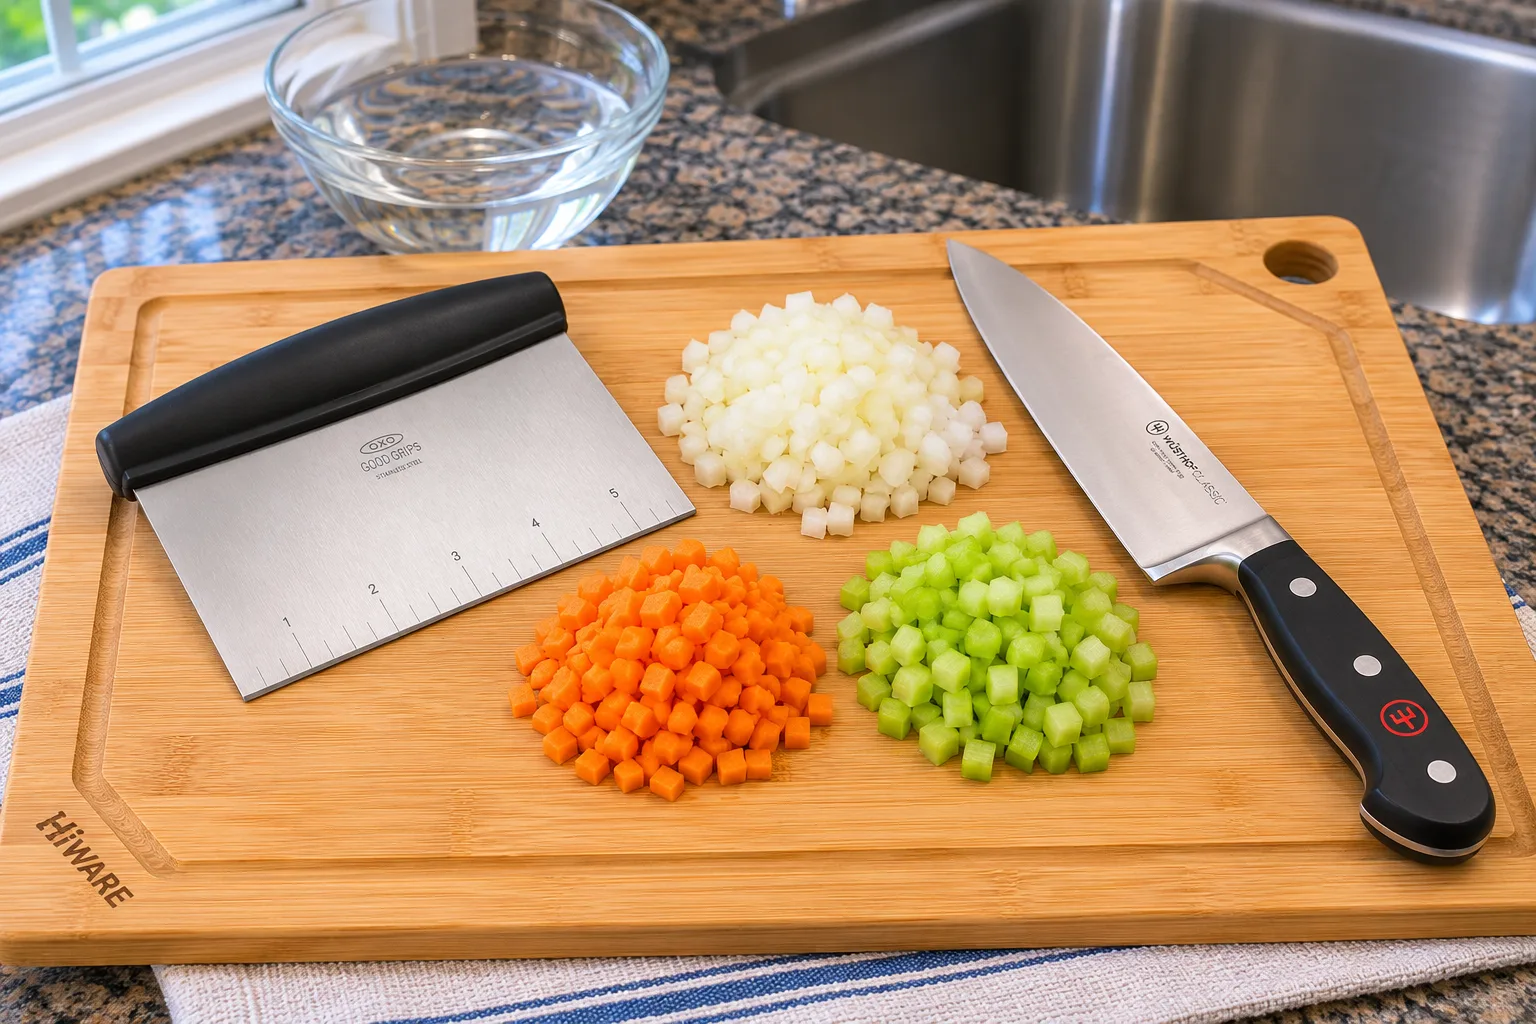
A bench scraper is the most useful cheap tool on the board. Scoop the finished dice with it instead of dragging them with the knife's edge. If food sticks to the blade, a hollow-ground (Granton) edge, the row of scallops along the side, helps a little. Culinary Schools points that out for dicing.
How to dice an onion
The onion is the special case, because its layers do half the work for you. Leave the root end on and it holds the layers together until the last cut. This is the method Forks Over Knives teaches, and it's the one you'll see in most chef videos.
- Cut off the stem end (the pointed top), not the root. Stand the onion on that flat end and halve it straight down through the root, with your guide hand in a bridge.
- Peel off the skin and the first papery layer. Lay each half flat on its cut face.
- With the root end away from you, make lengthwise cuts from near the root to the cut end, using the tip. Stop short of the root so the layers stay joined; Virginia Tech's extension guide leaves about 1/2 inch uncut. Spacing sets the dice size.
- Make two or three horizontal cuts, blade parallel to the board, from the cut end toward the root. Keep your guide hand flat on top, fingers up. Stop short of the root again.
- Claw, and cut across the onion at the same spacing. The dice fall away as you go.
- When you reach the root, stop. Chop the root stub or save it for stock.
For a very fine dice, space the cuts tighter and make one more horizontal cut. On a small onion you can skip the horizontal cuts entirely; the curved layers already separate into pieces, and fewer cuts toward your hand is never a bad thing. A sharp knife is the best onion tool there is. It also means fewer tears, because the blade slices through the cells instead of crushing them and spraying the juice.
Which onion method: horizontal cuts, radial cuts or quarters
Cooks argue about step 4. The horizontal cuts are the only ones that travel toward your guide hand, and there are two well-known ways to skip them.
| Method | How it works | How even the dice come out | Pick it when |
|---|---|---|---|
| Parallel cuts plus horizontal cuts (the steps above) | Straight-down lengthwise cuts, two or three horizontal cuts, then across. Virginia Tech's guide uses two horizontal slices. | Pieces near the board come out bigger, because the outer layers are wider there. Straight cuts alone come out at about 37% spread in The Pudding's model, and adding the horizontal cuts "almost never" improves it. | You already know it, or the recipe needs a fine dice from a big onion |
| Radial cuts, no horizontal cuts | Fan the lengthwise cuts like spokes. Aim each one at a point under the board, a little more than half the onion's radius below the cut face, not at the center of the onion. | The most even of the measured methods when aimed low: about 35% spread at Kenji Lopez-Alt's suggested point, 60% of the radius down. Aimed at the center itself it's the worst, about 58%. | You want even dice and no blade moving toward your hand |
| Quarters, every cut vertical | Quarter the onion through the root. Cut each quarter one way, flip it onto its other flat side and cut again, then cut across. The root holds it all together. | Not measured in The Pudding's model | Safety comes first, or you're teaching a beginner |
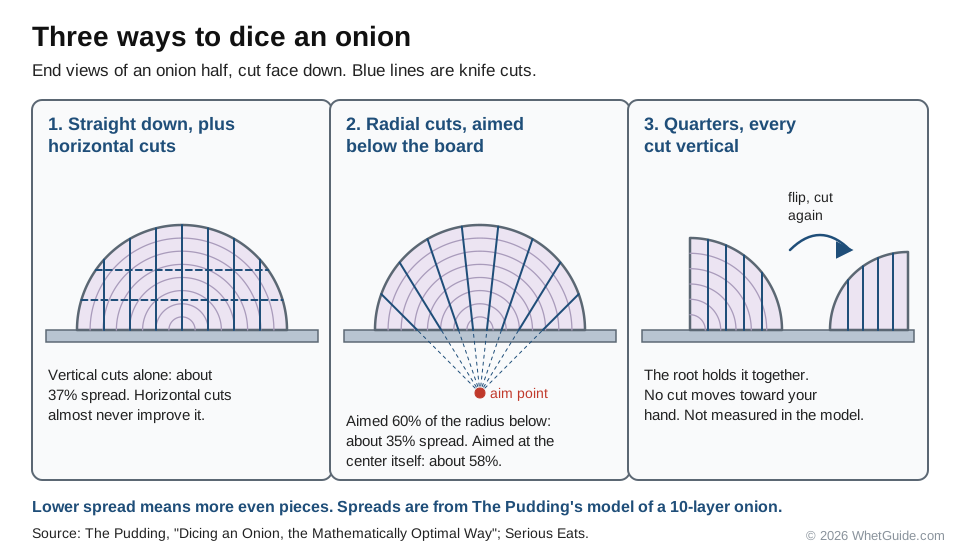
The numbers come from The Pudding's "Dicing an Onion, the Mathematically Optimal Way", which modeled each method on a 10-layer onion; a lower spread means more even pieces. The quarter method is the safer technique Serious Eats added to its onion guide, credited to Sasha Marx, for dicing "without making any horizontal cuts." If horizontal cuts make you nervous, drop them. On The Pudding's numbers you give up almost nothing in evenness.
Wedges
For onion, tomato, potato or lemon wedges, halve through the root or stem end with a bridge hold, then cut each half lengthwise into equal wedges, angling every cut toward the center. With onions, leave a little root on each wedge so it holds together on a grill or in a roasting pan. For potatoes, keep the wedges equal in thickness at the fat end, which is where they cook slowest.
↑ Back to all sectionsHow to julienne
A julienne is a thin stick, about 1/8 x 1/8 inch and 1 to 2 inches long (3 mm x 3 mm x 3 to 5 cm), per the CIA sizes in Wikipedia's list. Wekiva gives 1/8 x 1/8 x 2 inches. A fine julienne is about 1/16 inch square.
- Cut the vegetable to length first: 2 inch lengths of carrot, cucumber, bell pepper or zucchini.
- Square each piece into a block. Culinary Schools trims all four sides; the flat sides are what keep it from rolling.
- Cut 1/8 inch planks with a push cut or a pull slice.
- Stack two or three planks, claw on top, and cut them into 1/8 inch sticks. Keep the knuckle low and the strokes light. On a very stable stack, Cutlery and More uses tap chops here.
Thin planks slide on each other. If the stack keeps shifting, cut fewer planks at a time; two neat ones beat four that fan out. Peppers julienne skin side down, and a mandoline with a julienne blade is a fair shortcut for big batches, with a cut-resistant glove.
Batonnet
The batonnet is the thicker stick: 1/4 x 1/4 inch and 2 to 2.5 inches long (6 mm x 6 mm x 5 to 6 cm) in the CIA's sizes. Cut it exactly like a julienne with 1/4 inch planks. It's the stick you cut across to get small dice, and it makes good crudites and stir-fry carrots. Some brand guides draw it thicker; Wusthof's says about 1/2 inch wide and 3 inches long. Recipes that say batonnet usually mean the 1/4 inch version.
Brunoise
Brunoise is a tiny cube, about 1/8 inch (3 mm), cut from julienne the same way small dice comes from batonnet: line up the sticks and cut across. Fine brunoise is about 1/16 inch, cut from fine julienne; sources put it at 1.5 or 2 mm. It's slow, and it needs the sharpest edge you have. A dull knife squashes 1/8 inch sticks into mush instead of cubes. Brunoise shallot is the classic for a vinaigrette or a pan sauce, and brunoise carrot, celery and leek make a fine garnish for clear soup.
↑ Back to all sectionsHow to chiffonade basil and other leaves
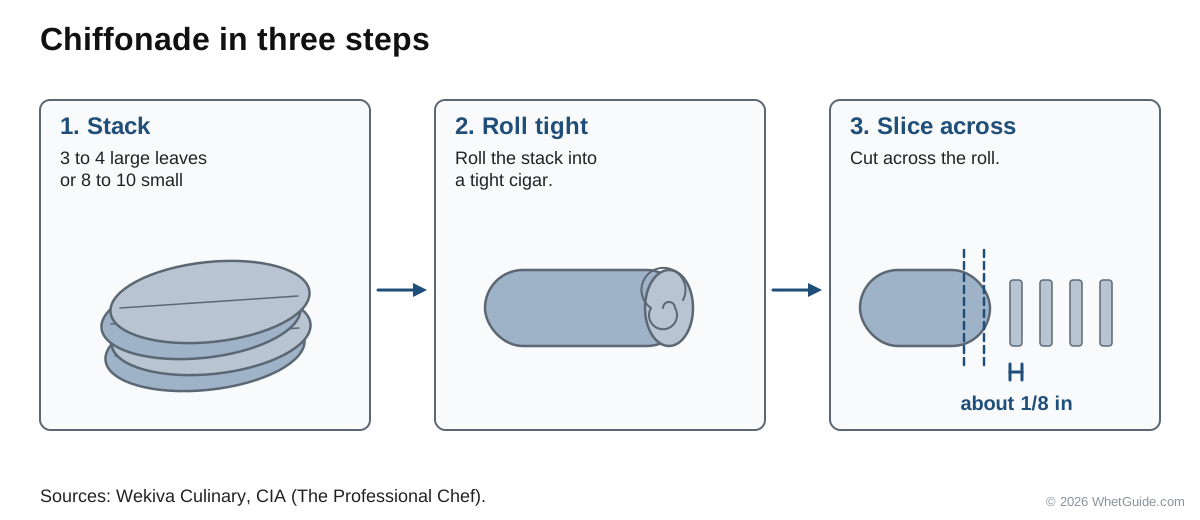
Chiffonade is French for "rags," which is roughly what you end up with: fine ribbons of leaf. Chowhound's old video on it pitched it as a way to turn lettuce or herbs into a garnish, and that's still what it's for. It works on basil, mint, sage, spinach, kale and lettuce.
- Wash and dry the leaves completely. Wet leaves slide and bruise. Tasting Table suggests a quick soak to clean them first, then a thorough dry.
- Stack them. Wikipedia's CIA-based entry says 8 to 10 small leaves or 3 to 4 large ones, largest on the bottom.
- Roll the stack lengthwise into a tight cigar.
- Claw on the roll and slice across it with a sharp knife, one clean push or pull stroke per cut. Ribbon width is up to you: the CIA range is 4 to 10 mm, and Wekiva says about 1/8 inch.
- Fluff the ribbons apart with your fingers and use them right away. Cut edges darken as they sit, as Victorinox and Tasting Table both note.
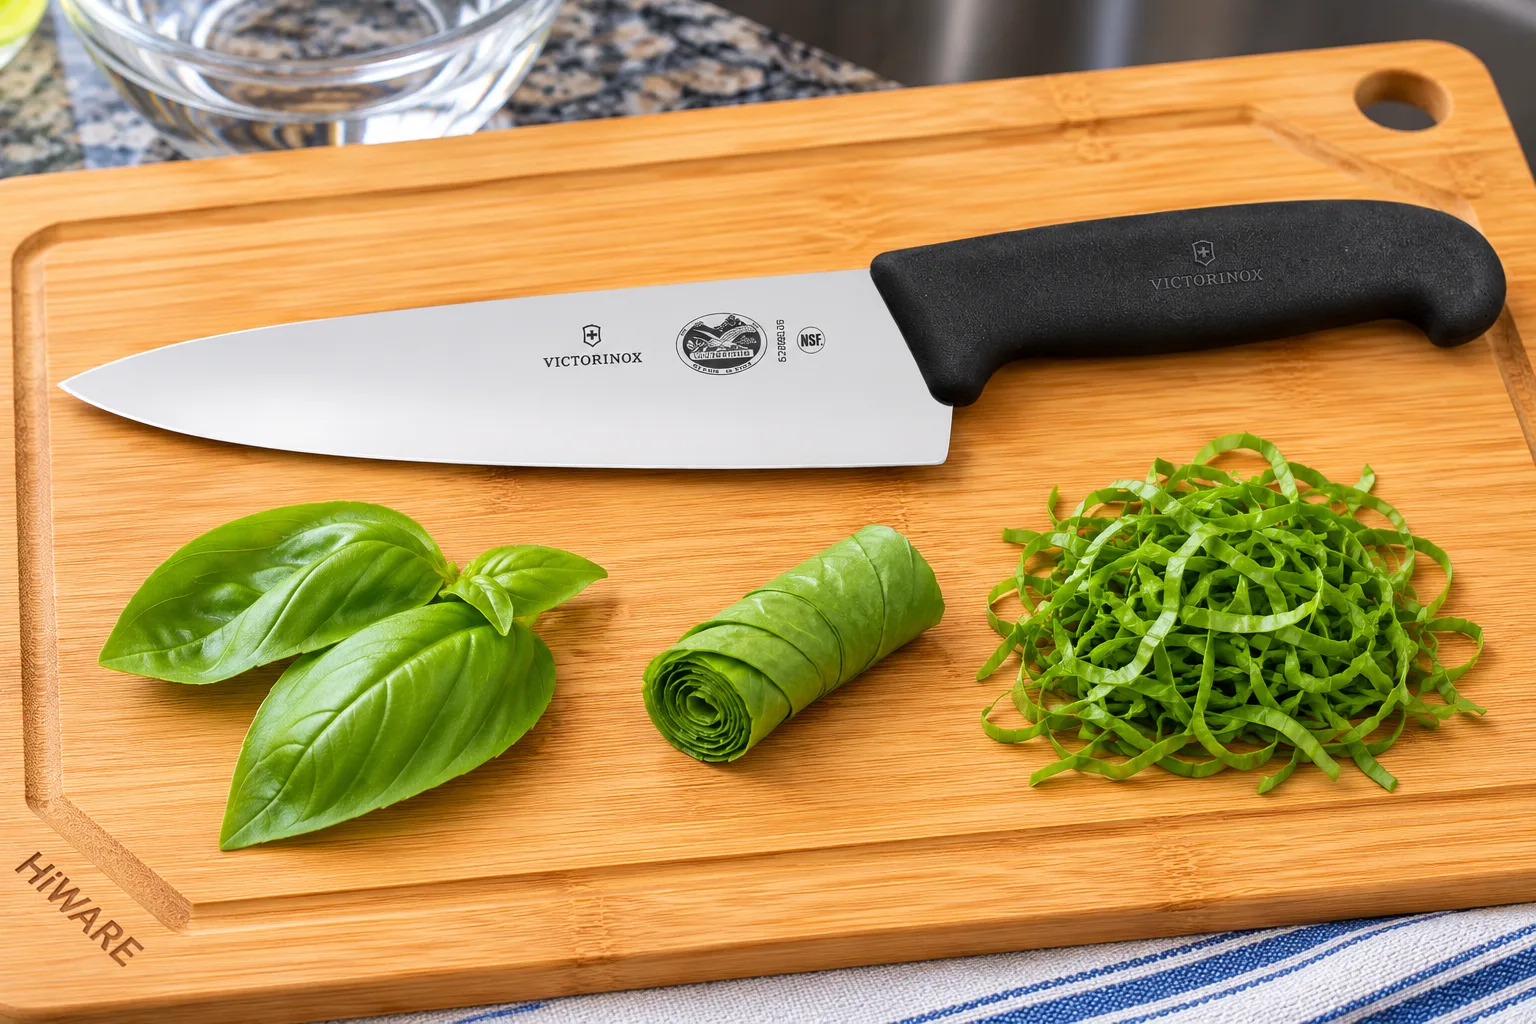
Black edges on your ribbons mean the knife crushed the leaf instead of cutting it. Hone, then slice with a single stroke rather than chopping down. For kale and collards, strip the stems before you stack.
↑ Back to all sectionsHow to mince
A mince is the smallest everyday cut: pieces about 1/8 to 1/16 inch, according to Victorinox. It's for aromatics that should melt into a dish: garlic, shallot, ginger, chiles, herbs.
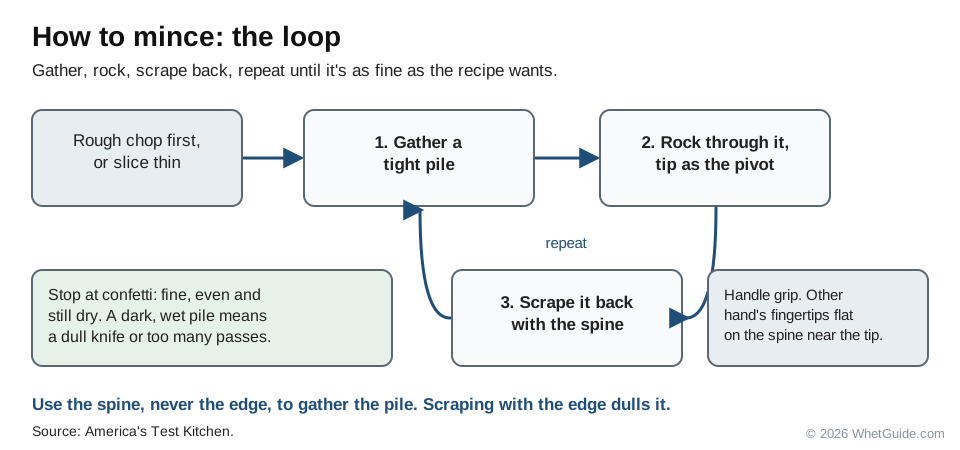
The method from America's Test Kitchen:
- Rough chop the food first, or slice it thin.
- Gather it into a tight pile.
- Switch to the handle grip. Rest the fingertips of your other hand flat on the spine near the tip to steady it.
- Rock the knife through the pile, moving across it, using the tip as a pivot.
- Scrape the pile back together with the spine (not the edge) and rock through again until it's as fine as you want.
Stop before it turns to mush. Minced herbs should look like confetti and still be dry; a dark, wet pile means a dull knife or too many passes.
- Shallots and small onions: halve through the root, then make horizontal slices about 1/8 inch apart without cutting through the root, then vertical cuts, then cut across. Tasting Table teaches it this way. It's the onion method, smaller.
- Ginger: peel it with the edge of a spoon, slice thin across the fibers, cut the slices into thin strips, then cut across. Fibers make ginger stringy if you mince along them.
- Parsley and cilantro: dry the leaves, bunch them tight, slice across the bunch, then rock or cross chop the pile.
- Chiles: halve lengthwise and scrape out seeds and ribs if you want less heat, then julienne and cut across. Wash your hands, and don't touch your eyes.
How to mince garlic
Garlic gets its own section because it's the most-asked mince there is. Three ways, from easiest to finest.
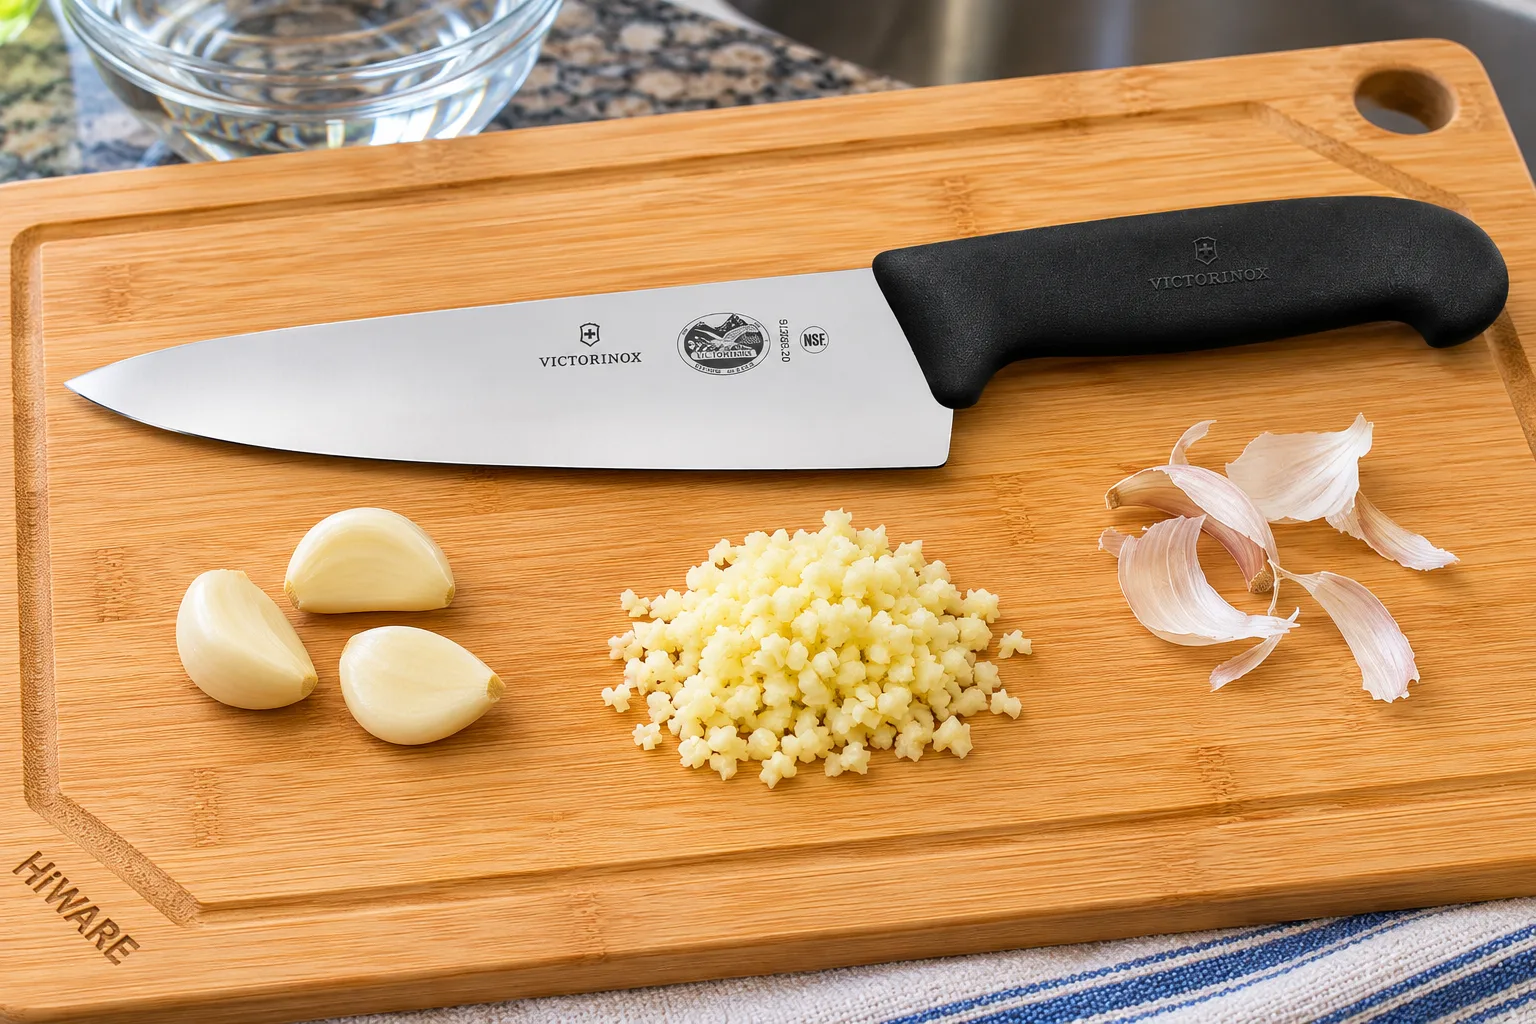
- Peel. Lay the clove on the board, set the flat of the blade on top with the edge facing away from you, and press down with the heel of your hand until the skin cracks. The peel slips off. Trim the hard root end.
- Slice and turn. Slice the clove thinly lengthwise, from root to tip. Turn the slices 90 degrees, cut them into thin strips, then cut across the strips into tiny pieces. This is the Culinary Schools method, and it gives even pieces with no mush.
- Rock to finish. Gather the pieces and rock through them a few times, as above, until they're as fine as the recipe wants.
For garlic paste, sprinkle a pinch of salt on the minced garlic and drag the flat of the blade across it, pressing, a few times. The salt grinds it smooth. Paste melts into dressings and marinades where pieces wouldn't.
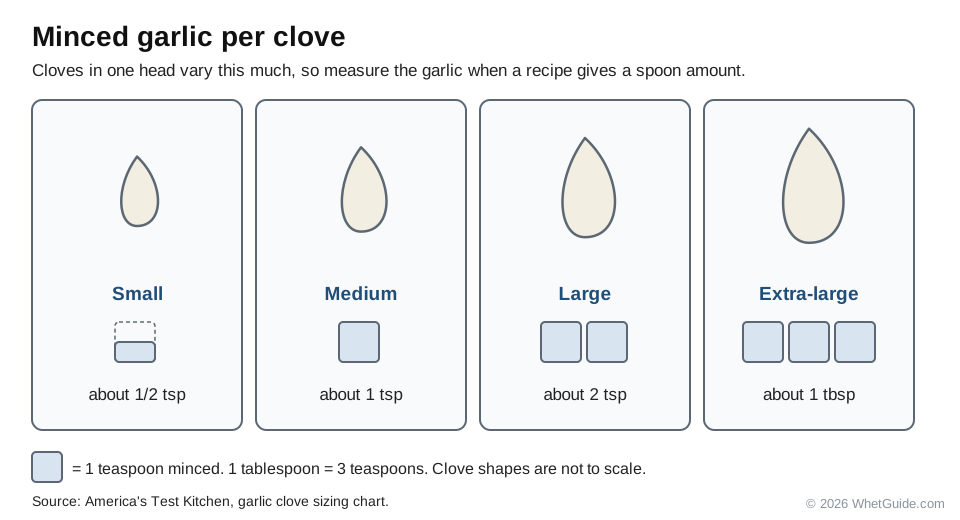
Wusthof notes that finer cuts of garlic release more flavor, so minced garlic tastes stronger than sliced in the same dish. How much is a clove? America's Test Kitchen's sizing chart puts a medium clove at about 1 teaspoon minced, a small one at about 1/2 teaspoon, a large one at about 2 teaspoons and an extra-large one at about 1 tablespoon. Cloves in one head vary that much, so when a recipe gives a spoon measure, measure the garlic.
How to cut on the bias
A bias cut is a slice on the diagonal. Instead of round coins, a carrot gives long ovals, each with more cut surface than a straight round. That cut surface is why it's used: Chowhound's 2010 knife skills video on the bias cut made the point that it shortens cooking time for vegetables in dishes like stir-fry, and Escoffier notes that angled cuts expose more surface area for browning.
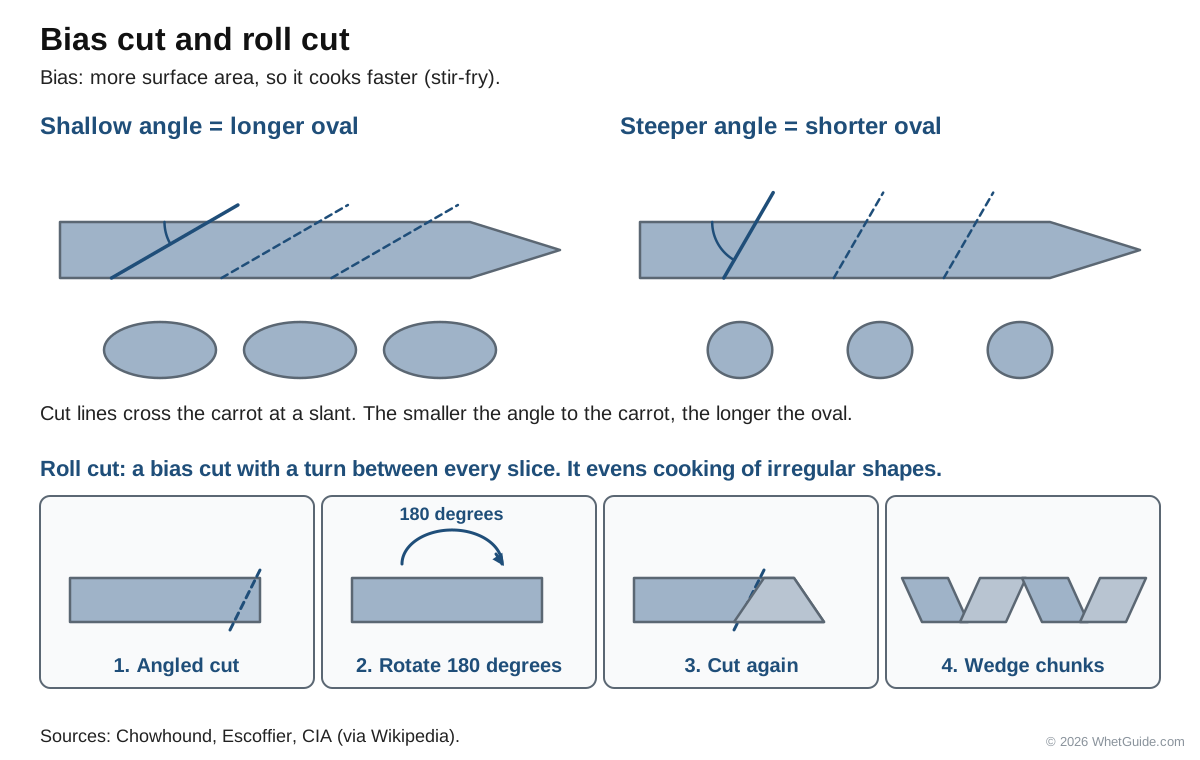
- Lay the carrot, celery stalk or scallion flat and stable. Trim a flat face on a thick carrot.
- Turn the knife (or the vegetable) so the blade crosses it on a diagonal.
- Slice with a push cut, claw guiding, keeping the same angle and the same thickness for every slice.
The angle is your choice, and the more extreme it is, the longer the oval. A gentle angle suits soups; a sharp angle gives the long, elegant slices you see in stir-fries and on scallion garnishes. Forks Over Knives covers bias slicing under its basic cuts. Keep the angle the same through the batch, or the pieces cook unevenly.
Roll cut (oblique cut)
The roll cut is a bias cut with a turn between every slice. Chowhound's old video called it similar to the bias cut, and said it helps the different parts of an irregular vegetable cook at the same speed. That's the trick with a tapering carrot: the thick end and the thin end end up as similar-size chunks.
- Make one bias cut at the end of the carrot, parsnip or zucchini.
- Roll the vegetable. The CIA's version, per Wikipedia's list, rolls it 180 degrees; a quarter turn gives smaller, chunkier pieces.
- Cut again at the same angle. Each piece now has two angled faces.
- Keep rolling and cutting. Toward the thick end, make the pieces a little shorter so they stay about the same size.
Roll-cut pieces have lots of surface for caramelizing, as Escoffier notes, which makes them a good fit for roasting, glazing and braising.
| Cut | Use it for | Why | Good vegetables |
|---|---|---|---|
| Straight round (rondelle) | Salads, sautes, braises | Quick, even discs 1/8 to 1/2 in thick | Carrots, cucumbers, zucchini |
| Bias | Stir-fries, scallion garnish, quick sautes | Longer slices with more cut surface cook faster | Carrots, celery, scallions |
| Roll (oblique) | Roasting, glazing, braising | Two angled faces brown well, and the thick and thin ends finish together | Carrots, parsnips, zucchini |
How to supreme an orange or grapefruit
A supreme is a citrus segment with no peel, no pith and no membrane: just fruit. It's what you want in salads, on fish or in a dessert. The steps below follow Blue Jean Chef's method.
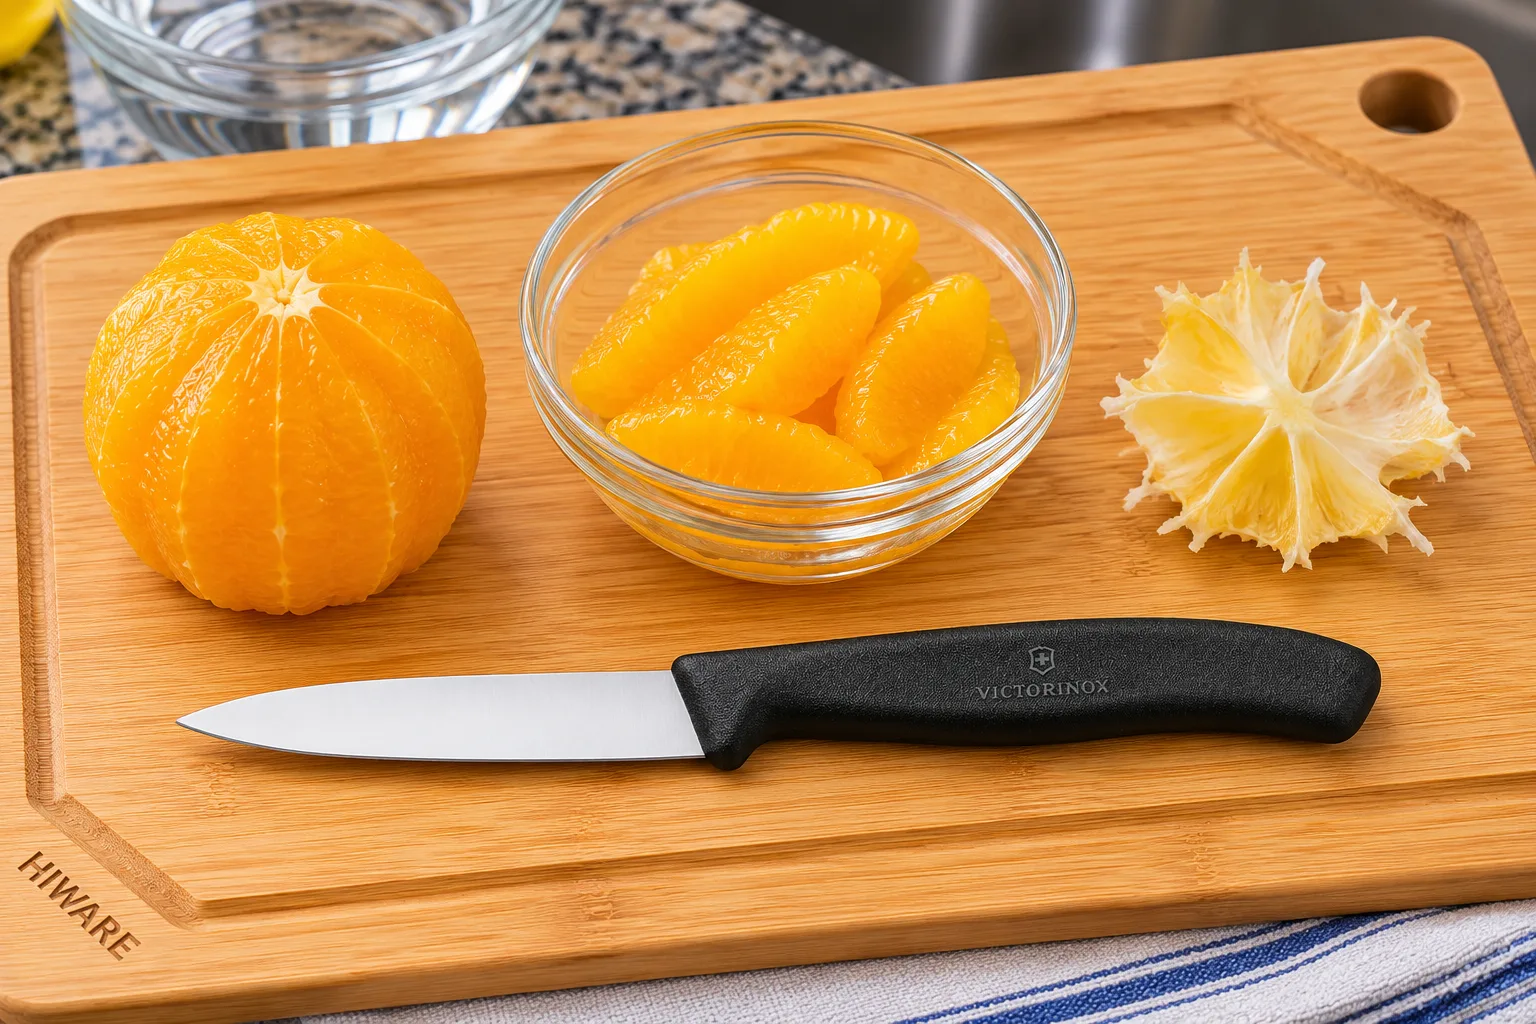
- Chill the fruit if you can. Cold citrus is firmer and easier to cut cleanly.
- Cut a slice off the top and bottom so the fruit sits flat on the board.
- Follow the curve. Cut the peel and white pith away in strips from top to bottom, bending the knife's path to follow the fruit's shape. Take all the white, but as little fruit as you can.
- Hold the fruit over a bowl in your guide hand. Cut down along one side of a segment, just inside the membrane, toward the center.
- Cut down the other side of the same segment and let it drop into the bowl. Repeat all the way around.
- Squeeze the leftover membrane over the bowl for the juice.
A paring knife gives the best control for the segments. A chef's knife is easier for the peeling on a big grapefruit. Keep the blade sharp; a dull edge tears segments instead of freeing them. The cuts in your hand go toward the center of the fruit, never toward your palm.
↑ Back to all sectionsHow to cut common produce: peppers, tomatoes, avocados and florets
The onion, garlic, herbs and citrus have their own sections above. These are the other things that land on a home cutting board most weeks. Each one uses the same grip, bridge and claw; the trick is knowing where to make the first cut.
Bell pepper
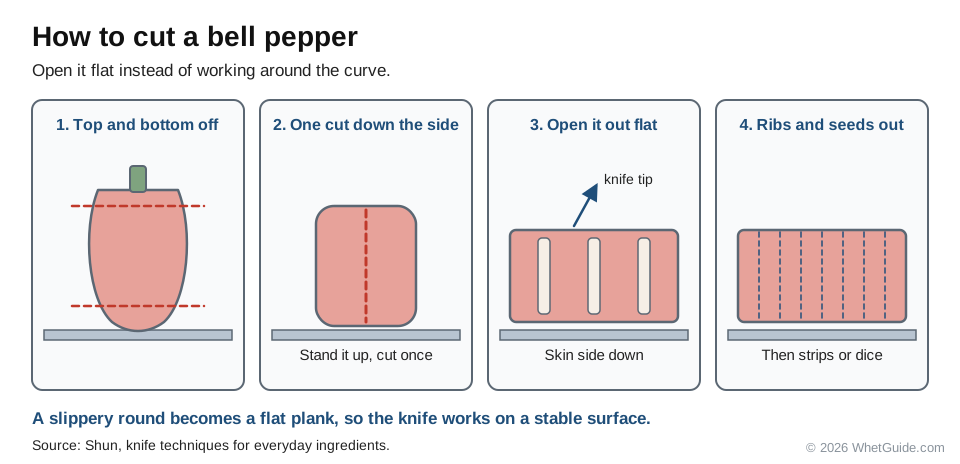
Shun's guide to everyday ingredients opens the pepper flat instead of working around the curve, which turns a slippery round thing into a plank.
- Cut off the top and the bottom.
- Make one vertical cut down the side to open the pepper, and lay it out flat.
- Cut away the seeds and the white ribs with the tip of the knife.
- Slice the flat piece into strips (julienne), or turn the strips and cut across to dice.
Shun's tip is the edge itself: a thin, sharp blade glides through pepper skin, so it doesn't tear or slip. If the knife skates on the skin, hone it before you go on.
Tomato
The skin is the hard part. A sharp edge, or a serrated one, breaks it without squashing the inside. The chefs in Food Network's tomato guide favor a sharp chef's knife, santoku or nakiri, with a serrated paring knife as the stand-in. Tasting Table puts tomatoes on the bread knife's list.
- Pull off the stem. Push the tip of a paring knife about 1/4 inch into the top, cut around the hard core in a circle, and lift it out.
- Lay the tomato on its side and start slicing at the blossom end, the end opposite the stem, with your guide hand in a claw.
- For dice, cut the slices into strips, turn the strips 90 degrees, and cut across.
- For pieces with less seed and juice, quarter the tomato instead (bridge for the first cut) and cut the quarters skin side down.
If the knife sinks in and squashes the tomato before it cuts, the edge is dull. Draw the knife back in a pull slice to start the cut instead of pressing.
Avocado
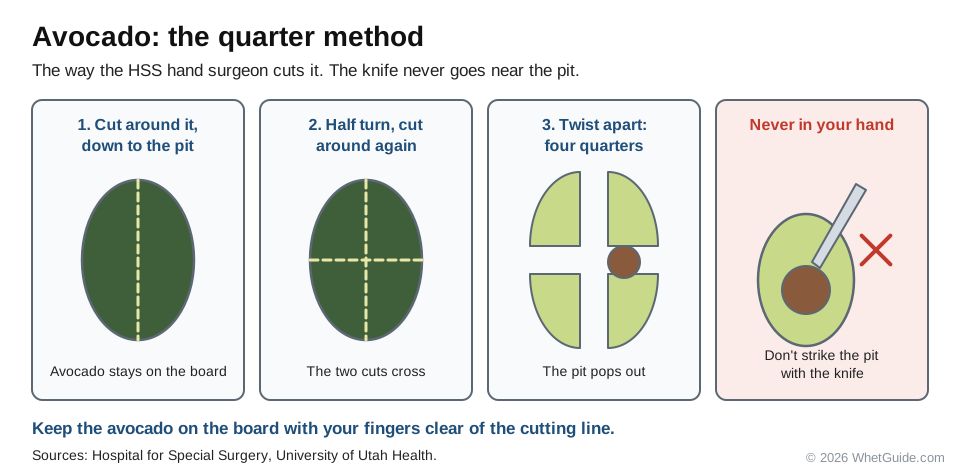
Avocados send enough people to hand surgeons that the injury has a name, "avocado hand." The Hospital for Special Surgery notes it often happens when people try to remove the pit with a sharp knife. The first rule from University of Utah Health is simple: don't cut the avocado while it's in your hand.
- Put the avocado on the board and hold it there with your guide hand, fingers clear of the cutting line.
- Cut all the way around the middle, at the equator, down to the pit.
- Roll it a half turn and cut all the way around again, so the two cuts cross.
- Twist the pieces apart. It comes apart in quarters, and the pit pops out on its own.
That quarter method is the one HSS hand surgeon Dr. Scott Wolfe recommends. If you halve the avocado instead, Utah Health's method keeps the knife out of it: hold the pit half, put the pit between your index and middle fingers, press on the skin side with your thumb, and push the pit out. Then scoop the flesh out with a spoon. What you never do is hold a half in your palm and strike the pit with the knife.
Broccoli and cauliflower florets
The same method works for both, per Shun's guide to everyday ingredients.
- Trim the end of the stalk and pull off any outer leaves.
- Cut the head away from the stalk.
- Use the tip of the knife to cut the florets free from the central stem.
- Cut the bigger florets into even pieces, so they all cook at the same speed.
Shun suggests a smaller utility or paring knife for the detailed trimming around the core. A chef's knife does the first two cuts.
Cooked meat: slice against the grain
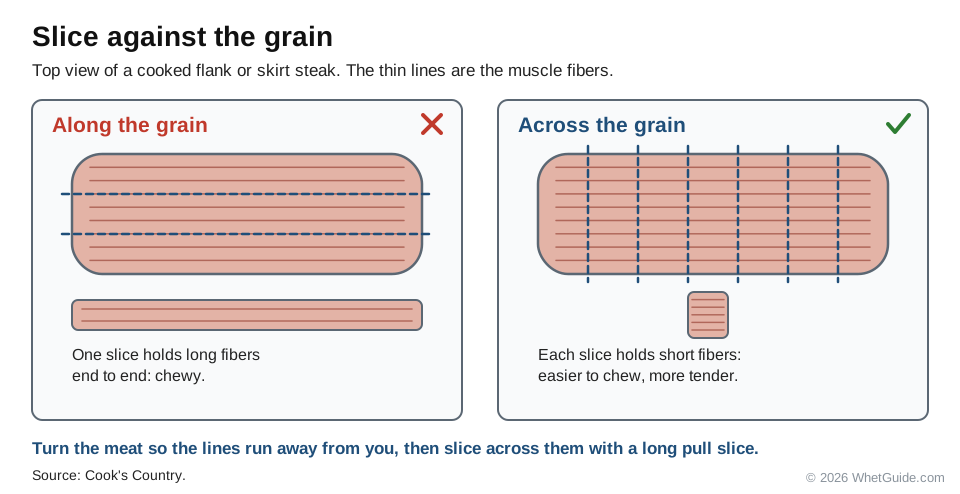
Look at a cooked flank or skirt steak and you'll see lines running through it: the muscle fibers, or grain. Cook's Country explains that slicing across them leaves short fibers that are easier to chew, which makes a tough cut eat more tender. Turn the meat so the lines run away from you, then slice across them with a long pull slice. For a long cut like skirt steak, cut it into sections along the grain first, then turn each section and slice across. Tender cuts don't need it.
↑ Back to all sectionsAromatic bases: mirepoix, soffritto and the trinity
Three classic mixes, and what size to cut them:
- Mirepoix (French): onion, carrot and celery. Large dice for long stocks, small dice for sauces and soups you'll serve as they are.
- Soffritto (Italian): the same three, often with garlic, cut finer and cooked slowly in olive oil. Small dice or brunoise.
- The holy trinity (Cajun and Creole cooking): onion, celery and green bell pepper, usually a medium or small dice for gumbo and jambalaya.
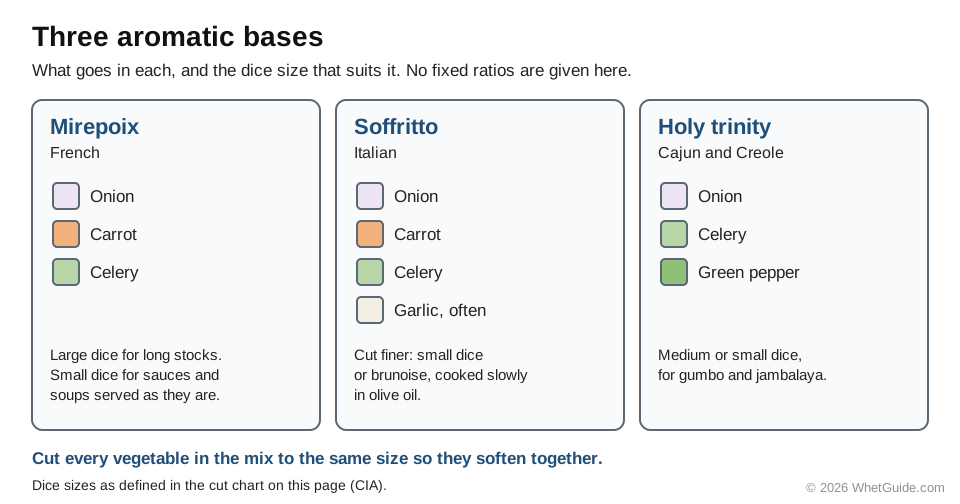
Cut each vegetable in the mix to the same size so they soften together. Size follows cooking time: the longer it cooks, the bigger the dice can be.
↑ Back to all sectionsKnife safety: ten rules, gloves and first aid
The Washington State Department of Labor and Industries' "Ten Safe Handling Hints for Knives" was written for restaurant workers, and every line of it applies at home. Here it is, with notes.
- Keep knives sharp, and tell others when a knife has just been sharpened. A freshly sharpened edge surprises people who are used to a dull one.
- Never touch the blade's edge. Check sharpness with paper, not your thumb.
- Use a knife only for its intended job. No prying lids, no opening packages with the chef's knife.
- Put a damp cloth under the cutting board so it can't slip.
- When you're interrupted, stop cutting and set the knife down on a flat, secure surface, never near the edge of the counter.
- Never leave a knife soaking in a sink full of water. Someone will reach in for it.
- Let a falling knife fall. Step back and warn others. Don't try to catch it.
- Carry knives with the cutting edge angled slightly away from your body.
- To hand a knife to someone, set it down on a clean surface and let them pick it up.
- Store knives in racks or sheaths, not loose in a drawer.
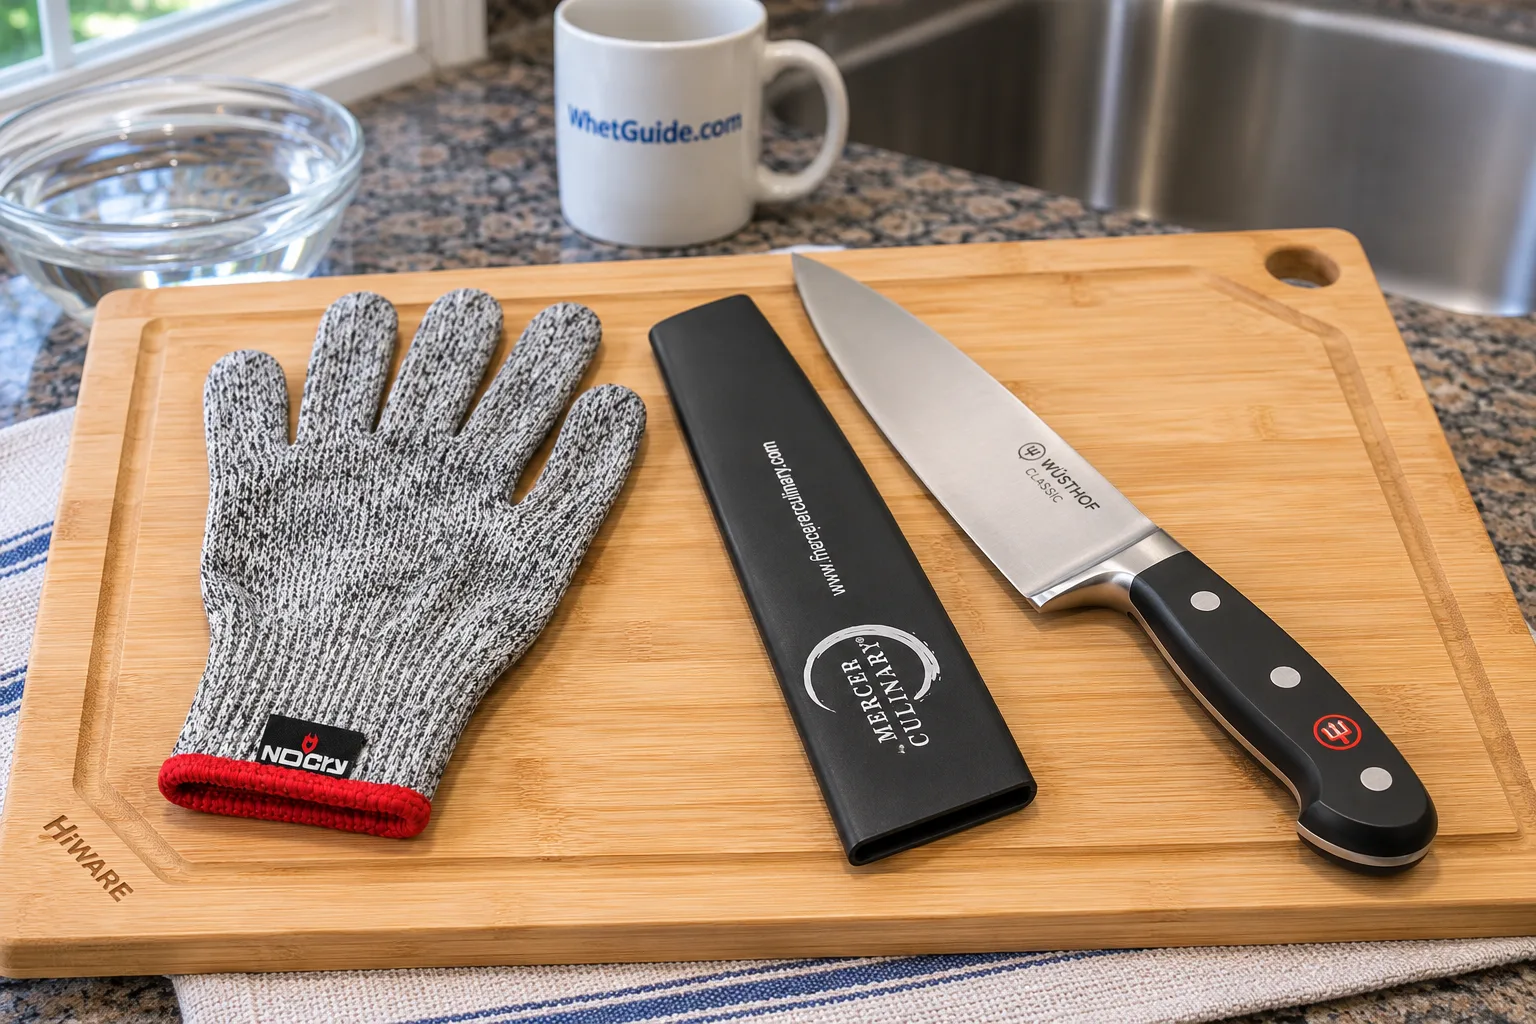
Escoffier adds two that belong on any list: cut away from your body when you can, and stay focused. The Institute of Child Nutrition's knife safety sheet adds two more. Never cut food you're holding in your hand, over the sink or anywhere else; it goes on the board. And keep the handle free of grease, so wash and dry your hands before you pick up the knife. Most of the rest of this page (the flat face, the claw, a sharp edge, a dry board) is safety too.
Cut-resistant gloves
A glove on the guide hand is a sensible training aid, and a must on a mandoline. Gloves are rated under ANSI/ISEA 105 on a scale from A1 to A9; the higher the level, the more force it takes to cut through, measured with a standard blade test (ASTM F2992). The chart below shows the grams of cutting load for each level, per MCR Safety's chart of the standard.
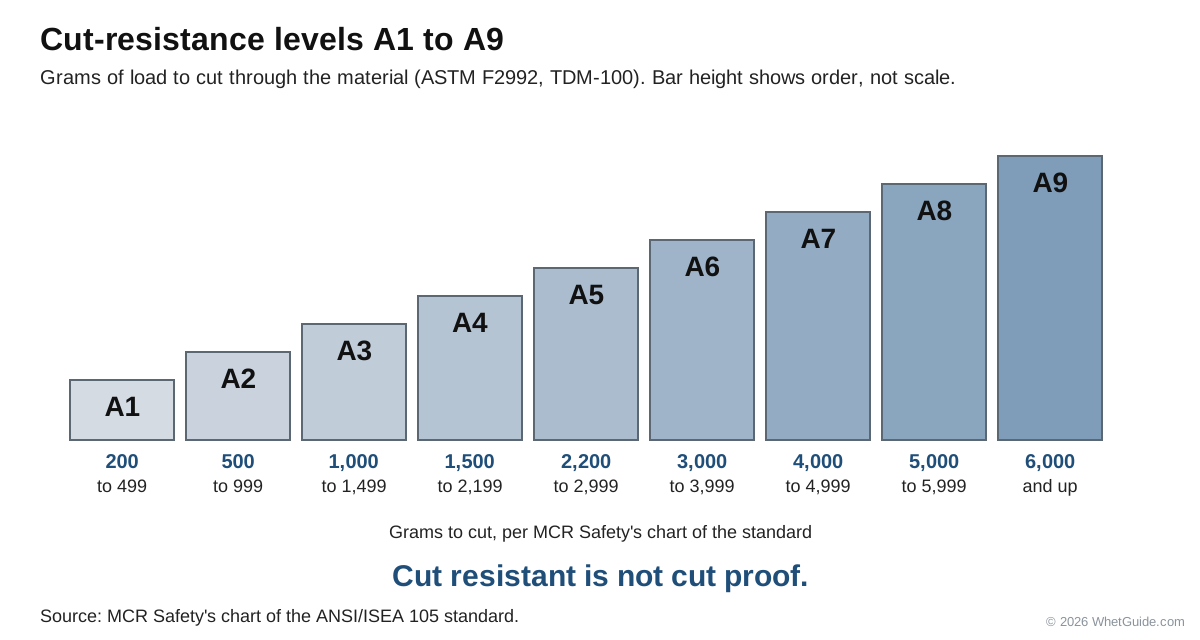
Two cautions. Kitchen gloves are often sold with a "level" that doesn't say which standard it refers to; check the listing for "ANSI A" and a number. And no glove is cut proof. A glove slows a slip; it doesn't make a flat-fingered guide hand safe, and it does nothing against a stab from the tip.
If you cut yourself
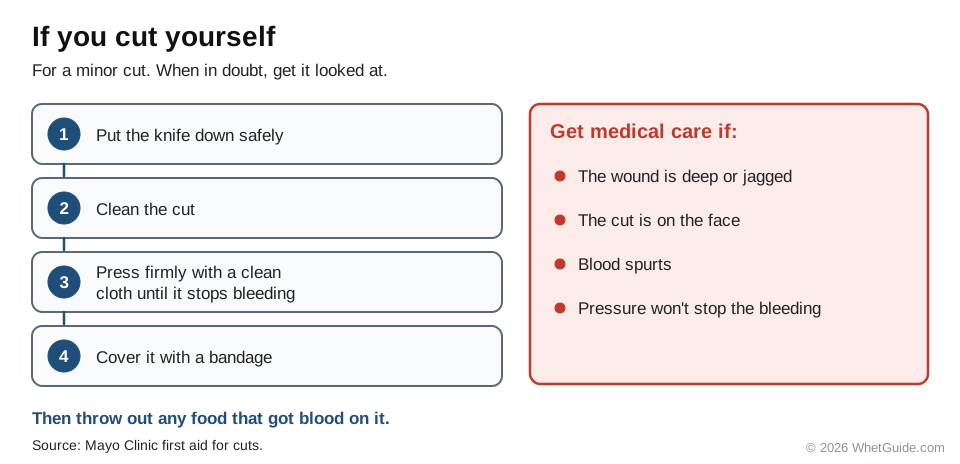
For a minor cut, Mayo Clinic's first-aid advice is to clean it, apply firm pressure with a clean cloth until the bleeding stops, and cover it with a bandage. Get medical care for a deep or jagged wound, a cut on the face, blood that spurts, or bleeding that won't stop with pressure. Put the knife down safely first, and throw out any food that got blood on it.
Knife skills troubleshooting
Chowhound's old troubleshooting video asked three questions that still come up in every cooking class. Here are the answers, then a table for everything else.
Do you really need a specific cutting technique? You need consistent size more than you need the French name. The named cuts exist so a recipe can tell you how big, which tells you how fast it cooks. If you chop everything to roughly the same size, your food will cook evenly, and that's most of the benefit. Use the named cuts when the recipe or the look of the plate depends on it.
What can you do with leftover vegetable bits? Squaring off carrots and potatoes leaves trimmings. Keep a bag in the freezer for onion ends, carrot trimmings, celery leaves and herb stems, and make stock when it's full. Trimmings also work in soups you'll blend, mashes, fritters and sauces. Trim with that in mind and squaring off costs you nothing.
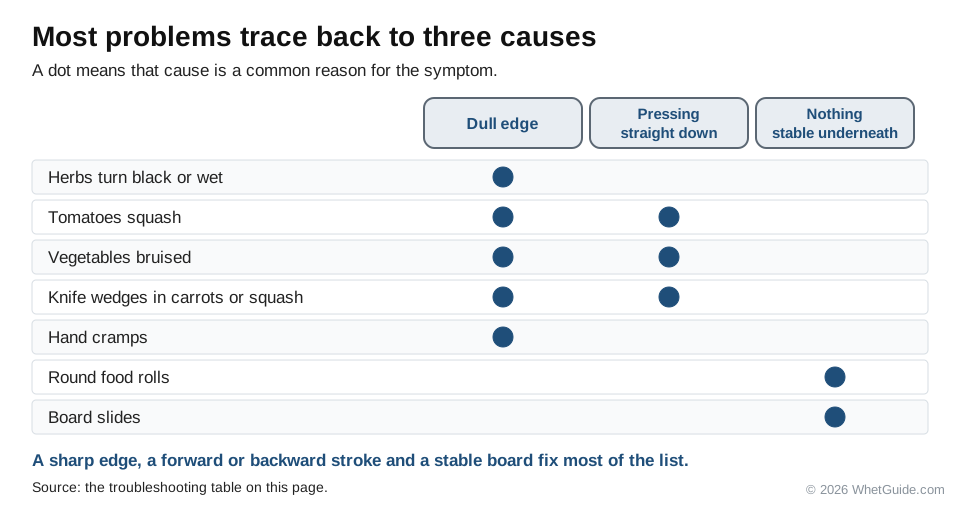
Why are your vegetables bruised? A dull knife crushes instead of slicing, so cells burst and leak, and herbs go black. So does chopping straight down instead of slicing, or cutting wet leaves. Hone or sharpen, use a forward or backward motion, and dry herbs before you cut.
| Symptom | Likely cause | Fix |
|---|---|---|
| Herbs turn black or wet | Dull edge, wet leaves, too many passes | Hone, dry the leaves, slice once (chiffonade) or rock lightly and stop |
| Tomatoes squash before the knife goes in | Dull edge, pressing down | Hone, or use a serrated knife; let a pull slice break the skin |
| Crying over onions | Crushed cells release more irritant | A sharp knife, the root left on until last, and a chilled onion help |
| Food sticks to the blade | Suction on wet, starchy food | Slice with a forward motion, wipe the blade; a Granton edge helps a little |
| Pieces come out different sizes | Claw moving back a different distance each time; uneven planks | Square the food first; use the knuckle as the width guide; cut planks before sticks |
| Knife wedges and sticks in carrots or squash | Thick or dull blade, pressing straight down | Push cut forward; halve big items first; sharpen. A blade worn thick behind the edge needs thinning |
| Board slides | Nothing underneath, or a wet counter | Damp towel or non-slip mat under the board |
| Round food rolls | No flat face | Trim a slice off one side and lay it on that face |
| Knuckles hurt or get nicked | Edge lifted above the knuckles, fingers flat | Keep the edge low, fingertips tucked, middle finger slightly forward |
| Hand cramps | Death grip, dull knife, board too high | Loosen the pinch grip, sharpen, adjust working height |
| Wrist sore after rocking | Rock chopping large or hard items | Use push cuts on big things; save rocking for herbs and garlic |
| Onion dice falls apart early | Root cut off, or cuts went through the root | Leave the root on and stop every cut just short of it |
| Julienne stack fans out | Too many planks, rounded sides | Square the block; stack two or three planks, not five |
Ten common knife skills mistakes
- Using a dull knife. It slips, it crushes, and it makes you squeeze. Sharpen first.
- The death grip. White knuckles on the handle and the wrist bent down. Pinch the blade and relax.
- Flat fingers on the food. The fingertips sit in front of the knuckles, right where the blade comes down. Curl them into a claw.
- Pushing the food into the knife. Move the claw back; don't feed the food forward with your fingertips.
- Cutting round food on its curve. Make a flat face first.
- Chopping straight down. Slice forward or back so the edge does the work.
- Scraping the board with the edge. It rolls the edge and dulls the knife fast. Turn the knife over and use the spine, or a bench scraper.
- Rocking through big, hard vegetables. Rocking is for small things. Push cut a squash or a sweet potato.
- A board that moves, or a glass or stone one. Damp towel underneath; wood or plastic on top.
- Dishwasher and sink soaking. The dishwasher knocks the edge against everything else in the rack; a knife in a sink of water is a hidden blade. Wash by hand, dry, put away.
How to practice knife skills: a 7-day drill plan
Knife skills come from repetition, and the cheapest way to get it is to cook. This plan gives each day one skill, using food you'll eat anyway, so the practice is just dinner prep done on purpose. Aim for even pieces first; speed shows up on its own.
- 1claw
- 2slice
- 3dice
- 4sticks
- 5push cut
- 6herbs
- 7mix
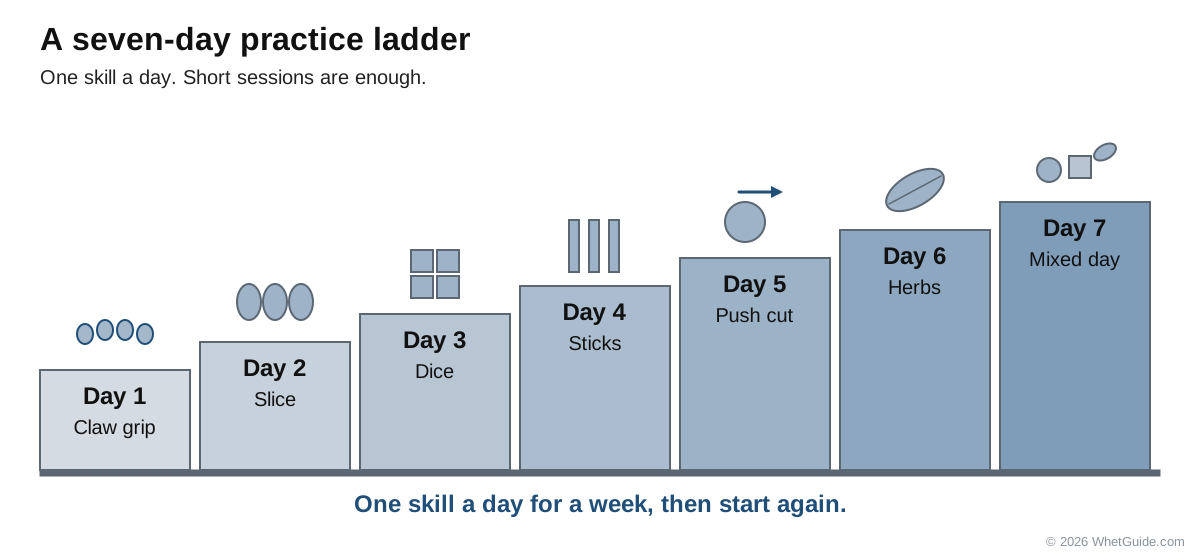
| Day | Skill | Practice on | What to watch for |
|---|---|---|---|
| 1 | Grip and claw | An apple or an onion, sliced into half-moons | Fingertips behind the knuckles; the blade's flat touching the middle knuckle on every cut |
| 2 | Slicing | Cucumber and celery | Same thickness every slice; the claw walks back the same distance |
| 3 | Dicing | Potatoes, as medium dice for hash or soup | Square block, even planks; cubes, not tiles |
| 4 | Sticks | Carrots: batonnet, then julienne, then a little brunoise | Square sides; two or three planks per stack |
| 5 | Push cut | Cabbage for slaw, or a pile of scallions | Forward and down, no sawing, very little pressure |
| 6 | Herbs and garlic | Basil chiffonade, parsley mince, a few cloves of garlic | Dry leaves, a fine pile, no black edges |
| 7 | Put it together | An onion, two carrots and two celery stalks as mirepoix, plus an orange to supreme | All pieces one size; a clean board as you go |
Then do the week again. The second time through, pick a smaller size each day: small dice instead of medium, fine julienne instead of julienne. Cook Smarts suggests the same kind of practice foods (onions, sweet potato cubes, jalapenos), and Tasting Table suggests learning the claw on an apple or onion.
Two books worth having on the shelf, both in plain text because we don't link to them here: The Zwilling J.A. Henckels Complete Book of Knife Skills, a well-photographed home reference, and the Culinary Institute of America's The Professional Chef, the textbook behind the cut sizes on this page.
↑ Back to all sectionsAfter you cut: wash, dry, store
Wash the knife by hand with warm soapy water, edge away from your hand, and dry it right away, especially carbon steel, which rusts if it sits wet. Don't leave it in the sink, and don't run it through the dishwasher. Store it in a block, on a magnetic strip, or in a sheath or edge guard if it lives in a drawer, which is the Washington L&I rule. Hone before the next session. The full routine, including rust and carbon steel care, is in our knife care guide.
↑ Back to all sectionsBeyond the basics
Once the basics are automatic, these are the next cuts to learn. Each one is a skill on its own; Escoffier lists several as advanced techniques.
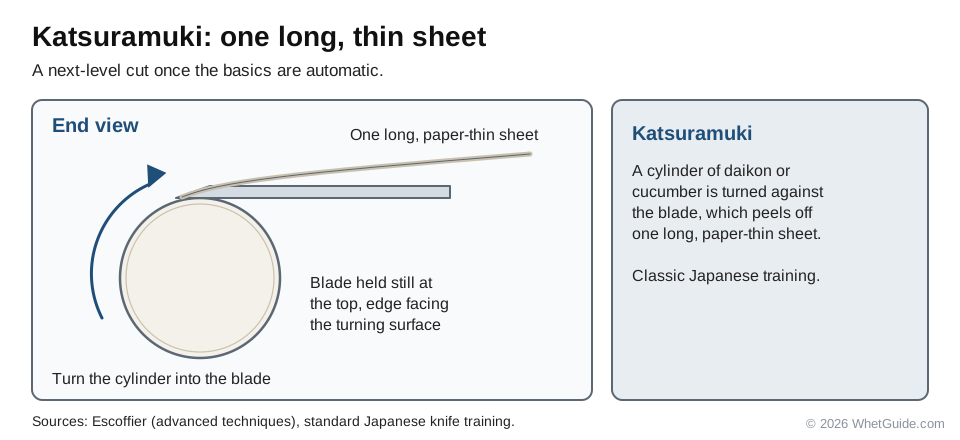
- Katsuramuki: turning a cylinder of daikon or cucumber against the blade to peel off one long, paper-thin sheet. Classic Japanese training.
- Sogigiri: an angled slice, blade almost flat, for wide thin pieces of fish, mushroom or chicken.
- Usu-zukuri and kaku-zukuri: Japanese slicing styles for sashimi, very thin and cubed.
- Fluting and canele: decorative grooves cut into mushrooms, lemons or cucumbers.
- Tourne: carving potatoes or carrots into small, even barrels with a curved paring knife.
- Cleaver work: Chinese cleavers do all of the above in many kitchens, with the guide hand flat on the dull top edge of the blade for some cuts, as Culinary Schools notes.
What we skip: knife tricks. Flipping, spinning and tossing knives look good on video and teach nothing that makes your food better, and they're how people get hurt.
↑ Back to all sectionsVegetable carving and simple garnishes
Carving fruit and vegetables into flowers is an old craft. Wikipedia's fruit carving article traces it to China's Tang dynasty, dates Thai watermelon carving to the Sukhothai era in the 14th century, and describes the Japanese version, mukimono, as a way to make dishes look more appealing. The five garnishes below take a paring knife, a board and a bowl of ice water, and they're good practice for the tip control in the paring knife section.
Which knife for garnishes
A small paring knife with a short, pointed blade. Rada Cutlery makes its tomato rose, carrot flowers and radish florets with paring knives and says the short blade gives "a lot of control." The Victorinox paring knife in the three knives photo is the same kind of tool. Serious carvers add more: Wikipedia lists a carving knife for shaping, a zester for grooves, a melon baller, and U- and V-shaped cutters for petals. The one extra worth buying early is a channel knife, a small tool with a notched blade that lifts a narrow strip of citrus peel.
Radish roses
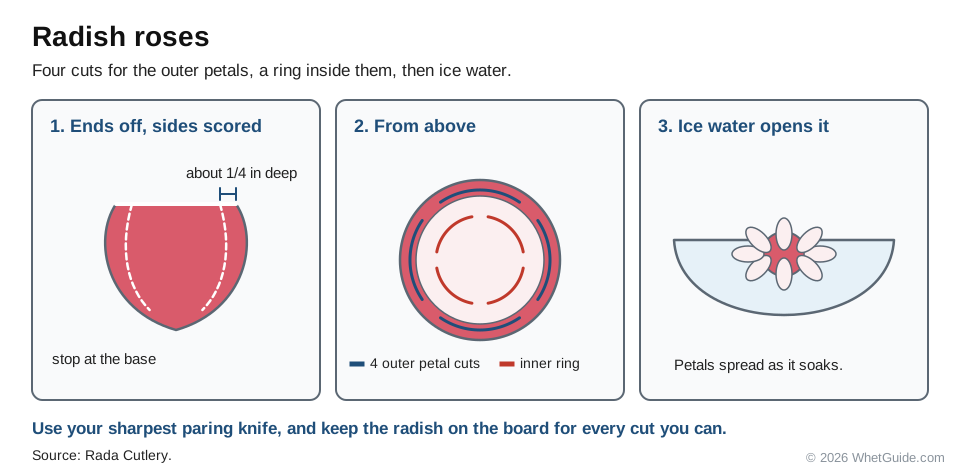
- Pick a good-sized, firm radish and cut off both ends, so it sits flat on the board.
- Make four evenly spaced cuts down the sides, about 1/4 inch deep, stopping at the base. These are the outer petals.
- Cut again around the radish, inside the first cuts, so the petals separate and start to fan out.
- Put it in ice water. Rada's last step for its radish florets is a soak in ice water so the petals expand and open.
Cucumber fans
- Halve a cucumber lengthwise and lay it cut side down.
- Cut one half into pieces 1 to 1 1/2 inches long.
- Slice each piece thinly, leaving one edge uncut so the slices stay joined.
- Fold every other slice up and tuck its end in, then spread the fan. That's Melissa's Produce's method, and it goes at the edge of a platter.
Citrus twists and spirals
A twist is a strip of peel with as little of the white pith as you can manage, because the pith is bitter. Microplane says a paring knife can cut one, but a citrus peeler gives better control. If the strip comes off thick and white underneath, trim the pith away and cut shallower on the next one. For a long spiral, use a channel knife: start at the top of the fruit and cut slowly in one continuous strip, holding the tool steady and turning the fruit, which keeps the pressure even. Pick firm, thick-skinned fruit.
Carrot flowers
Rada's carrot flowers are cut like sharpening a pencil. Peel a thick carrot (thin ones are hard to work with), trim the end, and then cut thin, angled slices around the tip, turning the carrot a little after each one so the slices stay attached as petals. A last cut and a twist frees the flower, and you start again on the next section. Rada gets 10 to 12 flowers from one carrot and puts them in ice water for an hour before they go on the plate.
Tomato rose
Peel a firm tomato the way you'd peel an apple, starting at the top or bottom and keeping the strip of skin as thin and as long as you can. Then roll the strip back up into a rose shape. Rada uses one on a plate of deviled eggs and warns that it's slow, fiddly work. A sharp edge is what keeps the strip from tearing.
Garnish safety
- Garnish cuts are small and slow, and the edge works close to your fingers. Keep the food on the board for every cut you can, and cut away from the hand that holds it.
- Use your sharpest paring knife. A dull tip skids off a radish skin, and that's when it lands in a finger (why sharp is safer).
- A cut-resistant glove on the holding hand is cheap insurance for spiral and petal work.
- These garnishes are eaten raw, so wash the produce and use a clean board kept away from raw meat (boards and cleaning).
What you need, by job
None of this is required beyond a knife and a board. These are the items in the photos on this page, named so you know what you're looking at. Prices and ratings change, so we don't print them.
| Job | What we show | Why |
|---|---|---|
| Chef's knife (budget) | Victorinox Fibrox Pro 8 in | Stamped Swiss knife with a non-slip handle; a common first knife and a kitchen standard |
| Chef's knife (forged) | Wusthof Classic 8 in | Heavier German knife; Wusthof lists it at 58 HRC |
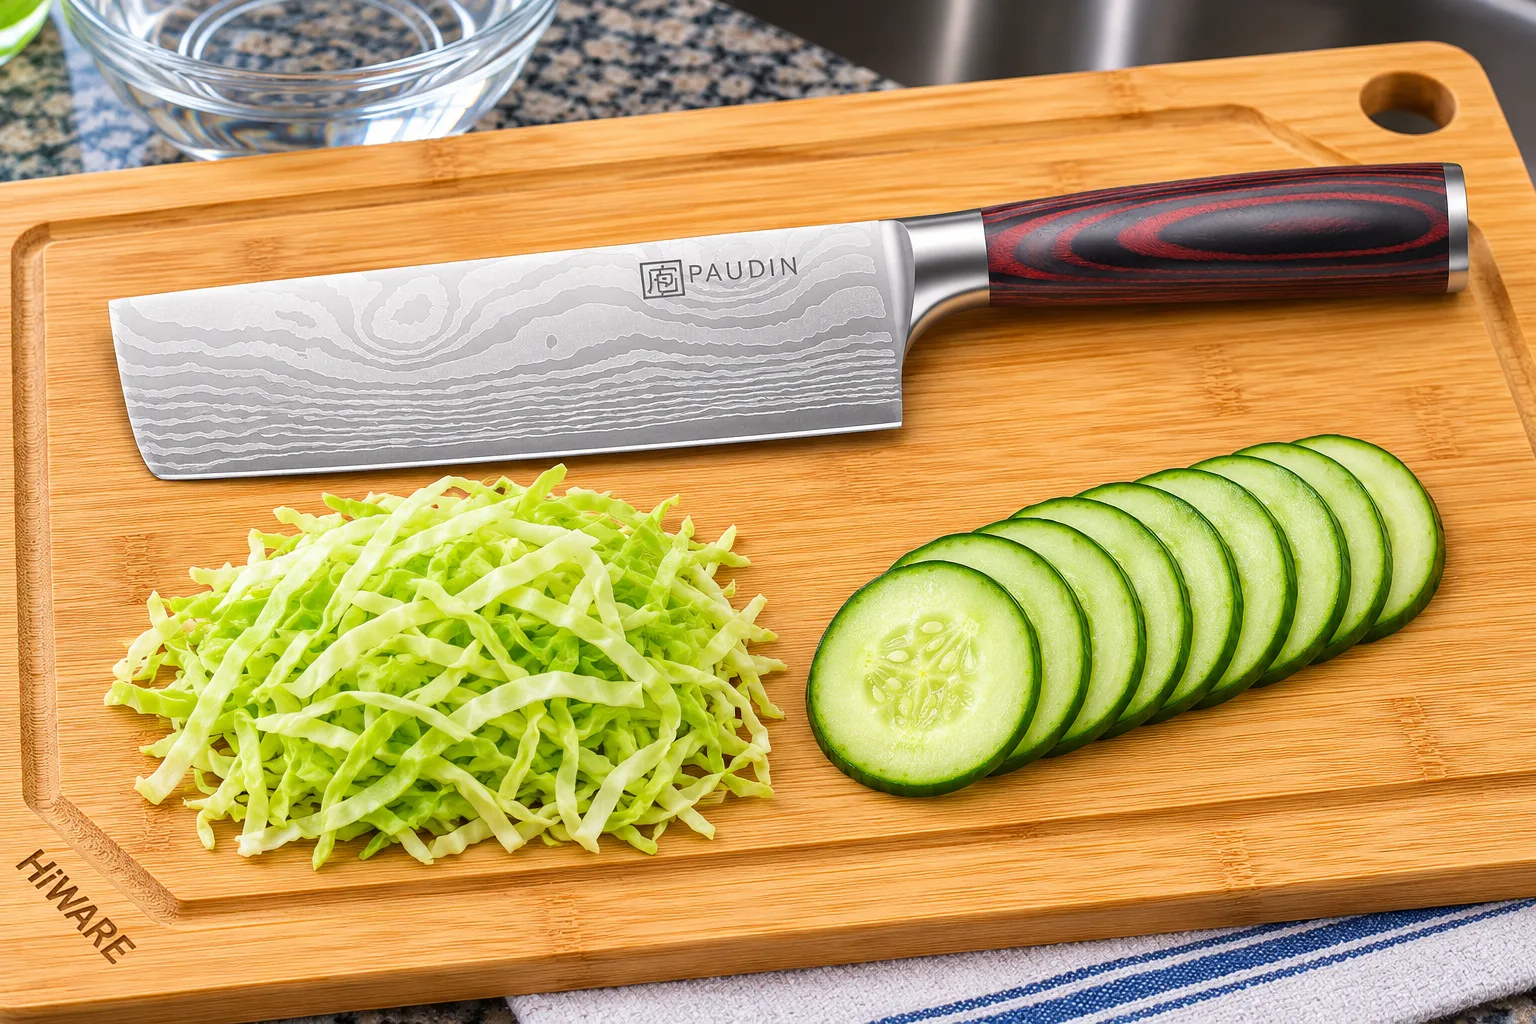
| Push cuts | PAUDIN 7 in nakiri | Flat edge made for push cuts on vegetables |
| Paring knife | Victorinox Swiss Classic paring knife (about 3 in) | Light and cheap, for peeling, trimming and citrus |
| Serrated knife | Mercer Millennia 10 in bread knife | Long enough for a loaf, also handles tomatoes |
| Board | Hiware 18 x 12 in bamboo board with juice groove | Large enough to push finished food aside |
| Non-slip base | Gorilla Grip cutting mat | An alternative to a damp towel |
| Moving food | OXO Good Grips bench scraper | Scoops dice without dragging the edge |
| Guide-hand protection | NoCry cut-resistant gloves | Sold as "Level 5"; check the listing for the standard |
| Honing | Wusthof 9 in honing steel | Keeps the edge lined up between sharpenings |
| Drawer storage | Mercer 8 in knife guard | Covers the edge in a drawer or a bag |
For a deeper buying guide, see how to choose a chef's knife and the best honing rods.
↑ Back to all sectionsKnife skills cheat sheet
The whole page on one card. Screenshot it for the kitchen, or print it.
| Station | Damp towel or mat under a big board. Dry top. Scrap bowl, finished bowl. Separate board for raw meat. |
|---|---|
| Knife | Sharp. Paper test: snags = hone; still snags = sharpen. 8 in chef's knife, paring, serrated. |
| Grip | Pinch the blade just in front of the handle, thumb and bent index finger. Three fingers wrap. Relaxed, wrist straight. |
| Claw | Fingertips tucked behind the knuckles, thumb tucked, middle finger slightly forward. Blade's flat on the knuckle, edge low. Walk back after each cut. |
| Bridge | First cut through round food: hand arched high, fingers one side, thumb the other. Blade under the arch, press down and draw back. Halves flat side down, then claw. |
| Stable | Flat face on round food. Halve big items. Onion: halve through the root. |
| Motion | Push cut forward and down at about 45°. Rock for herbs and garlic. Pull slice for meat, fish, tomatoes. Saw only bread. Never scrape with the edge. |
| Dice | Large 3/4 in (20 mm). Medium 1/2 in (13 mm). Small 1/4 in (6 mm). Brunoise 1/8 in (3 mm). Fine brunoise about 1/16 in. |
| Sticks | Batonnet 1/4 x 1/4 x 2 to 2.5 in. Julienne 1/8 x 1/8 x 1 to 2 in. Fine julienne about 1/16 in. |
| Other | Mince 1/8 to 1/16 in. Chiffonade: stack, roll, slice, use at once. Bias: diagonal slices. Roll cut: angle, turn, angle. Supreme: ends off, peel along the curve, cut beside each membrane. |
| Produce | Pepper: ends off, open flat, cut out ribs. Tomato: core, lay on its side, slice. Avocado: on the board, never in your hand; never strike the pit. Florets: cut free from the stem with the tip. Meat: slice against the grain. |
| Safety | Set it down when interrupted. Let a falling knife fall. Carry edge angled away. Hand off by setting it down. Never in a soapy sink. Gloves A1 to A9: resistant, not proof. |
Sources: cut sizes from the Culinary Institute of America, The Professional Chef, as listed in Wikipedia's list of culinary knife cuts and by Wekiva Culinary; mince and grip guidance from Victorinox; Wusthof, Essential Knife Skills 101 and The Best Way to Hold a Knife; Wusthof Classic hardness from Wusthof's product page; knife parts from Shun; grips, honing and the paper test from America's Test Kitchen; techniques and safety from Escoffier; motions and the hard-steel caution from Cutlery and More; safety rules from Washington State L&I; board hygiene from USDA FSIS via UC ANR; glove levels per MCR Safety's ANSI/ISEA 105 chart; first aid from Mayo Clinic; citrus from Blue Jean Chef; garlic sizes from America's Test Kitchen's clove chart; the bridge hold from the Jamie Oliver Food Foundation's Kitchen Garden Project handout; pepper and florets from Shun; tomato from Food Network; avocado safety from Hospital for Special Surgery and University of Utah Health; slicing against the grain from Cook's Country. Also Forks Over Knives, Gear Patrol, Tasting Table, UCHealth, Cook Smarts, Great British Chefs and The Sharp Cook, linked where they're cited, and Culinary Schools. Read November 14, 2026. Technique otherwise reflects standard, widely taught kitchen practice. How we research