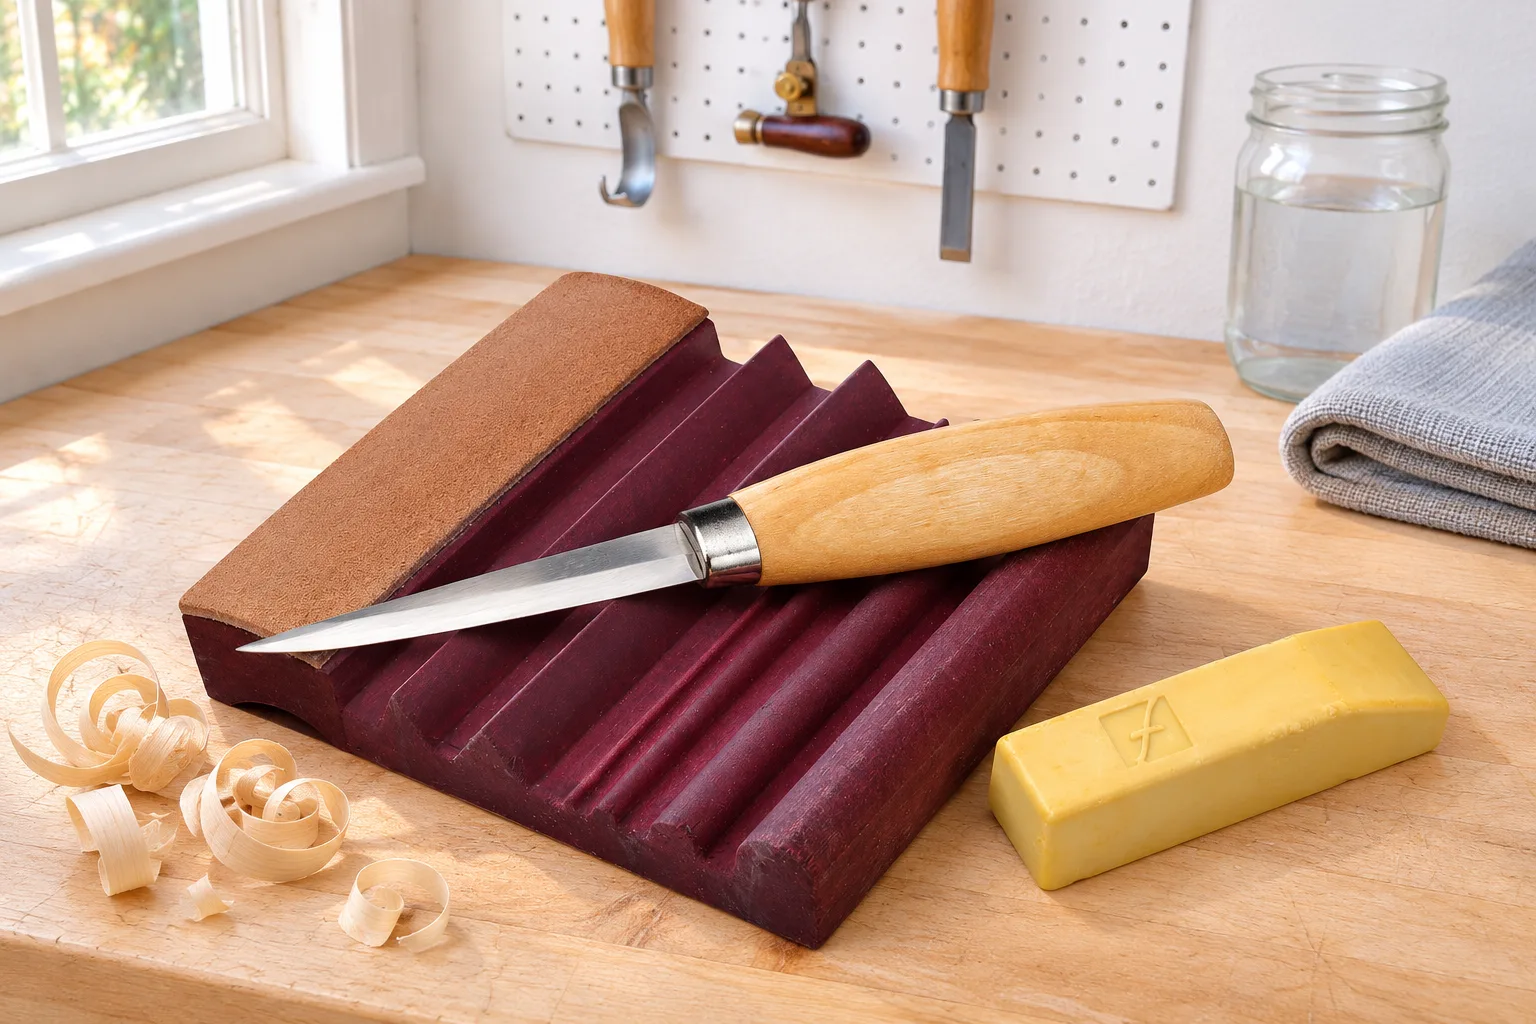
Quick answer: sharpening a carving knife in 8 steps
- Look at the bevel. Most sloyd and whittling knives have one wide, flat bevel on each side (a Scandi grind) running straight to the edge. Hook knives and chip knives are covered in their own sections below.
- Color the bevel with a permanent marker. It shows you exactly where the abrasive is cutting.
- Lay the bevel flat on the abrasive. On a Scandi bevel, the bevel is the angle guide: rest it flat, then press on it, not on the spine or the edge. Use wet/dry sandpaper on glass or a stone.
- Stroke with the edge trailing. Draw the knife spine first so the edge follows behind. Some teachers stroke edge first on sandpaper (see push or pull), but edge trailing is the easier stroke to learn and the only one for the strop. Work the heel, the middle and the tip, lifting the handle to follow the curve near the point.
- Raise a burr. Keep going on one side until the ink is gone from shoulder to edge and you can feel a slight burr along the whole edge on the other side. Then do the other side with the same number of strokes.
- Step up the grits. A typical run is 400, 600 and 1000, then finer if you like a polished edge. Each grit only has to remove the scratches from the one before.
- Strop. Leather loaded with compound, bevel flat, edge trailing, light pressure, alternating sides, until the burr is gone.
- Test on wood, then keep it up. Slice the end grain of a scrap of basswood or cedar. Shiny cut: done. Strop whenever the knife starts to drag, and go back to the abrasive only when stropping no longer helps.
A knife that is just a little dull needs only step 7. A new knife from a good maker may need nothing at all. If you only read one more section, read stropping, because that is where most carving edges are won or lost.
↑ Back to all sectionsStart here: which carving knife do you have, and what does it need?
New carvers usually ask "how do I sharpen this?" about a knife that may not need sharpening yet. Work out two things first: what kind of blade it is, and what state the edge is in.
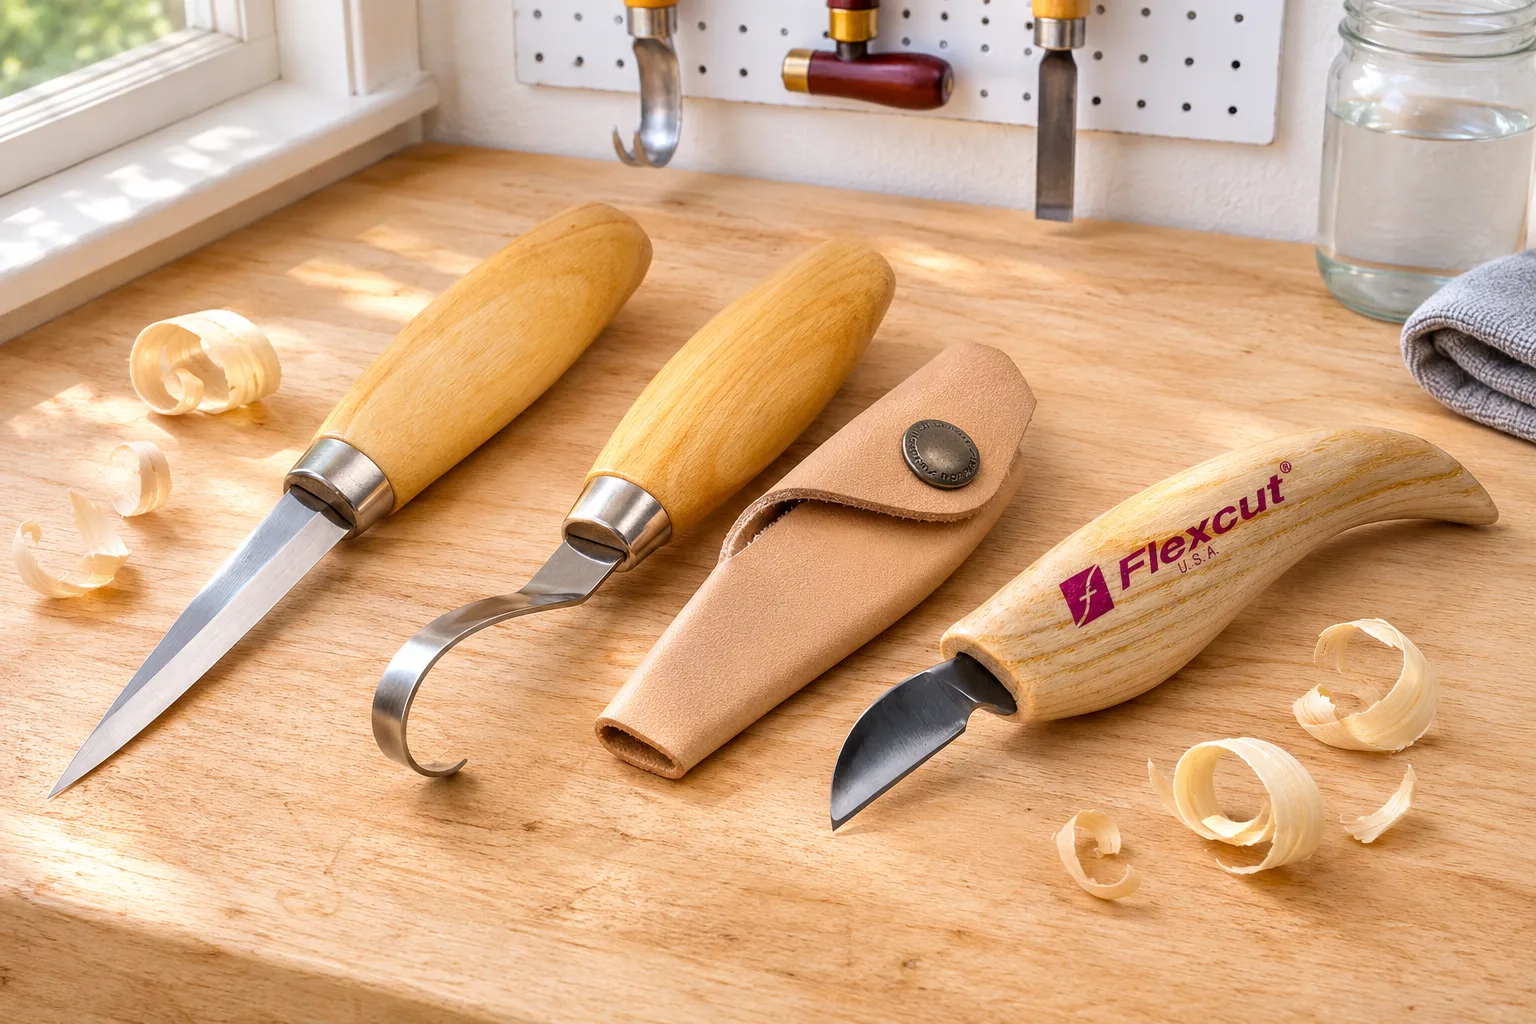
| Blade | How to spot it | How it's sharpened | Go to |
|---|---|---|---|
| Sloyd or Scandi carving knife (Mora 106, 120; most straight carving knives) | One wide flat bevel on each side, ending in the edge with no second bevel | Bevel flat on sandpaper or a stone, then strop | Sloyd |
| Whittling or pocket knife, bench knife | Shorter blade, sometimes folding; small bevel or Scandi grind | Same as sloyd, or a small V bevel at a guide angle | Whittling |
| Hook or spoon knife (Mora 162, 164; BeaverCraft SK1) | Blade bent into a curve or a hook for hollowing spoons and bowls | Inside of the curve with sandpaper on a dowel, then a round or paddle strop | Hook knife |
| Crooked knife (bent knife) | Long, gently curved blade on an offset handle with a thumb rest, pulled toward you like a drawknife | Shaped sticks wrapped in abrasive and leather | Crooked knife |
| Chip carving knife | Short, stiff, thin blade with a straight edge and a sharp point | Very low angle, polished faces | Chip carving |
| Gouges and V-tools | Curved or V-shaped chisel edges | Rolled on abrasive, slip stones, contoured strop | Gouges |
- 27°total edge angle Mora recommends for carving knives
- 2.7 mmMora 106 blade thickness, so the 27° figure applies
- 58.5 HRChardness of the 106's laminated carbon steel
- 85 mmblade length: short enough to steer, long enough to shave
Figures from Morakniv's 106 LC product page and sharpening guide. The 106 is a common first carving knife, so it's the reference knife on this page.
What does the edge need right now?
| What you see or feel | What it needs |
|---|---|
| New knife that slices basswood cleanly and leaves a shiny cut | Nothing yet. Strop it now and then. Flexcut, for one, says its tools ship pre-sharpened to a polished edge and need only stropping. |
| New knife that needs force, crushes fibers or won't take a thin curl | The factory edge is too steep or unfinished. Wood Carving Illustrated says factory edges are usually too steep for carving. Set the bevel on sandpaper or a stone. |
| Was sharp, now drags; the cut surface goes fuzzy or dull | A strop. That's most of the upkeep a carving knife ever needs. |
| Stropping no longer brings it back | A fine grit (1000 or up), then strop. |
| White lines in the cut, a visible nick, or a dropped knife | Coarse grit to remove the damage, then the full ladder. See chips. |
| Bevel rounded so the knife rocks or bounces out of the cut | Flatten the bevel on a coarse grit. See micro-bevels and rounding. |
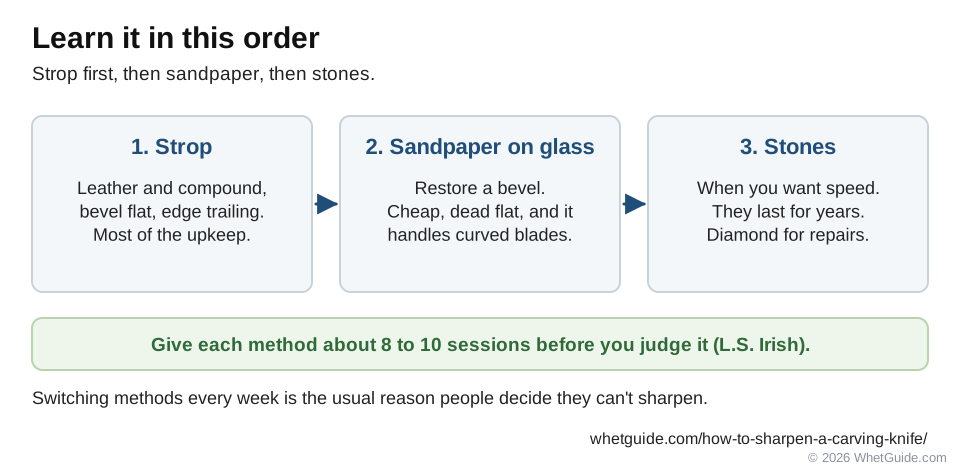
If you're working from a club resource list or a class handout, this is the order most carving teachers use: learn to strop first, then learn to restore a bevel on sandpaper, then move to stones when you want speed. L.S. Irish, who teaches bench-knife carving, says to pick one technique and stay with it for about 8 to 10 sessions before judging it. Switching methods every week is the usual reason people decide they "can't sharpen."
A beginner's kit that covers every straight knife: a sheet of glass, three or four grits of wet/dry sandpaper, a leather strop, a bar of compound and a permanent marker. Stones come later.
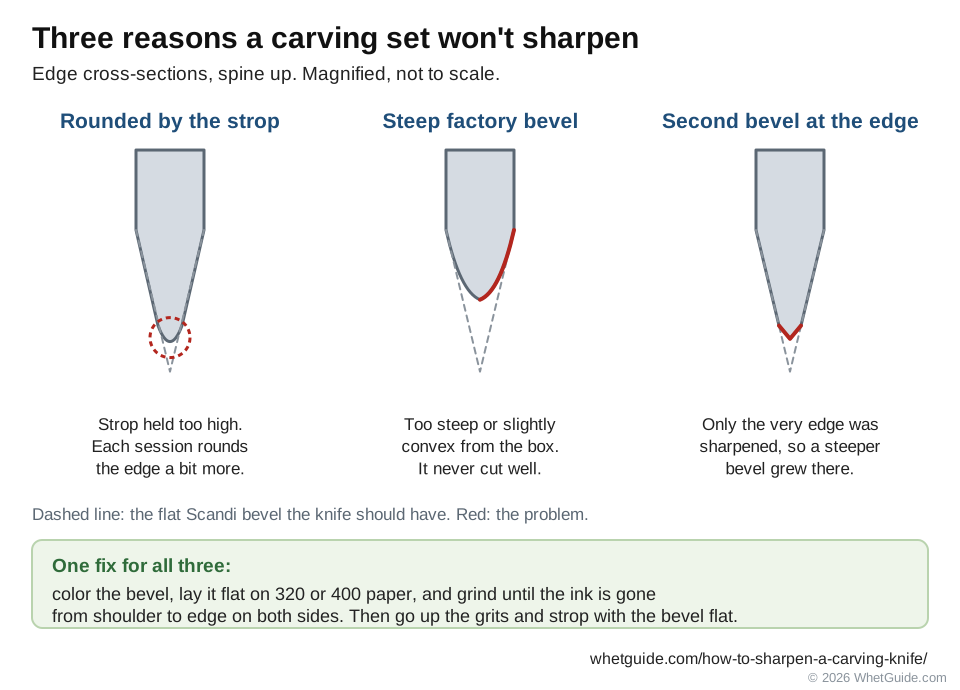
"I bought a carving set and I can't get it sharp"
This is the most common question on carving forums, usually about an inexpensive multi-knife set. Three things go wrong. The strop is used at too high an angle, which rounds the edge so each session makes the knife a little worse. The factory bevel is steep or slightly convex, so the knife never cut well to begin with. Or the owner sharpens only the very edge instead of the whole bevel, building a second, steeper bevel. The fix is the same for all three: color the bevel, lay it flat on 320 or 400 sandpaper, and grind until the ink is gone from shoulder to edge on both sides. Then go up the grits and strop with the bevel flat. After that one reset, stropping works.
Safety at the bench
Morakniv's own sharpening advice starts with a stable surface and fingers kept away from the edge. For carving knives that means:
- Glue or clamp sandpaper to glass, MDF or a board so nothing slides. Put the glass on a damp towel.
- When you're learning, strop the inside of a hook knife with the strop held still on the bench or in a vise, not waved around in your hand. A cut-resistant glove on the hand holding a dowel is cheap insurance.
- Keep your fingertips behind the edge on every stroke. With edge-trailing strokes the edge moves away from your fingers, which is one more reason to use them.
- If you drop the knife, step back and let it fall.
- Wash your hands when you finish. SharpeningSupplies' sloyd guide points out that fine steel dust from sharpening ends up on your fingers, and from there on your work.
A sharp carving knife is also the safer one. Wood Carving Illustrated puts it simply: a sharp knife needs less force, gives more control and tires you less. Most carving cuts happen because a dull blade was forced and then let go all at once.
↑ Back to all sectionsWhat makes a carving knife edge different
A kitchen knife has a thin blade with a small bevel at the very edge, and you sharpen it by holding an angle in the air. Most carving knives don't work that way. A sloyd or whittling knife usually has a Scandi grind: one wide, flat bevel on each side that runs all the way from the shoulder to the edge. When you carve, that flat bevel rides on the wood and steers the cut. When you sharpen, the same flat bevel sits flat on the stone and sets the angle for you.
So the first rule of carving-knife sharpening is to keep the bevel flat. A bevel that has gone rounded (convex) rocks on the stone and rocks in the wood, and the knife bounces out of the cut instead of following it.
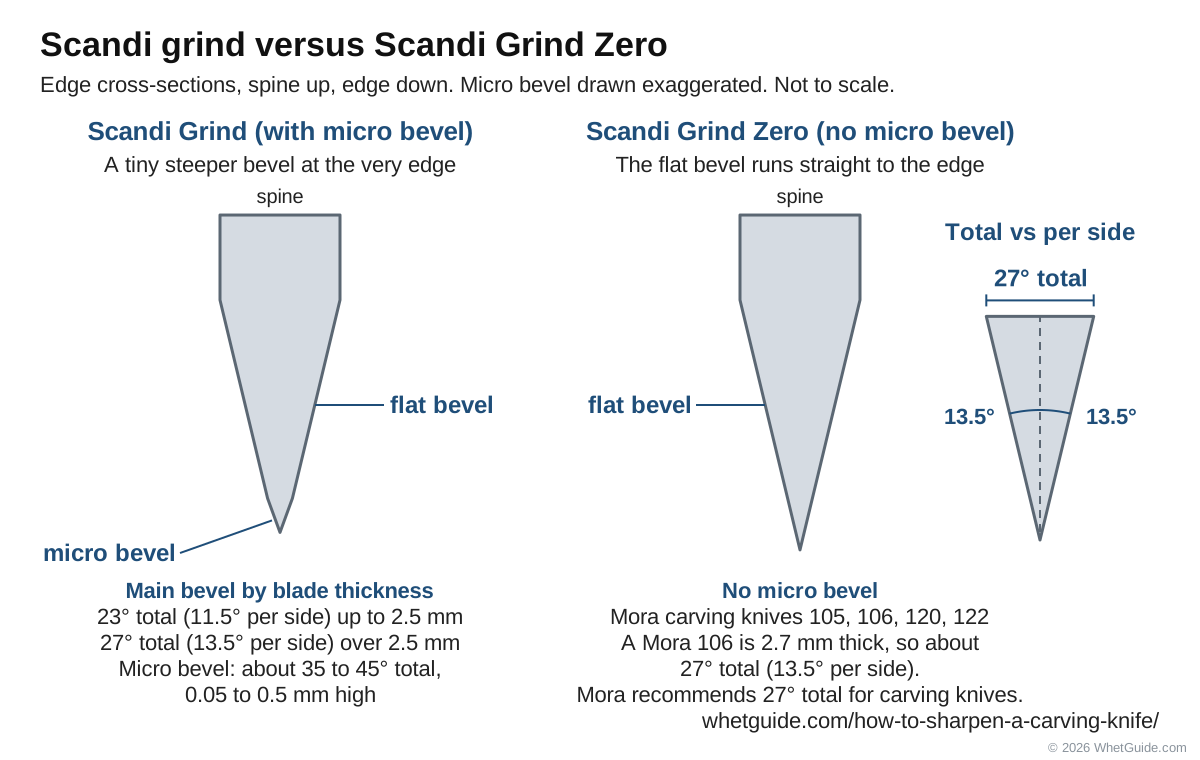
The grinds you'll meet
| Grind | What it looks like | How to sharpen it |
|---|---|---|
| Scandi with micro bevel | Flat bevel plus a tiny steeper bevel at the very edge. Mora says its micro bevel is about 35 to 45 degrees total and 0.05 to 0.5 mm high, and that it is a different thing from an American-style secondary bevel. | Sharpen the flat bevel, then add back a light micro bevel if you want one |
| Scandi Grind Zero | Flat bevel straight to the edge, no micro bevel. Mora uses it on its carving knives 105, 106, 120 and 122, among others. | Flat bevel only, then strop with the bevel flat |
| Hollow grind | Bevel slightly dished, so it touches a flat stone at two points: the shoulder and the edge | Easy to hold on the two contact points; refine on fine stones. Common on hook knives. |
| Convex (rounded) | Bevel curves into the edge. Sometimes by design, more often from years of stropping at a high angle. | Flatten back to a Scandi bevel on a coarse grit if it no longer steers |
| Secondary V bevel | A narrow steeper bevel along the edge, like a kitchen knife | Grind it away to restore the flat bevel. The Green Wood Guild calls a secondary bevel a poor fit for carving. |
Grind figures: Morakniv, Grinds and edge angles.
Bevel length and the cut
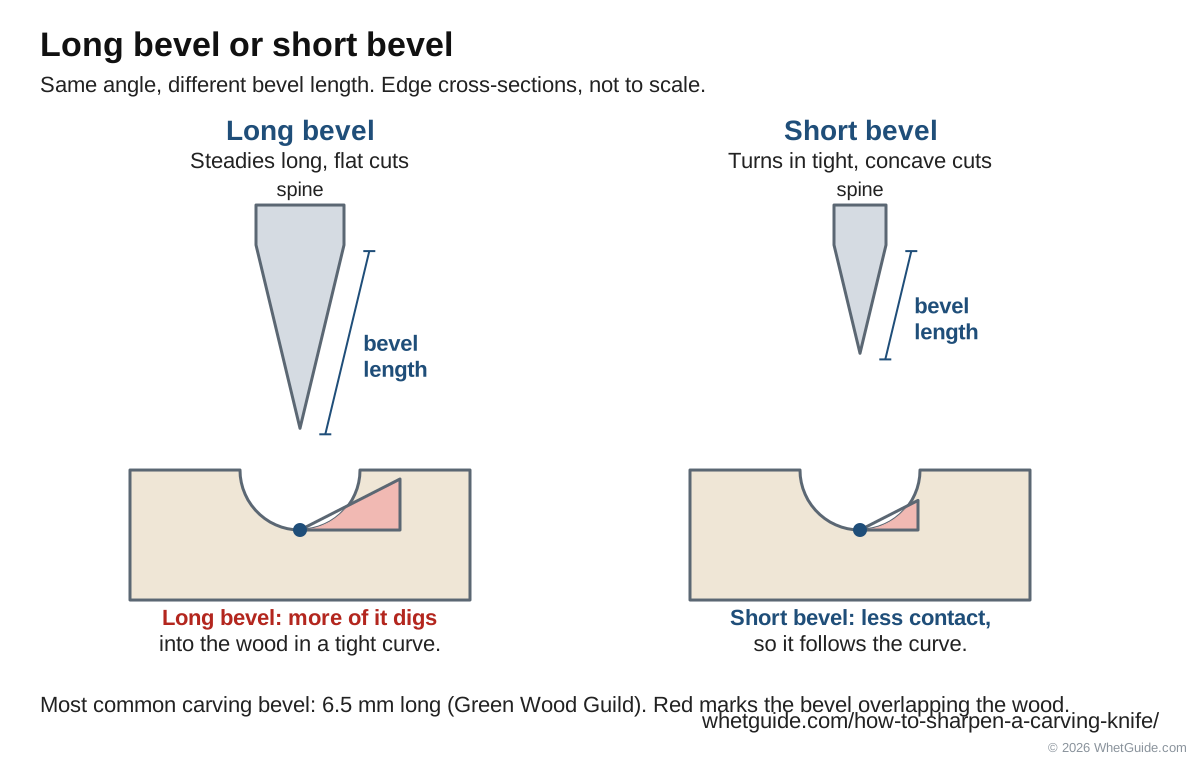
The Green Wood Guild's straight-knife guide gives 25 degrees and a bevel length of 6.5 mm as the most commonly used carving bevel (the guide labels the angle on a diagram without saying whether it's per side or total). A long bevel gives the edge more support and steadies long flat cuts. A short bevel turns more easily in tight concave cuts, such as the inside of a spoon bowl's rim, where a long bevel bottoms out and digs. Hewn and Hone's sloyd article makes the same trade: longer bevels support the edge but are harder to use in concave cuts.
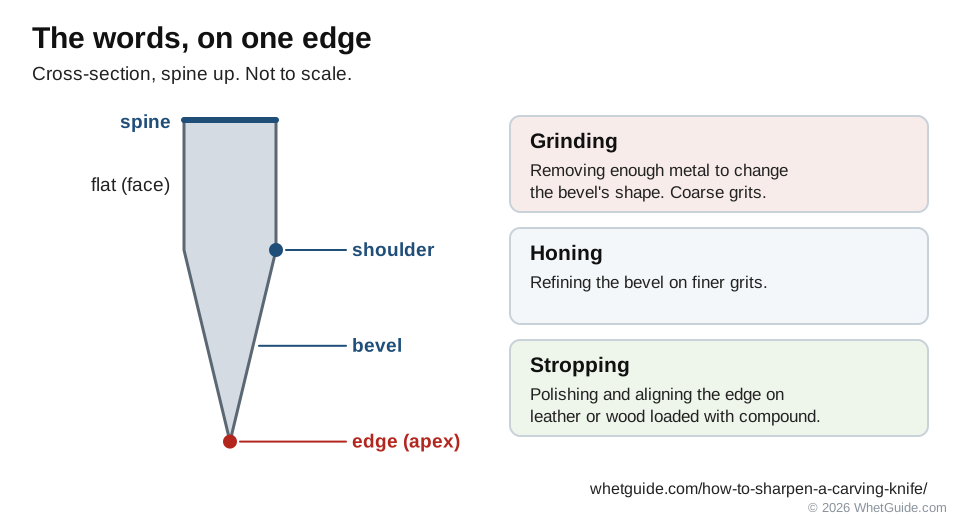
A few words you'll see in carving sharpening guides. Grinding is removing enough metal to change the bevel's shape. Honing is refining it on finer grits. Stropping is polishing and aligning the edge on leather or wood loaded with compound. The shoulder is the top line of the bevel, where it meets the flat of the blade.
What angle to sharpen a carving knife
Keep the angle the maker ground. For a Scandi carving knife, Morakniv recommends 27 degrees total, and explains that with the Scandi Grind Zero the edge becomes too fragile if you bring it down toward 20. That's 13.5 degrees per side.
The biggest source of confusion in carving forums is per side versus total. A "25 degree" sloyd bevel and a "12 to 14 degree" sloyd bevel are the same edge described two ways. Every figure below says which one it is.
| Knife | Per side | Total | Source |
|---|---|---|---|
| Mora Scandi blade up to 2.5 mm thick | 11.5° | 23° | Morakniv |
| Mora Scandi blade over 2.5 mm (the 106 is 2.7 mm) | 13.5° | 27° | Morakniv; the 106 spec sheet lists 26 to 28 total |
| Scandi knives, SharpeningSupplies' guide | 12° (up to 2.5 mm), 14° (thicker) | 24° to 28° | SharpeningSupplies |
| Sloyd knife, flat bevel | about 12.5° | about 25° included | Hewn and Hone, Woodworkers Institute |
| Mora hook knife 162 or 164, cutting edge | 12° to 13° | 24° to 26° | Morakniv (the body grind is 9 to 11 total) |
| Chip carving knife | 8° to 10° | 16° to 20° (derived) | Fine Woodworking |
| Carving chisels (for comparison) | 20° bevel on both sides | n/a | Woodcraft |
Per-side figures for the Mora hook and the Hewn and Hone bevel are the published totals halved.
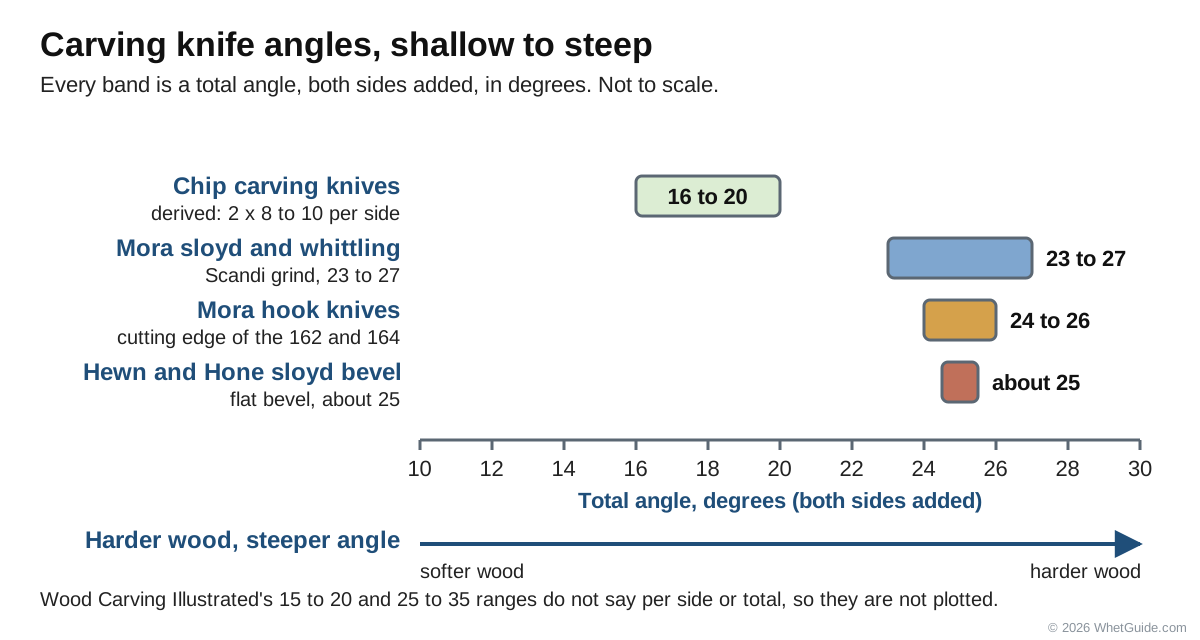
Harder wood, steeper edge
Wood Carving Illustrated's Hand Sharpening Made Simple says carvers each have favorite angles, and the rule underneath them is to raise the angle as the wood gets harder, because a low bevel won't hold up as long in hardwood. Its rule of thumb is 15 to 20 degrees for soft woods such as basswood and pine and 25 to 35 for hard woods such as oak and walnut. The article doesn't say whether those are per side or total, so use them as a direction, not a setting. On a Scandi knife you can't change the angle much anyway without regrinding the whole bevel. If a knife at the factory angle keeps chipping in hard, dry wood, add a tiny micro bevel (see micro-bevels) instead.
How to tell what angle your knife is
- The marker test. Color the bevel, take one light stroke on a fine stone, and look. Ink gone evenly from shoulder to edge: you're on the existing bevel. Gone only at the edge: you're steeper than the bevel. Gone only at the shoulder: lower. Morakniv describes this exact method, and our Sharpie trick guide walks through it.
- A digital angle finder, which Hewn and Hone suggests. Zero it on the stone, then rest it on the blade.
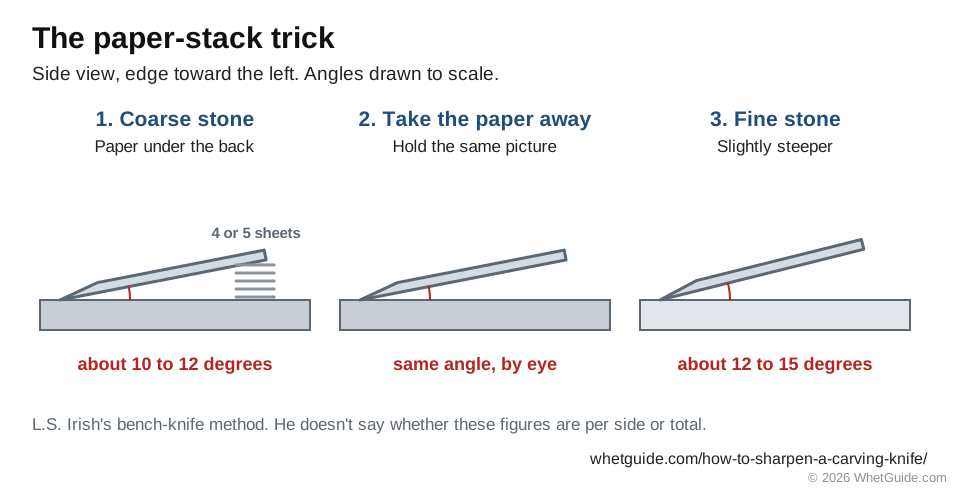
- The paper stack. For a small bench knife on a coarse stone, L.S. Irish slips about four or five sheets of typing paper under the back edge of the blade to get roughly 10 to 12 degrees, then takes them away and holds the picture. That's his rule of thumb for chip and bench knives, and he doesn't say per side or total.
- The coin check. Garrett Wade sharpens carving knives on sandpaper at about 11 degrees and checks the angle with a nickel: if a nickel just passes under the blade, the angle is right. Garrett Wade doesn't say per side or total, or which part of the blade it measures from, so treat it as a quick check, not a spec.
- The math. If you know the blade's width and the angle you want, our angle calculator gives the spine height. The knife sharpening angle chart lists makers' figures for other knives.
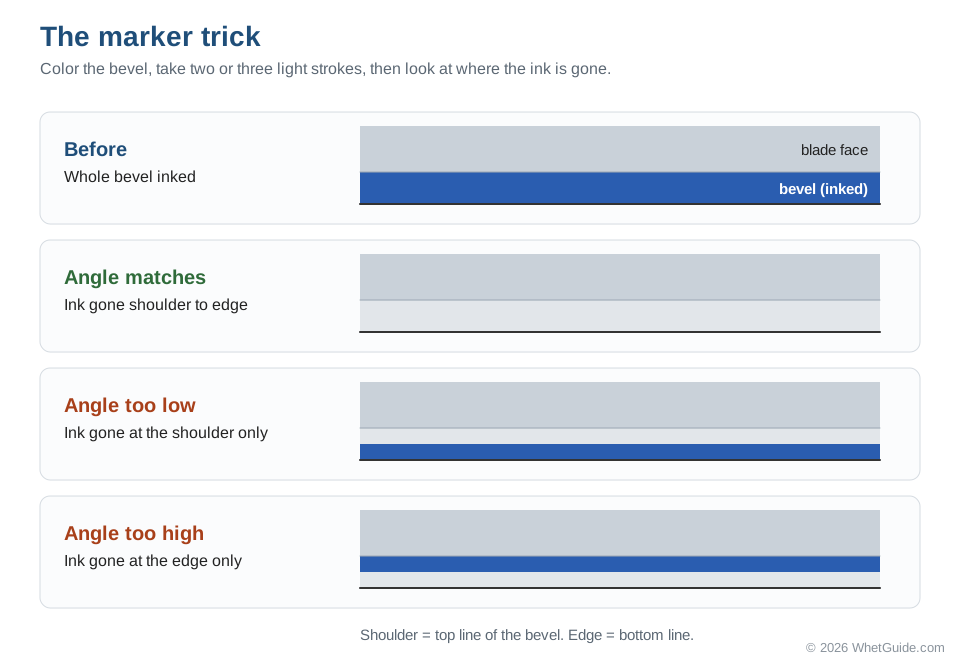
Sharpening at the wrong angle has a feel. Too steep, and the knife has to be tilted up before it bites, so long controlled cuts become a fight. Too low, and the edge folds or chips in knots and hard wood. Wandering between the two gives you a rounded bevel, which is the worst of both.
↑ Back to all sectionsWhat you need: sandpaper, stones or both?
Three routes all end at the same edge. Pick by budget and by which knives you own.
Route 1 · Sandpaper on glass
Cheapest start, and the easiest way to do curved blades. A flat pane of glass or MDF, wet/dry paper from coarse to fine, a spray bottle. The paper wears out, so you keep buying it.
Route 2 · Stones and plates
Faster, and it lasts for years. A diamond plate for repairs, a medium and a fine stone for the edge. Water stones need flattening; diamond plates don't.
Route 3 · Strop only
For a knife that's already sharp. Leather on a paddle or board, loaded with compound. This is most of your upkeep, whichever route you sharpen with.
For every route
A permanent marker and good light. The marker shows where you're cutting; the light shows dull spots on the edge as bright reflections.
Robin Wood, who has taught woodcarving sharpening courses, has made the point that an inexpensive setup gives a fine edge in good hands. Technique beats kit. The gear list below names specific products.
↑ Back to all sectionsThe sandpaper-on-glass method, step by step
The setup here follows Wood Carving Illustrated's Basics of Sharpening: wet/dry paper on glass, a short grit ladder, then the strop. The stroke is the edge-trailing one the Green Wood Guild teaches, and I'll explain below how it differs from Wood Carving Illustrated's. It works for any straight carving knife and is the backup method for everything else.
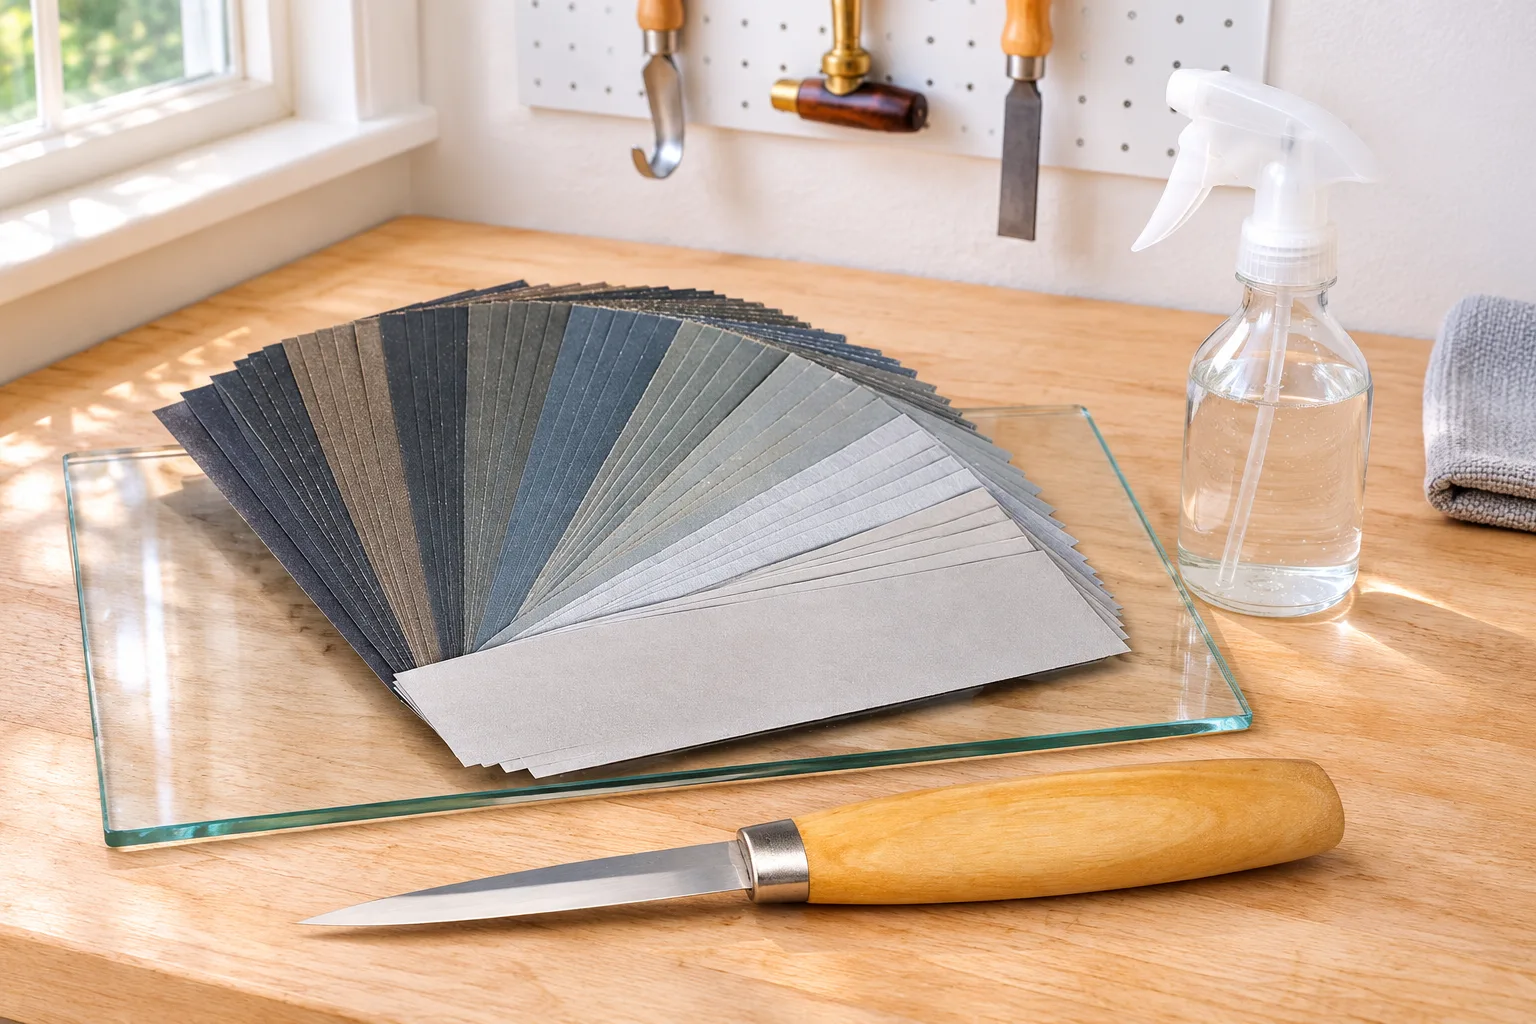
Set up
- A flat backing. Wood Carving Illustrated suggests glass about 1/4 in. thick and about 6 by 12 in., or a piece of MDF. Tape the edges of the glass or have the edges ground so they don't cut you.
- Wet/dry sandpaper in 6 in. strips, one strip per grit: 200 to 320 to set the bevel, then 400, then 600. Add 1000 and finer if you want a polished edge; Wood Carving Illustrated finishes with 1200 paper or a hard black Arkansas stone.
- Spray adhesive to hold each strip down, or a spritz of water under the paper, which holds it surprisingly well.
- A spray bottle of water. Wet paper cuts cleaner and doesn't clog as fast.
- A permanent marker.
Sharpen
- Color both bevels with the marker.
- Lay the knife on the coarsest strip with the bevel flat and the edge facing away from you. Rock it very slightly until you feel the bevel settle flat; that's the angle.
- Press on the bevel with two fingertips and pull the knife toward you, spine first, so the edge trails. The Green Wood Guild says never to push toward the cutting edge on paper. An edge-first stroke that wobbles digs in and slices the strip.
- Sweep the knife sideways as you pull so the whole length of the edge, from heel to tip, passes over the paper. Lift the handle slightly as the curved tip reaches the paper.
- Check the ink after a few strokes. Ink gone evenly across the bevel means you're flat. Ink left at the edge means you're riding the shoulder; ink left at the shoulder means you've lifted the spine.
- Keep going until the bevel shows bright fresh metal along its whole length and you can feel a burr on the other side. Count your strokes.
- Turn the knife over and do the other side with the same number of strokes.
- Move to the next grit. Each grit only needs to replace the scratches from the one before, so it takes fewer strokes. Wipe the blade between grits so coarse grit doesn't ride onto the fine paper.
- Finish on a strop (see stropping).
Push or pull on sandpaper? How Wood Carving Illustrated does it
Wood Carving Illustrated does it the other way round. Its steps push the knife away from you toward the cutting edge on one side, then pull it toward the cutting edge on the other, so the edge leads on both. It also lifts the back of the blade about 1/32 in. (1 mm) off the paper and holds that lift the whole time, on the paper and again on the strop. That lift is a deliberate small secondary bevel at the very edge.
Both ways work. Here's the trade-off:
- Edge leading with a 1 mm lift (Wood Carving Illustrated). Edge-first strokes are easy to aim, and the lift means you only grind a narrow strip at the edge, so it's fast. The cost is a small second bevel that grows every session, which is the steering problem covered in micro-bevels. Light pressure matters, or the edge bites into the paper.
- Edge trailing with the bevel flat (Green Wood Guild, Westermann). It can't slice the paper, it keeps the Scandi bevel as one flat face, and it's the same motion you'll use on the strop. It's slower, because you're grinding the whole bevel.
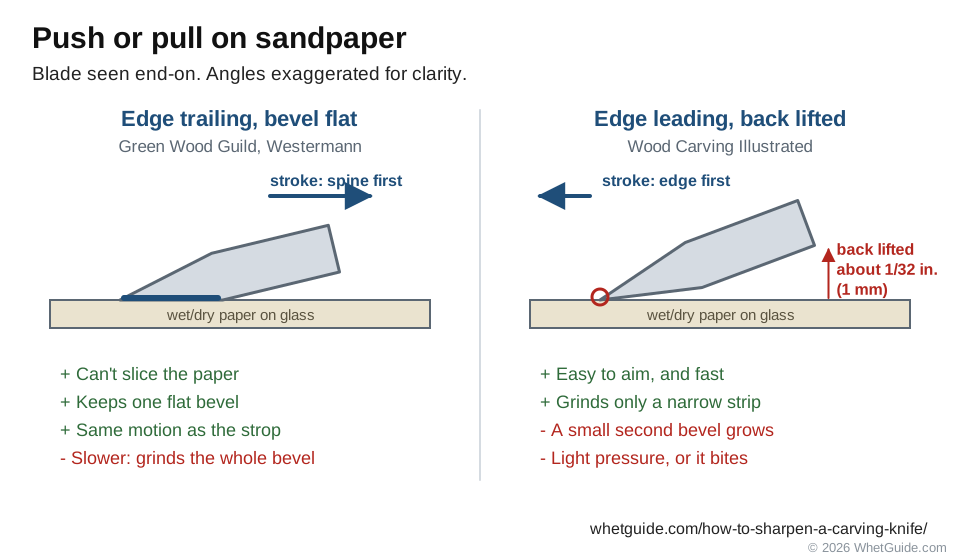
My advice for a first knife: edge trailing with the bevel flat. Once you can hold an angle without thinking, try Wood Carving Illustrated's way on a knife you use for hard wood and see whether you like the tougher edge.
Don't skip grits. Going from 320 straight to 1000 leaves deep scratches the fine paper takes ages to remove, and the edge will feel sharp and then crumble. The Green Wood Guild's grit advice makes the same point: no skipping.
↑ Back to all sectionsStones, diamond plates and which grit to start on
A stone does the same job as sandpaper, faster and for years. The grit you start on depends on the edge you have, not on the knife.
| The edge you have | Start on | Then | Source |
|---|---|---|---|
| Chipped or nicked | About 400 | 800 to 1500, then strop | Green Wood Guild |
| Rounded bevel that needs flattening | About 300 (diamond) | Up through the grits | Hewn and Hone |
| Normal wear: drags, stropping no longer helps | 800 to 1500 | Finer if you like, then strop | Green Wood Guild |
| Still pretty sharp | 2000 to 3000 | Strop | Green Wood Guild |
| Hollow-ground blade, routine upkeep | 2000 to 3000 | About 5000 to 8000 | Hewn and Hone |
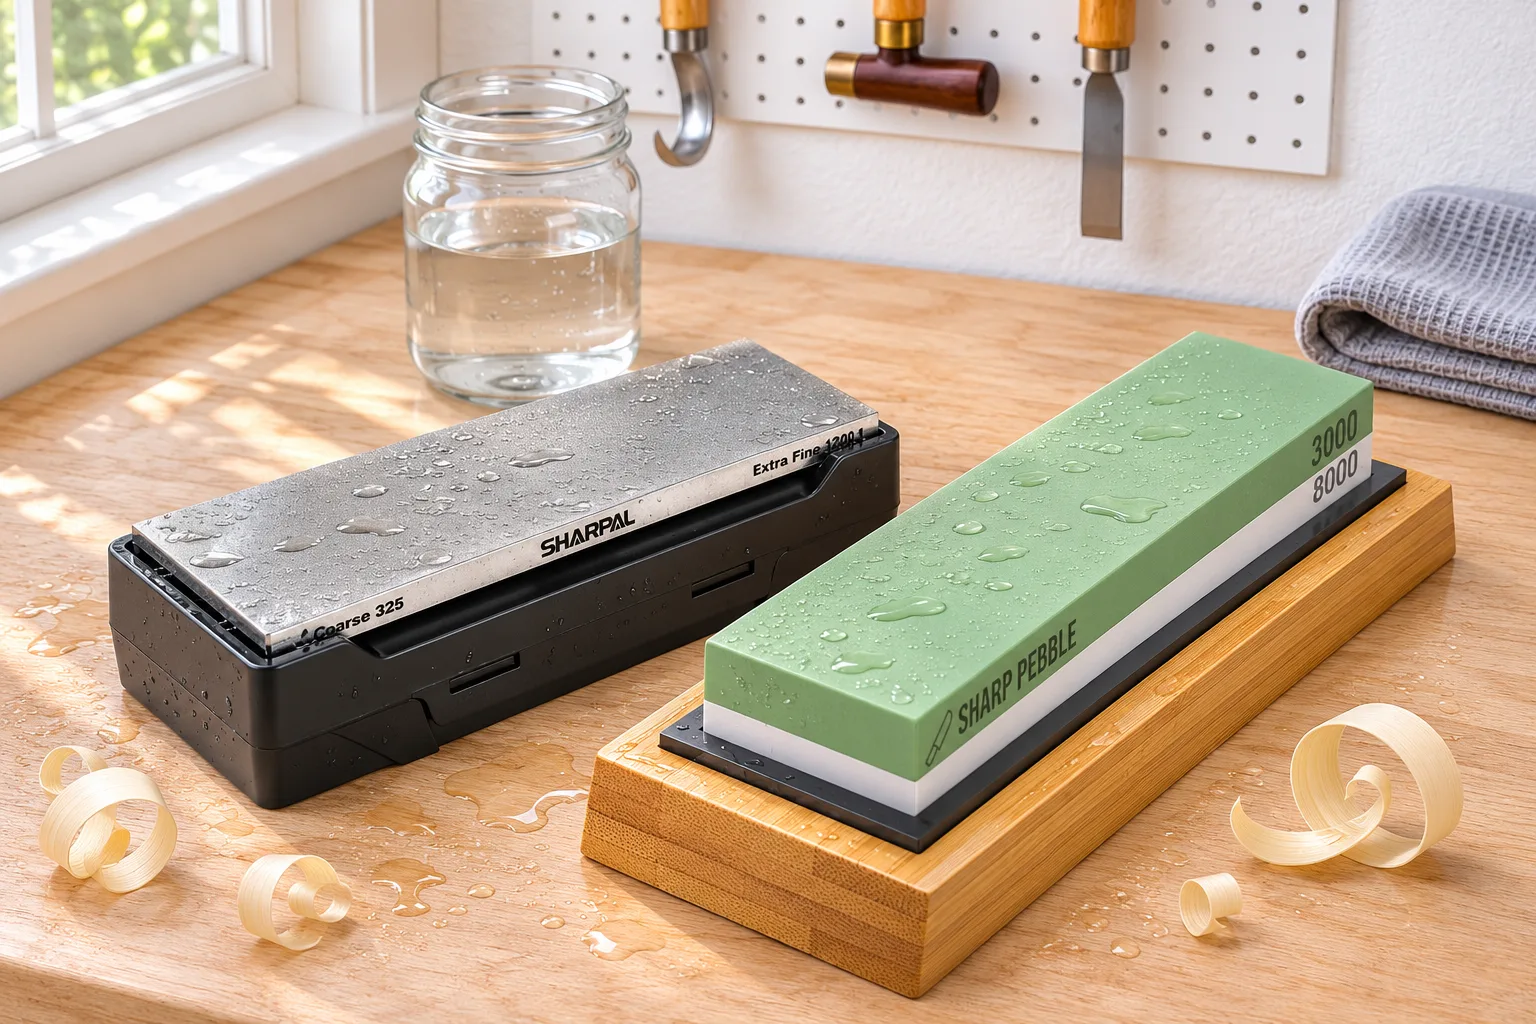
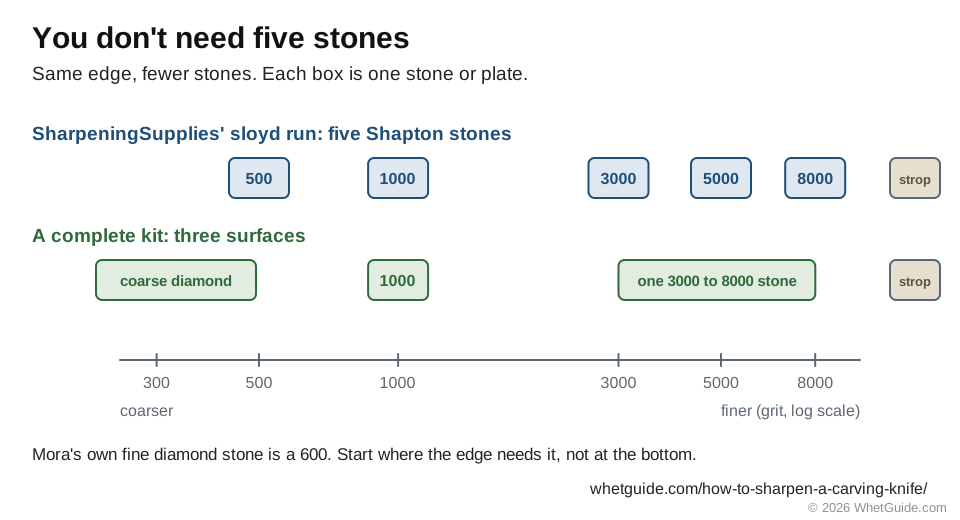
For comparison, SharpeningSupplies' sloyd article works through Shapton stones of 500, 1000, 3000, 5000 and 8000 before the strop. You don't need five stones. A coarse diamond plate plus a 1000 and a 3000 to 8000 stone is a complete kit, and Mora's own fine diamond stone is a 600. Our sharpening stone grit chart converts between Japanese and Western grit scales.
| Stone type | For carving knives | Lubricant |
|---|---|---|
| Diamond plate | Fast, stays flat, handles any steel. Best for repairs and for flattening a rounded bevel. Also flattens your water stones. | Water, or dry |
| Water stone | Fast and fine. Wears into a dish, which rounds a Scandi bevel, so it needs regular flattening (how to flatten a whetstone). | Water |
| Oil stone (Arkansas, India) | Slower, very durable. Hard black Arkansas is a traditional finishing stone for carvers (Arkansas guide). | Honing oil |
| Ceramic | Hard, slow, fine. L.S. Irish uses a coarse and a fine white ceramic for bench knives. | Usually dry |
Wood Carving Illustrated prefers water stones over oil stones for carvers, partly because oil stains wood. If you use an oil stone, wipe the blade before it touches your carving.
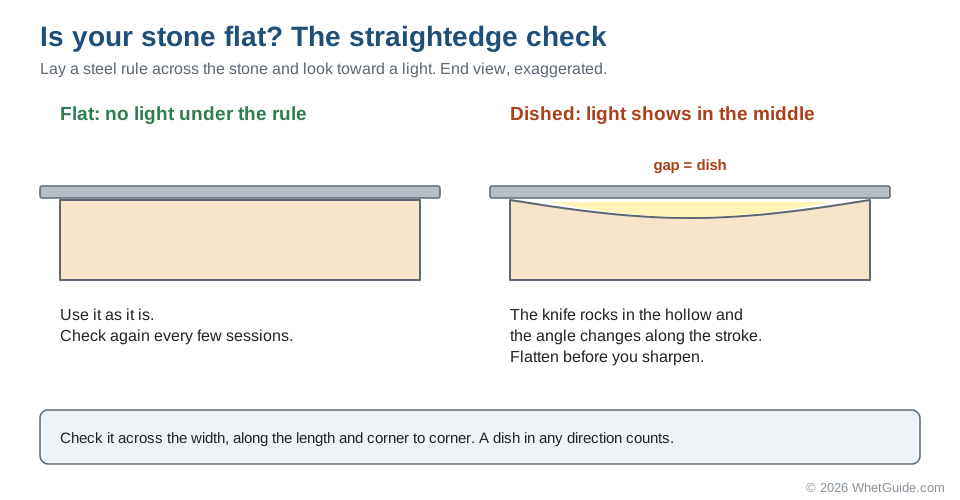
Keep the stone flat. A Scandi bevel is only as flat as the surface under it, and a dished stone puts a convex bevel on a knife in a few sessions. Check it with a straightedge every session or two. For full stone technique, see how to use a whetstone.
How to sharpen a sloyd knife (Scandi grind)
Sloyd comes from the Swedish word slöjd, meaning handcraft, and a sloyd knife is the straight carving knife of the green-woodworking tradition: a Mora 106 or 120, a hand-forged blade from a smith such as the Djarv family in Sweden, or a Scandi-ground bushcraft knife. They all sharpen the same way, because they all have the same flat bevel.
The steps below follow the sequence in SharpeningSupplies' Sharpening a Sloyd Carving Knife (on a Mora 106) and the Green Wood Guild's straight-knife guide.
- Color the bevel and set the stone or paper on a non-slip base. Wet a water stone; diamond plates can run wet or dry.
- Lay the bevel flat. Put the knife on the stone and roll it slightly on the bevel until you feel it seat: the shoulder and the edge both touching, the ink about to come off evenly. That feel is the whole technique. You're not holding an angle in the air.
- Put your pressure on the bevel. Two or three fingertips of your free hand go on the blade face right over the bevel, pressing it flat. Press too far up the blade and you lift the edge; press on the edge and you round it.
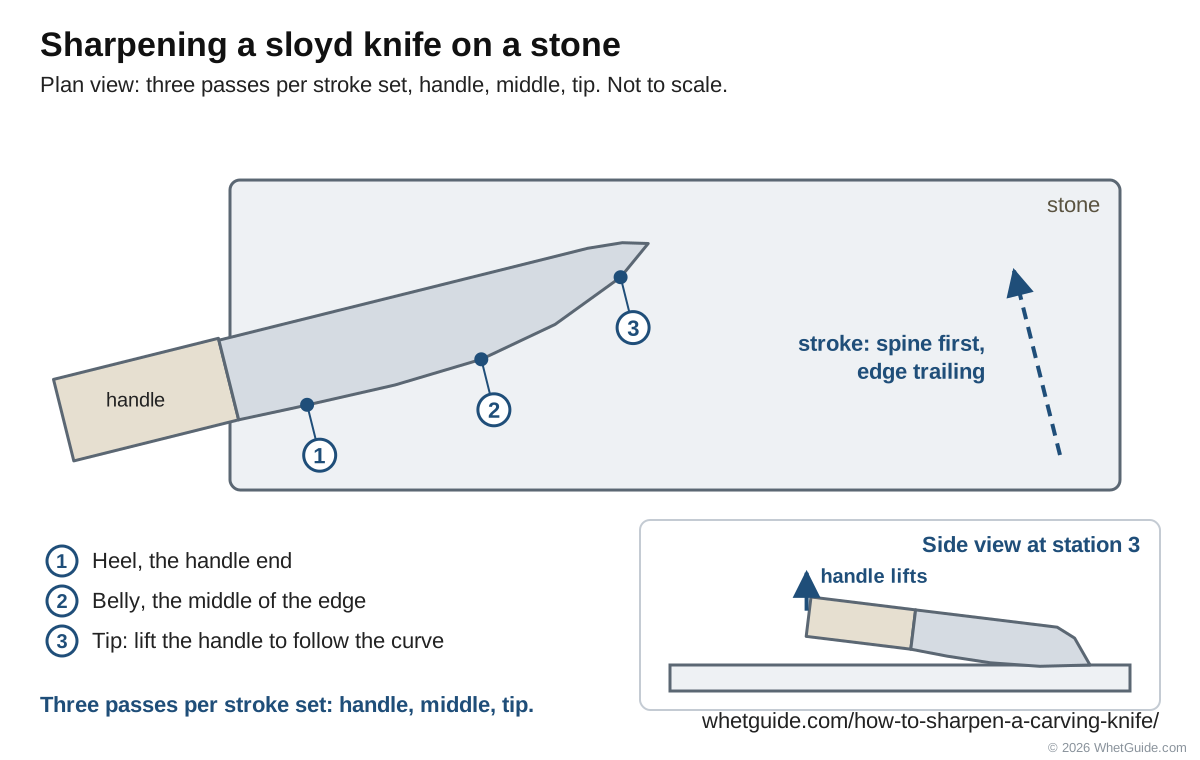
- Work in three passes. SharpeningSupplies uses three: the part near the handle, the middle, then the tip. For each, draw the knife edge-trailing (spine first) diagonally across the stone.
- Lift the handle for the tip. As the curved part reaches the stone, raise the handle just enough that the curve stays flat on its bevel. The Green Wood Guild says to sharpen the area near the handle with the knife at a right angle to the stone, so the edge at the heel gets the same treatment as the middle.
- Check the ink, then raise a burr. Keep going until the ink is gone from the whole bevel and a burr runs the whole edge. SharpeningSupplies checks with a fingernail drawn off the edge, or looks at the scratch pattern.
- Same number of strokes on the other side. The Green Wood Guild's point is that the bur should be raised by taking even material from both sides, never by over-grinding one.
- Work up the grits, fewer strokes on each, until the bevel is evenly polished.
- Finish and strop. SharpeningSupplies finishes the 106 at 8000, then strops on green compound.
Some carvers start each stroke with the very tip on the stone, so the point can't dig in at the end of the stroke. Others use a "stab" stroke, where the knife is pushed straight down the stone with the edge leading. Hewn and Hone describes it, but it gouges soft stones and needs a lot of control. Edge-trailing strokes are the safer default.
The feel to learn: when the bevel is flat on the stone, the knife glides with a smooth, even hiss. If it chatters or skates, you've tipped onto the edge or the shoulder.
Scandi Grind Zero vs Scandi with micro bevel
Mora calls the Scandi Grind Zero (on the 105, 106, 120 and 122, among others) a sharper, more aggressive edge for woodworking that is more delicate and demanding to maintain. Keep it zero: strop with the bevel dead flat, and when you go back to the stone, work the whole bevel. Other Mora knives ship with the micro bevel. If you want to keep one, sharpen the main bevel flat, then add a few very light strokes with the spine lifted slightly. Or take it off and go zero. See micro-bevels for which to choose.
Hollow-ground sloyd knives
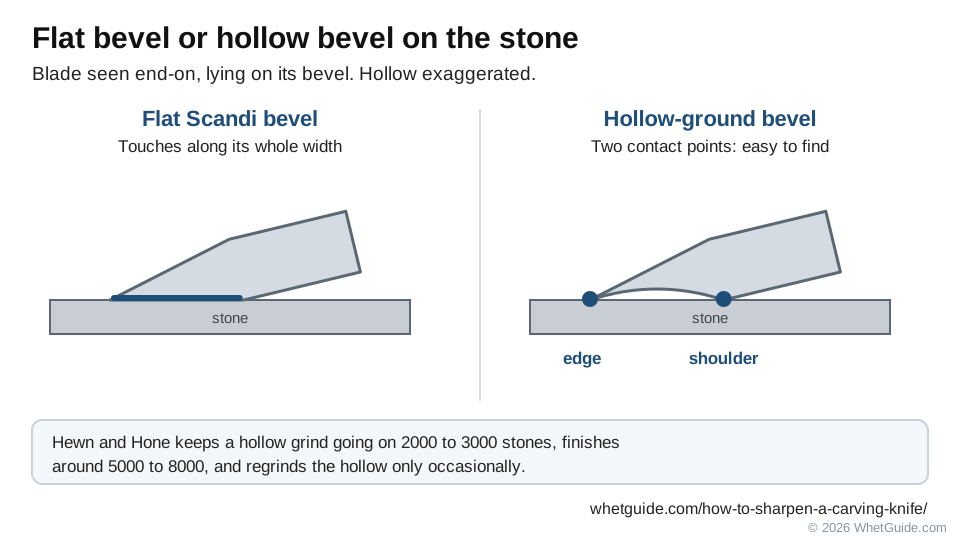
A slightly hollow bevel touches the stone at two points, the shoulder and the edge, which makes it easy to find and hold. Hewn and Hone's method is to keep a hollow grind going on 2000 to 3000 stones and finish around 5000 to 8000, regrinding the hollow only occasionally.
How to sharpen a whittling knife
A whittling knife is any small knife for carving by hand: a fixed-blade bench knife, a Flexcut detail knife, or a pocketknife with a carving blade. If it has a flat Scandi bevel, sharpen it exactly like a sloyd knife. If it has a small V bevel like a pocketknife, use this five-step version.
- Grind the first bevel. Color the bevel and find the angle with the marker. On a coarse stone or 320 to 400 paper, edge-trailing strokes from heel to tip until the ink is gone. L.S. Irish holds about 10 to 12 degrees on the coarse stone for bench knives, set with his paper-stack trick (he doesn't say per side or total).
- Check for the burr. Feel for it on the other side, along the whole edge. No burr at the tip means the tip isn't sharp yet.
- Switch sides, then switch to a finer grit. Same number of strokes on each side, then repeat on the fine stone. L.S. Irish goes slightly steeper on the fine stone, about 12 to 15, which takes off the thin "tin edge" the coarse stone leaves.
- Strop. About 15 strokes per side on leather with compound is L.S. Irish's figure.
- Test on carving wood. Slice a scrap of basswood across the grain. A clean, shiny cut that takes a thin curl means you're done. Paper and fingernail tests tell you less about how the knife will carve than a cut in the wood you carve.
Time: L.S. Irish says a new bench knife can take up to about 15 minutes on the coarse stone and 10 to 15 on the fine one the first time. After that, the knife lives on the strop.
For a folding pocketknife, the general method in how to sharpen a pocket knife applies, and a guided system can hold the angle. For a craft knife with replaceable blades, see how to sharpen an X-Acto knife. If you whittle caricatures, ornaments or roughouts in basswood, the knife will stay sharp a long time between stone sessions as long as you strop.
↑ Back to all sectionsRaising, feeling and removing the burr
The burr is a thin lip of steel that folds over to the far side when the two bevels meet at the edge. It's your proof that you've reached the edge. No burr, no sharp knife, however long you've worked.
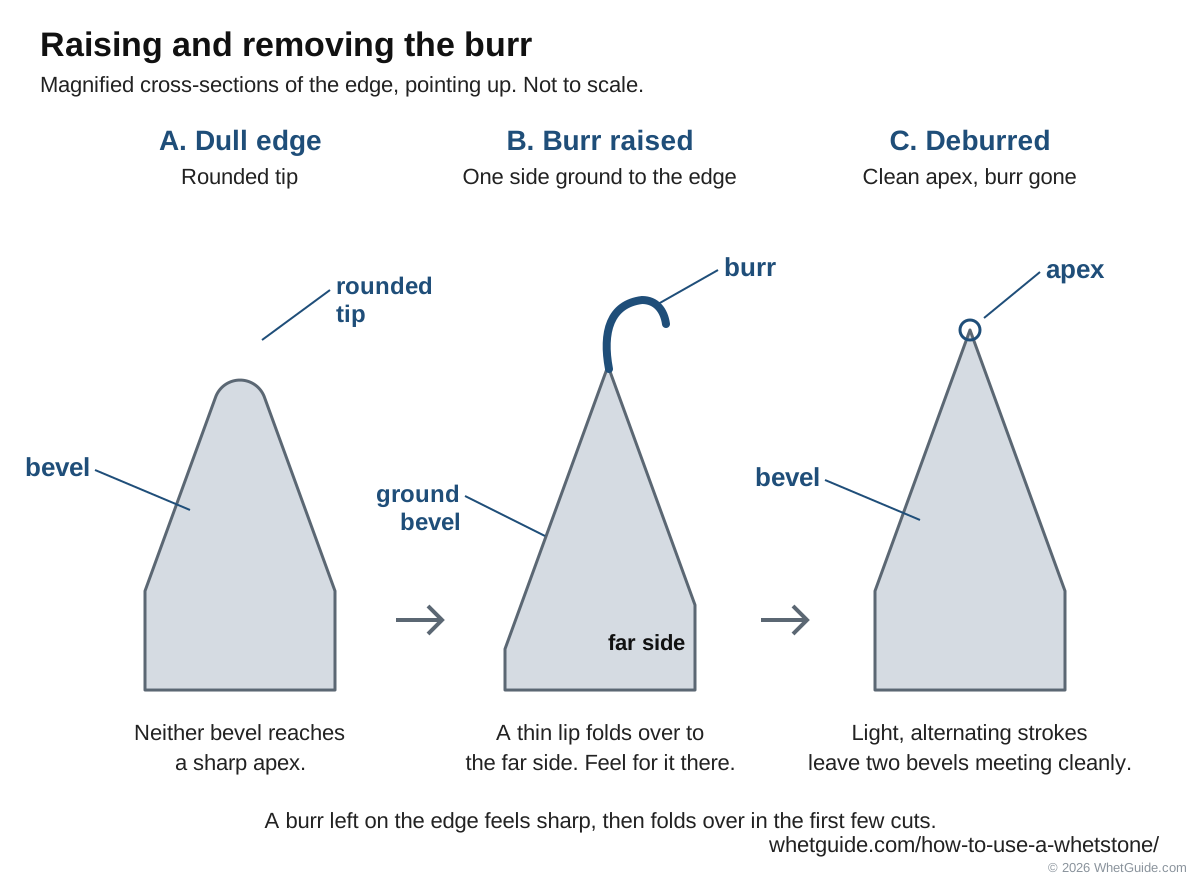
- How to feel it. Brush a fingertip gently off the edge, from the spine side toward the edge, on the side you weren't sharpening. Never along the edge. The Green Wood Guild says the same: brush away from the edge. A burr feels like a slight catch.
- Where to check. Heel, middle and tip separately. The tip is where it's usually missing.
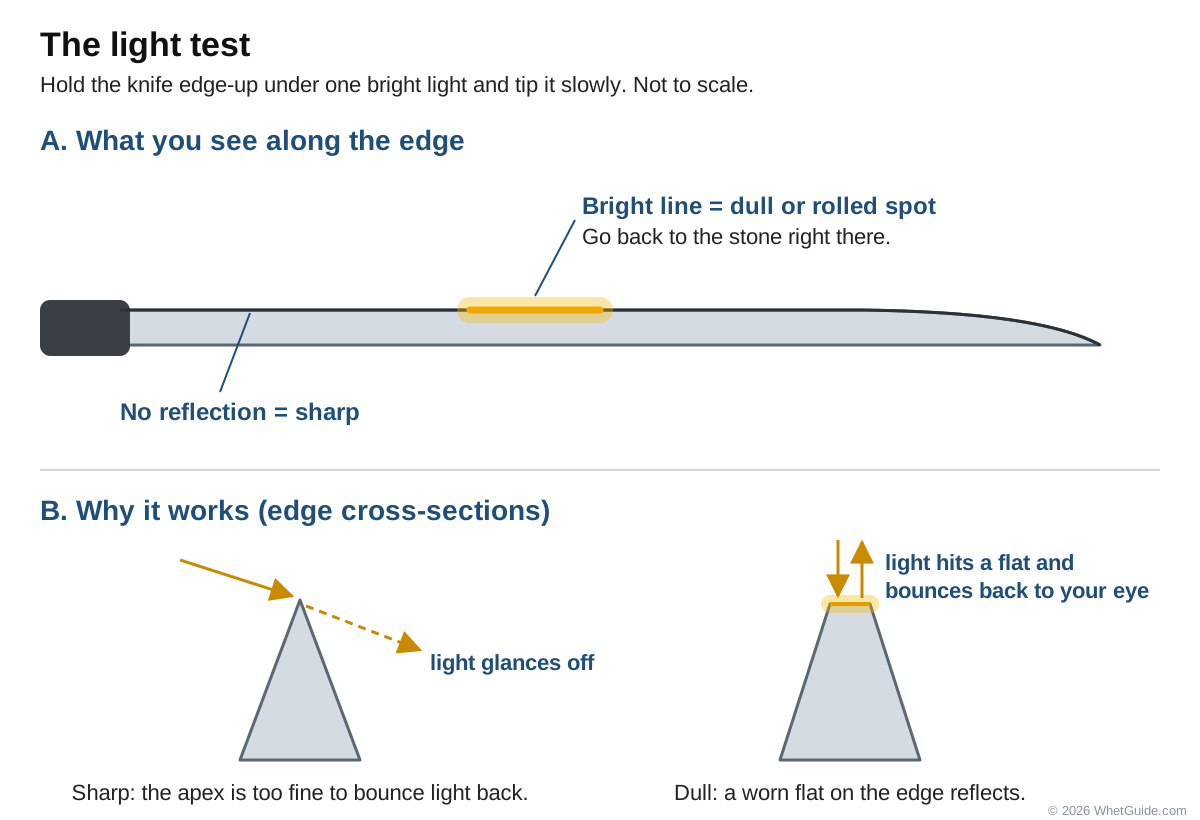
- How to see it. L.S. Irish judges the burr, which he calls a tin edge, by light, not by touch: "If you can see the edge of the tool, it's not sharp yet." Hold the edge under a single bright light. A bright line or glinting specks mark a burr or a dull spot.
- On fine grits, the burr gets too small to feel. Look at the scratch pattern instead: when the scratches from this grit run evenly to the very edge, you're done on that stone.
To remove it, drop to lighter pressure and alternate sides with fewer strokes, then strop. Wood Carving Illustrated warns that a leftover burr tears the wood instead of cutting it, and that tracks or lines in the compound on your strop mean a burr is still there. The full story is in our guide to the sharpening burr.
↑ Back to all sectionsHow to strop a carving knife
Stropping is where carving knives stay sharp. Flexcut's whole maintenance routine for its tools is periodic stropping of both sides with compound, and it says stones are too coarse for routine upkeep because they scratch the polished edge. Get stropping right and you'll rarely need a stone. Get it wrong and the strop slowly rounds every knife you own.
Step by step
- Load the strop. Rub the compound bar onto the leather like a crayon until there's a thin, even coat, then warm it with your hand or rub it in with a finger. A thin coat cuts better than a thick, gummy one. Wood Carving Illustrated says the exact compound grit doesn't matter much for carving knives.
- Lay the bevel flat on the strop. On a Scandi knife, flat means flat: the same feel as on the stone.
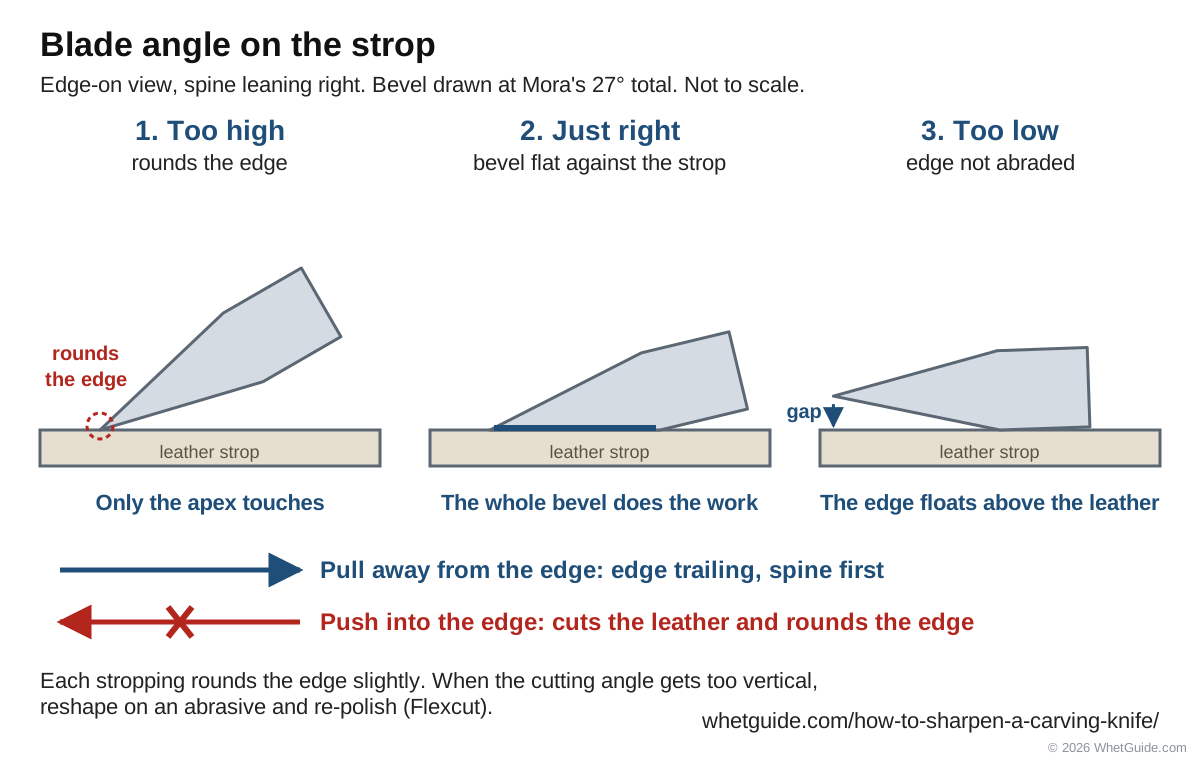
- Pull, spine first. The edge trails behind. Wood Carving Illustrated is blunt about it: don't push the blade toward the cutting edge, or you'll damage the strop and round the edge.
- Light pressure. You're polishing, not grinding. Press harder and the leather dips around the edge, which rounds it.
- Alternate sides. Several strokes on one side, the same on the other, then fewer, then single alternating strokes. L.S. Irish uses about 15 strokes per side on a bench knife. On a Scandi bevel, SharpeningSupplies' Scandi guide suggests about a minute per bevel on the strop.
- Check. Slice end grain. If the cut is shiny and the knife takes a thin curl, go carve.
The angle on the strop
Flexcut puts it in two sentences: "If the angle of the bevel against the strop is too high, it will round prematurely. If it is too low, the edge will not be properly abraded." For a Scandi or flat-bevel knife the answer is simple: lay the bevel as flat against the strop as you can. You'll see angle figures for stropping on blogs; ignore them for a flat-bevel knife, because the bevel itself is the angle.
Flexcut adds a warning that matters for everyone: each stropping rounds the edge very slightly. Over months, that adds up. When the knife's cutting angle has crept up so far that you have to hold it too steeply to cut, the strop can't fix it. Flatten the bevel back to its original angle on an abrasive and polish again.
Compound, leather and other strops
- Compound. Green chromium oxide is the common choice. Flexcut sells its own gold compound for its tools. Fine Woodworking uses a yellow compound on chip knives. Wood Carving Illustrated's view is that the specific compound matters less than using one, and its whittling-prep article notes that powdered stropping compound sells at hardware and auto-parts stores.
- Leather. A paddle strop (leather on a wooden paddle) is the easiest to control. L.S. Irish strops on rough leather first, then smooth.
- Thin leather, no oil. A Wood Carving Illustrated quick-steps article uses very thin leather with the fuzzy side out, never oils it, and rubs the compound in with the back of the knife. That strop is 2 1/2 in. wide and 10 1/2 in. long, a handy size to copy.
- Make one from a belt. Wood Carving Illustrated's basics article glues a piece of leather, such as an old belt, to a flat piece of wood with the rough side up. Add a little compound and it's a working strop.
- MDF or wood. Compound on MDF is harder than leather and rounds the edge less. The Green Wood Guild notes that stropping on MDF with compound does form a slight micro bevel.
- Contoured strops. Flexcut's SlipStrop has the inside profiles of gouges and V-tools molded into one side and a flat side for the outside of the edge.
- Newspaper or card. In a pinch, a few edge-trailing strokes on newspaper over a flat surface. L.S. Irish uses newspaper as a final polish on bench knives.
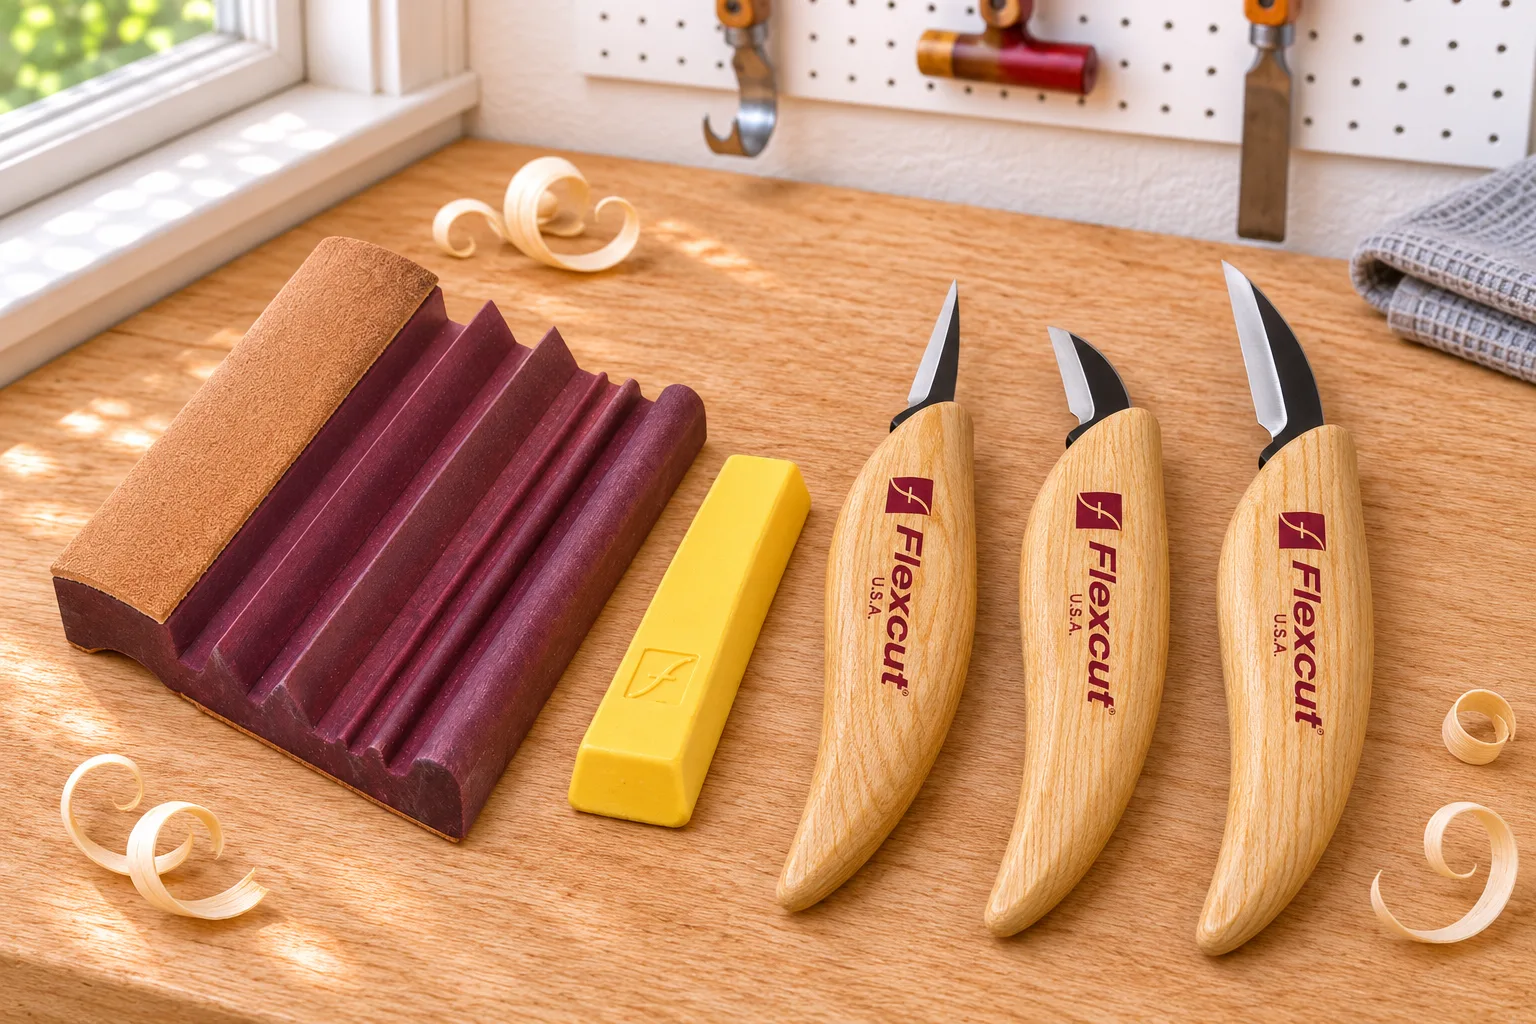
Wood Carving Illustrated suggests stropping at the start of each carving day, partly to drive off any moisture on the edge. During a session, strop whenever the knife starts to drag. Don't worry when the leather turns black: Garrett Wade reads a blackening strop as a sign the blade is getting sharper. Tracks or lines in the compound are different. Wood Carving Illustrated says those mean a burr is still on the edge, so go back to the burr step. More on bare vs loaded leather, how to clean a strop and making your own in how to strop a knife, and on choosing one in best leather strop.
↑ Back to all sectionsMicro-bevels and rounding: who's right
Ask five carvers whether a micro bevel is good and you'll get five answers, and the published sources split the same way:
- Morakniv puts a micro bevel of about 35 to 45 degrees total (0.05 to 0.5 mm high) on many Scandi knives, and deliberately leaves it off its carving knives, calling the zero grind sharper but more delicate and demanding to maintain.
- The Green Wood Guild calls a micro bevel good on a carving knife and labels one at 25 degrees on its diagram.
- Wood Carving Illustrated builds one in on purpose: it holds the spine about 1 mm off the sandpaper and the strop on every stroke, which makes a small secondary bevel at the edge (see push or pull).
- Flexcut tilts its tools slightly when stropping the inside of a gouge to form a slight secondary bevel, for durability and to clear the burr.
- Hewn and Hone warns that repeated stropping builds a micro bevel that weakens the edge, and says to go back to a coarse stone when that happens.
- Woodwork Wizardry, one of the top-ranked carving sharpening guides, says a micro bevel reduces the slicing feel of the knife.
They're describing the same trade-off from different sides. A micro bevel makes the very edge stronger. It also lifts the flat bevel slightly off the wood, so the knife no longer steers on its own bevel and has to be held at a steeper angle to cut. The bigger the micro bevel gets, the worse both effects become.
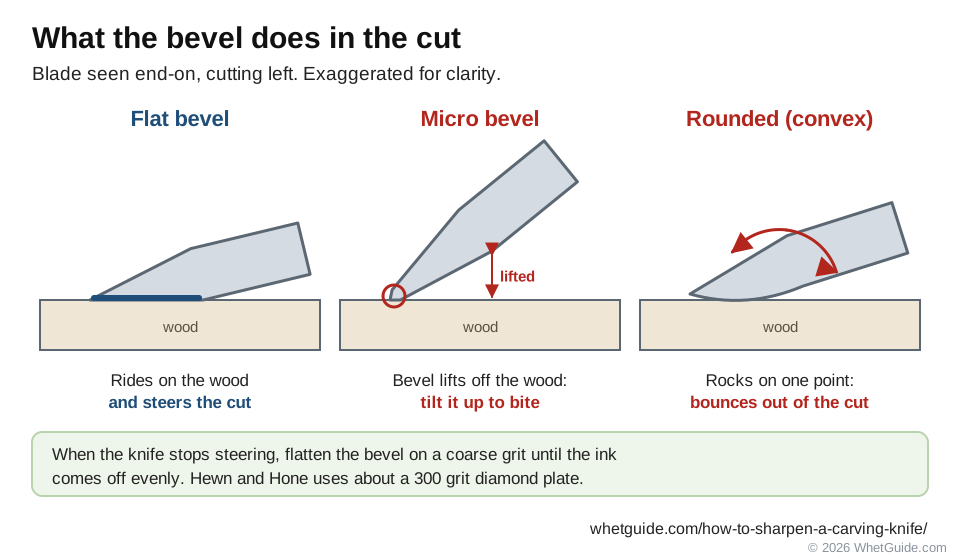
| Your situation | Micro bevel? | Why |
|---|---|---|
| Mora carving knife (Scandi Grind Zero), green wood or basswood | No | The way Mora ground it. Strop with the bevel flat. |
| Mora knife that shipped with a micro bevel | Keep it small, or remove it | Mora designed it in; remove it if you want the knife to steer like a carving knife |
| Edge chips or folds in hard, dry wood | A tiny one | Durability beats steering here; keep it barely visible |
| Knife has to be tilted up to bite; bounces out of the cut | You already have one (from stropping). Remove it. | Flatten the bevel on a coarse grit until the ink comes off evenly |
| Gouges and V-tools (inside edge) | A slight one, as Flexcut does | Strengthens the edge and helps take off the burr |
| Chip carving knife | No; hone the bevels slightly convex instead | Fine Woodworking's method (see chip carving) |
The same logic explains rounding. A bevel goes convex from stropping at too high an angle or with too much pressure on soft leather, and from a dished stone. A slightly convex bevel still cuts, but once it stops steering, flatten it. Hewn and Hone flattens a rounded bevel on about a 300 grit diamond plate.
↑ Back to all sectionsHow to sharpen a hook knife (spoon knife)
A hook knife is the hardest carving knife to sharpen and the one that most needs it, because a dull hook skids in a spoon bowl instead of cutting. You mostly won't use a stone here. You bring curved abrasive to the curved blade: sandpaper wrapped around a dowel.
First, find out which kind of hook you have. Look at the inside of the curve.
Hollow-ground inside
Sharpen the inside only. The inside bevel is slightly dished, so a dowel touches it on two "rails", the shoulder and the edge, and stays put on its own. Anne of All Trades explains the two-point contact. The Spoon Crank and most spoon carvers say to sharpen only the inside and leave the outside flat; just strop it flat to take off the burr.
Flat inside, bevel outside
Inside first, then fix the outside. Many hook knives, including many Mora hooks out of the box, have a flat inside face and a steep bevel on the outside. Sharpen the inside, then flatten or blend the outside bevel so it stops holding the edge off the wood. Anne of All Trades regrinds a steep outside bevel on a belt grinder; BushcraftUK posters blend it by hand on coarse paper.
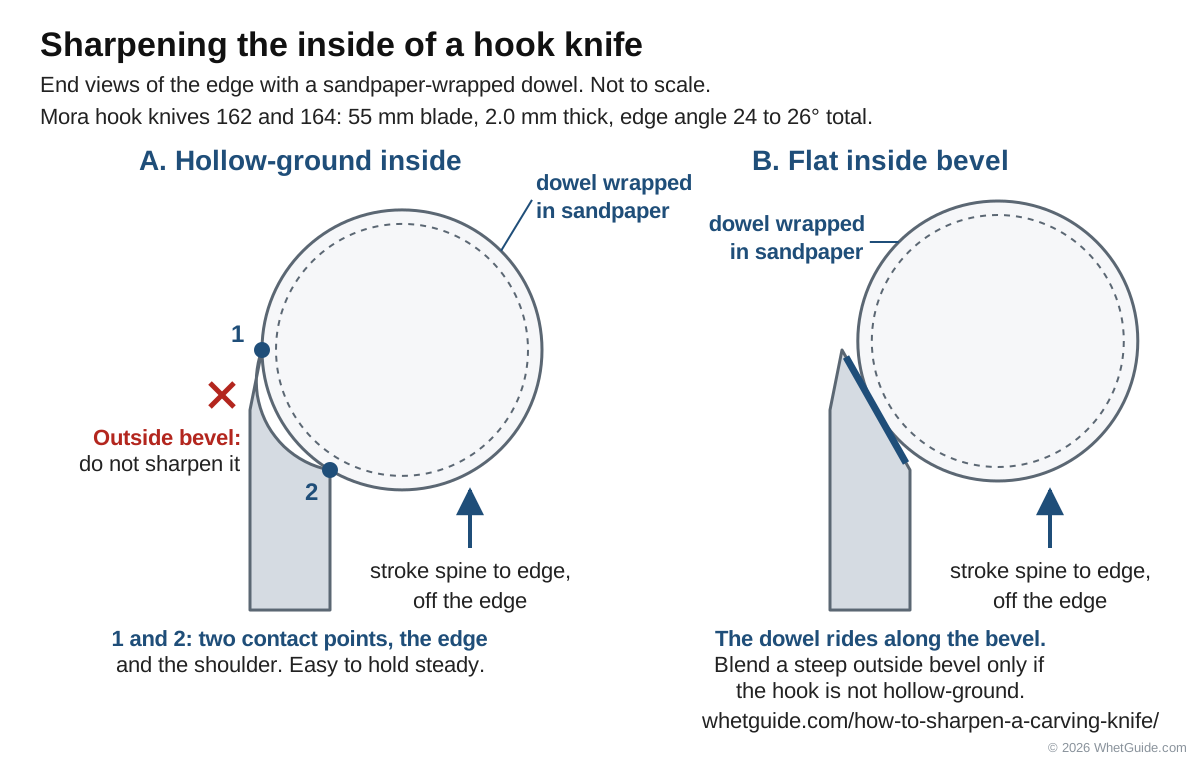
Mora's hook knives 162 and 164 are 12C27 stainless at 56.5 HRC, with a 55 mm blade 2.0 mm thick, a body grind of 9 to 11 degrees total and an edge of 24 to 26 degrees total, per Morakniv's spec sheets. The 164 is ground on one side and comes in right- and left-hand versions; buy the one for your carving hand.
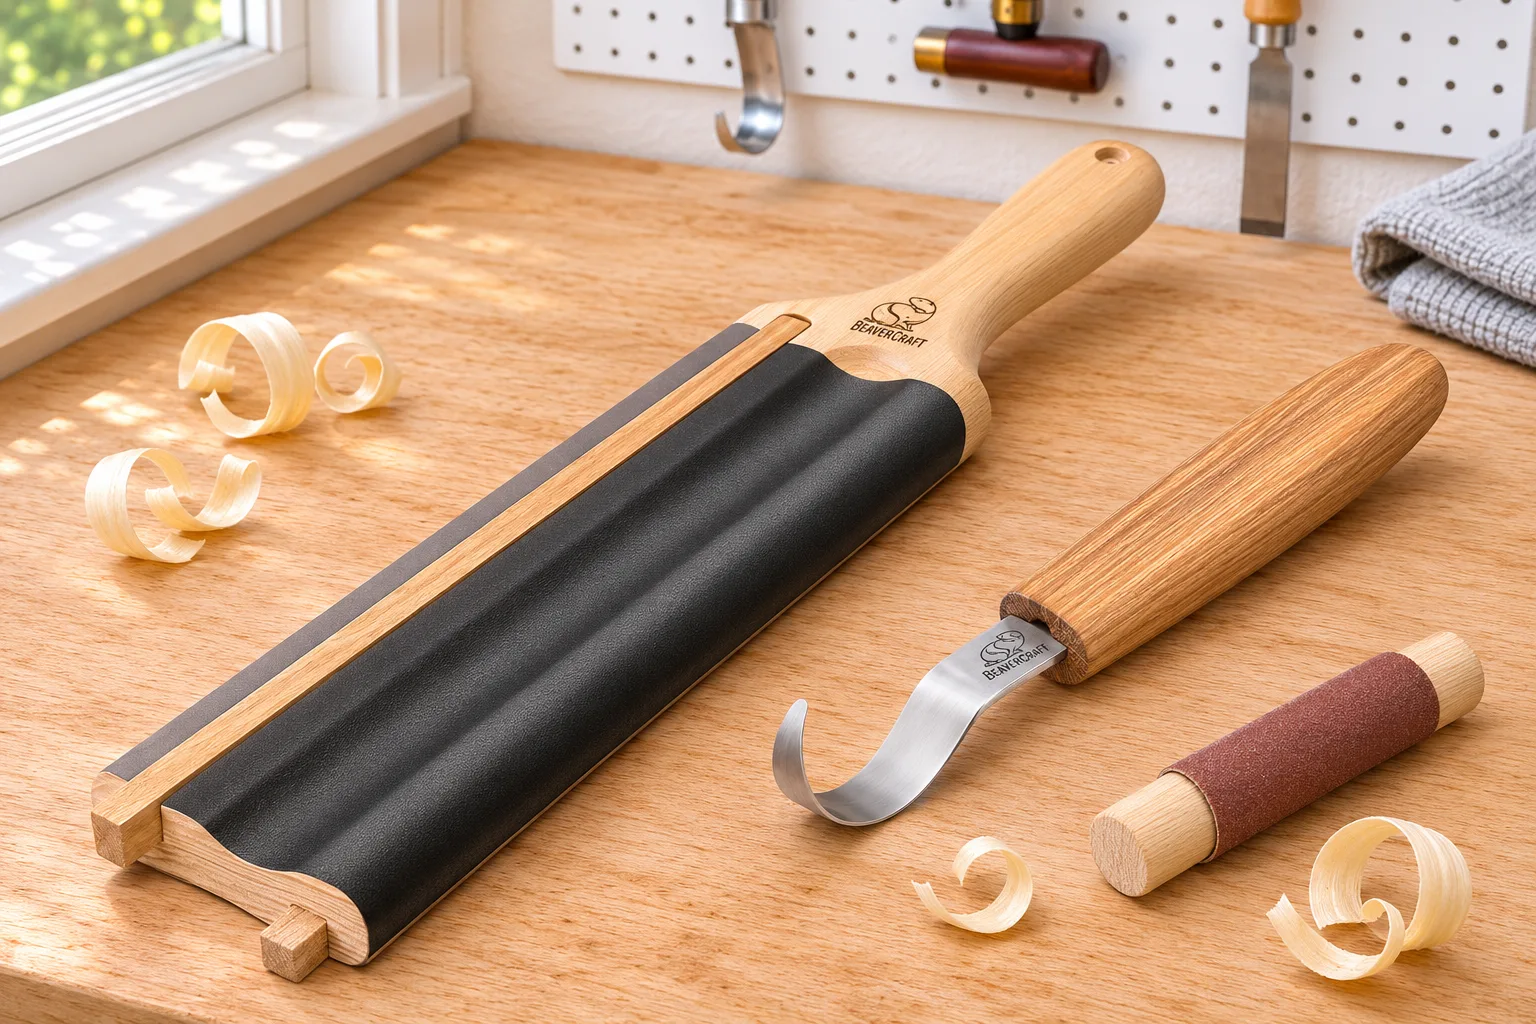
Step by step: the dowel method
- Pick a dowel slightly smaller than the inside curve of the hook, so it touches the bevel without bridging the curve. A tapered dowel fits more hooks.
- Wrap it in wet/dry paper. Self-adhesive paper is easiest; Nic Westermann, the toolmaker, suggests self-adhesive wet/dry on a dowel. Make one dowel per grit. The Spoon Crank uses 400, 800, 1500 and 3000.
- Color the inside bevel with a marker.
- Hold the knife still, edge up, braced against the bench or your knee, with your fingers behind the edge. Lay the dowel in the curve flat on the bevel.
- Stroke from the spine side toward the edge and off it, never into the edge from the cutting side. Westermann and the Green Wood Guild both say to work away from the edge with paper. Move along the curve so every part of the edge gets the same strokes, including the tight end of the hook.
- Check the ink. If it's gone evenly from the inside bevel, you're flat on it. If it's only gone at the edge, roll the dowel slightly toward the spine.
- Feel for a burr on the outside, along the whole curve.
- Take the burr off the outside. Lay the outside of the hook flat on a fine paper or a flat strop and draw it spine first a few times. On a hollow-ground hook, keep it flat: don't create an outside bevel.
- Step through the grits, then strop the inside with leather wrapped around a dowel and the outside on a flat strop.
How far up the grits? Anne of All Trades says stopping around 600 is fine for a working spoon knife. Sean Hellman's older advice for the Mora 164 was 180 grit, then 600, then the strop, and later a longer ladder of 180, 400, 800, 1200 and 2000. Go coarse only for repair.
Stropping a hook knife
For the inside, leather glued round a dowel, or a dowel with compound rubbed straight into the wood. The Spoon Crank uses a round strop for 10 to 15 strokes on the inside. For the outside, a flat paddle strop. BeaverCraft's guide for its paddle strop gives 10 to 15 passes with a small angle and light pressure, and suggests sharpening before each use or every few uses.
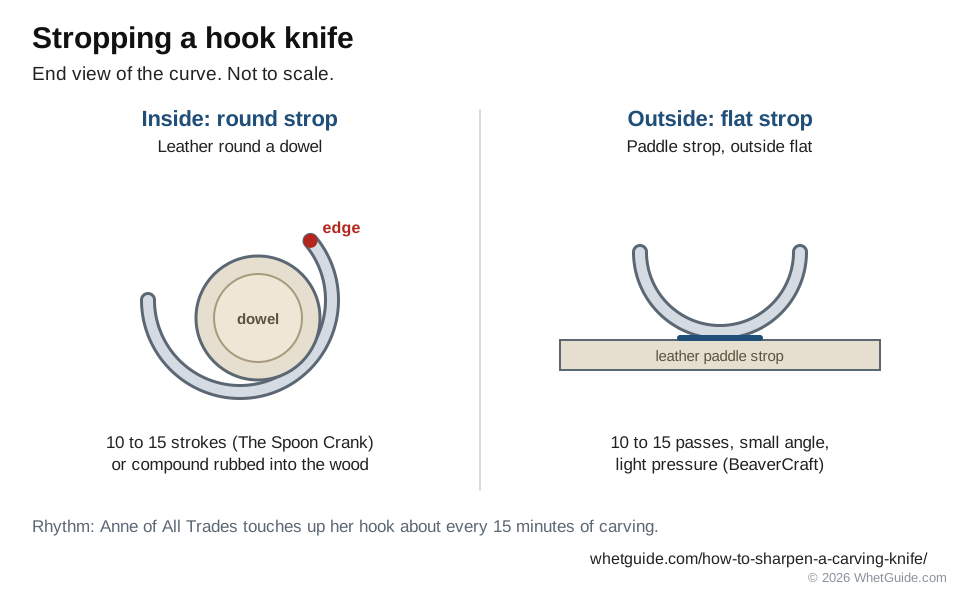
Anne of All Trades touches up her hook knife about every 15 minutes of carving. That's a good rhythm for spoon carving in green wood: a few strokes on the strop before the knife starts to tear.
"I think I ruined my hook knife"
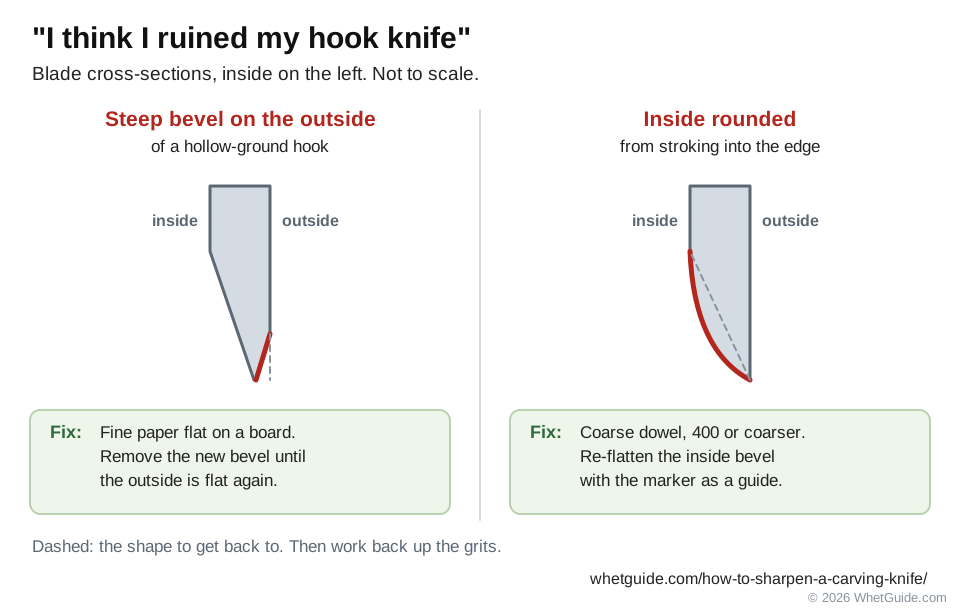
Usually you haven't. The two common ways people spoil a hook are grinding a steep secondary bevel on the outside of a hollow-ground hook, and rounding the inside by stroking into the edge. For the first, go back to the outside with fine paper flat on a board and remove the new bevel until the outside is flat again. For the second, go back to a coarse dowel (400 or coarser) and re-flatten the inside bevel with the marker as your guide. Then work back up. A belt grinder will fix a badly misshapen hook fast, with the cooling caution in power tools.
Double-edged hook knives
Some hooks, such as the Mora 162, are sharpened on both edges of the curve. Sharpen each edge exactly as above, one at a time, and strop both. Be careful which edge faces your hand while you hold the knife.
↑ Back to all sectionsHow to sharpen a crooked knife
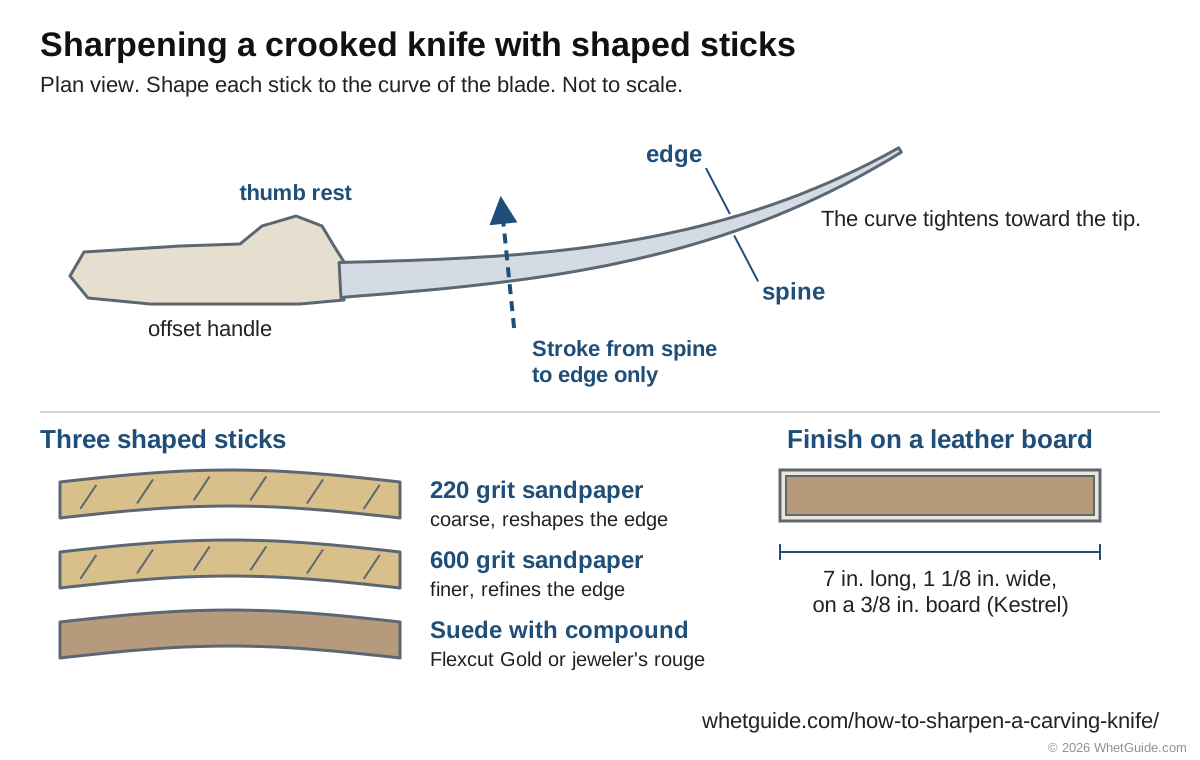
A crooked knife (also called a bent knife) is the long, gently curved knife used to hollow bowls and spoons. The traditional tool has an offset handle with a thumb rest, and you pull it toward you, thumb braced on the handle, much like a small drawknife. Robin Wood's post on crooked-knife making with Jarrod Stone Dahl shows hand-forged blades with a long, almost straight curve that tightens toward the end. Many shops also sell hook knives as "crooked" knives, so check which you have.
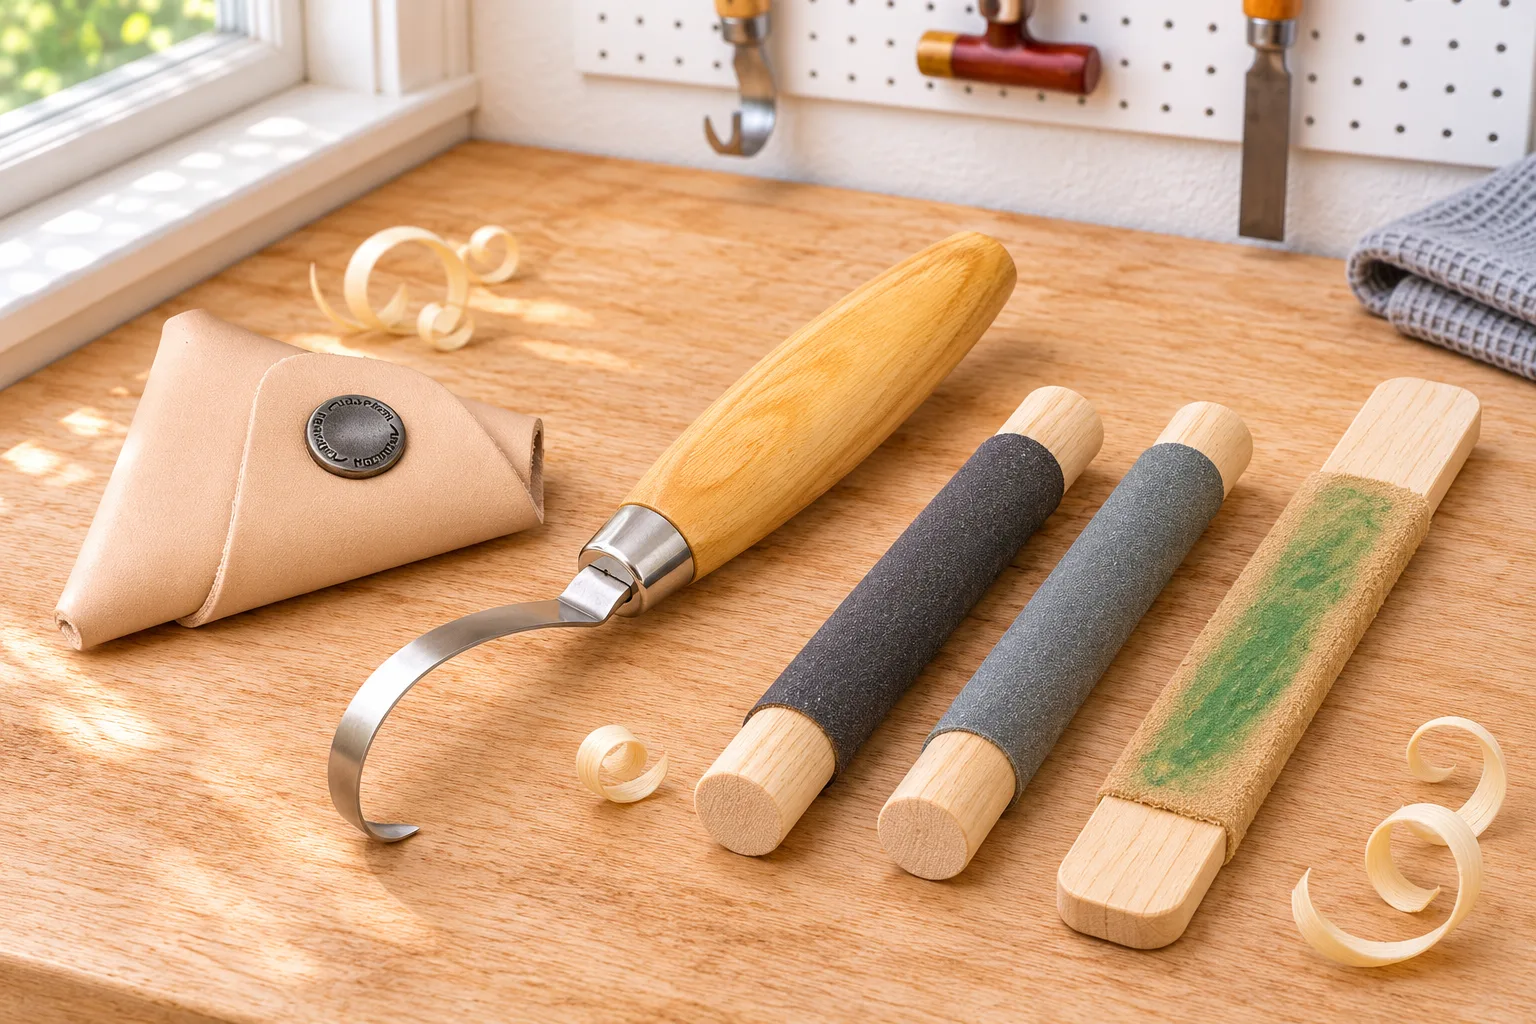
The sharpening is the same idea as a hook knife, stretched out along a longer, gentler curve.
- Make sharpening sticks shaped to the inside curve. A dowel works for the tight end; for the long sweep, shave a flat stick so its edge matches the blade's curve. The blog Wonderful Whittlin' describes two sticks wrapped in 220 and 600 grit wet/dry and a third wrapped in suede.
- Color the bevel and lay the stick flat on it.
- Stroke from the spine toward the edge only, as Wonderful Whittlin' does. On a long blade, use slightly diagonal strokes that sweep along the curve, like sharpening a skew, so each pass covers a stretch of edge.
- Cut the bevel down until the marker is gone and the edge looks evenly bright along its length, and you can feel a burr on the flat side.
- Take the burr off the flat side with fine paper on a flat board, keeping that face flat.
- Strop. Load the suede stick with polishing compound (Wonderful Whittlin' uses Flexcut Gold or jeweler's rouge) and stroke spine to edge. Kestrel Tool, which makes crooked knives, glues strop leather with rubber cement to a 3/8 in. board, 1 1/8 in. wide by 7 in. long, for the inside of its crooked knives, and also suggests a teardrop-shaped ceramic slipstone.
A Mora "crooked knife" or any hook sold under that name may arrive with a small secondary bevel at the edge. Woodworkers who have sharpened them on LumberJocks advise sharpening that small bevel away, working from the ridge in the middle of the bevel down to the edge, so the knife gets one clean bevel. We don't give an angle for crooked knives: makers don't publish one, so keep the bevel the smith ground.
↑ Back to all sectionsHow to sharpen a chip carving knife
A chip carving knife is the finest-edged knife on this page. It cuts short, deep, precise triangles, and the blade must slide into the wood and out again without crushing the walls. Fine Woodworking's How to Sharpen a Chip-Carving Knife sets out the geometry: a thin blade about 1 1/2 in. long with a straight edge, a needle-sharp point, polished faces and bevels of about 8 to 10 degrees per side.
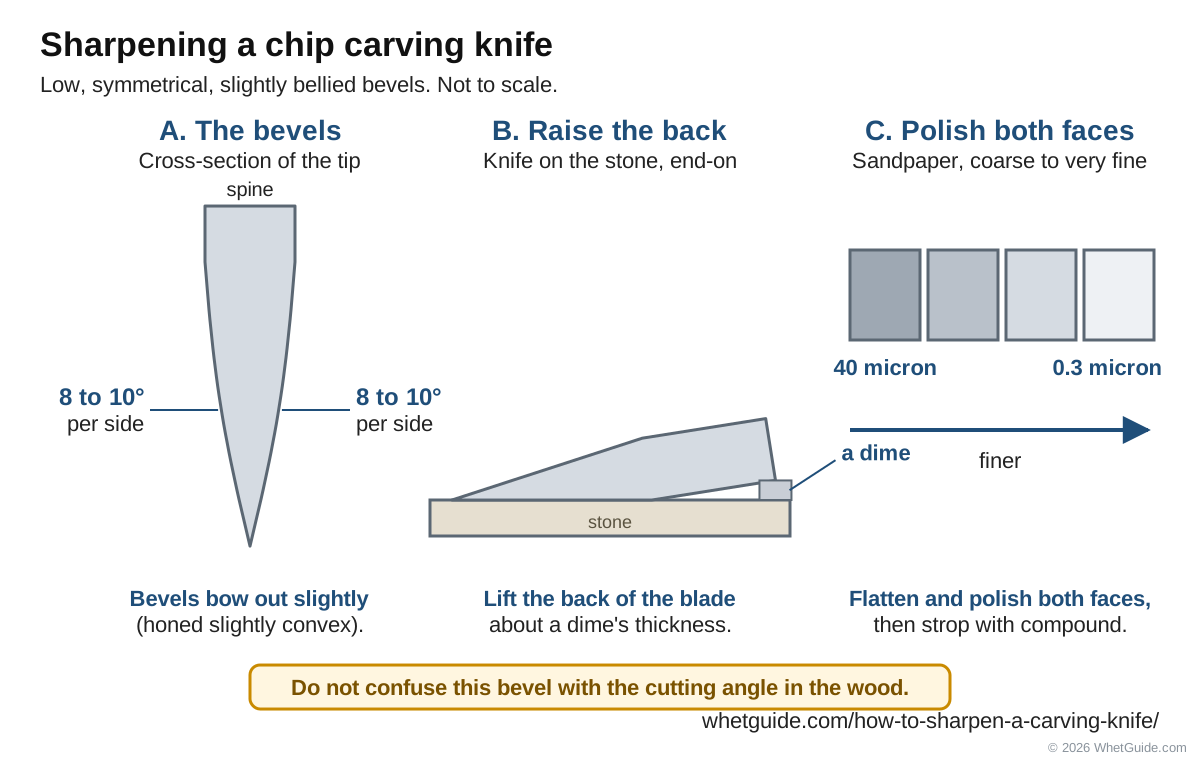
- Flatten and polish both faces of the blade first. Fine Woodworking goes from 40 micron down to 0.3 micron abrasive film. On a budget, wet/dry paper on glass from a medium grit up to the finest you have, then a strop, does the same job. A polished face slides through the wood with less friction.
- Set the bevel low. Lay the blade almost flat and raise the back of the blade about the thickness of a dime, per Fine Woodworking. That gives about 8 to 10 degrees per side on a typical chip knife.
- Keep the edge straight. Sharpen the full length evenly, and keep the point. A rounded or shortened point ruins a chip knife faster than anything.
- Hone the bevels slightly convex. Fine Woodworking does this on purpose, letting the bevel belly a little so the edge has some support at such a low angle.
- Strop with a fine compound. Fine Woodworking uses yellow compound.
The faces matter as much as the bevels. And chip knives are often high-carbon steel: Flexcut's are described in retailer listings as 1095 high-carbon steel, so wipe and oil them after use.
The angle you hold the knife at in the wood while cutting chips is a separate thing from the sharpening angle. The 8 to 10 degrees here is the bevel on the blade.
↑ Back to all sectionsGouges and V-tools, briefly
Gouges and V-tools are chisels, not knives, but most carvers own both, and the same stropping rules apply.
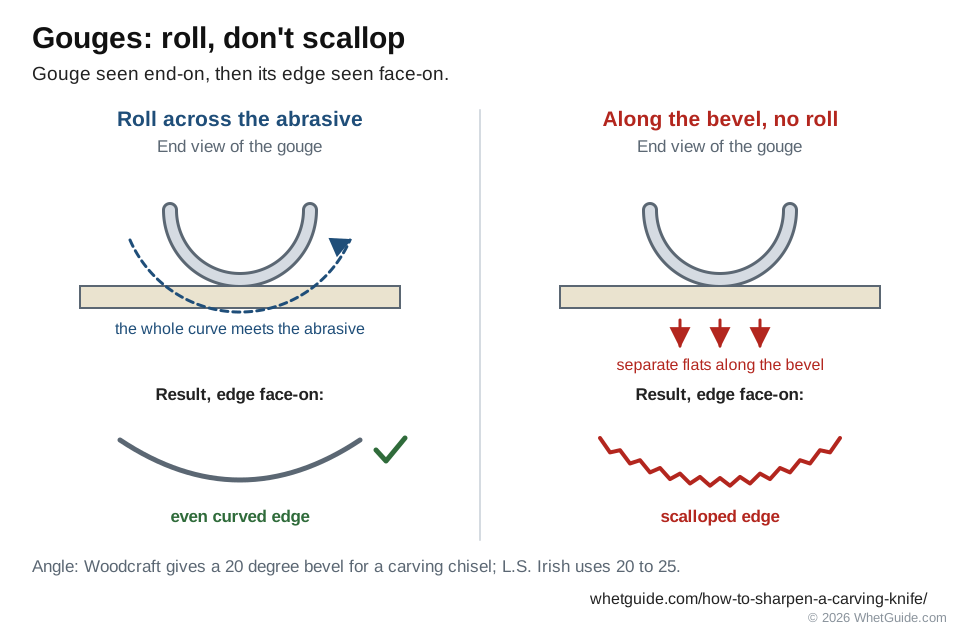
- Outside bevel. Roll the gouge as you stroke so the whole curve meets the abrasive. Woodwork Wizardry drags straight tools and rolls gouges on sandpaper. Flexcut says to keep the outside bevel as flat against the strop as possible and pull away from the edge, rolling gouges as you go. Sharpening along the length of the bevel rather than across it leaves a scalloped edge, Wood Carving Illustrated warns.
- Inside. A slip stone or a contoured strop. Woodcraft holds a slip stone at about 45 degrees to the blade for the inside of a carving chisel. Flexcut tilts the tool slightly on the inside profile of its SlipStrop to form a slight secondary bevel.
- Angle. Woodcraft gives a 20 degree bevel on both sides for a carving chisel. L.S. Irish's range for chisels and gouges is 20 to 25.
- V-tools. Treat each wing as a small chisel, then take care of the point where they meet, which is easy to over-grind into a hook.
For flat chisels and the honing-guide method, see how to sharpen a chisel. Stropping gouges is covered in more detail in how to strop a knife.
Fixing chips, nicks, a dropped knife or a steep bevel
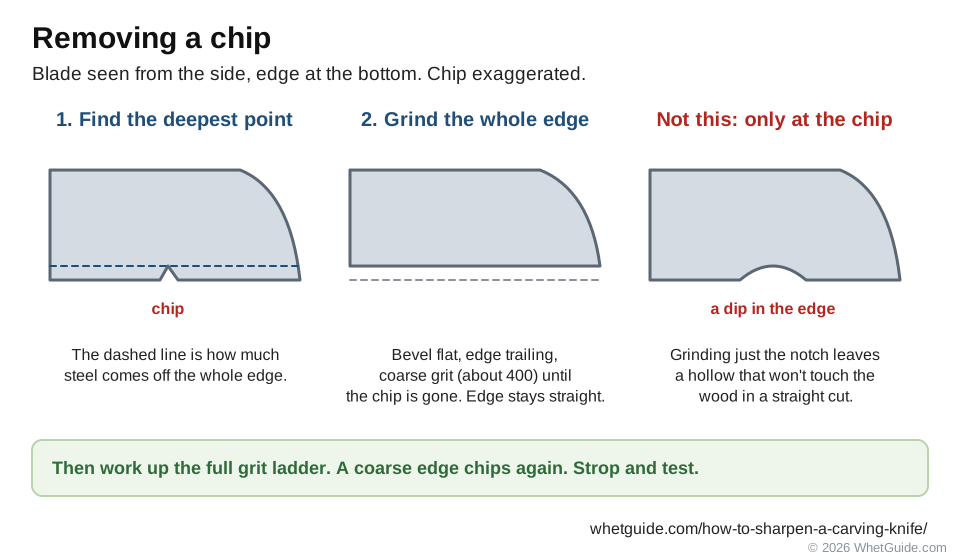
You'll find the damage in the wood before you see it on the blade: a white line or a ridge running along every cut, in the same spot each time. SharpeningSupplies spotted the chip in its Mora 106 exactly that way. Hold the edge under a bright light and the chip shows as a bright notch.
Stropping won't fix a chip. SharpeningSupplies' chip was under 1 mm deep, and stropping was still far too slow to remove it. They started on a 500 grit stone. The Green Wood Guild starts a chipped edge at about 400.
- Find the deepest point of the chip. That's how much steel has to come off the whole edge, not just at the chip.
- Grind the whole bevel evenly on a coarse grit (about 400; coarser for a big chip), bevel flat, edge trailing, until the chip is gone. Work the full length so the edge stays straight and doesn't develop a dip.
- Don't stop at the coarse grit. A badly chipped edge tempts you to quit once the notch disappears, but a coarse edge chips again. Work up the full ladder.
- Strop and test.
A dropped knife with a bent or broken tip: grind the tip back to a new point on the coarse grit, keeping the curve of the edge, then reshape the bevel near the point. A Flexcut detail knife that lost its tip in a fall is a common forum question, and it's fixable this way, with the blade a little shorter afterward.
A steep or rounded factory bevel: color it and flatten it on a coarse diamond plate or 200 to 320 paper until the ink comes off from shoulder to edge. On a hook knife with a steep outside bevel, see the hook knife section. Thinning a whole bevel is slow by hand. That's one job where a power tool earns its place.
Rust and lacquer: Woodwork Wizardry's first step on an old tool is to clean it. Strip any factory lacquer from the edge area and remove surface rust with fine abrasive and oil before you sharpen. Deep pitting at the edge has to be ground past, which costs steel; a heavily pitted blade may not be worth it.
↑ Back to all sectionsHow to test a carving knife's sharpness
Test on wood. A carving knife's job is to cut wood fibers cleanly, and a knife that shaves paper can still tear end grain.
- End-grain test. Woodwork Wizardry slices clear cedar end grain about 1/4 in. thick. A shiny, dark, smooth surface means sharp. Whitish streaks mean nicks or rounding. Basswood end grain works too. Testing on soft pine can fool you, because it crushes cleanly even under a mediocre edge, a mistake on Woodwork Wizardry's list.
- Thin curl. Carve a long, thin shaving with the grain. A sharp knife takes a curl so thin you can see light through it, without tearing.
- Light test. Edge up under a single bright light. A sharp edge reflects nothing. Bright specks mark dull spots, a burr or a chip. L.S. Irish's line again: if you can see the edge, it's not sharp yet.
- Nail test. Rest the edge on a fingernail at a low angle with no pressure. A sharp edge catches; a dull spot skates. The Spoon Crank uses this on hook knives. Go gently.
- Paper. A clean slice through newspaper or printer paper is L.S. Irish's final check on a bench knife.
Shaving arm hair is a common test among carvers. It works, but it's a bad habit with a curved hook knife and pointless with a knife you'll judge in wood anyway. Feeling the edge with a fingertip along its length is worse: SharpeningSupplies warns that you can cut yourself checking a chip by touch.
↑ Back to all sectionsCarving knife steels and what they mean at the stone
| Steel | Example | At the stone |
|---|---|---|
| Laminated carbon steel | Mora 106 LC: laminated S235 and 100Cr6 steel, 58.5 HRC (Morakniv) | Rusts: wipe and oil after use, as Mora says. |
| Stainless 12C27 | Mora hook knives 162 and 164, 56.5 HRC | Easy to sharpen, takes a fine edge, resists the moisture of green wood. |
| High-carbon steel | Flexcut knives (retailer listings say 1095) | Takes a very keen edge and strops up quickly. Rusts if left wet. |
| Hand-forged carbon steel | Smith-made sloyd, hook and crooked knives | Varies by smith. Follow the maker's advice and keep the bevel they ground. |
Hardness figures here are the makers' own. Harder steel holds an edge longer but is more likely to chip at a low angle. Mora's own reason for 27 degrees total on its carving knives is that the zero-grind edge gets too fragile much below it.
↑ Back to all sectionsBelt sanders, bench grinders and powered sharpeners
Power is for repair, not upkeep. A belt sander or grinder takes off a chip or regrinds a steep factory bevel far faster than sandpaper. It also takes off far more steel than you meant, and the heat can ruin the edge.
- Heat. Woodwork Wizardry's warning is to keep the steel cool: a thin carving edge heats in seconds, and steel that changes color at the edge has lost its temper and won't hold an edge there. Use light passes, dip in water constantly, and touch the blade often.
- Belts. Use a fine belt and check it for a lumpy lap seam, which bumps the edge (another item on Woodwork Wizardry's mistakes list).
- Hook knives. Anne of All Trades regrinds steep outside bevels on non-hollow hook knives with a belt grinder. That's a sensible use.
- Water-cooled slow grinders, such as Tormek's, avoid the heat problem and some have jigs for carving tools. They're expensive for a carver with a few knives. Finish by hand on a strop either way.
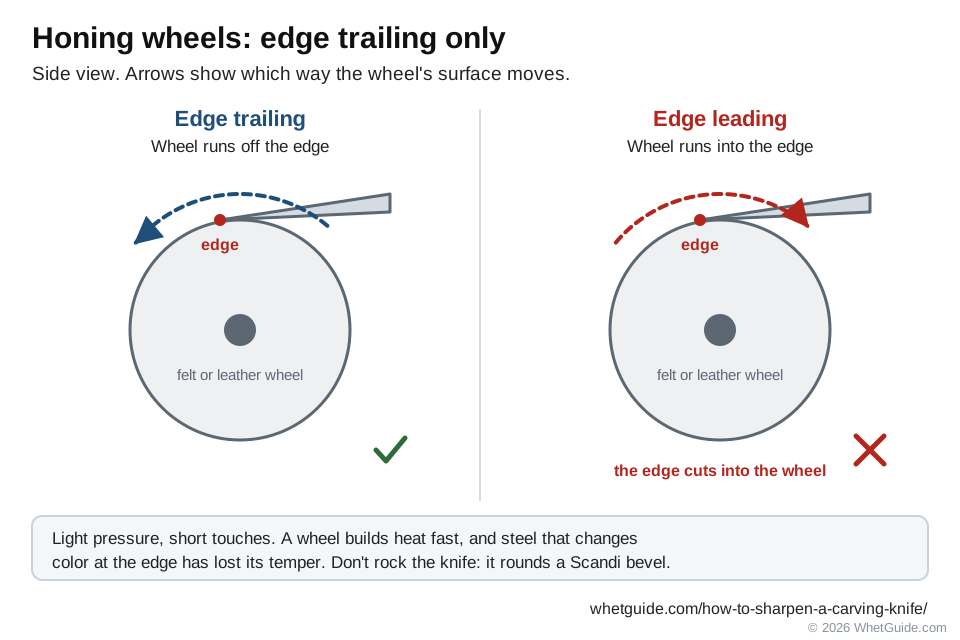
- Felt and leather honing wheels. These are powered strops. Woodwork Wizardry polishes on a hard felt wheel on a bench grinder, charged with green chromium oxide, and Mora's own guide names a honing wheel as one way to take off the burr. The wheel has to turn away from the edge, so the edge trails. Tormek says honing is always done edge trailing, or the edge cuts into the wheel. Use light pressure and short touches. A buffing wheel builds heat fast and rounds a Scandi bevel if you rock the knife.
More technique: sharpening on a belt sander and on a bench grinder. Skip pull-through sharpeners entirely: they cut a V bevel that destroys a Scandi grind.
How often to strop, and when to sharpen again
Strop often, sharpen rarely. Flexcut says to strop when the tool begins to drag, and that how often depends on how hard and abrasive the wood is. A carving knife in basswood can go a long time; the same knife in dry oak, or in a log with grit in the bark, needs it far sooner.
- Start of the dayA few strokes on the strop. Wood Carving Illustrated's habit, partly to drive off moisture.
- During carvingStrop when the knife starts to drag or the cut goes fuzzy. Anne of All Trades does her hook knife about every 15 minutes. Leather carvers on the Leatherworker.net forum call it a golden rule: strop every time you pick the knife up.
- Stropping stops workingBack to a fine grit, 1000 or up, then strop. A few strokes, not a full regrind.
- Chip, or the bevel has roundedCoarse grit and the full ladder. Flexcut's rule: when the cutting angle becomes too vertical, flatten the bevel back to its original angle on an abrasive.
The signs to watch for in the wood: the knife needs more push, the cut surface is fuzzy or dull instead of shiny, the knife tears when you change direction across the grain, or it wants to bounce out of a cut. Wood Carving Illustrated ties tearing to a leftover burr and bouncing to a rounded bevel, so those two tell you what to fix as well as when.
What dulls a knife fastest: dirt and bark grit, dense dry wood, twisting the blade in a cut, prying, and knocking the edge against other steel in a tool bag. Store it in a sheath or roll.
↑ Back to all sectionsCommon mistakes and fixes
| Problem | Likely cause | Fix |
|---|---|---|
| Knife drags or tears the wood right after sharpening | Burr left on | Lighter strokes alternating sides, then strop. Check the strop for tracks in the compound. |
| Knife bounces out of the cut, or must be tilted up to bite | Rounded bevel or a micro bevel from stropping | Flatten the bevel on a coarse grit until the ink comes off evenly. Strop with the bevel flat and less pressure. |
| Two bevels where there was one (double bevel) | Sharpening only the edge, with the spine lifted | Lay the bevel flat and grind the whole bevel back to one face. |
| Edge gets duller with every strop session | Pushing into the edge, too high an angle, or too much pressure on soft leather | Edge-trailing only, bevel flat, light pressure. Try a firmer strop. |
| Sharp in the middle, dull at the tip | Not lifting the handle for the curve | Third pass for the tip, handle lifted; check for a burr there. |
| Edge rounded after long strop sessions | Stropping one side much longer than the other | Alternate sides with the same count. If stropping no longer brings it back, flatten the bevel again on a 600 to 1200 grit diamond plate, laid flat with a sawing motion, dry or with soapy water, until no shiny line shows at the edge (Woodwork Wizardry's fix). |
| Bevel wider on one side | More strokes or pressure on one side | Count strokes. Same number each side. |
| Edge chips again soon after a repair | Stopped at the coarse grit, or the edge is too thin for the wood | Work up the full ladder. For hard wood, add a tiny micro bevel. |
| Scalloped edge on a gouge | Sharpening along the bevel instead of across it | Roll the gouge across the abrasive. |
| Groove worn in the slip stone | Always using the same spot | Move the tool across the whole stone. |
| Bevel turning convex over time | Dished stone, or rocking the knife | Flatten the stone; lock the wrist and let the bevel sit. |
| Sandpaper slipping, or bubbles under it | No adhesive, or paper laid dry and wrinkled | Spray adhesive, or wet the glass first and smooth the paper out. |
| Paper clogs and stops cutting | Used dry; steel dust packed in | Use wet/dry paper wet. Rinse or replace it. |
| Oil marks on the carving | Oil stone residue on the blade | Wipe the blade before carving, or use water stones or diamond plates. |
| Glass slides on the bench | No grip underneath | A damp towel or a non-slip mat under the glass. |
| Gripping the knife so hard the bevel rocks | Tension | Relax the handle hand. The fingertips on the bevel do the work. |
| Can't make progress; switched methods twice this month | No method gets enough practice | Pick one method for 8 to 10 sessions (L.S. Irish's advice). |
| Chasing one exact angle number | Forum advice in per-side and total mixed up | Keep the factory bevel. Let the flat bevel set the angle. |
Most of these are on Wood Carving Illustrated's and Woodwork Wizardry's lists, plus Hewn and Hone's (gripping too tight, dished stones, stropping toward the edge).
↑ Back to all sectionsCare and storage
- Wipe the blade after every session. Sap and moisture from green wood start rust on carbon steel quickly.
- Oil carbon steel. Mora's copy for the 106 says to wipe and oil the blade after use. A drop of mineral oil or camellia oil on a rag is enough. The Spoon Crank says the same for hook knives that aren't stainless.
- Protect the edge. A sheath, a tool roll with a pocket per knife, or edge guards. Most edge damage on carving knives happens in the bag.
- Keep the strop clean and covered. Grit on the leather scratches the edge.
- Wash your hands after sharpening.
What to buy: a carving sharpening kit
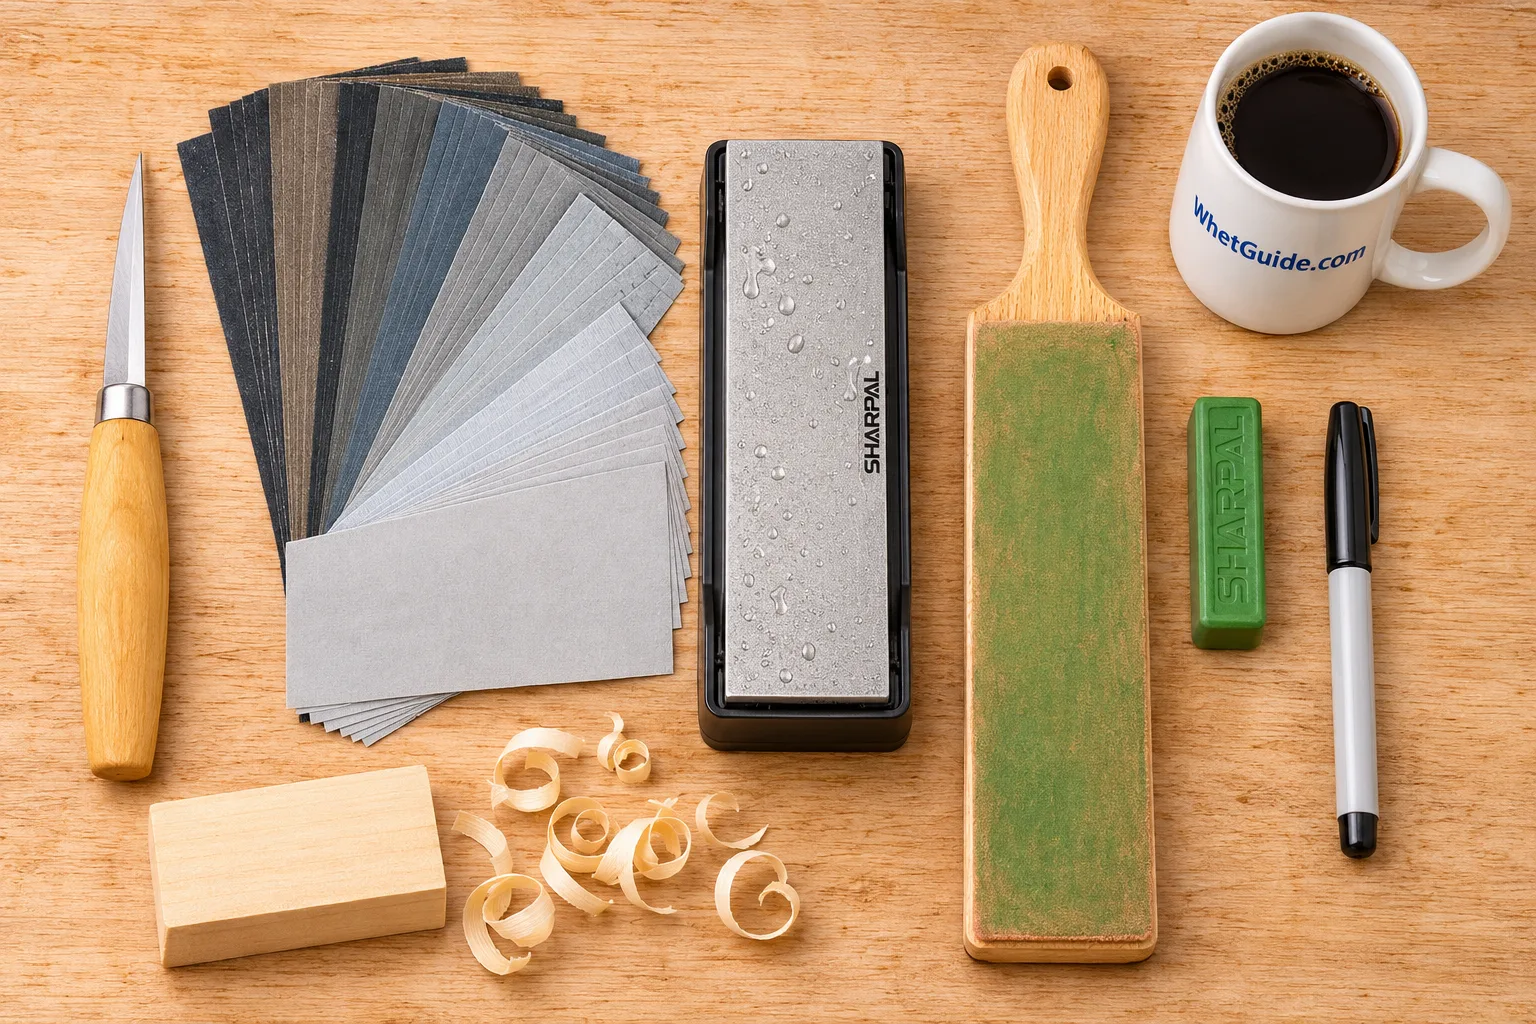
| Item | Why | Examples |
|---|---|---|
| A good first knife | A straight Scandi knife teaches you the flat-bevel method | Morakniv 106 or 120; Flexcut cutting and detail knives |
| A hook knife | For spoons and bowls | Morakniv 164 (one-sided, right or left) or 162 (double-edged); BeaverCraft SK1 |
| Wet/dry sandpaper assortment | Flat on glass for straight knives, wrapped on dowels for hooks | A mixed pack covering about 400 to 3000 |
| Flat glass or MDF | A dead-flat backing | About 6 by 12 in. glass, edges taped |
| Diamond plate | Repairs and flattening | A double-sided coarse/fine plate, such as SHARPAL's; Mora's own 600 grit fine stone |
| Fine stone (optional) | Faster, longer-lasting finishing | A 3000/8000 water stone |
| Strop and compound | Daily upkeep | A two-sided paddle strop (SHARPAL, BeaverCraft) with green compound; Flexcut SlipStrop with Flexcut Gold for gouges |
| Dowels | Hook and crooked knives | A few hardwood dowels in different diameters |
| Permanent marker | Shows where you're cutting | Any fine-tip permanent marker |
If you're stocking a club's shared bench or a class, the sandpaper route costs the least to start and has the shortest learning curve. Mary May's carving school starts beginners the same way, with getting-started guides on tools, sharpening and suppliers. For strop choices, see best leather strop.
↑ Back to all sectionsCarving knife sharpening cheat sheet
The whole method on one card. Print it and pin it over the bench.
How to sharpen a carving knife: one-page cheat sheet
| Angle | Keep the factory bevel. Mora carving knives: 27° total (13.5 per side); blades up to 2.5 mm: 23° total. Hook knife edge: 24–26° total. Chip knife: 8–10° per side. |
|---|---|
| Scandi rule | Lay the bevel flat. The bevel is the guide. Press on the bevel, not the spine or edge. |
| Check | Marker on the bevel. Gone evenly: flat. Gone at the edge only: too steep. Gone at the shoulder only: too low. |
| Start grit | Chip: about 400. Rounded bevel: about 300 diamond. Normal wear: 800–1500. Still sharp: 2000–3000. Don't skip grits. |
| Sandpaper | On glass or MDF. 200–320, 400, 600, then finer. Wet. Pull only, edge trailing. |
| Strokes | Heel, middle, tip. Lift the handle for the tip. Same count each side. |
| Burr | Brush off the edge, never along it. Full length before you flip. If you can see the edge under a light, it's not sharp. |
| Hook knife | Dowel + paper (400, 800, 1500, 3000). Spine toward edge. Hollow-ground: inside only, outside stropped flat. |
| Strop | Thin coat of compound. Bevel flat, edge trailing, light. About 15 a side (bench knife), 10–15 (hook). Strop when it drags. |
| Test | End grain of basswood or cedar: shiny = sharp, white streaks = nicks or rounding. |
| After | Wipe, oil carbon steel, sheath it, wash your hands. |
whetguide.com/how-to-sharpen-a-carving-knife/
Related guides
The whetstone method in full detail, including pressure and stone care, is in how to use a whetstone. Stropping for every kind of blade is in how to strop a knife. Flat chisels and plane-iron-style edges are in how to sharpen a chisel, and the green woodworker's other edge tool is covered in how to sharpen an axe. For a knife that does camp and carving duty, see how to sharpen a hunting knife. Woodburning (pyrography) pens don't take an edge, so they aren't covered here.
Sources: Morakniv, Grinds and edge angles, How to sharpen a knife, Wood Carving Knife 106 LC, Hook Knife 162 and 164; Flexcut, Sharpening your tools; Wood Carving Illustrated, The Basics of Sharpening and Hand Sharpening Made Simple; Fine Woodworking, How to Sharpen a Chip-Carving Knife; L.S. Irish, Sharpening Bench Knives; The Green Wood Guild, Sharpening a Straight Knife (PDF); Hewn and Hone, Sharpening sloyd knives; SharpeningSupplies, Sharpening a Sloyd Carving Knife and Scandi grind guide; Woodcraft, Sharpening carving chisels; Woodwork Wizardry, How to Sharpen Wood Carving Tools; The Spoon Crank, hook knife sharpening; Anne of All Trades, How to sharpen a hook knife; BeaverCraft, How to make a hook knife razor sharp; Sean Hellman, Sharpening a Mora 164 hook knife; Wonderful Whittlin', Keeping a crooked knife sharp; Kestrel Tool, Sharpening; Robin Wood, Crooked knife making and sharpening course. Maker pages read November 14, 2026. Derived figures (per-side halves of published totals, and the chip knife's total) are arithmetic on the sources above. How we research